Showing posts with label stars. Show all posts

Tuesday, August 7, 2018

Mug Rug Swap (2018)

I've mentioned the quilting group on Ravelry that I'm a part of, Quilters Knitting. This summer they organized a mug rug swap and I jumped on board. Sign ups were closed June 15 and the mug rug had to be delivered by August 15. (In their hands, not in the mail.) One person organized it so that we were all given a person to send to and someone else would send to us.

The last week of July, I received this beauty:
Isn't it so wonderful?! Here is the back, nicely "signed":
And here are some detail shots of the quilting.
She said she is new to free motion quilting and pieces like this are great to practice on.
She did a great job.

Meanwhile, I had already been working on my mug rug. I had bought a pack of english paper piecing papers on sale when the local quilt shop closed earlier this year. I knew I'd do something with them!

June 9: The papers were small diamonds for making a star pattern. I pulled out some fabrics, covered some papers, and started playing with a design.
Soon I had the design laid out,
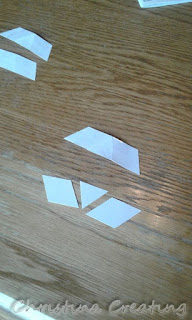
except I needed to make special pieces to make a straight edge. I simply took the three pieces needed to fill the space (bottom of picture below) and taped them together to make one piece (upper piece in picture below).
Then I could cover that one piece with fabric and save myself a bit of sewing. There was no need to make all those pieces separate.

By the end of the day, I had pieced together the centre star with the background pieces.
Isn't it so cute!?

June 10: All the pieces are sewn together and it is time to take out the papers:
Even though the diamonds were very small, I still punched a hole in the middle to make it easier to pull them out. After loosening the glue holding the fabric to the paper, I insert the seam ripper under that paper through the hole and pop the paper out. This is not only easier but saves a bit of wear and tear on the edges of the fabric.

Once all the papers are out, the pieces looks a little ragged,
but nothing that a session with an iron won't fix.
Look at all those furled intersections! I love it. This happens automatically, as long as you wrap your fabric around all the papers in the same direction.

This was a nice trial to see if ironing the fabric before washing out the glue would harm the iron or cause any other problems. It all worked fine and now I know I can do this on my Lucy Boston blocks if needed.

I did, however, go ahead and soak the piece to get out the glue before proceeding. After drying and ironing, everything looked neat and trim:

Next stage is to layer it with batting and a backing.
June 11: The quilting is done. I hand quilted it, outlining the individual pieces in thread that matched the colour of the front.
I had enough of one of the blues to use for the binding. It was a small piece, however, so I had to use a few short cuts of fabric.
The first time I tried to sew it on, I got a seam of the binding in the corner three times. So I took off the binding and started in a different place so the seams would land in the middle of a side instead.

Here is the backing that I chose to go with the binding:
It was a beautiful piece of orange and blue batik. I only had a small piece, but it was enough for this.

Here you can see some of the design made on the back by the different colour threads:
And here is the finished piece.
A mug rug in three days. I was done in plenty of time for the deadline, but then I decided to enter it in the county fair. So my poor recipient was forced to wait. On the good side, it did get a blue ribbon! :)
I mailed it yesterday and my recipient should have it by Thursday (August 9 - so plenty of time before the deadline!) I really loved making this piece and the final result, so I hope she likes it. I know she really likes stars in quilts, so I think I'm safe.

Saturday, May 19, 2018

Look Up to the Stars

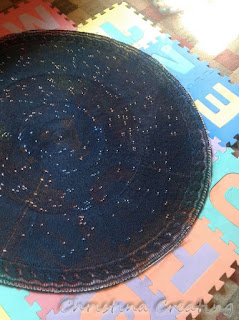
Look at me....I'm a star. Or rather, I'm wearing stars. The Celestarium shawl I started for the Ravellenic Games in February has been finished!

The basic structure follows the "pi shawl" formula popularized by Elizabeth Zimmermann. Simply put, every time the diameter of the shawl doubles, you double the number of stitches. Since knitting is stretchy and flexible, it works to make a circle.

That is why the shawl looks like it is made of concentric bands. Each time you double the stitches, they are close together and make a dark section. As you knit out to the end of that band, the stitches are more spread out and the shawl looks lighter.

When the knitting was done, I wasn't sure where I was going to have room to layout and block the shawl. I finally moved all the furniture in the living room to the edges and laid the mats in the middle.

Weaving some blocking wires through the eyelets at the edge made it easy to pin the shawl into shape.
I put the wires in and pinned it when it was dry and then drenched it with a spray bottle of water. Apparently you don't want to over-handle silk when it is wet because it is much weaker. But pinning when dry and then soaking it does the trick. The shawl took to the shape beautifully.

As I said previously, I went with a fancier border than the original pattern. Someone had published an alternative edge that they used on their shawl and I went ahead and used her pattern.
I noticed afterward that some people blocked peaks in the edging (giving the shawl a scalloped edge) but I think the round shape works fine. Maybe next time I'll try the scallop edge.
The shawl is knit from the center out, so the rows go around and around the shawl. When the center part is done, you cast on a few stitches for the edge and then work those rows perpendicular to the edge of the shawl. All the shawl stitches are still on the needle and every other row you knit one of those stitches with the last stitch of the edging row. In that way you incorporate all of the live stitches into the edging as you work around the whole edge of the shawl.

In addition to adding interest by changing the direction of the knitting, this also solves the problem of how to bind off the shawl stitches. Most conventional bind offs are not stretchy enough and prevent the shawl from flowing properly.
Here is the star chart from the pattern which marks all the stars included. I have not looked to see how it matches with the picture of  my shawl above so I very much doubt it is in the same orientation.

As you may recall, the shawl was knit in 100% silk. It is very drapey and heavy for how thin it is (compared to wool especially).
It's warm but doesn't have that "cozy" feeling that fuzzy wool gives.
How to wear this thing?
I could fold just a bit of the curve under and then wrap it around my shoulders, securing with a wood shawl pin.
I preferred it worn shifted to one side instead of perfectly centered.
From the back, you can see a good part of the star pattern.

I could also wear it gathered around my neck with the ends wrapped back to the front.
Or gathered around the neck, but with the ends pinned at the back of my neck because the ends are too wide and thick to be able to tie them.
This does run the risk of some discomfort if the pin moves wrong!

A couple places you are unlikely to find this shawl just hanging out:

Project Stats
Started
: 10 Feb '18
Finished: 21 Apr '18
Pattern: Celestarium by Audry Nicklin and Stellar Wave Edging by Kimberlee Johnson.
Materials: Dk/worsted weight silk raveled from an Oscar de la Renta sweater, 300 grams. Many size 6 clear silver-lined crystal beads.

Sunday, November 12, 2017

#Christmasiscoming

I don't know if you've noticed, but the Christmas music and commercials offering all of the things you should buy are already out. One even had the nerve to start with carolers singing Jingle Bells and the protagonist saying "Noo...it's only November" and then being convinced it is indeed time to start buying buying buying. I did not fall for that one.

But it is true that people who hand make gifts or like to make their own decorations do have to think about these things early. I don't mind if the fabric store has Christmas fabric in July. There's a good reason for that. And for whatever reason, my mind turned to Christmas about a month ago when I came across this image:
I only ever found this image. I couldn't find the source, who made it, whether it was a pattern or an item for sale. But for whatever reason, when I saw the picture, I really wanted to make this star pattern into a Christmas table topper. (Who can predict when inspiration and motivation will strike at the same time? If you could bottle that, "5 hour energy boost" would go out of business and you would be a millionaire.)

It's not surprising I was attracted to a star made from a sixteen-patch and half square triangles. It seems to be what everything I'm doing right now is made of. And it's scrappy. Need I say more?

One problem was that I had absolutely no Christmas fabric scraps. I don't mind using some non-seasonal fabrics if the colours are right, but none? That doesn't seem right. So I called my sister and asked her to bring what she had and was willing to give me. She saved my butt.

We had fun looking through all the fabrics. I had no problem adding some more reds, and then we went shopping where I picked up a few more fat quarters that I thought would work. (Ok, like 10.) We did a general sort of layout where I decided I could group the flowers/stars by colour instead of doing it completely scrappy.

I also decided that there was no need to do HST for the flying geese border. I cut 2.5x4.5 rectangles instead and sewed them together like you would sew a flying geese unit. It saved a lot of seams and made for a smoother look.

I decided I couldn't do this quilt table topper unless I laid it all out and planned where everything would go. With the restriction of the colour placement I wanted and with a piece this small, you can't sew pieces together and arrange them afterward.
In the picture above you can see the three stages of the stars. The blue is laid out but nothing is sewn. I kind of simulated the triangles that would be sewn. The red has the HSTs sewn but none of the squares are sewn together. And the green has all of the star sewn together. (Isn't it amazing how much difference in the size sewing the seams makes, even with only a 1/4" seam?)

In the border above, the rectangles are folded in half so I could see the colour progression. They look like squares but they're not. :)

Once I had the center together, I couldn't stop and put the border together as well.
It's not sewn to the center yet in this picture. I had to put that off for another day.

Here's a close up of each star:
One of the fabrics my sister brought had very fancy gold trimmed poinsettias. I didn't think they would fit in the design (and hated to cut them up), and then I had the brilliant idea to use them for the center of the stars. I love the effect.

You can see the background is made of a lot of scrappy neutrals. This is something I am learning and having fun experimenting with. I did try to group neutrals with green or red or blue in the area around the corresponding star.
After I had the border sewn on, I layered it with a piece of red damask and pin basted it. I decided not to use any kind of batting. I wanted a very flat table topper.
I've started to quilt it and so far I am pleased with how it's going. There is a ways to go, but I am confident I can get it done by Christmas season.

Linking up with Oh Scrap! on Quilting is more fun than Housework.

May I suggest?

I Say! or at least I did once...