Monday, May 20, 2019

Holland Tulip Time Quilt Show 2019

Last week I took a jaunt to Holland (Michigan) and enjoyed the quilt show they host during Tulip Time. Come along on a virtual tour.

The first few quilts featured flowers prominently.
They're Not Your Poppies by Karen de la Durantaye
Sundays with Auntie Rose by Karen de la Durantaye
And, of course, what would Tulip Time be without tulips?!
Abounding Tulips designed by Marilyn Fisher
top by Delaney Ann Prins; quilted by Janet Haines
The traditional style quilting was wonderful on this one:
Detail of Abounding Tulips
There were several impressive applique quilts:
Happy Scrappy Glorious Album designed by Kim McLean and
Barbara Schippa; top by Barbara Schippa
quilted by Janet Haines
Flower Pots designed by Kim McLean
top by Kathleen Myers; quilted by Darla Parks
Lolli Dot designed by Kim McLean
top made and adapted by Nora Slikkers
quilted by Karen Kielmeyer
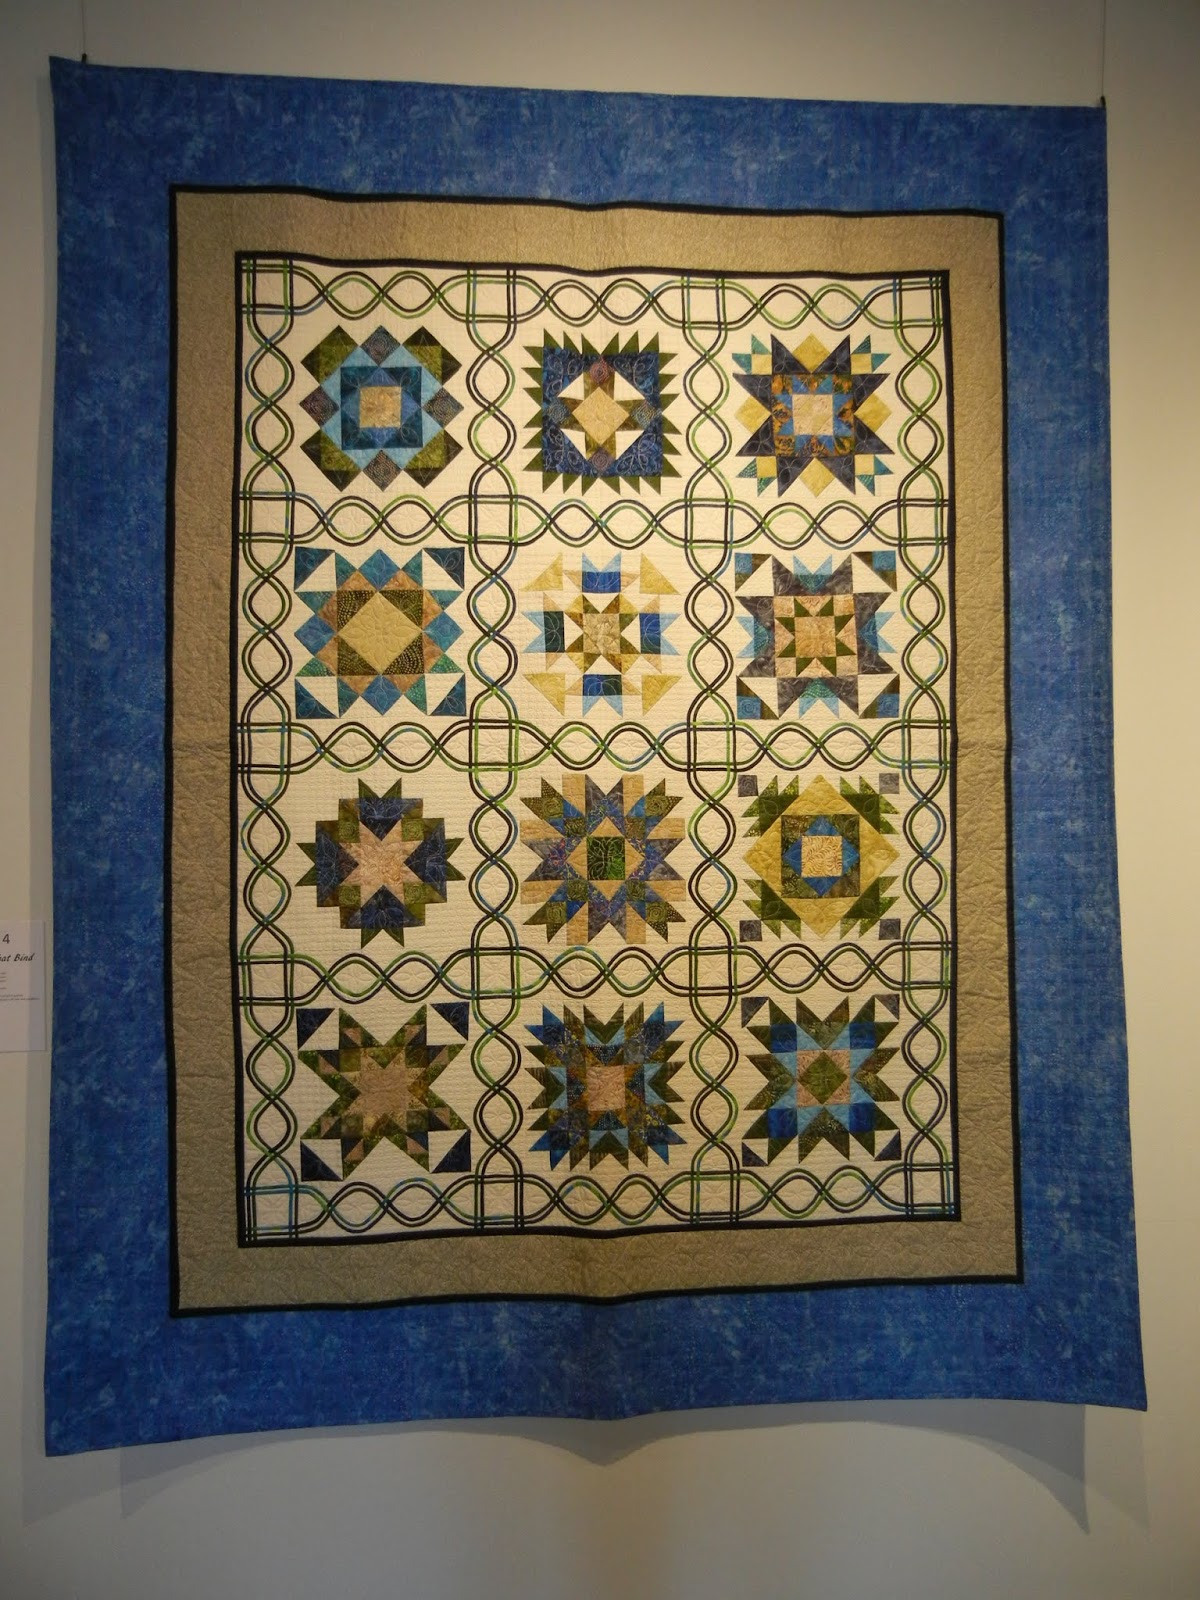
The blocks in the following quilt were pieced but all of those lines were appliqued.
Ties That Bind by Ellie Bremer
The quilt has about 31 yards of 1/4" wide bias strips, each of them stitched down on both edges!
Detail of Ties That Bind
As I go to more shows and read more online, I recognize more patterns and designs. Do any of you recognize the following?
Farm Girl Sampler designed by Lori Holt
made by Sue Fabiano
These are blocks from the Farm Girl Vintage by Lori Holt. My sister and I did a quilt-along of these blocks in 2016. (Click here for posts about that project.)

The following is a "One Block Wonder" quilt.
Aurora Borealis - one block wonder design
Made by Janet Judson
I was really intrigued with these when I first saw them, but I doubt I will make one at this point. The blocks are hexagons made up of six identical wedges. They're all cut from the same fabric. Each hexagon is unique because it is cut from a different part of the fabric, but all the colours are consistent. Once the blocks are sewn, you  have just as much work to decide how to arrange the blocks as there are so many options.

The following is a small quilt I have the pattern for and still hope to make. The first picture shows you the scale of the pieces (tiny).
Here is the full quilt. It's about 24" square.
Diamond Log Cabin designed by Little Bits
top by Mary Raak; quilted by Char Koppernal
It's paper foundation pieced, which is a technique I like, but every time I try to start this, I get stuck on which fabrics to use and how to arrange the colours. The one above looks like it was done very close to the original pattern sample, if my memory is correct.

Following is a quilt that catches my eye every time - you don't have to wonder why!
Elmer the Elephant designed by Violet Craft
Made by Greg Hugel
This one is done in a wider variety of colours than others I've seen.

Speaking of elephants, this is a cute one!
Ellie designed by "bj designs & patterns"
Made by Arla Beukema
And hanging right below it was this endearing goat.
We Could All Use a Goat (a.k.a. Frasier)
by Karen de la Durantaye
It was an original design done in foundation paper piecing. I was surprised to see that the black is not applied bias strips, but is all done in the paper piecing.
Detail of We Could All Use a Goat
There were a good number of modern style quilts:
Winter Birds designed by Nancy Halvorsen
Made by Myra Morrison
Two of them had distinctive 3D effects,
Heart of Hearts designed by Ellie Brown
top by Barbara Vanden Bosch
quilted by Living Threads Ministries
like these fluttering hearts:
Detail of Heart of Hearts
and puffy flower petals:
Flower Burst design inspired by online picture
made by Living threads volunteers
quilted by Living Threads Ministries

Labyrinth by Barbara Schippa
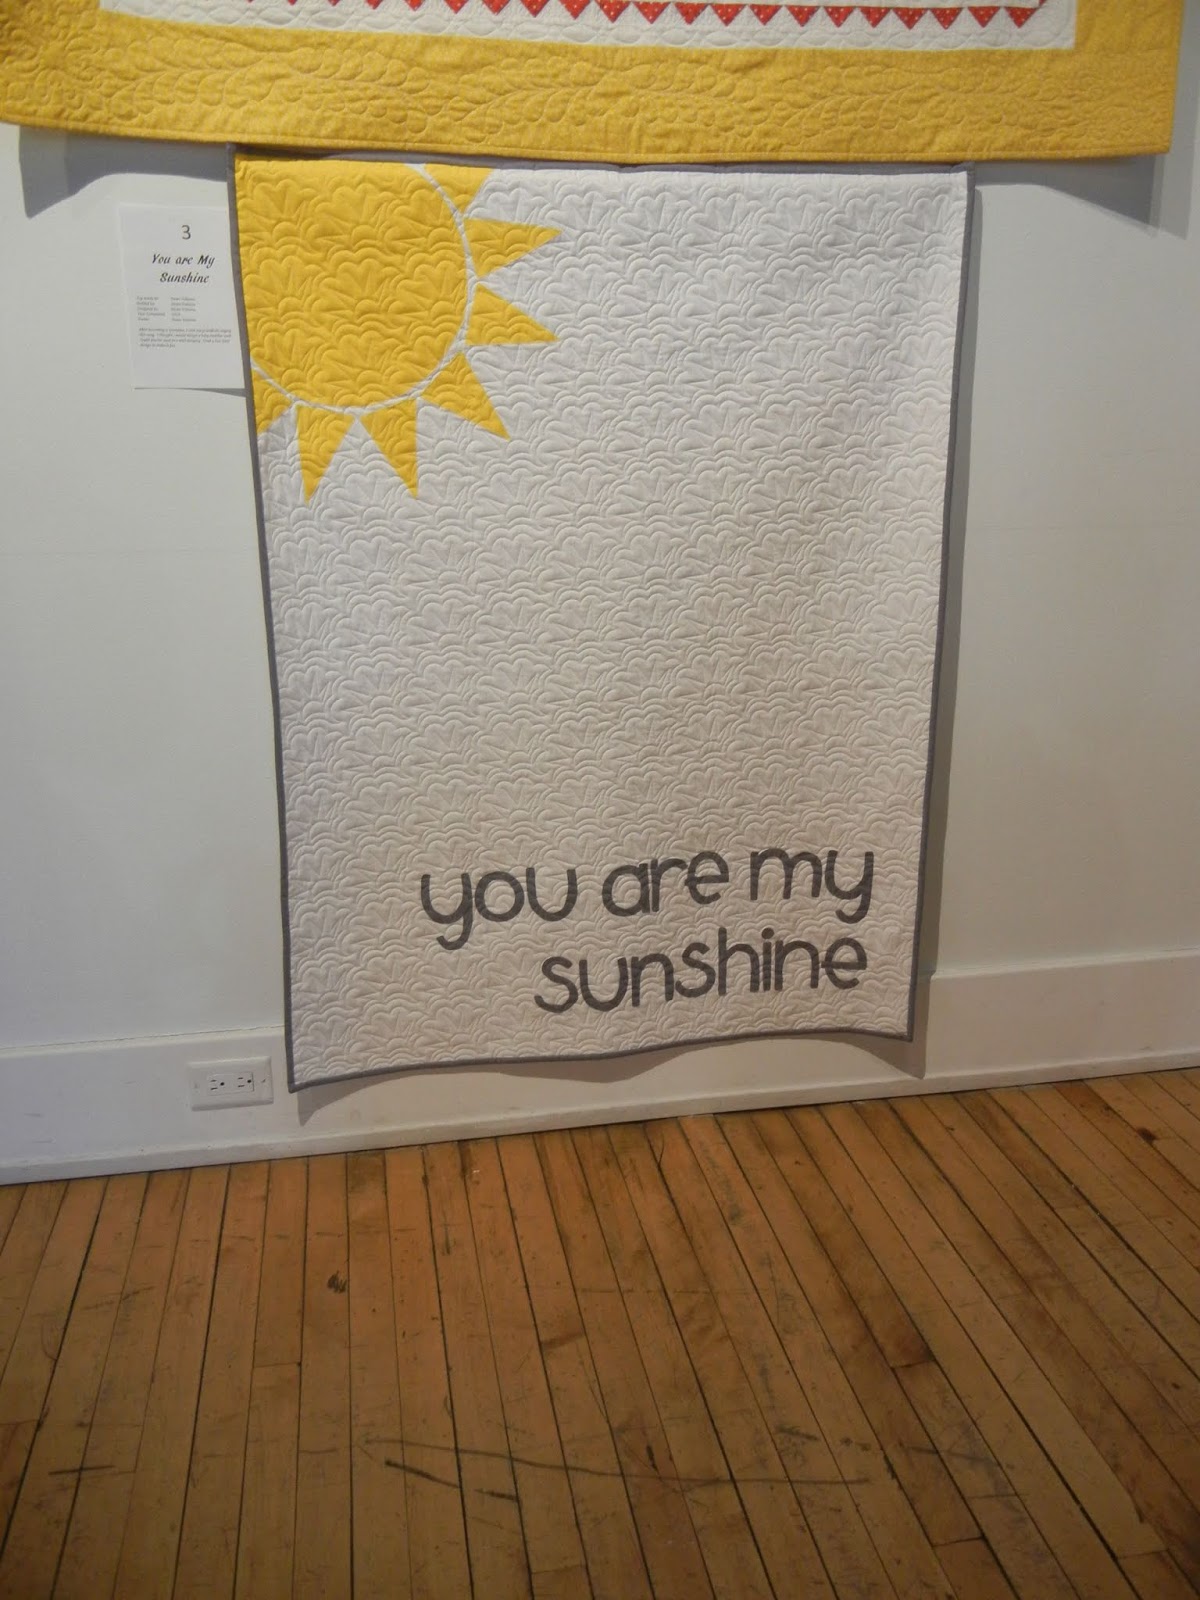
You are My Sunshine by Dawn Veltema
Potters Wheel designed by Briar Hill Designs
Made by Sarabeth Carr
There was an aisle of Christmas/holiday quilts:
This collection was from a shared class:
The common feature was this "bricked" background made from only two fabrics.
Tree Shadow by Kathy Ryzenga
from a technique taught by Gloria Loughman
It looks like one fabric is cut apart but arranged so the its original pattern is maintained.

These three quilts were made by a mother, daughter, and granddaughter. They worked on them together once a week over a school year.
Design: Jenny Haskins Heritage Quilt
There were made from silks, lace, and other fancy fabrics. They shared some blocks but others were unique as far as I could tell.

The following quilt was inspired by and made from her wedding dress (once her daughter decided not to wear it):
Wedding Dress Recycled designed by Cheryl Scott
top by Cheryl Scott; quilted by Deloa Jones
Her favourite part was the lace panels so that is what she featured in the design.
Medallion designed by Edyta Sitar
Made by Nancy Einfeld
There were many more lovely quilts, but I'm not going to post them all.

After the show, I shopped at a quilt shop in Holland that I hadn't visited before. It was a nice shop but I didn't make any purchases that day.

Friday, May 17, 2019

Not So Merrily

I've been working on the blocks for my Merrily Christmas quilt steadily. (Some might say obsessively, but you know, tomayto, tomahto.) By last Friday I had all twelve blocks done. After the red and grey ones I showed in the last post about this quilt, I finished the two brown and four green ones:
I pinned all the blocks to my design wall so I could work on arrangements and see what I had. I planned each block individually working with the limited fabric I had but after seeing them all together, I made a few changes.

One thing I did was change the position of the light and dark on the corner units of this block. (It's the top left block in the picture above):
I also switched out the center of one of the green blocks where I had used grey. I realized I could use white there instead. (No, I don't know why I didn't think of that in the first place.) It brightened up the block a lot.

I also swapped the centers of the two grey blocks (link to picture). The center of each block used the same fabric as the outer corners. By switching the centers, I got a little more variety within the blocks.

You can see the animals inserted as
blocks in the magazine.
Once that was done, I worked on the animals from the panel. Since the animals appeared in this very quilt pattern in the magazine, I didn't expect any more trouble than making sure I cut out a proper square.

Well. Not quite.

The four animals came on a panel of fabric a yard long. This makes it easy for shops to sell one yard and everyone gets all four animals. Now a little simple math. A yard is 36". Since the animals are printed 2x2 on the yard, each animal is half a yard, which is 18". My blocks are 18.5" (unfinished). I'm sure that was simple enough for you to notice that my 18" animals blocks weren't going to be large enough to be sewn to the 18.5" blocks. I let that realization sit over night.

I had a few small scraps from cutting the height down to 18.5". Fabric is 42-44" wide so the animals were about 21" tall. Cutting them to 18.5" gave me an inch and a half if I was lucky. (I know the math doesn't work there, but you lose some of the width from squaring the block and removing the selvage.)

I used the four widest strips to add width to the blocks even though that would add an extra seam. (Boo!)
Of course, the strips were only 18" long so I had to piece in a patch to the patch to get the full 18.5" length:
But once you have one seam, what's adding one more? (That was sarcasm in case my sarcasm font isn't working.)

I put them all up on the wall to see how I liked it:
I can get over the extra seams, but one of the strips wasn't really wide enough. The text on the edge of the block below will mostly get caught up in the seam, but there's a line printed to the left of the text and that won't be in the seam.
I put it on the back side, but since it's a light fabric it will be visible on the front. I'm not sure I want to live with that.

As an alternate arrangement, I could put all four animals in the center of the quilt. With a frame around them and between them, they would be wide enough.
I could use white for the frame or I have some yardage of one of the green fabrics from this line. I don't like this option as much as the first layout, but it's always good to realize you have options.

PS: Aren't these animals adorable!? So cute!

Tuesday, May 7, 2019

Then and Now Vintage Striped Blouse, Start and Progress

I'm getting pretty close to finishing a vintage "Then and Now" blouse so I thought I'd give you the full tour.

Gauge swatch. The gauge didn't match the
pattern but it was what worked for this yarn
so I resigned myself to recalculating all the
stitch counts in the pattern.
It started with a Then and Now knit-along suggested in the Vogue Knitting Magazine group on Ravelry in 2018. The idea was to knit something from a current year (2018) issue ("now") and knit something from the selection of Vogue "flashback" patterns where they take a vintage pattern and update it with modern materials and colours ("then").

My "now" pattern was the pink and black cowl from the Winter 2017/18 issue. I started it in January and finished in April.

I knew pretty early that my "then" pattern was going to be a striped blouse from a 1984 issue but I didn't have any idea what yarn to use.
I wanted something drapey, probably silk. And as usual, I was hoping to get the yarn from a second hand sweater. I couldn't find anything. I purchased a couple sweaters from other unravelers online to try, but they weren't well suited either. (Too thin or wrong colour.)

I looked a little further in the stash and decided a white silk I bought from colourmart.com would work with a tan rayon/linen blend from this sweater. Because I had less white than tan, I figured I had to switch the main colour from white to tan. That was probably better for my colouring anyway.

I knit up a swatch at the end of December to technically meet the knit-along requirement to start the project in 2018. The group is pretty relaxed anyway. I mean, it's not like they won't want to see a finished project just because it was late or that we're competing for cash prizes! :)

After all the calculations for gauge and size, it didn't really look like I had enough yarn, but it seemed to me like I should. Normally ignoring the math for a feeling isn't advisable, but yardage numbers aren't always reliable. So, I started anyway. (Spoiler alert - it's going to be fine.)

The blouse has an interesting construction. The front and back panels are knit side to side, and those are the pieces done first. Besides recalculating stitch counts for gauge, the only change I made was to finish the shaping with short rows instead of casting off stitches over a series of rows.
Along the sides, the top and bottom are knit a little wider
to give waist shaping.
The final effect gives a smoother edge that is easier to seam. No one else will ever notice but I like to take care of the little details.

The next piece is a monster. The yoke and sleeves are knit in one piece that stretches from the cuff of one sleeve to the cuff of the other. Over 300 stitches and each row took a while.
With this many stitches, I had to work on
a circular needle. I switched back to my
straight bamboos after I split for the neck.
I only had a couple small misadventures while working on this piece. While doing the neck shaping, I misread the instructions. Probably more accurate to say I assumed the directions. In many, many cases shaping (increases or decreases) is done on every other row. Well, the neck shaping needed to happen a little faster and should have been done on every row. I realized after 18 rows were knit.
Fortunately that was when I was working on just one side of the neck, so the rows were only about 140 stitches, not 300.

As I got close to finishing the second shoulder, I noticed I had dropped a stitch far below.
I was not eager to rip all the way back. I thought about just sewing the stitch in place, but didn't like that idea other. So I dropped the stitch beside it all the way down too, and then "knit" them both back up. Dropping the extra stitch gives you a little more slack in the yarn to even out the tightness over two stitches. With a final blocking I don't think it will ever be noticeable.

I was happy to finish this massive piece:
I think the neck hole is obvious. The slit will go in the back and be closed up with three buttons. (So vintage, right?) The left and right sides, will curl into tubes and form the sleeves.

Here's the front panel in position below the yoke to give you a bit of an idea (and give me a little motivation that this is actually coming together):
The piece I'm working on now is one of the cuffs:
The cuff in progress under the end of the sleeve.
My first effort was far too narrow. I added about 20 stitches and I think I'm in the ball park now. The size is forgiving as long as it's big enough to be loose around my forearm and small enough to have to gather the sleeve to fit. (Again, so vintage, right?) This cuff shouldn't take too much longer and then I have to knit the second one.

After that, I only have to knit two pieces for the collar. It's nice to be knitting these small portable pieces. I'm looking forward to having this together. I should be able to wear it even in warmer weather so I won't have to wait until next winter to wear it! :)

May I suggest?

  • Retreat Project - My focus in 2024 has been to make progress with quilts that I've had on my 'to do' list for years. I had planned to work on two of those quilts at the Ja...
    30 minutes ago
  • One more fabric............ - I found another Kaffe print in the same red/orange as the button fabric for a possible choice for binding. I have to check all around the edge and make ...
    1 hour ago
  • Singularity - It's been quite a few years since The Midnight Quilt Show ended, and to this day I still miss it. It was always a delight watching Angela Walters every wee...
    16 hours ago
  • Colorful! - I had a few more quilts to share but I guess I didn't get them photographed. I have been so busy lately; I don't always get everything done by the end o...
    1 day ago
  • Twenty - There’s quiet music playing in the kitchen. I’ve got a cup of tea and it’s snowing. My sweater knitting is calling me, but the house is a mess so really I ...
    3 months ago
  • More finished quilts for Covered in Love - Guest blogging here and here.
    1 year ago
  • A Beekeeper's Cushion - There was something about when the pandemic first began that put me in a “make due and mend” mindset. Maybe it was the uncertainty of what was going to h...
    3 years ago
  • Little Window Mitts - These mittens were inspired by the colourful glowing lights of midwinter’s night. Stained glass windows, cottage windows, fairy lights… any bright light th...
    4 years ago
  • I Kicked My Sandwich - I was hungry for pizza, but there wasn’t time. This was three days ago, when I was connecting in St. Louis on my way to Baltimore. I know the St. Louis...
    6 years ago

I Say! or at least I did once...