is a picture of woman pretty pleased with herself. And the blouse she's wearing.
You may recall, this was a "flashback" pattern from Vogue Knitting Spring/Summer 1984. (Original pattern from 1948.) I was inspired to make it as part of a then-and-now knit-along in the Ravelry Vogue Knitters group.
In mid May, I (finally) had all of the pieces knit. I blocked them all before seaming.
I usually don't bother and just block everything afterwards. But the experts say that you get the best results blocking the pieces first and I decided to listen to them. The edges of the pieces were very curly and I wanted to make the seaming easier. It also helped to fold over the hems on the cuffs and collars so they wanted to stay in place while I sewed them down.
You can see I didn't work in any of the ends before blocking either. I decided to wait to take care of them until after it was sewn together. It turned out to be a very good decision. I had kept all of the ends to the edges, and it was simple to work them into the seam allowances after the seams were sewn. I was worried about being able to anchor the slippery white silk but it wasn't an issue at all working them into the seam allowances.
The first seam was to sew the back and front sections to the yoke.
Since I was sewing the ends of one piece to the sides of the other, I couldn't just match stitch for stitch. Despite having to adjust the gauge and stitch count, the length of the pieces I was sewing together were the same. (Yay!) I used safety pins to match centers and quarters and added a few more.
I made sure the yoke began and ended so that a garter ridge ran right along the top of the front and back pieces, making it consistent with the rest of the stitch pattern. (Each tan stripe is edged with a garter ridge.) You can see I also matched up the white stripe from the front and from the sleeve. (The pattern planned for that so that's not all me, but it is nice when it works!)
The next seam was the long underarm and side seam, done in one shot. I normally sew with the same yarn that the piece is knit with, but for this one I used thread instead. I wanted to minimize bulk. It didn't feel right to use regular sewing thread, though, so I used top stitching thread which is thicker.
Next was the hem around the bottom:
It's so neat and simple!
The pattern said to fold over four stitches, but I just curled a little bit that seamed to naturally want to roll, closer to two stitches. I sewed it down with the thread, just making sure that it stayed even and straight all the way around.
Next the cuffs. The reworking of the pattern in 1984 changed the cuffs so the stripe pattern was different from the original. I modified the cuffs and from what I can see on the picture, it matches the original. It just seemed a lot more balanced and in tune with the rest of the sweater to arrange them as shown.
The sleeves are gathered into the cuffs quite a bit, so I ran a length of the tan yarn around the sleeve bottom. I used it to gather the sleeve width to match the length of the cuff and tied a knot to keep it there. I intended to pull it out after I sewed on the cuff, but it wouldn't come out when I tried. Apparently I sewed through it in places. That's alright, it will just help keep it from stretching out.
The cuffs had a knitted hem. The pattern had the hem the same width as the cuff, but I followed Elizabeth Zimmermann's formula of making the part you turn under about 10% smaller. I sewed it down just above the white stripe. Putting all the extra bulk under the white stripe camouflages the extra thickness of the hem.
Next was the collar. I modified the hem so I could knit it in one piece.
Under side of the collar.
The pattern had you knit the hem for the long edge, cast off, and then pick up stitches on the short sides to knit the hem there. I picked up the stitches before starting the hem and knit the long side and short sides all at once. I decreased stitches at the corners so it would lie flat.
I really wondered how to sew it to the body. I didn't want to do a regular seam where you put right sides together and the flip it inside right--too much bulk in the seam and I didn't think the collar would fold over neatly.
Then I noticed that the top edge of the collar (the cast on edge) was neat enough to show to the outside. So I laid the collar on the body in position and just sewed the top edges together on the back side. I made sure the collar rode a little higher than the body and kept all the stitches on the back.
And it turns out that once it was on, the weight of the blouse pulled the collar to the inside and produced a nice folded edge. (Except at the front and back center, as you'll see.)
The back includes a slit finished with buttons. The pattern called for the entire back seam to be open and fastened with three buttons. This seemed very open to me, so I sewed the seam shut from the bottom to half way, and put the buttons on the top half.
The ends of the opening are finished with crocheted slip stitch, including crocheted loops for the buttons. The buttons were from my button jars and definitely do not look brand new. Let's call that a design choice to reinforce the vintage look of the garment. :)
It looks like the back of the collar isn't quite centered after the buttons were fastened. We'll see if I think that's worth fixing. (I doubt it.)
And finally, here's the entire piece:
It came out exactly as I wanted. It's comfortable to wear and I love the fit.
There's flexibility in the fit of the shoulders since there is no set shoulder seam. Despite the all-in-one construction of the yoke and sleeves, there is shaping in the underarm so that it's not just blocks of rectangles put together. (Always a recipe for weird bulk under the arms.) I was happy to have a pattern to tell me how to do it because there was some unusual geometry going on.
The waist shaping worked out well too. It was hard to know for sure when the pieces were knit side to side, but again, the pattern did not steer me wrong.
To cap off this wonderful finish, I found two brown pants at Goodwill in the last couple of weeks that will match!
I'm getting pretty close to finishing a vintage "Then and Now" blouse so I thought I'd give you the full tour.
Gauge swatch. The gauge didn't match the
pattern but it was what worked for this yarn
so I resigned myself to recalculating all the
stitch counts in the pattern.
It started with a Then and Now knit-along suggested in the Vogue Knitting Magazine group on Ravelry in 2018. The idea was to knit something from a current year (2018) issue ("now") and knit something from the selection of Vogue "flashback" patterns where they take a vintage pattern and update it with modern materials and colours ("then").
My "now" pattern was the pink and black cowl from the Winter 2017/18 issue. I started it in January and finished in April.
I knew pretty early that my "then" pattern was going to be a striped blouse from a 1984 issue but I didn't have any idea what yarn to use.
I wanted something drapey, probably silk. And as usual, I was hoping to get the yarn from a second hand sweater. I couldn't find anything. I purchased a couple sweaters from other unravelers online to try, but they weren't well suited either. (Too thin or wrong colour.)
I looked a little further in the stash and decided a white silk I bought from colourmart.com would work with a tan rayon/linen blend from this sweater. Because I had less white than tan, I figured I had to switch the main colour from white to tan. That was probably better for my colouring anyway.
I knit up a swatch at the end of December to technically meet the knit-along requirement to start the project in 2018. The group is pretty relaxed anyway. I mean, it's not like they won't want to see a finished project just because it was late or that we're competing for cash prizes! :)
After all the calculations for gauge and size, it didn't really look like I had enough yarn, but it seemed to me like I should. Normally ignoring the math for a feeling isn't advisable, but yardage numbers aren't always reliable. So, I started anyway. (Spoiler alert - it's going to be fine.)
The blouse has an interesting construction. The front and back panels are knit side to side, and those are the pieces done first. Besides recalculating stitch counts for gauge, the only change I made was to finish the shaping with short rows instead of casting off stitches over a series of rows.
Along the sides, the top and bottom are knit a little wider to give waist shaping.
The final effect gives a smoother edge that is easier to seam. No one else will ever notice but I like to take care of the little details.
The next piece is a monster. The yoke and sleeves are knit in one piece that stretches from the cuff of one sleeve to the cuff of the other. Over 300 stitches and each row took a while.
With this many stitches, I had to work on a circular needle. I switched back to my straight bamboos after I split for the neck.
I only had a couple small misadventures while working on this piece. While doing the neck shaping, I misread the instructions. Probably more accurate to say I assumed the directions. In many, many cases shaping (increases or decreases) is done on every other row. Well, the neck shaping needed to happen a little faster and should have been done on every row. I realized after 18 rows were knit.
Fortunately that was when I was working on just one side of the neck, so the rows were only about 140 stitches, not 300.
As I got close to finishing the second shoulder, I noticed I had dropped a stitch far below.
I was not eager to rip all the way back. I thought about just sewing the stitch in place, but didn't like that idea other. So I dropped the stitch beside it all the way down too, and then "knit" them both back up. Dropping the extra stitch gives you a little more slack in the yarn to even out the tightness over two stitches. With a final blocking I don't think it will ever be noticeable.
I was happy to finish this massive piece:
I think the neck hole is obvious. The slit will go in the back and be closed up with three buttons. (So vintage, right?) The left and right sides, will curl into tubes and form the sleeves.
Here's the front panel in position below the yoke to give you a bit of an idea (and give me a little motivation that this is actually coming together):
The piece I'm working on now is one of the cuffs:
The cuff in progress under the end of the sleeve.
My first effort was far too narrow. I added about 20 stitches and I think I'm in the ball park now. The size is forgiving as long as it's big enough to be loose around my forearm and small enough to have to gather the sleeve to fit. (Again, so vintage, right?) This cuff shouldn't take too much longer and then I have to knit the second one.
After that, I only have to knit two pieces for the collar. It's nice to be knitting these small portable pieces. I'm looking forward to having this together. I should be able to wear it even in warmer weather so I won't have to wait until next winter to wear it! :)
I've had some excitement around here and it felt like it happened so fast I didn't have a chance to write about it. And then afterward I thought I'd better wait for the pictures because I remember the first rule of blogging: No pictures means it didn't happen.
Well, the week before the Vogue Knitting Live event in Chicago, I actually read through one of their marketing emails and saw that it was not too late to apply for the Readers on the Runway event. "What's that?" you ask? Well, it's a runway show of Vogue Knitting readers wearing garments or accessories that they have knit from Vogue Knitting patterns. Simple enough, right?
I wasn't planning to go to the event, but Chicago's just a hop, skip and a jump, really, so I applied on a whim. I submitted three articles I had made from the magazine's patterns and thought they might take two. Well, they responded that they would like me to bring all three and did I have any more? So I submitted one more item and they accepted that too. So I was set to walk the runway with no less than four of my knitted garments. Super exciting!
Yes, she's wearing my My Sister's Shawl
and she's keeping it too. :)
I notified my sister to see if she would like to go along and she jumped at it. She lives between me and Chicago so I made a weekend of it by staying at her place the night before.
We took the SouthShore Line train in leaving plenty of time to catch lunch in the city and explore the art installations we passed before we went to the show.
And some extra doors too.
Don't ask me what why we are looking over there.
When we got to the show (at the Hilton on Michigan Avenue), we had to hang out with Krysten Ritter who was featured on the latest cover:
In case you have to ask, she plays the badass super hero Jessica Jones (among other roles). And yes, she knits (and designs).
We also hung out with some bears Nicky Epstein made with all the sample swatches she had made and kept over the years!
We got our measurements taken by the author/designer Deborah Newton (herself), which is one thing I had on my must-do list. It's a little hard to measure yourself. :)
Then we just had time to catch the Vogue fashion show with 20 or so garments from the two most recent issues.
These were the samples from the designers that were actually photographed for the magazine.
And oh look! here's Krysten Ritter again and the model has on the very sweater Krysten wore on the cover:
We then had a chance to wander the marketplace. The only yarn I bought was a cowl kit from Handspun Hope. I had read about the project and was happy to support their mission to provide work opportunities and fair wages for women in Rwanda.
The yarn is either kept in its natural colour or dyed with local ingredients. One of the skeins I chose was dyed with avocado pit. Who knew 1. That avocados grew in Rwanda and 2. that you could dye with them? The result is a pinkish tan that I'll show you some other time.
As at any knitting event, it is normal to openly (and loudly) admire what people are wearing, ask them what pattern it is from, and what yarn they used. I got pictures of a couple that I really liked. Here's a cardigan done in mosaic knitting.
And this crocheted sweater caught my eye but I didn't have a chance to get a picture until I accosted her in the bathroom. (Awkward!)
I love how each of them used colour in their pieces.
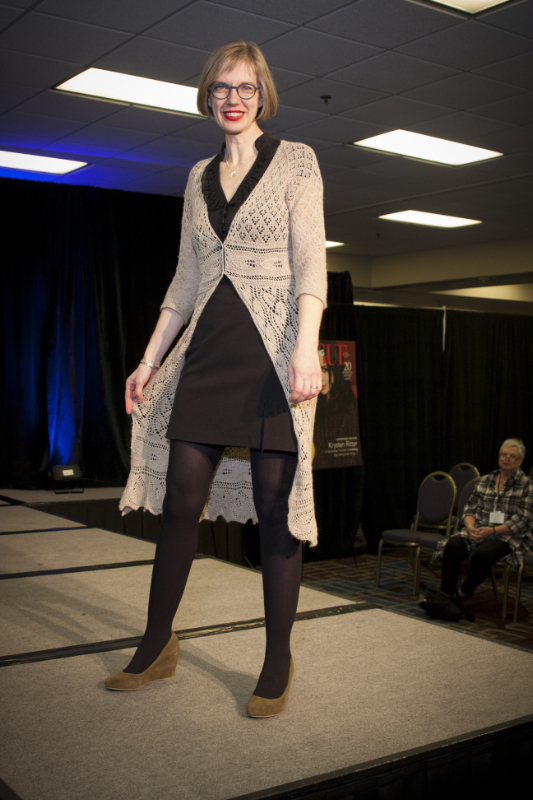
Then it was time to get ready for the main event. (My main event, anyway!) And what was I going to be wearing? This:
of course. Ok, honestly, no I am not going to be wearing them all at the same time.
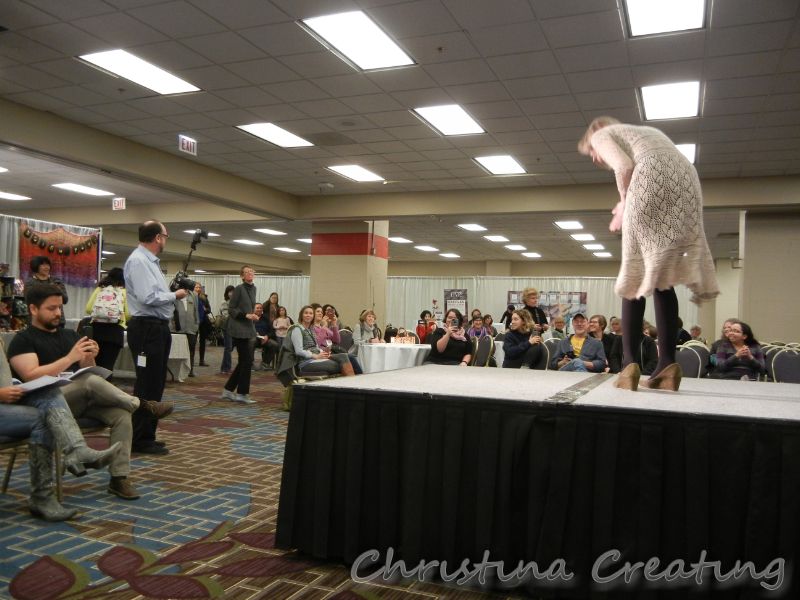
All of us models reported to the backstage area and were given a walking order. I was going to have to be quick about my changes to be ready for my next turn. But from what little I've seen of a real runway show (on TV), it looks like that's true of the pros as well.
We were given a brief explanation and backstage demonstration of how to walk and then, with Trish Malcolm, the editor of Vogue Knitting magazine announcing, we were off!
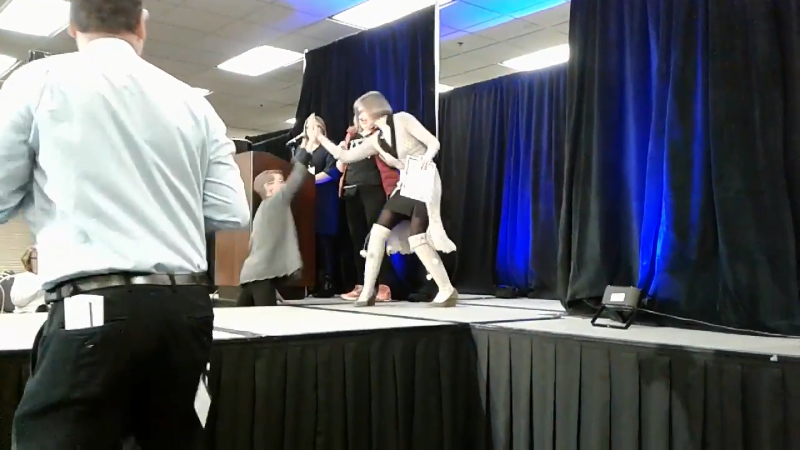
After I had finished my walk and exited the stage, I heard my name and I was called back. The designer, Brooke Nico, happened to be on the show floor and heard it being announced. She ran to the stage because she wanted to see it. So I came back out to show her and gave her a namaste bow for her beautiful design.
Brooke was a very lively woman and this interruption seemed to loosen up the crowd. I noticed they were a lot more responsive after that than they were even during the "real" runway show earlier.
This woman flew up for Tampa just for this show. (She flew from warm and sunny Florida to Chicago in early March, people - that's dedication.)
4. The ZigZag Skirt from the Winter 2011/12 issue.
Photo: Vogue Knitting magazine
Lest you have any doubts, this was a real walk/pose to the right/turn/pose to the left/walk to the end/pose for the Vogue photographer/turn/and walk out runway walk.
As we were walking, Trish Malcolm announced our names, the pattern, magazine issue, yarns used, etc.
5. Long-sleeved dress with cable details:
Photo: Vogue Knitting magazine
This was a late entry, so I don't have the information and couldn't find the pattern in Ravelry. (I was too busy changing back stage to be able to hear what was being announced.) I believe she added some mods because they were talking about her adding the ribbing at the waist to achieve the shaping.
There were several entries that I did not get a picture of, but the final item was my Over Knee Socks from the Late Winter 2017 issue:
Photo: Vogue Knitting magazine
Then it was a dash from the stage exit to the stage entrance to join the final walk:
Photo: Vogue Knitting magazine
The white sweater and the blue or mauve wrap behind it are two of the items that I didn't get an individual picture of.
Photo: Vogue Knitting magazine
Then we waited back stage for the announcement of the winners. Oh yes, there are winners! I'll let you watch:
That was the designer, Brooke Nico, running up to give me a high five after the announcement:
Here is the group of all the reader runway models with Trish Malcolm (to my left):
Photo: Vogue Knitting magazine
And I got to meet the designer again and get a picture with her:
Photo: Vogue Knitting magazine
The day was a resounding triumph. Especially as we did have enough time to catch the 6:30 train and didn't have to wait for the next one at 9:15! Phew.
Now I get to decide which Vogue Knitting Live event I'd like to go to next to use my prize. San Francisco's in September; Minneapolis in November; and New York in January. Hmmmm....
And I had better start thinking about what to knit for the Reader Runway at the next one; I've used up all my "back stock"!
It was a Busy Week!
-
I recently shared some of the smaller quilts finished this week. We also
had some larger lap quilts cross the finish line too.
This quilt top has bee...
2025 Laundry Basket Mystery Quilt, Weeks 1 & 2
-
I've been so good this year sticking to my list of projects and not getting
side tracked however I got squirreled! I've succumbed to the Laundry Basket
M...
It's A Bit Supernatural
-
Recently I bought some Spoonflower fabrics inspired by the TV show
Supernatural, and I decided to make some projects with it.
When I found this panel fabr...
What’s math for anyway
-
Well, spoiler alert… Ranunculus fits just fine. This was not at all a
guarantee, despite the rather ridiculous number of times that I checked
before bindin...
#3 : My Most Embarrassing Moment Would Be …
-
This is the 3rd installment in a series of 51 posts inspired by a list
of writing prompts from the website Journal Buddies. If you’d like to know
mor...
Gilipeysa Cardigan
-
Recently I have enjoyed indulging in a sweet little colorwork sweater as a
gift for my cousin’s brand new baby boy!
I have been seeing so many amazing co...
The Christmas Morning Socks Knit-Along!
-
Yesterday on Instagram I posted the idea of casting-on for a sock
knit-along with the goal to finish them in time to wear them Christmas
morning. I thou...