Showing posts with label beads. Show all posts

Saturday, May 19, 2018

Look Up to the Stars

Look at me....I'm a star. Or rather, I'm wearing stars. The Celestarium shawl I started for the Ravellenic Games in February has been finished!

The basic structure follows the "pi shawl" formula popularized by Elizabeth Zimmermann. Simply put, every time the diameter of the shawl doubles, you double the number of stitches. Since knitting is stretchy and flexible, it works to make a circle.

That is why the shawl looks like it is made of concentric bands. Each time you double the stitches, they are close together and make a dark section. As you knit out to the end of that band, the stitches are more spread out and the shawl looks lighter.

When the knitting was done, I wasn't sure where I was going to have room to layout and block the shawl. I finally moved all the furniture in the living room to the edges and laid the mats in the middle.

Weaving some blocking wires through the eyelets at the edge made it easy to pin the shawl into shape.
I put the wires in and pinned it when it was dry and then drenched it with a spray bottle of water. Apparently you don't want to over-handle silk when it is wet because it is much weaker. But pinning when dry and then soaking it does the trick. The shawl took to the shape beautifully.

As I said previously, I went with a fancier border than the original pattern. Someone had published an alternative edge that they used on their shawl and I went ahead and used her pattern.
I noticed afterward that some people blocked peaks in the edging (giving the shawl a scalloped edge) but I think the round shape works fine. Maybe next time I'll try the scallop edge.
The shawl is knit from the center out, so the rows go around and around the shawl. When the center part is done, you cast on a few stitches for the edge and then work those rows perpendicular to the edge of the shawl. All the shawl stitches are still on the needle and every other row you knit one of those stitches with the last stitch of the edging row. In that way you incorporate all of the live stitches into the edging as you work around the whole edge of the shawl.

In addition to adding interest by changing the direction of the knitting, this also solves the problem of how to bind off the shawl stitches. Most conventional bind offs are not stretchy enough and prevent the shawl from flowing properly.
Here is the star chart from the pattern which marks all the stars included. I have not looked to see how it matches with the picture of  my shawl above so I very much doubt it is in the same orientation.

As you may recall, the shawl was knit in 100% silk. It is very drapey and heavy for how thin it is (compared to wool especially).
It's warm but doesn't have that "cozy" feeling that fuzzy wool gives.
How to wear this thing?
I could fold just a bit of the curve under and then wrap it around my shoulders, securing with a wood shawl pin.
I preferred it worn shifted to one side instead of perfectly centered.
From the back, you can see a good part of the star pattern.

I could also wear it gathered around my neck with the ends wrapped back to the front.
Or gathered around the neck, but with the ends pinned at the back of my neck because the ends are too wide and thick to be able to tie them.
This does run the risk of some discomfort if the pin moves wrong!

A couple places you are unlikely to find this shawl just hanging out:

Project Stats
Started
: 10 Feb '18
Finished: 21 Apr '18
Pattern: Celestarium by Audry Nicklin and Stellar Wave Edging by Kimberlee Johnson.
Materials: Dk/worsted weight silk raveled from an Oscar de la Renta sweater, 300 grams. Many size 6 clear silver-lined crystal beads.

Sunday, December 1, 2013

Jeweled Cowl


You've been warned.

Remember the beading tutorial I did a few weeks ago?
I have finished the project I was working on at the time. All laid out for blocking:
Being a gift, I didn't write much about the scarf, but it was a pleasure to make. I repeated the yarn combination that I used for a scarf for my mother last year. (You can see it in this post, although it looks like I never did a final post on it.) The green is a soft merino and the blue/green is a sock yarn (merino and nylon). The green really helps soften the other yarn and I love the colour combination. I alternated the colours on every row.

It came out really long.
Probably too long to wear as one loop.

This is a triple loop:
A nice jumbled mess around your neck.

Here's a long/short double wrap:
Nicely shows off the lace and bead work section, if you have time to arrange your scarf just so.

Too cold to have your head uncovered? No problem; try a loose double wrap:
Or a double wrap around your neck:
And I realized after it was wrapped, the most likely way the recipient will wear it is to put it around the back of her neck, pull the two ends to the front and put one folded edge through the loop of the other end. No muss; no fuss.

Project Stats
Started
: 13 Oct '13
Finished: 3 Nov '13
Pattern: Jeweled Cowl by Sachiko Uemura
Materials: Pagewood Farm Denali Hand Dyed Sock Yarn (Sante Fe) (62 grams) and madelinetosh tosh merino light (Jade) (40 grams)


Monday, November 4, 2013

Stringing Beads onto your Knitting: A Tutorial

There are two ways you can add beads to your knitting: 1. You can thread the beads you need onto your ball of yarn before you start. But make sure you put on enough, and be ready for the extra wear and tear that will put on your yarn as all those beads are repeatedly pushed further down the line of string.

Or 2. You can add the beads as you go. It takes less prep time, but really slows down the knitting time. But you don't have to guess how many beads you need (or count them if you know how many you need--I mean counting is relatively easy but beaded projects quickly get into the hundreds of beads needed and that is just tedious) and it is easier on the working yarn.

I am working on a little something that required beads and the instructions called for adding the beads as you went. The pattern suggested using a tiny crochet hook. I have heard this before and have a hard time picturing a crochet hook so small it would fit through a tiny bead. I know they exist or people wouldn't be talking about them all the time, but I certainly do not have one.

So I made my own solution. I took some very light weight and flexible wire I have for beading. I cut a piece about 6 inches and bent it back on itself like a V. At first I used it with the ends even, but it's much easier if one end is longer than the other.
When you get to the stitch you want to add a bead to, you stop.
Then you slide the wire through the stitch:
Then put the bead onto the wire:
Now pull the stitch off of the left neede,
and slide the bead down onto the stitch:
Then put the stitch back onto the left needle:
Remove the wire and knit the stitch like normal:
You have now added a bead to your knitting and it will sparkle! :)
Repeat hundreds and hundreds of times.

(I know, sounds tedious, right? It's knitting--get used to it. You either like it or you don't.)

Saturday, September 25, 2010

Beading During the Game

So it wasn't that I wasn't interested in the game. And it's not that I needed to distract myself from what quickly looked to be a losing game. (Not for sure, but just likely...) But my bead box was still out from when I fixed my mom's necklace and just having it out put my mind to beading.

There were a lot of beads in there that I thought were so pretty. So pretty I couldn't resist buying them. Why was I leaving them sitting in a box? Not inspired? Insecure about liking the results? Not in the mood for stringing beads? Well, no more!

I whipped out a lot of necklaces, earrings, anklets and a ring today. Ya, I know...wow, right!?

Here we go:

1. Necklace from golden brown stones that I love:
It's meant to be worn with the clasp in front. This probably isn't "cool" anymore as I remember my older sister showing me a necklace like this years and years ago. But oh well, I like it. I love these toggle clasps by the way. So simple. So secure.

2. Simple strand of light-weight wooden beads:
These are reused from another necklace that I didn't like as much. But I really liked the beads. And several times since I had the idea to restring them, I've wanted to wear it with an outfit I had on. But I hadn't made it yet. Well, here you go, self!

It's held together with a magnetic clasp, but very insecurely. The magnet is not nearly strong enough. When I realized it, I did not have the energy to restring the whole thing. So I will live with it. Hopefully nothing's yanking on my necklace anyway.

I took a few of the extra beads, added some smaller black ones and strung them unto a stretchy cord for a ring:
I finished it with a simple square knot figuring it would be hidden inside my palm. I wore it all afternoon and it was very comfortable. I've had some of these rings that were way loose or tight, but this one seems good.

3. Another simple strand of pretty brown beads:
I found these brown beads strung on a string in my box. So I had "laid out" the necklace, put it on a string and then...? What happened? The only thing I could figure is that it came out too short and that I didn't have the energy at that time to solve the problem.

But today I did. I added some little silver spacers between each bead (I had only one extra...phew! I was a little worried at the end) and that did the trick.
The brown beads are flat and highly reflective. I found them in three different shapes: large ovals, small diamonds and small rectangles (not shown). This necklace is a touch longer than most I make which would  make it longer than a choker but not by much.

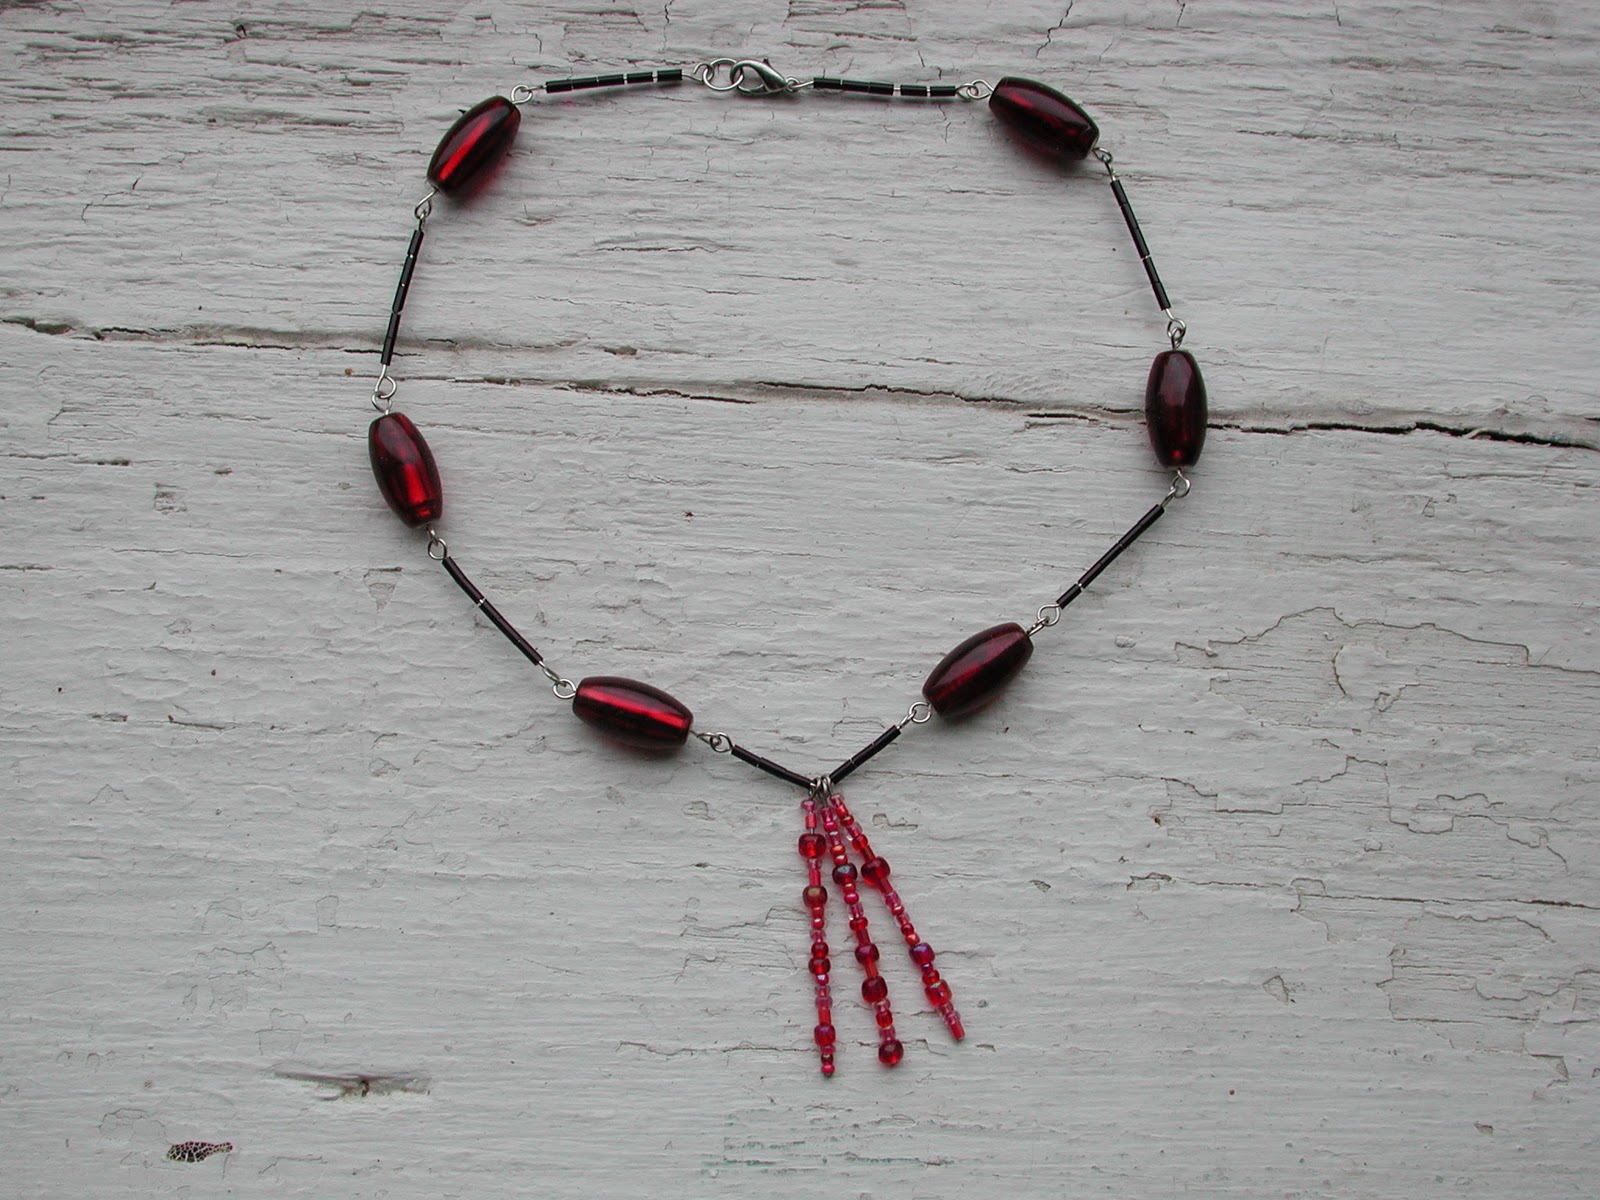
4. Red and black necklace:
Finally something different--I didn't just string some beads on a wire!

I took some extra red beads and put them on a wire with loops on each end. Then I separated them with black tube beads on wires. I put a bend in the center wire and hung some wires with various red seedbeeds on them.

I ended up with two extra red beads already on wires so I threw them on some fisherman hooks and now I have a pair of matching earrings.

5. Wooden bead necklace on leather thong:
I had a hard time doing a clasp the last time I used this leather thong so this time I just tied each end around the other string and now it is adjustable. There's enough friction with the leather that it doesn't slide unless you pull on it specifically.

6. Stone and shell necklace:
This necklace is made up of two strands. I liked the shells but couldn't quite see myself wearing a shell necklace. (Ok on a cruise, but not in my "real" life.) The other strand is made up of various stones and beads that I liked but didn't really have enough of anything to make a necklace with them.

I wanted to twist the two strands together but could not find a way to make them stay twisted.
Lucky for me, if I twist them and then do up the clasp, it stays that way. (When I unclasp it, it completely untwists again). I really love this necklace. The subtle colours, the interesting textures and shapes.

7. Two fun anklets: (Just in time for summer...oh wait...maybe not.)
The blue one is strung onto a stretchy material that clams to be "strong, stretchy, and easy to knot." The last part is completely untrue. Any knot I put in it came out with the slightest pull. I think I have it in place now with a couple of different types of knots. (A crimp bead just cuts through the stuff.)

The second one is strung on regular beading string. It was fun to do.

And that's "all." Now to figure out what outfits to wear them with...

May I suggest?

I Say! or at least I did once...