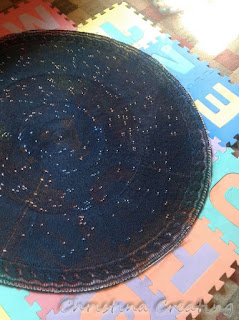
Look at me....I'm a star. Or rather, I'm wearing stars. The Celestarium shawl I started for the Ravellenic Games in February has been finished!
The basic structure follows the "pi shawl" formula popularized by Elizabeth Zimmermann. Simply put, every time the diameter of the shawl doubles, you double the number of stitches. Since knitting is stretchy and flexible, it works to make a circle.
That is why the shawl looks like it is made of concentric bands. Each time you double the stitches, they are close together and make a dark section. As you knit out to the end of that band, the stitches are more spread out and the shawl looks lighter.
When the knitting was done, I wasn't sure where I was going to have room to layout and block the shawl. I finally moved all the furniture in the living room to the edges and laid the mats in the middle.
Weaving some blocking wires through the eyelets at the edge made it easy to pin the shawl into shape.
I put the wires in and pinned it when it was dry and then drenched it with a spray bottle of water. Apparently you don't want to over-handle silk when it is wet because it is much weaker. But pinning when dry and then soaking it does the trick. The shawl took to the shape beautifully.
As I said previously, I went with a fancier border than the original pattern. Someone had published an alternative edge that they used on their shawl and I went ahead and used her pattern.
I noticed afterward that some people blocked peaks in the edging (giving the shawl a scalloped edge) but I think the round shape works fine. Maybe next time I'll try the scallop edge.
The shawl is knit from the center out, so the rows go around and around the shawl. When the center part is done, you cast on a few stitches for the edge and then work those rows perpendicular to the edge of the shawl. All the shawl stitches are still on the needle and every other row you knit one of those stitches with the last stitch of the edging row. In that way you incorporate all of the live stitches into the edging as you work around the whole edge of the shawl.
In addition to adding interest by changing the direction of the knitting, this also solves the problem of how to bind off the shawl stitches. Most conventional bind offs are not stretchy enough and prevent the shawl from flowing properly.
Here is the star chart from the pattern which marks all the stars included. I have not looked to see how it matches with the picture of my shawl above so I very much doubt it is in the same orientation.
As you may recall, the shawl was knit in 100% silk. It is very drapey and heavy for how thin it is (compared to wool especially).
It's warm but doesn't have that "cozy" feeling that fuzzy wool gives.
How to wear this thing?
I could fold just a bit of the curve under and then wrap it around my shoulders, securing with a wood shawl pin.
I preferred it worn shifted to one side instead of perfectly centered.
From the back, you can see a good part of the star pattern.
I could also wear it gathered around my neck with the ends wrapped back to the front.
Or gathered around the neck, but with the ends pinned at the back of my neck because the ends are too wide and thick to be able to tie them.
This does run the risk of some discomfort if the pin moves wrong!
A couple places you are unlikely to find this shawl just hanging out:
Project Stats
Started: 10 Feb '18
Finished: 21 Apr '18
Pattern: Celestarium by Audry Nicklin and Stellar Wave Edging by Kimberlee Johnson.
Materials: Dk/worsted weight silk raveled from an Oscar de la Renta sweater, 300 grams. Many size 6 clear silver-lined crystal beads.
Sewing long rows...............
-
These are the 2 new blocks I made yesterday, actually 2 of each of them. I
didn't take a photo of the final layout.
I had 3 sewing sessions and this ...
4 hours ago


No comments:
Post a Comment
Comments are moderated so you will not see yours post right away. Thank you for leaving a comment; I enjoy reading each one!