The last week of July, I received this beauty:
Isn't it so wonderful?! Here is the back, nicely "signed":
And here are some detail shots of the quilting.
She said she is new to free motion quilting and pieces like this are great to practice on.
She did a great job.
Meanwhile, I had already been working on my mug rug. I had bought a pack of english paper piecing papers on sale when the local quilt shop closed earlier this year. I knew I'd do something with them!
June 9: The papers were small diamonds for making a star pattern. I pulled out some fabrics, covered some papers, and started playing with a design.
Soon I had the design laid out,Meanwhile, I had already been working on my mug rug. I had bought a pack of english paper piecing papers on sale when the local quilt shop closed earlier this year. I knew I'd do something with them!
June 9: The papers were small diamonds for making a star pattern. I pulled out some fabrics, covered some papers, and started playing with a design.
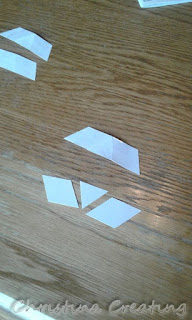
except I needed to make special pieces to make a straight edge. I simply took the three pieces needed to fill the space (bottom of picture below) and taped them together to make one piece (upper piece in picture below).
Then I could cover that one piece with fabric and save myself a bit of sewing. There was no need to make all those pieces separate.
By the end of the day, I had pieced together the centre star with the background pieces.
Isn't it so cute!?
June 10: All the pieces are sewn together and it is time to take out the papers:
Even though the diamonds were very small, I still punched a hole in the middle to make it easier to pull them out. After loosening the glue holding the fabric to the paper, I insert the seam ripper under that paper through the hole and pop the paper out. This is not only easier but saves a bit of wear and tear on the edges of the fabric.
Once all the papers are out, the pieces looks a little ragged,
but nothing that a session with an iron won't fix.
Look at all those furled intersections! I love it. This happens automatically, as long as you wrap your fabric around all the papers in the same direction.
This was a nice trial to see if ironing the fabric before washing out the glue would harm the iron or cause any other problems. It all worked fine and now I know I can do this on my Lucy Boston blocks if needed.
I did, however, go ahead and soak the piece to get out the glue before proceeding. After drying and ironing, everything looked neat and trim:
Next stage is to layer it with batting and a backing.
June 11: The quilting is done. I hand quilted it, outlining the individual pieces in thread that matched the colour of the front.
I had enough of one of the blues to use for the binding. It was a small piece, however, so I had to use a few short cuts of fabric.
The first time I tried to sew it on, I got a seam of the binding in the corner three times. So I took off the binding and started in a different place so the seams would land in the middle of a side instead.
Here is the backing that I chose to go with the binding:
It was a beautiful piece of orange and blue batik. I only had a small piece, but it was enough for this.
Here you can see some of the design made on the back by the different colour threads:
And here is the finished piece.
A mug rug in three days. I was done in plenty of time for the deadline, but then I decided to enter it in the county fair. So my poor recipient was forced to wait. On the good side, it did get a blue ribbon! :)
I mailed it yesterday and my recipient should have it by Thursday (August 9 - so plenty of time before the deadline!) I really loved making this piece and the final result, so I hope she likes it. I know she really likes stars in quilts, so I think I'm safe.


No comments:
Post a Comment
Comments are moderated so you will not see yours post right away. Thank you for leaving a comment; I enjoy reading each one!