Showing posts with label Nocturne Star Quilt. Show all posts

Saturday, July 17, 2021

Finally Quilting!

There are a lot of things I could update here, but let's take on the biggest project making the most progress: my Nocturne Star quilt:
I started the blocks in May, 2016 and had them finished by July. I assembled them into the star and added the border in November and December. I pieced the backing and basted the quilt in June, 2020.

I couldn't start quilting until I had something that would hold the cones of thread I bought for this quilt. I sent a link to Troy for one as a suggestion for my birthday, and he, like any self-respecting maker would do, decided he could make one far better than what was offered for sale.

By February, his creation was ready to use:

It's very pretty and has a very solid (read: heavy) base.
It's working great.

So I could being to quilt. I started by thinking about the center star. It works better to start quilting in the middle of the quilt and it's also the hardest to do so it's nice to get it done first. The first part of the design I settled on was doing ribbon candy inside a diamond frame down the middle of each arm of the star.
I auditioned designs (and practiced the motion of making them) on a piece of glass and a dry erase marker. Then I tried some options to fill in the outside.
And settled on the wave like lines (upper design in the picture below).
Having that settled, I started stitching. In preparation, I had ordered a new foot for my machine that is designed to ride along the edge of a special ruler. (They're both sized so you can't slip and slam your needle into the ruler. Don't try to use just any ruler you have.)
In some ways, it's a little rough. I'm a beginner and the ruler is shorter than the distance to be travelled, so I have to keep moving it while maintaining the straight line. And the stitching is 1/4" from the edge of the ruler so that takes some learning. In some ways, I found it very straight forward and had no qualms about doing my very first ruler work on this special quilt.
Progress was made.
They say consistency of texture is more important that having perfectly placed and symmetrical lines, and I am choosing to believe them. :)

I am very happy that the center lies perfectly flat:
For breaks from that quilting, I sometimes worked on the light squares.
I added borders 1/4" from the edge and filled in an area with various designs based on circles or half-circles.

In general I would have liked to have kept the density of the quilting mostly the same, but in fact the designs do vary quite a bit.
I tried various ways of marking the gaps, including just relying on the markings on the ruler, water soluble pen, and a hera marker. They've all got their pluses and minuses (and I could use more practice with all of them!)
When I couldn't take doing more of the light squares, I started on the outer dark diamond shapes (the "wheel" in the Carpenter Wheel pattern). I auditioned patterns and practiced them on glass again, and ended up with a feather variation.
Something I thought I would never quilt because I wasn't that crazy about feather quilting, and it is deemed "hard". And to be honest, my earlier efforts where pretty bad! I think "modern" feathers are more forgiving and I've learned to go a lot slower and to look ahead. It's helped.
I recently gave a push and finished all of that quilting.

The center area of the light squares was left to do. I was dithering about what to do there. I wanted simple and something fairly dense to make the gaps between the borders pop. I wanted it consistently dense so nothing pictorial. I had settled on traditional crosshatching when a video about the spiraling square came up on my feed.
I decided that was it. It's back to ruler work after a lot of free-motion quilting but this is a little easier since the ruler can span the length of each line.

I've finished it on four of the twelve small squares. I'm not sure I'm going to do the same thing in the larger squares but I have a little time to think about it.

If by some heroic effort and the miracle of nothing going wrong, I have this done in two weeks, I'll be able to enter it in the county fair. If that doesn't happen, my next deadline is mid-August when I'll be traveling to see family. The quilt is destined for my sister and she has been waiting a long time (like since 2016--she had no idea it would be this long!) and I'd like to finally deliver.

Saturday, January 16, 2021

2020 Planning....How'd that Go?

Remember back in a more innocent time when I made plans for 2020, prompted by a link-up party? I had planned to revisit this every quarter but haven't posted anything since April. Just for fun, let's take a little look.

1. Quilt the Nocturne Star Quilt. Um, no. But it is basted.
And I'm pretty sure this is going to be my next big project to tackle once my machine gets back from being serviced and Troy finishes the adapter so I can uses cones of thread. So stayed tuned.

2. A wall hanging from a block I made in a class with Pat Sloan. I added the borders to the block and got it mostly quilted.
This was an adventure in finding and piecing together fabric to match the other wall hanging I had made years ago.

3. Sashing my Lucy Boston blocks. I had 24 done at the beginning of the year and now have 51 out of 56 done. Here's the last one I finished:
By "sashing" the block, I mean adding
the grey honeycombs around the outside
My goal is to finish by the end of the month (that will be three years since I started). That is going to be a push.

The goal also mentioned starting on the connecting crosses and I have done that. Here are a couple:
I probably don't have half of them done yet, but I think I'm getting close to that. I can sew together one of these in about an hour.

4. Finish my Joy to the World quilt top. That was done at the last update in April.

5. Start a quilt with my "antique red" fabrics. Not started. But I pulled out all the fabrics I had assembled and took out a few that really didn't go. I picked the order I would put them in for a Boston Commons quilt.
I still want to make this one but am not in a hurry to start it.

6. Make a cashmere memory blanket for a friend. This also was already done by the April post.

7. Calligraphy. I didn't do the drills with the big brush pen as I suggested I could in the April post, but I have continued lettering. Mostly a lot of decorated envelopes.

This would be one of my fancier ones:
And I was proud of this circle design:
I enjoy fitting words into shapes.

For Christmas, I did a lot of hand lettered envelopes:
Banners:
Ornaments:
and Christmas trees:

I made some personalized cards in the spring with floral initials:
Pretty much every project and design is still inspired by the Happy Ever Crafter (on youtube and Instagram).

8. Skating more. As I reported in April, I went twice in January and that's it. I haven't been this winter yet (Covid) but hope to go soon again. The outdoor rinks are opened with precautions.

9. Take a trip with Troy to celebrate our 20th anniversary (in September). Um, no. You know why.
I got out my wedding dress and put Troy in a suit and took some pictures in our yard.

10. Pray more: still going. I had a daily Lectio Divina practice until the summer and then it dropped off. I'm averaging a couple times a week now and that seems like a good amount. Last week, my church started a scripture series where we're reading a prayer from scripture and then doing a relevant prayer practice. The series goes up to Lent and I hope to keep up with that. (Not that I did in the first week we just finished!)

I'm not worried about evaluating whether I won or lost in meeting these goals, but I was interested in reviewing them after the end of the year.

Sunday, June 21, 2020

Basting Begun

An update on the quilt I tried to baste last week.

This quilt was born because I fell in love with a fabric line and had to use it right away! At the time I bought a layer cake (set of 10" squares) and that is what I used for the body of the quilt (plus a lot of my own stash in suitable colours and tones).

Even after I finish a quilt top, my eyes are still caught by fabric that would have been good in it, or, in this case, caught by a mini charm pack of the same fabric line. ("Charms" are 5" squares; "Mini charms" are 2.5" squares. This pack contained 42 squares from the fabric line.) Even though the top was assembled and I had no use for them, I couldn't resist buying this mini charm pack. I obviously was not over this fabric line. (And the mini charms are so cute and only a few dollars. Very hard to resist.)

This charm pack has been hanging around in the room I use for sewing ever since, which is at least a few years. I don't have a set place to store fabric pre-cut packs because I don't tend to buy a lot of them. And I didn't want to break up the set and put the squares with my scraps. So the neat little bundle moved from surface to surface as it needed to be moved out of the way. Repeatedly getting my attention but it was never the time to use them.

Until.

Until I needed just a few inches more width on my quilt back! Sewing them together in one long strip and inserting them as a stripe might just add the width that I needed.

I decided to piece them alternating light and dark.
I did it in sections instead of one long strip because it's very easy to have a long strip warp or curve on you. So they were pieced into 8" and 10" sections and then I added a solid border on each side. I had extra of a tannish brown colour that worked well. (I bought it online for my Lucy Boston but it really wasn't the right shade. I had just enough for what I had in mind here!)

I put 2" (finished) on each side and the top and bottom.
I didn't have enough of the brown for the full height of the backing so I added strips on the top and bottom. I looked through my scrap bags, and found leftover pieces from making the top, including more fabric from the same fabric line.

With this extra 6" in width, the backing was just wide enough:
I laid the top on top of the backing and the backing is 2-3" wider than the top. Not enough extra to quilt it on a long arm machine, but enough for me to work with on my domestic machine.

Once that was confirmed, I secured the backing to the table (good side down, of course; not like pictured above), covered it with the batting and then the top. The batting was also just large enough. I buy queen size battings and usually have a comfortable excess on the width and plenty of extra on the height. Not in this case but it was enough.

Then then pinning started.
And continued and continued. I had two and a half hours to do all this (including a final pressing of the top and steaming the batting, which I have not shown) and that was not enough time. As my departure time approached, I was able to confirm that the room wouldn't be needed by anyone else in the next week so I left the quilt set up on the tables and will continue--and hopefully finish--next week.

Also, I need to buy another pack of pins because I have enough for the center but not the borders. That will mean I have 900. Surely that is enough?

Tuesday, June 16, 2020

Basting Busted

I've had a quilt top, batting and backing packed in my car for a couple weeks waiting for a chance to baste it together. I like to baste at church where I can put three tables together for a big work surface. But every time I've gone to the building, my day ends up being too long or getting interrupted so that I can't get to the basting.
Last Saturday, I needed to be somewhere for about an hour that was just down the street from the church building. Ok, I would have time to baste after I was done. Excellent.

I got to the church. No one else was there. I set up my tables. I pulled out my supplies.

The first thing I notice is that the backing fabric that I thought was a wide backing was not. I would have to sew two widths together for it to be wide enough. Ok, I can fix this. I know there's a sewing machine at church. Can I find it?

I did find it (in the attic space) and it had just enough thread loaded on it that I thought I would be able to sew the seam. I set it up on a piano bench so it could be close to the outlet
 and took a look.
It is a pretty old machine but I had used it once before so I thought I could figure it out. It looked like a stretch stitch was the only straight stitch available! I started sewing the seam with that, but after a couple inches had to stop because using a stretch stitch was ridiculous. (Because it goes forward and backwards as it sews the seam, it is slow and uses a lot of thread.)

So I looked again and decided I would try the blind hem stitch with a stitch width of 0. That worked. I folded the fabric in half and sewed along one of the long edges. Now I had to cut at the fold so I could open it up to the full width. I had no scissors.

Obviously the office had scissors. They were the "craftiest" quality scissors an office might have, but I got them to work.

Now I had to press the seam. I knew there was an iron and board around. It took me a while, but after looking everywhere I thought it might be, I remembered where it was normally stored and there it was.

I think the board is the same vintage as the sewing machine, but that doesn't mean it doesn't work!
So I pressed the seam open and was ready to go.

I laid out the top on the tables. I put the backing on it to check the size.
And it was short. If I could use the selvage, it was only a couple inches short. But since I shouldn't use the selvage, it was at least 5 inches short.

I couldn't fix that. At least not there at church.

So I packed everything up, put everything away, and aborted my basting.

A disappointing end to the story, but I was still closer to a finish. I now know exactly what I have to do to make the backing work. :)

Monday, December 5, 2016

Nocturne Star Quilt Top

As soon as the pressure of finishing the haunted house season was over (that is, Thanksgiving weekend), I cast around for some quilt projects I could sew on. I was done all the Farm Girl Vintage blocks and I felt up to pulling out the machine.

I thought of the squares for my Nocturne Star quilt. I laid them out in early June:
I changed the layout slightly after this picture, but that was basically it. I wasn't sure what I would find when I opened the box--I wasn't looking forward to laying them out again trying to match what I had before.

And lo and behold, before taking the blocks off the wall, I labeled them so I would know how they went together!! I was so grateful to June Christina for doing that for me!!

I sewed all the seams in one direction without cutting the thread in between blocks.
See the orange sticker? They didn't stay on very well when
I started moving the quilt around, but they stayed on long
enough for me to be able to put the blocks together.
Not only are all the blocks held in position to sew the seams in the other direction, but you can also examine the quilt top before you sew them. I laid it out on my bed to check for misplaced or rotated blocks.
Vertical seams are sewn. Horizontal seams still
need to be sewn.
I had the added bonus of having my sister visit the same day so she could see the quilt in progress. I didn't find any errors, so I went ahead and sewed the rest of the seams. As I recall, I had them done by Friday evening of Thanksgiving weekend.

Then I took out the extra strips from the top and others I cut to use in the border. I sorted them by value (light/dark) and then sewed them end to end in strips long enough to fit the quilt edge.
I started with the lightest colours to match the background of the quilt center and then worked darker toward the outside. When I was done,  I stepped back and it looked just like I pictured it! Happy success.

Here is the entire top:
I am hoping to quilt it in early 2017. Before then I have to come up with a back. I'll look through the leftovers and see what's there.

My plan is to take it to a local shop that I found out has a long arm machine you can rent time on. It would be so exciting to get it quilted in an afternoon!!! :)

The top is 92"x100" and Troy will be happy to finally have a blanket that is wide enough to go over the sides of the mattress! (We're making do right now.)

The last few people to whom I showed the quilt (or pictures of) asked me what I was making it for. I.e., who was I giving it to? Um, me. In my head I was thinking, "Back off from the quilt...it's mine and you can't have it!"

Wednesday, July 6, 2016

Nocturne Star

I mentioned at the end of May that I had found a fabric line, fallen in love, and started a new quilt.

You can see samplings of the fabric to the right. I saw a couple of the fabrics at my local quilt store and was curious enough about them that I looked at the name of the line on the bolt and actually remembered it.

A few days later I was still thinking about it and Googled the line to see what I could find out. I found out the following:

1. I loved it.
I loved the designs, I loved them as a group, I loved them individually. I loved the colours, the warm grey/cool tan tone and the blues. I loved the limited palette. And I really loved the names. The fabric designs are Moon Phases, Data, Cassiopeia, Orbit, Constellation, Atmosphere, and Galaxy, with colour names (from light to dark) Milky Way, Stellar, Hubble, Armstrong, and Eclipse. (I've always been attracted to space things--the natural things I mean. Not rockets.)

Yes, I was so obsessed, I tracked down all the names from different websites that had various pieces in stock.

and

2. It was discontinued.
It was hard to find yardage of all of the fabrics but there were still precut packages available. I have been watching all of Jenny Doan's videos (from Missouri Star Quilt Company) and she uses pre-cuts almost exclusively. So although I have never been attracted to a precut package before, I have been getting used to the idea and it was the perfect solution in this case. I found a "layer cake" (10" squares) from a seller on etsy and I had my own pieces of all of the fabrics.

I was over the moon when the package arrived! :)

If you want to see the fabrics a little better and have any curiosity about how a fabric line is developed, I really encourage you to take a minute (or 6, which is how long it is) to watch this video of the designer introducing the line.

I spent some time admiring the fabric but not a lot because I was so eager to start sewing with it. I had an idea to combine the squares with scrappy strip-pieces squares in the same palette to make a bunch of half-square triangles.

With a little more planning and considering, I decided to organize the half square triangles into a big carpenter square star, and that is what I did:
I think it took me less than two weeks to sew together all the strips and then sew them into the half square triangles! I was obsessed.

I put them up on my design wall the first weekend of June. I played with the arrangement and settled on the one above. Since I made two half-square triangle blocks from each pair of plain square and strippy square, I had matching pairs to work with. For each block, you can find its mate "diagonally" across from it.

Some of the fabrics blur the line between what is light, medium and dark, so I converted the picture to black and white to test the values.
Not perfect, but pretty good I decided.

The quilt isn't quite big enough without a border so I started to think about that right away. The first choice was to put an extra ring of "light" blocks around the outside but I didn't have enough light fabric. So I cut strips of all the fabrics I had left (2.5" by 10-12") and will be piecing them end to end. I will sew them on one long strip at a time (staggering the corners), working my way from the light colours next to the quilt to the darkest colours on the outside.

I went from thinking I wouldn't have enough, to getting just enough by dismantling some strippy blocks I made but didn't end up using to buying more that I couldn't resist at the fabric store. It's really hard to get a quilt out of your head--even when you have enough fabric, your eye is still looking for more. So I'll have a little more variety in the borders and may use some on the back. I think I found a fabric for the binding too. I really liked the colours but the pattern didn't work well in the quilt. For a small thin line like the border, it will work perfectly.

Since taking the blocks off the design wall (before they all blew down like before) and cutting all of the border strips, I have put everything away to work on things with deadlines. I'm looking forward to fishing it out again though!

Wednesday, May 25, 2016

Let me explain. No, there is too much. Let me sum up.

I haven't been knitting too much lately, but I picked up the needles enough to finish these three bibs I've been working on since the end of March.
A couple people I know have just had a baby or are about to, so I felt a deadline on these. None of them are exactly the same because I was making them up as I go. They're all double knit in the centre with a garter stitch border.

And just because I am obsessed with Kitchenering and managed it in garter, I'll show that too:
Can you find it? Don't worry, you're not really supposed to!
I used it to join the end of the neck band to the beginning.

I'm also working on a liturgical stole. I knit the base a while ago and finally figured out how I could use it. I'm also going to apply some embroidered symbols:
Three down, one to go. Deadline for this is June 5 when it will be presented to our new minister when she is installed that day.

I applied to have my orange and grey zig zag quilt in the Shipshewana Quilt Festival and just found out Monday that it was accepted!!
Wow...it's my first time and I am very excited.

This also means I have to add an identification label and a hanging sleeve to the back of the quilt before June 18 when I have to turn it in.

I've done a little more quilting on my Mt Robson quilt. Here's a piece of the sky
 and a bit of the water:
The quilt is too thick for my machine to free motion quilt comfortably and I have to go painfully slow. But I did get the sky and water done and now I only have the ground (very little area) and the mountains left! The only deadline associated with this project is that I hope to enter it in the county fair at the beginning of August.

Of course, I have been keeping up with the Farm Girl Vintage I'm doing with my sister. In addition to sewing blocks, I took some time to play with layouts.

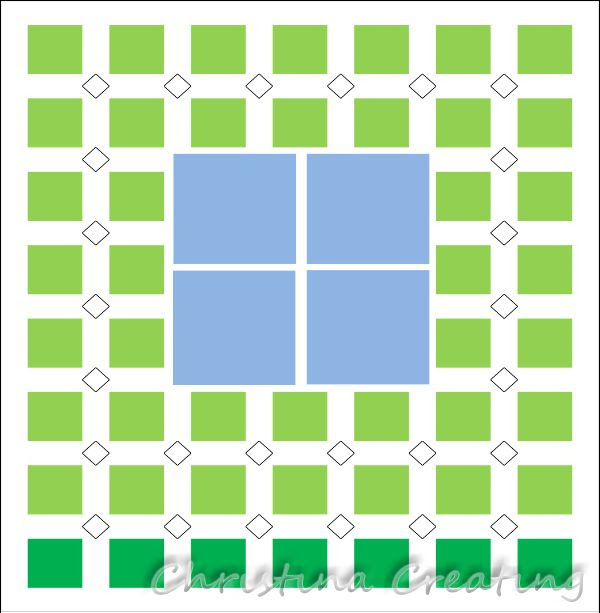
My first idea with to have the four 12" blocks in the corners with the 6" blocks filling the rest:
So the blue squares are the 12" and the green are the 6". The black outlined squares are like cornerstones, but set on point. Currently I am thinking they will be a brighter print--all of them done in the same fabric.

But I realized that this would make the 12" squares hard to see on a bed because they would be hanging off the edges. So I looked at a layout that would put them in the centre, sort of like a medallion quilt:
I wasn't happy with the spacing around the larger blocks, so I kept trying. This is the design I landed on:
It gets the larger blocks toward the centre but still has a nice spread out grid feeling to it. There are also fewer cornerstones so that makes it easier! :)

Yes, I have a new block to show you, but I'll do that in its own post later this week.

And finally, briefly for now, I fell in love with a fabric line, had to have it, and had to start a new project with it right away.
I did four blocks to try out the idea I had. I need to get a little more fabric to get some more variety in the striped sections and to complete the pattern I have in mind, but I am itching to work more on this project. No deadline--just fun!

May I suggest?

I Say! or at least I did once...