Showing posts with label backing. Show all posts

Sunday, June 21, 2020

Basting Begun

An update on the quilt I tried to baste last week.

This quilt was born because I fell in love with a fabric line and had to use it right away! At the time I bought a layer cake (set of 10" squares) and that is what I used for the body of the quilt (plus a lot of my own stash in suitable colours and tones).

Even after I finish a quilt top, my eyes are still caught by fabric that would have been good in it, or, in this case, caught by a mini charm pack of the same fabric line. ("Charms" are 5" squares; "Mini charms" are 2.5" squares. This pack contained 42 squares from the fabric line.) Even though the top was assembled and I had no use for them, I couldn't resist buying this mini charm pack. I obviously was not over this fabric line. (And the mini charms are so cute and only a few dollars. Very hard to resist.)

This charm pack has been hanging around in the room I use for sewing ever since, which is at least a few years. I don't have a set place to store fabric pre-cut packs because I don't tend to buy a lot of them. And I didn't want to break up the set and put the squares with my scraps. So the neat little bundle moved from surface to surface as it needed to be moved out of the way. Repeatedly getting my attention but it was never the time to use them.

Until.

Until I needed just a few inches more width on my quilt back! Sewing them together in one long strip and inserting them as a stripe might just add the width that I needed.

I decided to piece them alternating light and dark.
I did it in sections instead of one long strip because it's very easy to have a long strip warp or curve on you. So they were pieced into 8" and 10" sections and then I added a solid border on each side. I had extra of a tannish brown colour that worked well. (I bought it online for my Lucy Boston but it really wasn't the right shade. I had just enough for what I had in mind here!)

I put 2" (finished) on each side and the top and bottom.
I didn't have enough of the brown for the full height of the backing so I added strips on the top and bottom. I looked through my scrap bags, and found leftover pieces from making the top, including more fabric from the same fabric line.

With this extra 6" in width, the backing was just wide enough:
I laid the top on top of the backing and the backing is 2-3" wider than the top. Not enough extra to quilt it on a long arm machine, but enough for me to work with on my domestic machine.

Once that was confirmed, I secured the backing to the table (good side down, of course; not like pictured above), covered it with the batting and then the top. The batting was also just large enough. I buy queen size battings and usually have a comfortable excess on the width and plenty of extra on the height. Not in this case but it was enough.

Then then pinning started.
And continued and continued. I had two and a half hours to do all this (including a final pressing of the top and steaming the batting, which I have not shown) and that was not enough time. As my departure time approached, I was able to confirm that the room wouldn't be needed by anyone else in the next week so I left the quilt set up on the tables and will continue--and hopefully finish--next week.

Also, I need to buy another pack of pins because I have enough for the center but not the borders. That will mean I have 900. Surely that is enough?

Tuesday, June 16, 2020

Basting Busted

I've had a quilt top, batting and backing packed in my car for a couple weeks waiting for a chance to baste it together. I like to baste at church where I can put three tables together for a big work surface. But every time I've gone to the building, my day ends up being too long or getting interrupted so that I can't get to the basting.

Last Saturday, I needed to be somewhere for about an hour that was just down the street from the church building. Ok, I would have time to baste after I was done. Excellent.

I got to the church. No one else was there. I set up my tables. I pulled out my supplies.

The first thing I notice is that the backing fabric that I thought was a wide backing was not. I would have to sew two widths together for it to be wide enough. Ok, I can fix this. I know there's a sewing machine at church. Can I find it?

I did find it (in the attic space) and it had just enough thread loaded on it that I thought I would be able to sew the seam. I set it up on a piano bench so it could be close to the outlet
 and took a look.
It is a pretty old machine but I had used it once before so I thought I could figure it out. It looked like a stretch stitch was the only straight stitch available! I started sewing the seam with that, but after a couple inches had to stop because using a stretch stitch was ridiculous. (Because it goes forward and backwards as it sews the seam, it is slow and uses a lot of thread.)

So I looked again and decided I would try the blind hem stitch with a stitch width of 0. That worked. I folded the fabric in half and sewed along one of the long edges. Now I had to cut at the fold so I could open it up to the full width. I had no scissors.

Obviously the office had scissors. They were the "craftiest" quality scissors an office might have, but I got them to work.

Now I had to press the seam. I knew there was an iron and board around. It took me a while, but after looking everywhere I thought it might be, I remembered where it was normally stored and there it was.

I think the board is the same vintage as the sewing machine, but that doesn't mean it doesn't work!
So I pressed the seam open and was ready to go.

I laid out the top on the tables. I put the backing on it to check the size.
And it was short. If I could use the selvage, it was only a couple inches short. But since I shouldn't use the selvage, it was at least 5 inches short.

I couldn't fix that. At least not there at church.

So I packed everything up, put everything away, and aborted my basting.

A disappointing end to the story, but I was still closer to a finish. I now know exactly what I have to do to make the backing work. :)

Wednesday, April 19, 2017

Farm Girl Vintage Quilt Finished

The quilt--it is finished.

With persistence, all 326 inches of the binding was hand stitched to the back and done before I went home for Easter.

Here is a full view of the quilt:

It contains 44 of the 45 blocks from Lori Holt's Farm Girl Vintage book. (I omitted the "Old Glory" block of the American flag.) The setting is my own invention. It needed to be created to accommodate my combination of 6-inch and 12-inch blocks.

The sashing is proportionally a bit wide, but I wanted the centre of the quilt to cover the top of a queen mattress. I think it also helps to calm the quilt down a bit because that is a lot of busy blocks all together!

Looking at it now, I would have liked the green diamond accents to have been larger and perhaps centred differently. But there were constraints presented by the way the sashing was constructed and the fact that a 12-inch block is not as big as two 6-inch blocks plus a sashing in between.

The corner blocks of the border are also an issue as they don't appear to be centred in the space because the outer triangles match the border fabric. I'll have to research how to do it differently, or just use a different block as cornerstones. (I did consider star blocks but I wanted to keep the borders simple and clean. Maybe I should have used the maple leaf block.)

Don't start thinking that I don't like the quilt because I certainly do. But I can't help but evaluate what I think worked and what I would do differently next time. And this is the place where I record my thoughts.

One thing I am happy with is the look of the blocks. I was going for a low-contrast look and think it worked out. The contrast between the different block pieces isn't really stark but it's not all mush either. You can still easily see what the blocks are.

I don't think I've showed the binding yet:
I ended up having enough of the same brown to make another flange on the outside of the border (with all of 10" leftover!). The binding is a very bland print that I bought a lot of once because I thought it would work for a quilt, but it's never been right. Since I didn't have enough of the blue polka dot for the binding, I am happy with this nondescript colour that doesn't compete with the flange.

I cut the backing and batting about 1/8" past the quilt top so that I could sew the binding on with a 3/8" seam. This way binding will be completely "stuffed" by the batting but you won't end up with a really thin binding on the front.

I basted the flange down first with a zigzag stitch so it would tamp down the outer edge at the same time. I cut the binding at 2.5 inches (worried it might be a bit large) but am very happy I didn't go with 2.25 inches. There ended up being a few spots I had to trim the extra batting and backing down a bit so the binding would fit.

This was the first quilt where I sewed down the mitred corners of the binding. I never really believed it was necessary or made a difference, but dang if it didn't look a lot better!
Sewn on right; not sewn on left.
So now I guess I will be doing that from now on. The good news is that the idea was planted by watching a video of an easy way to do it. (Not so much an easy way, but how to do it while stitching the binding down. I had always thought of it as a separate step and it's not.) So although it is "one more thing", it's not much extra and actually does make a big difference. (This is me eating crow here.)

After the quilt was done and I could sit back and look at it, I was surprised at how well centred the quilting pattern turned out. You can see on the farmhouse that the pattern has loops exactly on both chimneys and first floor windows.
The barn was similarly centered:
Presumably a coincidence of the stitching repeat and the size of the block, but a happy one.

I mentioned that I pieced the back:
The large center piece is the yellow gingham that I had. The rest is made up of fabrics that weren't my favourites and then a few more to make up the difference. I used 10" blocks to fill in the sides, with some 10x20" pieces and one 20x20" piece where I had enough fabric to do so.

The back ended up quite a bit larger than the front, which is good for loading it on the long arm machine, but did result in some funny spots on the back. Like here:
where you can see a 1/4" strip of fabric at the top of the photo. If I had known it would work out like that, I could have shifted the back and gotten rid of that extra seam. But when you load the one end of the quilt on the machine, you don't know exactly how the other end will come out. (And as long as it's not too short, you don't really care!)

On the sides, the outside 10" blocks were cut off to just a few inches:

But again, as long as it's not too short, we don't really care! I did recover all that extra fabric after the backing was cut off and put it all in the box of scraps. So they may resurface on another quilt one day.

One thing I noticed while doing the binding and my nose was just inches from the quilt, was a lot of spots on the back where the batting was pushed through the fabric and where the needle tore through the fabric instead of piercing it cleanly.
You may have to click on the picture to see it in a larger size, but each circle in the picture is a spot where the stitching push through a tuft of batting. (This is called "bearding".) Each line is a thread of the fabric that was pulled because the needle didn't go through cleanly. This didn't happen with the last quilt I did using the same batting, so my current theory is that the needle was too dull. (I have since learned that wool batting can be tough on needles. I don't know exactly why.) Next time I use the long arm machine, I will ask for a fresh needle to be put on and that should take care of it. (I hope.)

While visiting at Easter, I had a little quilt show and tell at my mom's house of my recent quilts. Here is the Farm Girl Vintage on her bed:

And I know you've been waiting for this too...here is Kim's quilt:
The top is in two halves and is not put together or quilted but you can see how her blocks are arranged and how the quilt will look. She also had to get creative with her layout as she had even more 12-inch blocks. Her quilt has such a crisp clean look with the light sashing and the clear contrast in all of her blocks. It looks fantastic.

And here's one more shot of my quilt on the bed we set up for my sister (a different sister) in the construction zone:
That's right, she had the honour of being the first to sleep under the quilt!!

Project stats and facts:

  • The quilt is 74x84".
  • The project was started in January 2016, and one block was done each week throughout the year as a quilt-along with my sister.
  • The blocks are a mix of hand sewn and machine sewn.
  • Although I would do it if I had to, I have no desire to work with 1" and 3/4" pieces again!
  • I spoke to this sister more in 2016 than any other year of our lives as we Skyped each week to show our blocks.
  • Most fabrics were purchased as I decided on a 1930s theme and had none in my stash. (A few stash fabrics that fit in well enough were used.)
  • It was the third quilt I have done on a long arm machine. I created the pantograph pattern because I wanted the look of chicken wire.


Monday, February 6, 2017

Putting it Together, Front and Back

<= This is how I spent a lot of January: watching football playoffs and sewing all my nine patches together. (Two of my favourite things, so yay!)

First I sewed all the seams in one direction (without cutting the thread between pieces) and I could throw the top over the couch and it (almost) looked like it was done.
But of course, it wasn't done yet. Only about half.

So I doggedly worked on the seams in the other direction. As I did so, I had to decide which way to sew the opposing seam allowances. Notice (below) the longer horizontal seam just in front of the needle:
Does it go forward or back?

You have to look at the seam on the opposite side of the square--if it goes forward, then the one you're sewing goes back, as seen below.
You could also say that they are both going away from the middle of the square. If, on the other hand, the other seam goes back, then you sew this one forward (and they both go toward the center of the square). Got it?

What also helps, is that the direction is always going to alternate from one square to the next, so I could get into a rhythm if I wasn't interrupted by replays.

Once I had the whole top together, I was left with long horizontal and vertical seams that needed to be pressed:
But I couldn't press them until I picked all the seams inside the seam allowance to allow me to furl every single last one of them. That got me a whole quilt that looked like this:
It really is a shame all of that great care has to be hidden on the inside of the quilt, but that's how it is.

After I sewed around the outside to stabilize it and pressed it, I threw it over my couch and I had a finished top:
Yell a cheer (woo hoo!), take a breathe (in...out) and then on to the next step: piecing a back.

I checked my numbers a few times, but the back of the quilt really was going to take over 9 yards of fabric. I still can't really wrap my mind around that. I certainly didn't have nine yards of one fabric to use and I was not interested in buying a piece for it. So I looked through my box of red fabrics and started on a plan.

The plan started with some leftover nine patch blocks that weren't used in the top. Instead of doing solid nine patches, I alternated them with squares of one fabric.

After sewing all the seams, I was left with some pressing decisions. On the first seams (vertical in the picture below), I chose to iron toward the solid piece of fabric. Makes sense because I don't want to press a seam back on itself if I don't have to.
But now if I try to do the same thing on the horizontal seams, it leads to trouble at the intersections. In order to furl the seam allowances, they have to all go in the same direction (clockwise or countercw) and that's not going to happen if I press toward the solid square.

So it was time to choose my poison: press seams back on themselves on all the nine patches in order to furl the intersections OR press seams back on themselves on half the nine patches by pressing the seam in one direction. Both would lead to some bulky spots. This was on the back of a quilt where there were already a lot of seams on the front. If they all lined up in an unfortunately way, it could lead to problems when sewing through all the layers.
So I choose a third bottle of poison: I cut the seam allowances and pressed them all away from the nine patches. There were still some bulky spots, but not as many. So I snipped on one side of the intersection:
and then pressed:
A compromise I was  happy enough with.

You can see the checker board section in the centre of my pieced backing:
which is essentially a giant nine patch!

I was going to cut the four dark corners from the same fabric because I had plenty of it. I had enough of it that I used it for the plain squares alternating with the nine patches in the middle. (Cue the ominous music...) Yes, after I had pieced the middle section, I cut out the large pieces for the other sections and did not have enough to do all four corners. Apparently I used just enough for the centre section that I was short, by about 3". :( If only I had really measured because then I could have used a different fabric in the middle and the four corners would have matched.

So enter another compromise, I mean solution. I didn't have enough of any one red to cut out the third and fourth corner pieces. So I cut smaller squares of a bunch of fabrics and made nine patches of similar reds to use on the last two corners. Are my nine patches in nine patches in nine patches getting fractal yet?

In the end, I did manage to put together a back for this quilt. It was sized about 6" bigger on all sides which is what I needed. And I met my very firm goal of not buying more fabric for the back.

Saturday, May 30, 2015

Got My Back

Once the front of my orange and grey zig zag quilt was done, it was time to turn my attention to the back. It had been a while since I cut out the pieces, so I had no idea what fabrics I had left over or if there would be enough for the back. I was quite certain I didn't have any fabric in the stash that would match this quilt.

So after a few days break, I pulled out the fabrics and was happy to find that I had pieces 7" wide by the width of the fabric (42"-44") from all the fabrics that I had purchased a half yard of. And there were a few fabrics I purchased more, either because I liked it, it was cheap, or it was the end of the bolt.

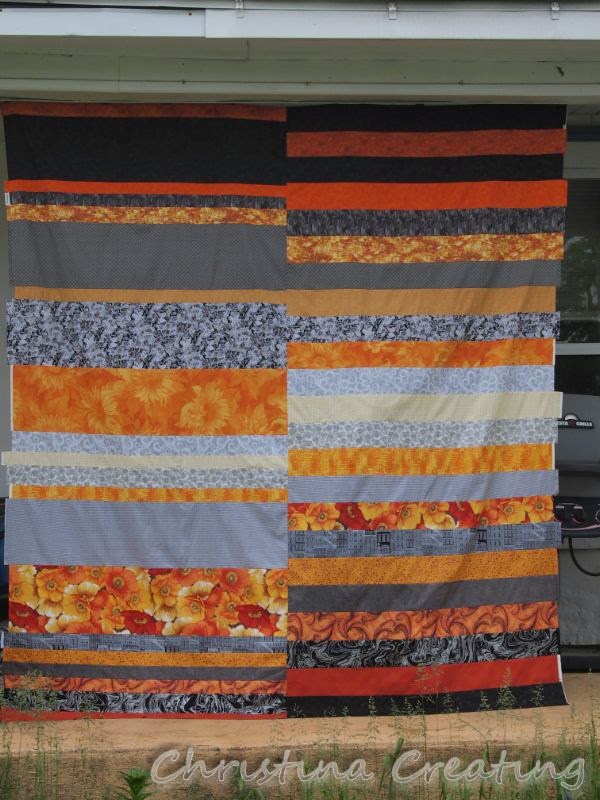
Next I figured what width of stripe I would need to get the full length of the quilt and came up with 4". I cut a matching piece from each fabric and lined them up in the same order as on the front of the quilt. Here is a sample:
That got me a strip of fabric that would cover one half of the back of the quilt. What to do with the other half?

I looked at what I had left of most pieces (3") and figured what I would need of the other fabrics to make the full length. I had enough to cut wider stripes of those and made up a striped piece to cover half of the back.

Since all fabrics are slightly different widths, I just made sure to match the selvage edge on one side consistently.
Once both halves were sewn and all seams were pressed open, I matched the even edges of the two pieces and sewed them together with a wide 1" seam. Once sewn, I cut the seam allowance to 3/8". That cut off all of the selvage edges, which are more tightly woven than the fabric and don't lie the same. Leaving them in would have likely caused puckers and folds in the final quilt.
And now I have a finished back for my orange and grey zig zag quilt made from the same fabrics:
I realized after I was done that I could have just cut all my 7" pieces in half lengthwise and sewed them short end to short end so they would cover the full width of the quilt and then made wider stripes from the fabric I had more of. Then there would have been one simple stripe pattern the full width of the quilt. But oh well, I did not think of that. If nothing else, I have a more "interesting" back now! ;)

The quilting I'm planning to do is perfectly suited to being done on a long arm quilting machine, so I tried to look up the shop in Kalamazoo that rents out time on their machine (after appropriate lessons). I had always thought that would be a great alternative to owning a machine. But it looks like they don't do it anymore. If you happen to know of a place near me that does, please let me know.

Otherwise, I'll be able to do it pretty easily on my home machine as well.

May I suggest?

I Say! or at least I did once...