Tuesday, February 27, 2018

My Sister's Shawl Finished

So Clue 5 of the My Sister's Shawl mystery knit-along has come and gone. The shawl was finished mirroring the shape of the first side.

I got about two rows done of the red before I ran out, so it's a good thing I had the second ball ready to go.

I blocked it with blocking wires on some foam squares I picked up at a yard sale. There's no place big enough (and vacant) in the house, so I forced it into the kitchen. We couldn't walk through to the dining room (office) for a couple days, but you can get in from the other side, so that was ok.
The final dimensions are huge; this shawl goes on forever. The longest side is 105"; the shorter side opposite, 52". The width straight across is 24" and the angled edges are 36" long. Big.

Here is a shot of the I-cord bind off with my modification so that the I-cord would run continuously.
I like that rounded point.

You may be able to make out the I-cord edging in the next pic:

follIt is a mystery knit-along, right?
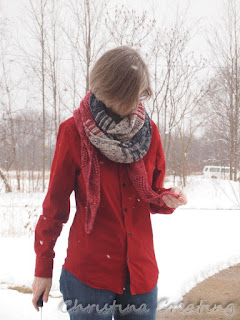
What follows are a few basic ways to wear it that first came to mind.

Double wrapped with the ends knotted at the back:
 Wrapped once around and pulled over the shoulders:
 I really like how this covers my shoulders and upper back when I'm cold.
 The double wrap with the ends hanging loose:
Realistically when I wear it around my neck, I wrap it three times because the thing is just so long. The fabric is loose and drapey enough that it works.
I finished the shawl in time to submit it for (randomly drawn) prizes, but I didn't win any. :(
Project Stats
Started
: 31 Dec ‘17
Finished: 30 Jan ‘18
Pattern: My Sister's Shawl by Cozy Up Designs, $5.95 CAD (It was released as a mystery knit-along but you can now buy the pattern in full.)
Materials: Plymouth Yarn Estilo Hand Dyed (the speckle), colour 4 Black Red Mix; and Plymouth Yarn Reserve Sport in 301 Red Mix and 304 Grey Mix


Saturday, February 17, 2018

No Time Now, Gotta Knit

Have you noticed the Olympics are going on? I haven't caught any prime time network coverage, but I have been bingeing on events through the CBC website. It's been fantastic to just watch the event, in its entirety, without it being edited and packaged for prime time. And much less annoying commentary. :)

Anyway, that is all secondary to the real event -- the Ravellenic Games. If you've been reading this blog for a while, then you know that the knitters and crafters on Ravelry hold a huge event each time the Olympics Games are on. There are multiple events you can enter (like Cowl Curling, Aerial Unwind, Hat Halfpipe, Sock Hockey, and more) and you get virtual medals when you finish projects. The only one you're competing against is yourself.

I warmed up with an easy project I've already mentioned -- I raveled this sweater
 to harvest this yarn
and earned myself a medal in the Aerial Unwind event:
I made a list of projects I could work on as I had time or interest, but I really have one main project, the Celestarium shawl by Audry Nicklin. If you follow the link, you'll see that it is a round shawl that makes a map of the night sky as seen from the north pole. I have been fascinated with it for quite a while and had planned to make it from the yarn of this blue silk sweater:
I raveled the sweater in December and got 669 grams / 2,273 metres. The pattern calls for 1,097 metres so it looks like there's no trouble there.

I mentioned I started the project last weekend and had decided that I needed to start over. I ordered beads and they arrived on Wednesday already. I re-started on Wednesday night but didn't really start knitting until Thursday. I watched a lot of curling and got to row 62, which is 8,307 stitches out of a total of 58,707 sts. That's about 14%, which I think sounds better.

On Friday I got in a lot more good knitting while watching snowboard cross, ski aerials, and more curling. By the end of the day I had finished row 80 -- 14,067 stitches or 24%.
And now the sooner I can stop typing here, the more knitting I can get done tonight (while watching some short track).

Tuesday, February 13, 2018

Family Crafting Retreat

I had the great pleasure of meeting a couple of my sisters, my mom, two cousins and an aunt for a crafting retreat this past weekend. This all came from my cousin posting her quilts on Facebook, our comments, and a chance remark about getting together to quilt (and craft). The snowball rolled from there.

And speaking of which, it snowed non-stop all weekend. I went out for a couple walks, but otherwise didn't have to be out, so I didn't mind at all. But it was surprising to look out the window for three days and have it snowing every single time. Thankfully someone else was taking care of snow removal.

The building where we were staying.
What did I work on over the weekend? Glad you asked because otherwise I wouldn't have much to talk about here.

First was the quilt I am currently calling Bright Stars on Black. I got it organized before I left and had already cut the parts I would need and pieced a lot of half square triangles (HST). I started by sorting them into sets of 8 for stars and sewing them into pairs.
Then I added the center black square:
Or I put two sets on the black square, anyway. My preparations neglected to include cutting the smaller black squares needed for the outside corners. So that was as far as I got with that. But that took quite a bit of time, so that's alright. Part of the time was spent pressing all those little seams.

Troy and I finished a new travel ironing board just in time for this trip. It has legs so it can be set up on a table, but I quickly realized it worked great sitting across my lap. I really can find a way to do anything while sitting on a couch.

Obviously I'm not pressing the HSTs in the picture, but the parts for the large stars all still needed to be pressed as well. It was a good chance to sit and talk.


I discovered a few of them hadn't had the outer corners trimmed, so I did that and immediately made some scrap blocks from the cut off triangle pairs. I didn't trim them to size or anything. I just ran them through the machine and matched up what I could.
These squares will finish less than 2" - piecing this small isn't crazy if you do it right away while the scraps are still fresh and the two triangle pieces are already matched up (as these were). Of course, I would be crazy to put these aside for using later. They are too tiny.

Although my aunt would say it's all crazy. (In fact she did say that on the weekend about someone else's quilt with small pieces. She was voted off the island.)

What will I do with these little squares? Who knows. For now they're in with the scraps (bigger scraps) and will get put into some slab block or scrappy project. Meanwhile, they're cute!

I did finish sewing and pressing all the large star pieces for this quilt and had been hoping to lay it out while I was there. But the building really didn't have any spaces large enough. I left it alone for a while, but it was nagging at me so I finally tried it on the kitchen table.

First I laid out all the star sets, organized by colour:
I figured out how many I had of each colour group and worked with some options on paper for what I could do with them. After I chose an arrangement, I picked out the best blocks for the layout.
Somehow I made twice as many star sets as I needed for one quilt, so there were plenty enough to choose from!

Then I laid out the pieces one row at a time and sewed them:
None of the rows are joined to each other yet, but I think you can get an idea of how it will look. I have to cut some black filler blocks for the edges too, and I didn't have the fabric with me. I was very happy to make this much progress.

In the time when I didn't think I had room to lay out the quilt, I did some playful sewing with scraps:
I got as far as I could with red scraps in making a slab block. It's not up to 10" yet but I can add more later. The squares on the right were cut offs from the quilt my sister was doing. She doesn't keep scraps that small. Again, these are not intended for anything yet, but things like this have a way of being perfect for something (one day).
Holding gifts that a few of us made for each other--
mug rugs, pin cushions, and matchbook needle cases.
A close up of the mug rug I chose.
We also worked on a puzzle - of a quilt of course.
Mom made it her first priority to get it done!
You can't really see it in the picture (right) but my sister is holding a blanket she is knitting. It's covered in cables and I showed her how she can do them without using the cable needle. (Essentially by permitting yourself to take the stitches off of the needles for a moment.) She sent me a note later that said it was one of the best things I ever taught her. :)

When I wanted something simpler I could do while sitting and talking, I pulled out this sweater.
I bought it at Goodwill to harvest the wonderful yarn. It will be perfect for a Wool-Aid project. The sweater was slightly felted so it was going to be a two person job to ravel it -- a perfect job for me and my mother.
One of us would pull the yarn from the sweater and the other would wind it into a ball.
By the end, I had four satisfying balls. (And we both had tired arms because we were trying to "keep up with" the other.)

A project I started over the weekend was a new shawl:
I got a little further than this but I have realized that I'm going to have to add the beads the pattern suggested. I thought yarn-overs would be enough, but they're not. So I have ordered beads and will have to start this over. I'll give more details about it in a later post, but if you're curious you can see the Ravelry project page by clicking here.

And finally, when I wanted to work on some hand sewing, I pulled out my Lucy Boston's Patchwork of the Crosses blocks. On the last night, I laid them all out - some sewn, some partially laid out, some partially sewn - and pulled out the new fabric I purchased on the drive there.
I had this block laid out except for the four feature pieces:
I found the brown fabric with orange flowers at the shop and added them. I sewed it together over the weekend.

I purchased some of this fabric:
and cut out and shaped this border from it:
Nothing is pieced, so I could still separate the sets of 8 matching pieces. We'll see.

Here's another border I cut out from a new fabric.
I'm not sure I'm going to keep it with the green center.

And finally, I tried out a different layout of pieces I had already prepared:
I like the spiral and sewed it together on Monday when I was home. I'll be playing with this some more.

What a fun weekend it was. There's talk of doing it again next year, so that would be great.

Thursday, February 1, 2018

TBT - Remember these Socks?

Let's have a TBT (Throw-back Thursday) for this project that was finished last July and never shown here on the blog. In fact the last (and only) time I showed them here was when I cast on the swatch. That was March 28.

They got pushed aside (as far as writing them up here) as I got increasingly busy and didn't write a lot here through the fall. Then it was due to the lack of good pictures. I rectified that last Sunday and here we go...

As you may (or may not - I wouldn't blame you if you don't) recall, I started these socks, well first because I loved them, but also because the Vogue Knitting group on Ravelry was having an anniversary challenge: knit something from this year (2017) and something from a previous decade year ending in 7 (1997, 2007...you get it.)

So I swatched these not once,

but twice.
The first was too tight a gauge and I didn't want my socks to be too small. The little needles were also killing my hands, so I was glad to work with bigger ones.

I did take a few progress pics that were posted on IG. Apparently this was a big event:
I had completely forgotten about it, but I think I had crossed the two-stitch cable the wrong way. I raveled out those two stitches all the way down to fix it. As I now recall, it took me three times because I kept making different mistakes as I worked my way up.

But here we are:
I take it this picture was taken to show that all was well again!

I finished the first sock in mid June
and the second sock about a month later:
Then began the saga of deciding whether to add pompoms. Once that was decided (in the affirmative), which pompoms? I didn't want yarn ones and was drawn to fur poms. A recommendation on Ravelry led me to Mokuba in Toronto, to which I finagled a trip when I was home visiting family. Not until I went to put them on the socks did I realize I had mistakenly bought two poms instead of four! (facepalm moment for sure)

I was not going to go back to Mokuba so I shopped online and ended up with the cutest little pink ones.
I had in mind to use some sweet ribbon for the tie but that didn't work out. I didn't knit holes in the cuff and the ribbon didn't look good going between the stitches. But I did have some leather cord around so I tried that, a little leather and lace type look. I wove the leather cord through the cuff and glued a pink pom to both side of each end. (So I used eight, in case you're counting.)

Then I waited six months to take pictures. /crickets/

What had become part of the challenge was to take pictures that replicated (however loosely) the pose and look of the magazine shot. It was a lot of fun. So I waited for a day when all of these things came together: I felt like doing it; the weather was suitable; it wasn't so cold I couldn't stand the thought of it; I had the time; I had the energy. So mostly me and the weather I guess.

But everything aligned last Sunday and here are the results:
(C) Vogue Knitting magazine
My version.
(C) Vogue Knitting magazine
My version.
(C) Vogue Knitting magazine
My version.
Ok, not bad, right? Sometimes it pays to have a beaten up front door and concrete porch.

Here is the back of the socks where the cable pattern is decreased (from the top down) for shaping.
I made a few changes to where the decreases happened, but I'm not sure they were any better than the designer's.

Another change I made was to mirror the cables from one sock to the other. I feel it's unbalanced to have them all leaning the same way on both socks.

I also added a gusset so the heel would fit better.
I've learned that this fits my foot better, but I also observed that the socks on the model were pulling a lot across the top of her foot (opposite the heel). (You can see it in the third Vogue picture above-the cables are stretched severely from side to side.) I've had this in socks before and it is not comfortable.

Confession: I have been wearing these over skinny jeans from time to time. Feels like the look is a little young for me, but when I feel like it, I go for it anyway.
The bigger issue is that I don't have any shoes to suit the look. (The high heels were only for the pictures!)

And yes, sadly, they do fall down all the time.
(Although it's not as bad over the pants.)

Project Stats
Started
: 7 May ‘17
Finished: 5 Jul ‘17
Pattern: #12 Over Knee Socks by Yoko Hatta (風工房) in Vogue Knitting Late Winter 2017
Materials: 3.5 skeins of Zealana Cozi (58% Merino, 22% Nylon, 15% Possum, 5% Alpaca) $60 (The pattern recommended 5 and I bought a spare, so I actually spent $90!)


I've been interested for a long time in knitting with possum (New Zealand possum, not North American possum - big difference apparently) so when I saw that this pattern called for this yarn, I went ahead and ordered it. I hardly ever go with the recommended yarn so this was a new experience.

I can't say it was an especially glorious experience, but the socks are very warm and I'm glad to be able to cross it off the bucket list. :)

May I suggest?

I Say! or at least I did once...