Showing posts with label KAL. Show all posts

Wednesday, November 21, 2018

Blooming Brioche KAL - Stages 1 and 2

Knitting has continued on the Blooming Brioche shawl. Each "stage" of the knit-along is being released on a Thursday.

It's been a lot of knitting and I am enjoying the brioche and the new-to-me techniques of decreasing and increasing stitches to create the flowing pattern on the front.

Depression has grounded me to the couch recently and sometimes I can't even knit, but a lot of the time I have been able to at least work on this project.

I decided to go with the green and red combination.
It was softer with more drape than the red and black, and my sister assured me it did not look like Christmas. BTW, I just got this comment on one of my Instagram posts: "that screams Christmas !" Hmmm....

I decided to ravel the swatch to use the yarn again. (Some people keep their swatch for reference during the project - I usually don't bother.) I'm glad I did. You can see in the picture below how much of the red bled onto the green during the soaking:
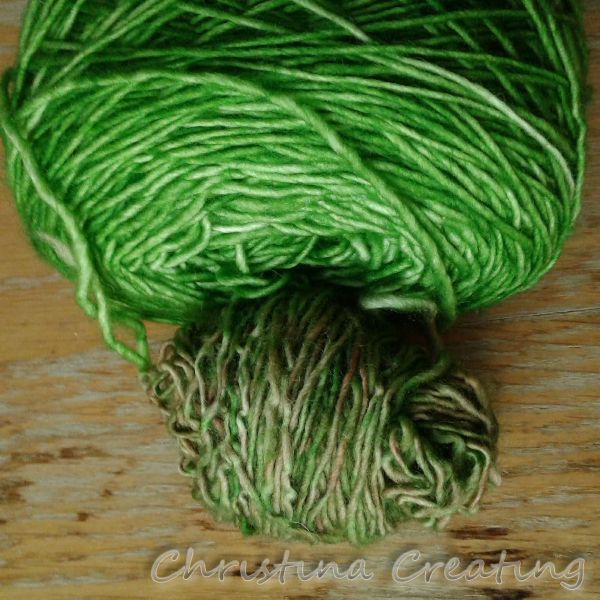
The little (lower) one is from the swatch.
I wanted a bright vibrant green in my shawl, so I set about rinsing the red yarn. It turned the water of several rinses vivid red so I tried a vinegar rinse. (Vinegar helps dyes to set.) The water came out almost clean and so did the next rinse. But the following rinse (just to be sure) was bright red again. Apparently the yarn had enough vinegar in it going into the first rinse that it still had an effect.

So I did another vinegar rinse but heated the yarn. Heat and vinegar should really do the trick. But I got the same result: rinse 1 was clear; rinse 2 had lots and lots of red in the dye. I was out of ideas but still wanted to use the yarn, so I decided I will just have to always rinse the shawl in vinegar water. How's that for cutting the Gordian knot?

The designer (Xandy Peters) has organized the pattern into different sections within each stage. The first was the "roots", i.e. the cast on:
It's a simple but brilliant cast on that gives a completely smooth beginning to the pattern -- a bunch of stitches coming from one point. The red is bordered by a green selvage all the way around. It really is great.

Next was short section of seeds:
And then the bulbs. Here I have the first repeat of the bulbs done:
The back, if you're curious:
Although the back is neat and has an interesting pattern of its own, the shawl is not reversible in the sense that the front and the back are the same.

And now all three repeats of the bulbs are finished:
I'm making the smaller version of the shawl, or I would have had more bulb repeats to do.

That was the end of Stage 1. I finished it the day that Stage 2 was released so I was not feeling very much behind the knit-along.

The first section of Stage 2 was the sprouts. You can just see the first leaf shapes in the picture below:
Here the sprouts and the next section of leaves are done:
And finally the "vines" are done as well and that is the end of Stage 2:
I've had to tink back several times as I missed some part of the pattern. Once time I took back a couple rows for something I thought was a mistake. I realized it wasn't a mistake but I had missed something on the following row so all my tinking was not a waste.

There are parts of the pattern done on the wrong side and it was a real exercise of trust to just follow the chart stitch by stitch without being able to see the pattern on the front. One of the reasons I like using charts is that you can see the pattern or design develop and can see how the row I'm doing builds on and fits with the previous rows. I couldn't do that from the wrong side in brioche and found myself often peaking over to the other side to make sure things were "ok". I did get a little better at working from the wrong side as I went.

The shawl is definitely growing in size. The stitches fill up my 40" needle cable and the shawl makes a half circle shape:
In the next pic you can see the various stages of the pattern and how they each develop from the previous:
I'd like to knit a rectangle shape from this pattern at some point because I think it shows the development of the pattern more clearly than the half circle shape. That is what I really love about the pattern.

Stage 3 is to be released tomorrow. (Yes, even though it's Thanksgiving!) I am ready. :)

Saturday, November 3, 2018

Blooming Brioche KAL - the Swatch

A couple months ago I started following the amazing designer Xandy Peters on Instagram (of Fox Paws fame, if that means anything to you) and when this picture came up:
Repost @xandypeters
I knew I was going to make it. I didn't even know for sure what kind of garment or object this detail was a part of, but I was immediately convinced that I was going to go along with the knit-along she mentions in the post.

Since then, I have seen the full shawl that this is a part of. Xandy announced the knit-along a few weeks ago and I jumped on board.

When you bought the pattern, you got general information about the shawl and what yarn you would need. I went stash diving and pulled out anything that might be suitable.
I didn't find anything that I loved right away but I whittled it down to workable options. When the instructions for the swatching came out this week, I tried two options:
It's the same orangey-red with a green and with a black. I also used the swatches to compare two methods of doing brioche. The green one was done the traditional way where you work with one colour at a time, meaning each row is worked twice--once with colour A and once with colour B. The black was done with the "one-pass" method where you work with both colours as you go down the row so you only work each row once.

I'm not sure if the difference in the length of the two swatches is because of the brioche method or the difference in the yarns, but you can see it is significant. Each swatch was worked the same number of rows, but the green one is much longer. The black swatch was done with fewer stitches (don't ask), but it is just as wide. I'm going to let the swatches relax a few days before I measure gauge and compare them more thoroughly.

In the meantime, here is a picture of each against a white background:

And here is a picture of each of them held up so you can see how airy or lacy they are:

The green one has a lighter look to it (more holes) and in fact feels lighter in my hand too. It also feels smoother as the black yarn itself is much coarser.

I have until Thursday to decide because that is when the next step is released.

Tuesday, February 27, 2018

My Sister's Shawl Finished

So Clue 5 of the My Sister's Shawl mystery knit-along has come and gone. The shawl was finished mirroring the shape of the first side.

I got about two rows done of the red before I ran out, so it's a good thing I had the second ball ready to go.

I blocked it with blocking wires on some foam squares I picked up at a yard sale. There's no place big enough (and vacant) in the house, so I forced it into the kitchen. We couldn't walk through to the dining room (office) for a couple days, but you can get in from the other side, so that was ok.
The final dimensions are huge; this shawl goes on forever. The longest side is 105"; the shorter side opposite, 52". The width straight across is 24" and the angled edges are 36" long. Big.

Here is a shot of the I-cord bind off with my modification so that the I-cord would run continuously.
I like that rounded point.

You may be able to make out the I-cord edging in the next pic:

follIt is a mystery knit-along, right?
What follows are a few basic ways to wear it that first came to mind.

Double wrapped with the ends knotted at the back:
 Wrapped once around and pulled over the shoulders:
 I really like how this covers my shoulders and upper back when I'm cold.
 The double wrap with the ends hanging loose:
Realistically when I wear it around my neck, I wrap it three times because the thing is just so long. The fabric is loose and drapey enough that it works.
I finished the shawl in time to submit it for (randomly drawn) prizes, but I didn't win any. :(
Project Stats
Started
: 31 Dec ‘17
Finished: 30 Jan ‘18
Pattern: My Sister's Shawl by Cozy Up Designs, $5.95 CAD (It was released as a mystery knit-along but you can now buy the pattern in full.)
Materials: Plymouth Yarn Estilo Hand Dyed (the speckle), colour 4 Black Red Mix; and Plymouth Yarn Reserve Sport in 301 Red Mix and 304 Grey Mix


Saturday, January 27, 2018

My Sister's Shawl - Clue 4

Clue 4 of the My Sister's Shawl mystery knit-along (by Cozy Up with the Stitchin Sisters) was released this week.

Now that the shawl has largely taken shape, it's wasn't too surprising that we continued mirroring the first side with colours and stitch patterns.

The description of how Clue 4 came about was cute. Each clue has been credited to one of the sisters who designed it. Clue 4 was Katie's and the story is that she wanted it to be the same as her twin's (Clue 2) so that is why we are doing the same colours and stitches. A good story. :)

Here is a look at the whole shawl (or what could fit in the camera's field of view):
It's still looking a little straggly but I'll have to wait for blocking to see it in nice shape.

Here I've zoomed in on just the Clue 4 area, the eyelets and lace sections:
It was a little less knitting, especially compared to Clue 3, and it was nice to have an "easy" week. Some people are having a hard time with the diamond lace as well so this gives them more time to tackle it.
Clue 5 is officially out on Monday, but probably will be released on Sunday (as the rest were). That is the last one so whatever shape it takes, the shawl will be done next week.

Thursday, January 18, 2018

My Sister's Shawl - Clue 3

Clue 3 of the My Sister's Shawl mystery knit-along by Cozy Up Knits was released on Sunday. It felt like there was more knitting in this clue, but since a lot of the rows were getting shorter, there may actually have been fewer stitches knit.


First up was to finish the one side we were already working on. After Clue 2, we had finished the grey lace section and the grey and white stripes afterward. Clue 3 topped these with a garter eyelet section, more stripes and then mesh lace and broken seed stitch stripes to mirror what had already been done.
Only this time, all of the rows were getting shorter on the one side. This came to a point, and I assume this side of the shawl is done. (But who knows!)

The pattern has you decrease the last 10 stitches quickly in the last row while binding off with a regular stitch-over-stitch bind off.
We had all that pretty I-cord edging and I didn't want to interrupt it. So once I reached the final 10 stitches, I bound off the centre four stitches with an I-cord bind off using the first I-cord. This brought the right I-cord around the corner. I finished by stitching the right I-cord to the left so the stitches run continuously. (Basically, Kitchener stitch. It was very fiddly.)

Then we did a complete about-face and the rest of the clue had us working from the beginning, but in the opposite direction. I had used the crochet provisional cast on so I only had to unzip the crochet stitches to reveal the live stitches.
As each crochet stitch came out, I slipped the red stitch onto a needle:
I used a much smaller circular needle because the stitches from a provisional cast on are often very tight if you use the needle size that you're knitting with. Since the size of the stitches are only determined by the needle that's making the new stitches, I can use a much smaller needle to hold the stitches waiting to be knit without any effect. (Besides the intended effect of being able to get my needle in them to knit them.)

Here's the entire new live edge on the needle:
The provisional cast on is right in the middle of a lace section. Assuming this is the middle of the shawl (it may not be since I don't know what the entire shawl looks like), it is natural to put the cast on there. But there would have been less risk of mistakes and the join would have been less apt to be noticed if it had been between one of the lace mesh and the seed stitch sections.

In any case, the way I did the cast on put the YOs (yarn overs) on the needle. I think the cast on given in the pattern adds an extra knit row. (You're making stitches on two needles instead of just one.) So the pattern continued straight into the lace rows with the YOs. I had to insert a row of knitting first to make up for the row that wasn't included in the cast on. This was not a big deal, but when you start doing things "off pattern", you have to be prepared to be adjusting for that in the rest of the pattern.

Here is the second part of Clue 3:
We finished the lace mesh in the center, added a seed stitch section and then some more lace mesh. Looking at the actual shawl, I am not able to see where the provisional cast on. Here in the picture, I notice there is a slight line. (You can see it in the middle of the middle lace section.) I think this is a result of the change in direction of the stitches. But if I had been given this shawl blindly and told to figure out the construction, there's no way I would see the cast on.

Here is the entire shawl after Clue 3:
I've only got a couple yards of the red left and I'm going to need more. (I didn't notice when I purchased the yarn, but all of the balls have less yardage than recommended by the pattern so I knew there was a chance I would have to buy more.)

I was hoping to go yesterday and then today, picking up another ball when I picked up my new special order needle set. But the needles haven't arrived yet. (I keep getting "Tomorrow" "Tomorrow". Well, ok, two times.) Hopefully they still have the same dye lot in stock...

In the picture above, I think the shawl looks pretty short. When you hold it up and the weight of the shawl does it's thing, it's up to my shoulder -- getting pretty long!

Friday, January 12, 2018

My Sister's Shawl - Clue 2

Sunday, the second clue for the mystery knit-along was released. I got out my shawl and realized right away something was wrong. My needles felt funny, the texture was wrong and they even felt too big.

What I decided was that they got wet when I spilled water upstairs that dripped down to the living room. I thought the shawl was spared (the balls of yarn that could have gotten wet were thankfully in ziplock bags) but I think the wooden needles got wet causing them to swell up and the grain to rise.

My favourite bamboo needles didn't feel as good, but I continued on. The first part was a diamond lace pattern. I made it through the first repeat and decided I didn't like one part of the lace pattern. I put it aside because I didn't want to decide whether to rip it out and figure out what to change or just follow the designer's directions.

The next day I got a notice that there was an omission in the pattern when it was released and Clue 2 should have started with two knitted rows before starting the lace. That made my decision easier...I ripped out all of Clue 2.

Regrettably, I didn't take a picture before I ripped it out so I can't show you what I changed, but here is the final lace:
Of course it will look better after blocking, but you should be able to see that the holes outline diamonds which are half stocking stitch (bottoms) and half reverse stocking stitch (tops). What I didn't like about the original is that the decreases made a knit border in the purl triangles. If you want purl texture against knit texture, then I felt the triangles should be solid knit or purl.

My solution was to change the decreases so they were done in purl instead of knit. (K2tog becomes ssp and ssk (skp in the pattern) becomes P2tog.) A different way you could get the same effect is to simply change the knits in the pattern to purls and the purls to knits, keeping in mind that this would change whether the knit halves were on the top or bottom of the diamonds.

Here is the back of the lace:
Doing the decreases in purls on the front moves the decrease lines to the back. You can now see them along the top edges of each knit triangle. Those are the lines I didn't want on my purl triangles on the front.

Once I got that figured out, I made it smoothly through the rest of the clue.
We've had our first shaping - you can see the width was decreased in the last couple inches on the right side. Who knows where this will lead!

Here is the entire shawl so far:
And I happened to be* in a yarn shop this week so I picked up some new needles in this size. Nice tinted ones from Knitter's Pride.
Only after I got home did I remember that I prefer the 14" length over 10" (the only option available which is probably why I didn't think of it in the store). I decided I could make do. I am enjoying their fresh new polished surface!

____________________
* If by "happened to be" you understand that I left the house expressly to drive to the yarn store. But I went for something else and they just "happened to" carry bamboo needles.

May I suggest?

I Say! or at least I did once...