Showing posts with label crochet cast on. Show all posts

Thursday, January 18, 2018

My Sister's Shawl - Clue 3

Clue 3 of the My Sister's Shawl mystery knit-along by Cozy Up Knits was released on Sunday. It felt like there was more knitting in this clue, but since a lot of the rows were getting shorter, there may actually have been fewer stitches knit.


First up was to finish the one side we were already working on. After Clue 2, we had finished the grey lace section and the grey and white stripes afterward. Clue 3 topped these with a garter eyelet section, more stripes and then mesh lace and broken seed stitch stripes to mirror what had already been done.
Only this time, all of the rows were getting shorter on the one side. This came to a point, and I assume this side of the shawl is done. (But who knows!)

The pattern has you decrease the last 10 stitches quickly in the last row while binding off with a regular stitch-over-stitch bind off.
We had all that pretty I-cord edging and I didn't want to interrupt it. So once I reached the final 10 stitches, I bound off the centre four stitches with an I-cord bind off using the first I-cord. This brought the right I-cord around the corner. I finished by stitching the right I-cord to the left so the stitches run continuously. (Basically, Kitchener stitch. It was very fiddly.)

Then we did a complete about-face and the rest of the clue had us working from the beginning, but in the opposite direction. I had used the crochet provisional cast on so I only had to unzip the crochet stitches to reveal the live stitches.
As each crochet stitch came out, I slipped the red stitch onto a needle:
I used a much smaller circular needle because the stitches from a provisional cast on are often very tight if you use the needle size that you're knitting with. Since the size of the stitches are only determined by the needle that's making the new stitches, I can use a much smaller needle to hold the stitches waiting to be knit without any effect. (Besides the intended effect of being able to get my needle in them to knit them.)

Here's the entire new live edge on the needle:
The provisional cast on is right in the middle of a lace section. Assuming this is the middle of the shawl (it may not be since I don't know what the entire shawl looks like), it is natural to put the cast on there. But there would have been less risk of mistakes and the join would have been less apt to be noticed if it had been between one of the lace mesh and the seed stitch sections.

In any case, the way I did the cast on put the YOs (yarn overs) on the needle. I think the cast on given in the pattern adds an extra knit row. (You're making stitches on two needles instead of just one.) So the pattern continued straight into the lace rows with the YOs. I had to insert a row of knitting first to make up for the row that wasn't included in the cast on. This was not a big deal, but when you start doing things "off pattern", you have to be prepared to be adjusting for that in the rest of the pattern.

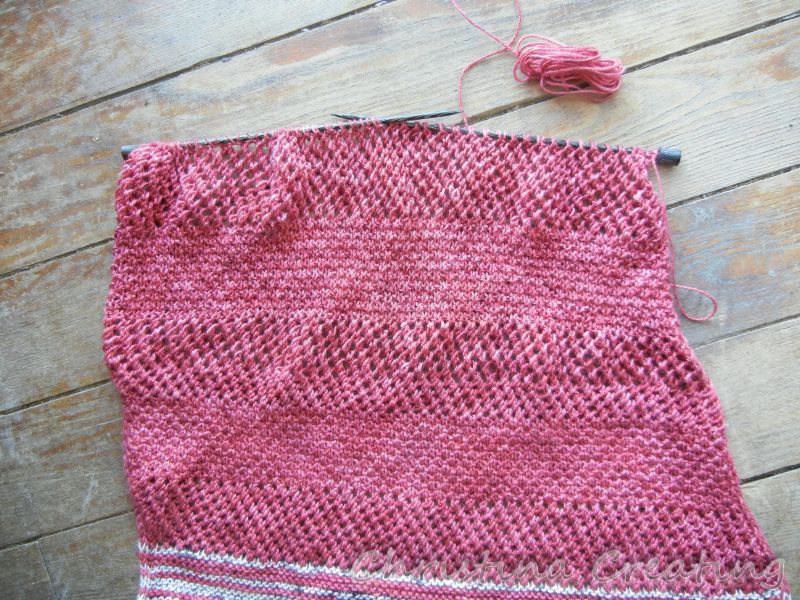
Here is the second part of Clue 3:
We finished the lace mesh in the center, added a seed stitch section and then some more lace mesh. Looking at the actual shawl, I am not able to see where the provisional cast on. Here in the picture, I notice there is a slight line. (You can see it in the middle of the middle lace section.) I think this is a result of the change in direction of the stitches. But if I had been given this shawl blindly and told to figure out the construction, there's no way I would see the cast on.

Here is the entire shawl after Clue 3:
I've only got a couple yards of the red left and I'm going to need more. (I didn't notice when I purchased the yarn, but all of the balls have less yardage than recommended by the pattern so I knew there was a chance I would have to buy more.)

I was hoping to go yesterday and then today, picking up another ball when I picked up my new special order needle set. But the needles haven't arrived yet. (I keep getting "Tomorrow" "Tomorrow". Well, ok, two times.) Hopefully they still have the same dye lot in stock...

In the picture above, I think the shawl looks pretty short. When you hold it up and the weight of the shawl does it's thing, it's up to my shoulder -- getting pretty long!

Tuesday, April 21, 2009

I Got My Pattern!

Remember the pattern I was searching for in this post? I received it from the fellow Raveler I had asked! (She says I'm lucky because she normally doesn't save the patterns she downloads but she still had this one. Phew!) And it looks so worth the extra work it took to get it.

I knit a 40-stitch swatch on Monday to confirm which size needles I wanted to use and what gauge I got with them. I knew the wool I wanted to use was thinner than what the pattern called for. And even though we all know swatches lie, they can help to get you in the ball park.

In addition to making changes to account for the swatch, I also have to make changes for the size. The (free) pattern is only available in the size the designer made for herself: too small for me. So I added a few inches based on the measurements of my Sahara which has a similar fit.

I got it cast on Monday night (all 212 stitches :mops brow:) with the crochet cast on. I didn't like how the ribbing looked on my swatch so I'm planning to change the bottom edge to a folded picot hem. This meant I needed some nice stitches along the cast on edge to knit. If you don't get why, you can be sure I will show you all the details in a future post. I just have to get there first!

I did want to pass on a tip for making a better join. It's so easy when you join in the round for the first stitch to be very loose, sloppy, and dare I say ugly. What I do to try to improve this stitch is to slip it, and then knit it up when I come back around to that spot, like knitting up a dropped stitch. Hmm...words are so inadequate. I will try a few pics to see if that will help.

[You will notice that I did not take pictures of the very first row which is where you would implement this trick, but I think you will get the point nonetheless.]

So you cast on your stitches and are about to knit the very first stitch which will make your work a circle instead of a line. Instead of knitting it, slip it to the right needle (purlwise) and knit the next stitch pulling the yarn firmly.

When you get back to this point after knitting a round, you will come to the slipped stitch (black arrow) and behind it will be an extra loop of yarn (red arrow):
Now you don't want to leave that loop of yarn flapping in the back; you want to knit it up. So, insert the tip of your left needle to pick up the loop:
Then insert the tip of your right needle into the slipped stitch (purlwise):
And pass the slipped stitch over the loop of yarn:
You have just knit up the loop as if you had dropped a stitch. You are now ready to knit away on your project:

So you see that this will tighten the first stitch and hopefully prevent it from stretching out and looking...can't think of a delicate way to say this...just plain ugly. (I will allow no ugliness on my Pencil Sketch Camisole.)

Tuesday, April 14, 2009

Tutorial: Provisional Crochet Cast On

When I was in Canada a few weeks ago, my sister asked me to show her a provisional cast on. In general, a provisional cast on is one which will be taken out at some point, leaving you with some "live" stitches which you can start knitting. (This may be used in a scarf, for example, with a one-way design. It would allow you to start at the center back and knit one side, then remove the provisional cast on, pick up those stitches and knit the other side. Both halves would then match.) I forgot to show my sister while we were together (we were a little busy with other things), but perhaps this tutorial will suffice.

There are at least several styles of provisional cast on that I've seen or tried, but once I tried the crochet version, I saw no reason to use any other. It's easy, neat, beautiful, and did I already say easy? I don't know why I don't use it as a regular cast on more. I really should.

But as a provisional cast on, the idea is to crochet a chain of stitches around a knitting needle. Then it is a simple matter to knit them, and off you go.

You will need
  • a crochet hook close to the same size as your knitting needle (This is where using metric sizes is so helpful!)
  • some small amount of waste yarn--using a contrasting colour will make it easier when you're taking it out. It should be smooth.
1. Make a slip knot in the waste yarn. Crochet 2 or 3 chain stitches by pulling the yarn through the loop with the crochet hook.
2 or 3 chains have been made

2. Position your knitting needle and yarn as pictured:

3. Moving the crochet hook over the needle, grab the yarn:

4. and pull it through the loop on your hook:
(You've just made a chain stitch over your needle.)

5. Now use your left forefinger to move the yarn to the back of your knitting needle by slipping it over the point of the needle:

You are now set up to make the next stitch:
Repeat steps 3-5 for as many stitches as you need.

Here is a video which may help to illustrate the motions:

Tip: I found it helpful and convenient to position the knitting needle very vertical, as opposed to how you might hold them when you are actually knitting.

After you have the required number of stitches, make a couple more chains which do not go over the knitting needle:

Then pull the yarn to make the loop about 2 inches long:

The resulting cast on edge is very neat (with a little practise with tension, of course):
Keeping in mind that it will be ripped out at some point, I guess it actually doesn't matter how neat it is. But of course, neat edges will make you happier in general. They do for me.

Now since you do not want the end of the waste yarn to get in your way, you will want to cut the loop and put a little knot in its end. The knot tells you which end to start at when you want to pull the stitches out. To do that, you simply pull the knotted string back through the end loop and start undoing the crochet stitches one at a time. Make sure you have a knitting needle handy to pick up the stitches which are released as you undo the crocheting.

Loverly!

I am probably going to use a provisional cast on on my Deep V Argyle Vest because I'm not sure which colour of yarn to use for the ribbing. So I can start knitting on the body of the vest, and then later remove the provisional cast on and knit the ribbing down from the body. As to the Vest, so far I am enjoying my large swatch which is proving very useful to 1. try out the red and grey together, 2. get familiar with the pattern and 3. even out my tension; but I have not starting on anything "real."

Tuesday, December 16, 2008

More Christmas: Ornaments

A dear friend wanted to do an ornament exchange at a Christmas party and this got the balls rolling, so to speak. The idea didn't actually pan out for that party, but it did get me inspired to make a few ornaments from a Vogue Knitting pattern I had seen...somewhere...hmmm... Yes, I found the pattern in the Holiday 2007 issue.

The balls are pretty quick knits, but still about 2 hours each. And that's plain and simple; no beading, special patterns or striping. I had some 3" styrofoam balls sitting around so I adapted the number of stitches and went to town. Ok, I did make a few changes. If you follow the link to the pattern, you'll notice that the knitting is not very smooth; it's all bunched up where it gathers at the top and bottom: this will never do! So 1. I used a crochet cast on so I could have live stitches and gather each stitch up (instead of every 4 stitches like the pattern called for); and 2. I ribbed for the first and last 5 rows so it would more naturally pull together. It makes the balls slightly bulkier there, but much smoother. A worthwhile trade off in my mind.

The first ball was done straight and simple with a red sparkly yarn I had left over from an aunt's "Red Hat Society" Hat I made her a few years ago. Observant readers will notice it's the same yarn I used for the Joy Pompom Hairband. Whatever you might say about its rather hideous appearance as a yarn, it performs beautifully as a Christmas ball.

With that success under my belt, I went a little fancier on the next one. You see, my friend had been rapsodizing about some chocolate brown Christmas balls she had seen in the store, and I happen to have some chocolate brown yarn interwoven with gold sparkles. (Left over from a beautiful Vogue pattern for a sleeveless sweater which turned out to flatter me not in the least.) And I also happen to have some leftover gold lame (yes the said same from the Christmas postcard). So I knit the pattern up but added a few rows of YOs [yarn overs] to make some peak-a-boo holes. Then I covered the styrofoam ball with strips of the lame pinned into place before covering the whole thing with the knitting. It all worked out great:

Next up was an attempt with some beads for sparkle. I needed some sock yarn which was all the excuse I needed to visit my favourite Red Purl. Amy had some sock yarn on sale so I chose 2 colours: the closest to red (really a taupe) and a variegated green. So far I got the beads strung on the taupe and a ball knitted up. The bead stripes aren't quite centered but I can pretend that was a design feature.

And this still leaves the green yarn to play with. Haven't quite gotten to it yet though. Too many Christmas parties and other activities!

Have fun decorating your place for the holidays!


May I suggest?

I Say! or at least I did once...