Showing posts with label christmas. Show all posts

Saturday, January 4, 2020

Christmas Balls

Now that Christmas gifts have been given, I can post about a few of them. First up, Christmas balls.

I don't remember how or where, but two years ago I saw the work of "The Ornament Girl" and signed up for her free tutorial. The ornaments are all made by folding fabric and pinning it to a foam ball.

Then I got emails every week with new examples of the same design or new designs. (She has an ornament of the month club so there are always new ones.) I deleted the ones I didn't like and collected the ones that I did like.

This year was finally the year when I was going to put the tutorial to good use.

Over Thanksgiving weekend, I spent some time at my sister's. We always talk about doing "craft days" together and that's what I decided to make it. I gathered and brought all the supplies to make some ornaments. (At first the only fabric I packed was a strip set of Christmas fabric that I got as a gift but by the time I left I had three gallon bags full of red, green, and blue Christmas or winter fabric!)

I didn't take any progress pics, so the rest of this post consists of pictures of finished ornaments. The first ornament strictly follows the instructions of the tutorial.
The tutorial even shows how to do the ribbon on the top, which is good because I am not great at those fussy embellishments. I used a bunch of leftover ribbon so none of them match!

This is the same eight-pointed star design with different fabrics:
Then I decided to try one of the other designs that I had collected:
I didn't have a tutorial for it and tried to figure out how to adapt the other technique on my own. I don't think I did it the same way, but the final effect is pretty much the same.

Another eight-pointed star:
Later, I added the beads to the ornaments.
Where I put beads was influenced by the pictures from the Ornament Girl and also determined by what colours of beads I had! The beads are applied with a pin through them so that is why they all have a silver "head".

I think I got three done at my sister's in an afternoon and the next morning. They took a lot more time than I anticipated!! (Picking and cutting the fabric takes quite a bit of the time.)

When I got home, I kept the supplies out and made a few more over the next week or so. I made a few where the center was a scene cut from a fabric.
(These "double pictures" show the two sides of the same ornament.)
Look at those sweet bunnies!!
And I had to make a pink one for my sister who does her tree up in pink. (When she does a tree; this year she didn't have one.)
Then I tried a little fussy cutting. Lucy Boston having her influence on me!
Here, the center pieces are fussy cut and folded to line up.
The center and outer pieces in this one
are fussy cut as well. The center lines up holly leaves on the fold and dotted lines where fabric pieces meet. The outer pieces are folded so a solid green line forms at the fold.

Here's a top view of the ribbon.
Some got single bows; some double. It just depended what I had to match and what I felt like the ornament needed.

And the final ornament was made with a collection of black and white holiday fabric I had.
I really liked this one!

There was one more ornament I made with a spiral design but I gave it away without getting a picture!! It was my attempt at this style:
Picture by the Ornament Girl
in red, green, and gold. (It looked a little like this but not so nice...this was one I really could have used instructions for!!)

A few other people got ornaments, but here's a picture with my sisters after I gave them theirs:
This was a really fun project and the results came out better than I expected. (It's hard to cover the raw edges of the fabric and to "finish" it when there's no place to hide the ends.) I don't naturally trust things that aren't fastened together somehow (pins pushed into foam can be pulled out!), but it seemed to work well.

It's a fun way to use up some small amounts of fabric and adding beads or other embellishments (sequins, charms, rhinestones, etc.) can make them sparkle in the tree lights.

Monday, April 29, 2019

Christmas in April

...or at least Christmas prep. I woke up with snow on the ground yesterday (seriously--on April 28) so why not work on a Christmas quilt? A couple Christmases ago, I was at my mother-in-law's looking through all her quilt magazines (as you do) and fell in love with these animals designed by Gingiber. I ended up ordering a set of cards with these animals and bought the fabric panel. (I never track things down that I see in magazines so I was seriously smitten.)


I also liked the designs and soft colours of the coordinating fabric line. By the time I discovered it, the fabric was getting old so it wasn't stocked in many places. (The danger of looking through older magazines.) But I did manage to find two layer cakes (a set of 42 10" squares). The layer cakes include of all of the fabric from the line.

I figured two layer cakes would be enough to make a quilt if I added a contrasting background fabric (like white).

And what pattern did I want to do with this fabric? Well, during the same magazine perusing I found a pattern in a different magazine where one of the "alternate" colour schemes was in this fabric. I liked the pattern and decided that was it.

Then once I was home, I couldn't find it again. This past Christmas I was looking through magazines again at my mother-in-law's and found it! I asked if I could borrow it and she gave it to me. Yeah!

This past Saturday I was signed up for a book class (a button accordion book - what?) but it was cancelled because there weren't enough sign ups. I decided I was going to claim all of that time (plus the 1.5 hours of driving it would have been) for quilting time. But then instead of waiting until Saturday, I started on Friday.
I had organized the fabric before - enough to be pretty sure I wasn't going to have quite enough. But I decided to proceed anyway and see how far I could get. After cutting most of the print fabrics for the blocks, I thought I should try a block or two to make sure everything was going to work out. I sewed the two grey blocks first:
(They overlap a little - they are the same.)
Everything seemed to be just fine!

I cut the rest of the fabric, including the white on Saturday. I had to get creative by the end. I was feeling some embarrassment that I was going to have to sew smaller pieces together to get the right size. Like it was shameful that there were going to be a couple extra seams in the quilt. (Ones that you will be hard pressed to see, I might add.)
But I did a quick turnaround on that feeling. Piecing bits together is resourceful and creative and that's how I'm going to see it. A bit of a tangent, but this reminded me of some embroidered blocks I picked up recently. In one of them, the background square was sewn from two pieces. My first thought was not "Shame on you"; it was more "Way to solve a problem; good for you."

For the last red block, I had to get very "creative" let's say. I'm supposed to have two squares of the same size that I can sew together (red and white). Well, in some cases I had red pieces the right size, but white squares a bit too small. But they weren't two small for a different method of making the same piece.

So here you see a red triangle (itself pieced together) being sewn to a smaller white square, and two smaller white squares sewn to a proper size red square.
After I cut them to shape and trimmed them, they all looked the same as the ones done "properly".

In another case, I didn't have a big enough piece for the center square. You're supposed to have a 6.5" square. But if you look at the blocks above, you can see that the center square actually has all four of its corners chopped off to turn it into a diamond.

So instead of doing the math to figure out the size of the finished square and sewing fiddly triangles on, I cut a piece of paper to 6.5". I folded it twice for reference points, and then cut a piece of grey fabric,
You can see I had pieced the grey fabric together and was
planning to cut the 6.5" square from it. But I decided to
do this foundation paper method instead to
save one extra seam (and use less fabric).
big enough to cover the center in the diamond shape.
Now when I put the square on the corner to make the triangle, I can line it up with the edges of the paper, sew on the marked diagonal line, and everything will be easy peasy and good as new. (I'll sew through the paper and remove it later.)
(I haven't sewn this block yet so I can't show you the final result.)

By Saturday night, I had a red block too.
And after today, I have six blocks done - all the red and grey ones. That means I'm half way there!
The blocks are 18" finished and seem huge to me. I got tired of overlapping them on my poster board so I taped them on the wall. They take up a lot of surface area!

Things are going pretty fast; it may not be too long before I have a quilt top!

Sunday, November 12, 2017

#Christmasiscoming

I don't know if you've noticed, but the Christmas music and commercials offering all of the things you should buy are already out. One even had the nerve to start with carolers singing Jingle Bells and the protagonist saying "Noo...it's only November" and then being convinced it is indeed time to start buying buying buying. I did not fall for that one.

But it is true that people who hand make gifts or like to make their own decorations do have to think about these things early. I don't mind if the fabric store has Christmas fabric in July. There's a good reason for that. And for whatever reason, my mind turned to Christmas about a month ago when I came across this image:
I only ever found this image. I couldn't find the source, who made it, whether it was a pattern or an item for sale. But for whatever reason, when I saw the picture, I really wanted to make this star pattern into a Christmas table topper. (Who can predict when inspiration and motivation will strike at the same time? If you could bottle that, "5 hour energy boost" would go out of business and you would be a millionaire.)

It's not surprising I was attracted to a star made from a sixteen-patch and half square triangles. It seems to be what everything I'm doing right now is made of. And it's scrappy. Need I say more?

One problem was that I had absolutely no Christmas fabric scraps. I don't mind using some non-seasonal fabrics if the colours are right, but none? That doesn't seem right. So I called my sister and asked her to bring what she had and was willing to give me. She saved my butt.

We had fun looking through all the fabrics. I had no problem adding some more reds, and then we went shopping where I picked up a few more fat quarters that I thought would work. (Ok, like 10.) We did a general sort of layout where I decided I could group the flowers/stars by colour instead of doing it completely scrappy.

I also decided that there was no need to do HST for the flying geese border. I cut 2.5x4.5 rectangles instead and sewed them together like you would sew a flying geese unit. It saved a lot of seams and made for a smoother look.

I decided I couldn't do this quilt table topper unless I laid it all out and planned where everything would go. With the restriction of the colour placement I wanted and with a piece this small, you can't sew pieces together and arrange them afterward.
In the picture above you can see the three stages of the stars. The blue is laid out but nothing is sewn. I kind of simulated the triangles that would be sewn. The red has the HSTs sewn but none of the squares are sewn together. And the green has all of the star sewn together. (Isn't it amazing how much difference in the size sewing the seams makes, even with only a 1/4" seam?)

In the border above, the rectangles are folded in half so I could see the colour progression. They look like squares but they're not. :)

Once I had the center together, I couldn't stop and put the border together as well.
It's not sewn to the center yet in this picture. I had to put that off for another day.

Here's a close up of each star:
One of the fabrics my sister brought had very fancy gold trimmed poinsettias. I didn't think they would fit in the design (and hated to cut them up), and then I had the brilliant idea to use them for the center of the stars. I love the effect.

You can see the background is made of a lot of scrappy neutrals. This is something I am learning and having fun experimenting with. I did try to group neutrals with green or red or blue in the area around the corresponding star.
After I had the border sewn on, I layered it with a piece of red damask and pin basted it. I decided not to use any kind of batting. I wanted a very flat table topper.
I've started to quilt it and so far I am pleased with how it's going. There is a ways to go, but I am confident I can get it done by Christmas season.

Linking up with Oh Scrap! on Quilting is more fun than Housework.

Saturday, December 12, 2015

Christmas Projects, Mostly...

I have finished most of my holiday gift making. One thing is blocking and I'm going to do one more small project because someone mentioned they wanted something and I can make it. Well, other than those two things, I only made one other project. So I'm taking it pretty easy this year for holiday gifts.

Most years, at some point in December, I am struck by inspiration or lunacy and decide to make one more (or one more batch) of presents for co-workers or parents or someone. I think I'm going to be able to avoid that this year. There's enough else going on that I just don't feel up to it.

I still don't feel recovered from the haunted house season (which ended at Thanksgiving in November for me) and we are putting in more hours in on the house rebuild again. (That is a good thing!)

But I haven't completely stopped my creative endeavours. Here is a peek at the Christmas gift that's blocking:
Ok, you didn't really think I was going to show you, did you? Not this year.

And here is the other gift I made:
Ok, not showing that one either. Sorry, you'll have to wait until after Christmas. (It's a good one, too!)

I'm expecting my Christmas cards to be delivered on Monday so I can send them out next week. That is something I'll show you. Why not?

This is the cover:
I did the collage onto an 11x14 canvas I picked up from Goodwill. (Yes, it had a painting on it. No, it is not worse for having paper glued over it.)

I am not crazy about the colour that the paint wash became but I am trying to get over it because once done, I didn't see any way to fix it. I found the center picture of the world in a National Geographic and I printed the other two from images on the web. I had Troy make the star for me from copper wire.

I can't remember exactly what inspired it but I had the idea for the center phrase first. After that, I tried to think of carols that use the word "world" in them so I could do the same word play. Besides "Joy to the [world]", I couldn't think of another one that I liked as much, so I used the phrase "Peace on [earth]" instead.

One other project has been taking a lot of my available time and I hope to show it soon. I have to figure out how to get pictures first...

Wednesday, December 25, 2013

Merry Christmas!

This is the first year I managed to hang the star I knit in 2009 above the tree.
It's a fun way to do it, and a lot better than just sitting it in the top of the tree as I've done the last few years.

A very merry Christmas to you all!

Sunday, December 22, 2013

MORE Hats and Cowls?!!

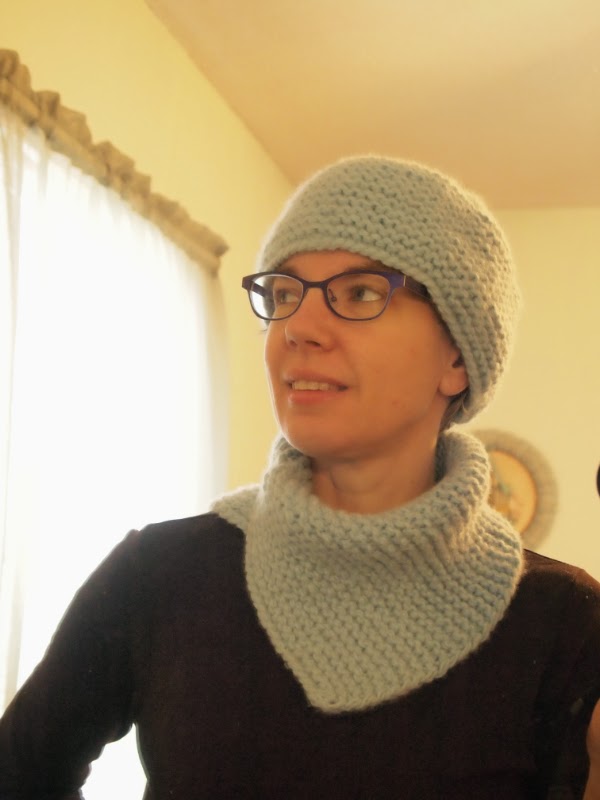
Yes, indeed! It is the time (and weather) for hats and cowls, isn't it? This time it's a gift for my mother-in-law. I'm not good about giving gifts every year (and I certainly don't always make them), but considering we were driving out to visit I wanted to have something.

I happened to have just purchased some recycled yarn from another unraveler, including some worsted weight cashmere. I thought a bulky cowl might be just the thing and the yarn was really lovely. (So lovely in fact, that a little girl who saw me knitting couldn't stop petting it and saying "nice...soft." I apologized to her parents for introducing her to cashmere so early. Well, it was more like one of those "sorry-not-sorry" apologies...)

Anyway, I found an interesting yet simple pattern I thought would be just the thing. You knit a rectangle in garter stitch and then do one small seam (about 4.5") along part of one long side to part of the other long side:
 Looks a little odd like this, but if you turn it inside out and fold down the top you get this:
Ok, still not quite cowl-looking. But how about this:
Now we're talking, right?

Oh, and that picture gives away a peek of the second part,
the matching hat--a cute little thing I whipped up while Troy did a bit of the driving yesterday.
I knit it flat and seamed it when it was done. A bit of garter (about 4.25") and then decreases (8 per row, every other row) and boom, a hat.

The cashmere is fluffy and warm and cushy. That hat is not very tight, which I like. The cowl can be worn in a surprising number of ways considering how simple it is. Here let me show you with a ridiculous lot of pictures:

First, with the seam in front and the points lying more in the front than back:

Second, with the seam on top of the shoulder and the points lying to the side:

Third, with the points dead center. This would be great for filling in that gap at the top of your coat's buttons or zipper:

Fourth (finally), with the seam at the back and the points lying more on the shoulders:

I briefly thought about crocheting a decorative edging around the outside or perhaps doing a knitted picot edge, but I talked myself out of it. KISS [Keep It Simple, Sweetie]. But, of course, you could easily add it to one that you made. Or maybe I'll do it on the next one should I make one to keep. I think I need another snug cowl that will fit under my jacket. (Um, yes, I used the word need.)

Project Stats - Cowl
Started
: 18 Dec '13
Finished: 21 Dec '13
Pattern: Miss Sadie's Scarflette by Sara Kay
Materials: 90 g of worsted cashmere, held double.


Project Stats - Hat
Started
: 21 Dec '13
Finished: 22 Dec '13
Pattern: My own (see below)
Materials: 74 g of worsted cashmere, held double.


Pattern - Miss Peggy's Hat
I used bulky weight cashmere and size 7mm needles.
Cast on 72 sts. (I use the cable cast on.)
Knit in garter stitch for 4.25 - 4.5"
Purl next row.
(Knit 7, K2tog) across row
Repeat last two rows, decreasing the number of stitches knit by one each time (I.e. Knit 7 becomes Knit 6, then Knit 5, etc) until there are 16 sts. You should have just finished a knit row.
Purl 2 together across row.
Cut yarn leaving about 10", enough to pull through the stitches and sew the seam.
Work in ends.
Wear and enjoy the toastiness.

May I suggest?

I Say! or at least I did once...