Showing posts with label tutorial. Show all posts

Sunday, May 24, 2020

Rectangles Squared Quilt Started, Stalled, and Resumed

Back in 2012 I saw a quilt on Ravelry in the show and tell thread, and it has stuck in my mind ever since! I love the pattern of the light and dark and then the added layer of the coloured squares that seem to float behind the dark lines.
Here's a link to the maker's post on Flickr. I did not see that she ever identified the pattern.

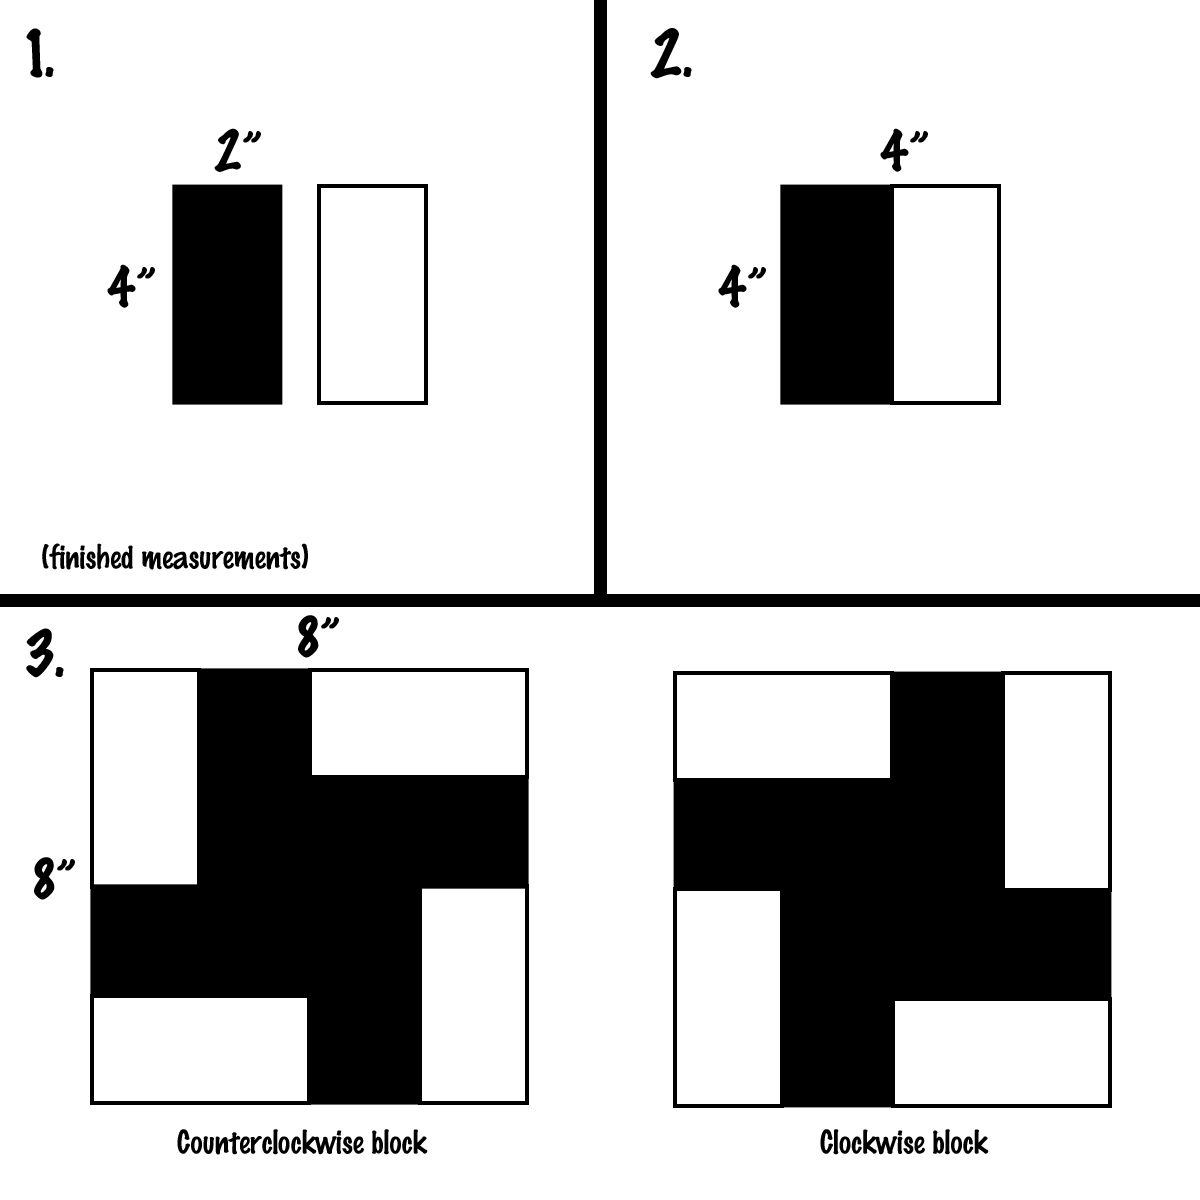
But as I looked at it more closely, I realized it was a very simple construction. I've diagrammed it:
You put two rectangles together to make a square. You put four of those units together to make the block. You do need to watch how you assemble them because you'll need half spinning clockwise and half spinning counterclockwise. (I choose 2x4" rectangles but of course you could use any dimension as long as the height finishes twice the width.)

When you put them together you get:
There's another way to get almost the same result with fewer seams to match in assembly:

Here they are side by side:
Except for how the pattern ends at the edges, these two methods produce the same result.

Unless you take into account how the colour falls in the pattern.
On the left is the quilt I admired. The squares of colour don't line up with the black lines and add an extra layer of interest. On the right you can see that the colour is confined inside the black lines and produces a flatter result. You could also say the one on the right is calmer and easy to line up the colours to emphasize the woven look. Neither is better; it just depends on what you enjoy and choose to make.

Who knows what made me decide now was the time for this quilt I have been thinking about since 2012, but I got started in early March.
I decided to make half of the blocks pairing dark blue with light yellows and greens and the other half pairing dark green with light blues and whites. I ended up not having enough fabrics in some of the colours so I didn't strictly follow that colour scheme. I organized everything in these stacking trays that used to be used for eyeglasses orders.
You might be scratching your head because these pieces do not look 2.5"x4.5".
No, they're not. When there was a big enough piece of fabric, I cut the pieces at 2.5"x9", and sewed them together before trimming them to 4.5"x4.5". It makes for a little less matching up while you're sewing.

I sewed a lot of the seams as leaders and enders while finishing my Joy to the World quilt.
That was a lot of improvisational sewing with scraps, so there were a lot of starts and stops perfect for fitting in some leaders and enders.

Once that top was done, however, I did some sewing with this quilt as the main project.
I completed the first few blocks and put them on the design wall to make sure I was pressing so the seams would nest.
It's a good thing I checked because I had to make a correction. If you're thinking of making this pattern, for the blocks turning one way, press the first seams toward the dark and the second seams away from the sewn seam. (This will make sense when you're doing it.) Press the blocks that turn the other way toward the light and toward the seam. Everything will nest that way.

By April 19, I had all the blocks sewn that I could make from the fabric I had.
I have quite a bit of blue so that was no problem. The dark green was not so plentiful. Here I have all 40 blue blocks done and 20 green ones. I put the project on pause then because I was waiting for some green to come from someone I had sent fabric to. (I had a certain design she needed and she agreed to swap.) I never did get anything from her. :( On the other hand, my sister came to the rescue and sent me a nice package with a good selection of greens.

It wasn't quite enough to do all 20 blocks in green, but I had already decided to fill in some of those blocks with blue. (And I snuck in some of that black that I have so much of!)

By mid-May, I had all the blocks done and laid them out on the spare bed.
I want to put them somewhere I can see all of them at once on a flat surface to double check the balance of colour and of lights and darks, but I think this is pretty close.
It's laid out in an 8x10 grid. At 8" a block, the quilt will be about 64x80, a twin size or so. I suppose I could border it, but right now I'm not planning to.

Linking up with:
  -"Oh Scrap" at Quilting is more fun than Housework.
  -Quilting Patchwork and Applique

Sunday, February 24, 2019

Snips Baskets

I mentioned in my last post that I made some snips baskets (or thread catchers if you prefer) to give away at the craft retreat. I have for you a little tutorial in case you would like to make your own.


Cut out two triangles that are 9 inches on each side. 9 inches with the seam allowance or without, you ask? It doesn't really matter. One choice will result in a little smaller basket than the other but either will work.

One triangle is your "outside" fabric and one is the inside. Put them right sides together and sew 1/4" seam all around the outside, keeping 2-3 inches unsewn on one side, but making sure to sew all three corners. Trim the seam allowance around the corners and flip it inside right. Press.

Ok, I am seriously lacking in pictures so far but hopefully you get it.

Here is my triangle after it has been sewn and flipped:
There is still an opening that is not sewn on one side. The seam allowance should be pressed to the inside along the same line as the seam.
If you are planning to do the rest of the sewing with a machine, you can top stitch around the triangle close to the edge and that will close up the hole. Specific instructions below are for hand stitching, which is what I did.

Now fold one edge in half with the inside fabric on the inside. Just make sure it is not the edge with the opening. (You can use the opening to get inside and hide your knots.) Mark half-way with a pin.
Then mark half the half way with another pin.
You can double check that the second pin is in a good place by folding over both corners and making sure they just reach the corner and are even.
If they aren't even, adjust the second pin (yellow above) until they are.

Now sew the two sides together along the edge between the two pins, either starting or ending at the fold. (I prefer to end at the fold because things are less likely to get misaligned.)
You can do it by machine (sewing right on top of the top stitching) or by hand, which is what I did, sitting by the wood stove. Mmmm, cozy.

Here the seam is sewn and you can see that the top half of the edge is left unsewn:
Now do it again to the second side (the remaining side without the opening):
Now it's time to close the opening.
The basic idea is to sew the opening closed and then sew the folded seam as on the other two sides.

More details: I folded the edge in half as with the other sides so I could check which end of the opening was furthest from the halfway pin.
Sew the opening shut starting at the end furthest from half way. When you get to the other end, tie off with a knot but do not cut the thread. Then insert the needle next to the knot and move it between the fabric layers to the halfway point. Pull the needle through, sew a knot to anchor your thread and then sew the seam.

Finger press from each sewn corner to its neighbours to shape the bottom. and now you have a triangle pyramid with loose flaps on top.
What you do with those is anchor them down with a button, bow, yarn, or just a stitch - whatever you want.
Fold each side down so the point is just above the folded edge of the bottom and centered between the sewn corners. Secure with your doo-dad of choice.

And when you want to make some gifts to take to a craft retreat, you do it all a few more times!
I had fun going through my button collection and finding some to complement each fabric combination.

The thing I liked about this little basket is that if you're working away from home, you can just fold up the basket and throw it in your project bag. The threads or yarn ends won't fall out.
I will find this very handy as I bring my knitting or hand sewing with me to plenty of places and am always making little piles of cut offs that I hope I will remember to throw out when I leave.
Compelling little shapes, aren't they!

Saturday, January 20, 2018

Scrappy HST (Half Square Triangles)

I am working on a quilt based on the Missouri Star Quilt Company tutorial for the Pecking Order quilt. When I saw her make it with a white background, I immediately wondered what it would look like with a black background.

And what do you know...soon after that, I came into a lot of black scraps. (Seriously, we bought 300 yards at work to make some hoods, and I got all the cut offs. Lots of rectangles about 15" x 8".) So I figured I would give the quilt a try. (I talked about starting it in this post.)

I cut lots of squares from bright fabrics and sewed them to the corners of 5" black squares. At the right you can see a bit of the layout - I had to test that the layout in my head worked in real life and that it would be conducive to assembling the whole top. (And, check!)

I decided to take the quilt one step further and do a pieced border of stars as well. Finished size 5". (So lots of little pieces.)

These small border stars will be made with hundreds of HST (half square triangles).
I had a few done (above), but pulled it out the other day to work on some more. I needed the final piece to be 1.75". I make HSTs by sewing on both sides of the diagonal and getting two blocks out of two squares. (This means you never have to cut out triangles-thank goodness.)

Usually you cut two squares of different fabrics to place together and sew, but once I had the black squares cut, I realized I didn't have to cut the contrasting fabric to size. As long as I sewed along the line marked on the black square, it would come out right. I was going to be trimming all of the blocks after they were sewn anyway so why cut them twice?

The black squares were cut at 2.25" (because you're sewing on both sides of centre, it has to be bigger than the final size you want (1.75" in this case)). I had some 2.5" scrap squares and just put them together with the black ones.
But I also had weird scrap shapes and I just put the black squares on top of them too. As long as the scrap was the same size or bigger than the black square, it was good to go. (See top row, third from left; bottom row, first and third from left.)

At one point I had a fabric I wanted to use, but it didn't cover the entire black square. No problem...just line up a straight edge with the diagonal line and sew that side.
"Top side" when sewing. The centre diagonal line is marked
with a ceramic pencil. The other two lines are stitching lines.
For the other side, just grab another small scrap and line up a straight edge with the diagonal on the other side.
"Bottom side" of the same square. It will be cut apart
where the two fabrics meet anyway.
Maybe everyone everywhere has been doing this already, but I haven't seen it. I found it so freeing to just grab scraps to match with a black square and still get good results.

Once they're all cut in half, it was time to press them. Look, I'm using my new travel iron:
It's so cute! The small size is nice for working on the smaller pieces. (It may also be nice for larger pieces so that it doesn't mess up seam allowances in areas I'm not trying to iron, but I haven't tried it yet.)

Final step is the trimming. This is why some people don't like this method. The idea is that you make them slightly oversized and cut them to the correct size. It's a "cheater" way to get an accurate piece. (And by "cheater", I mean clever.)

Trimming scraps is no harder than if you had sewn two squares together.

1. Lay the HST so that the diagonal line is parallel to the 45 degree line on your ruler.
2. Line up the ruler so that the 45 degree line is on the seam and the full measurement of your final square (1.75") is on fabric.
3. Trim the right side and top:
4. Rotate the piece 180 degrees so the cut sides are now on the bottom and left side:
5. Line up your ruler so the 45 degree line is on the seam and the lines of your final measurement line up with the bottom and left side.
6. Trim the right side and top:
And you have a 1.75" HST ready for the next step.

And then repeat 255 more times.

Tuesday, April 7, 2015

Cute as a Button

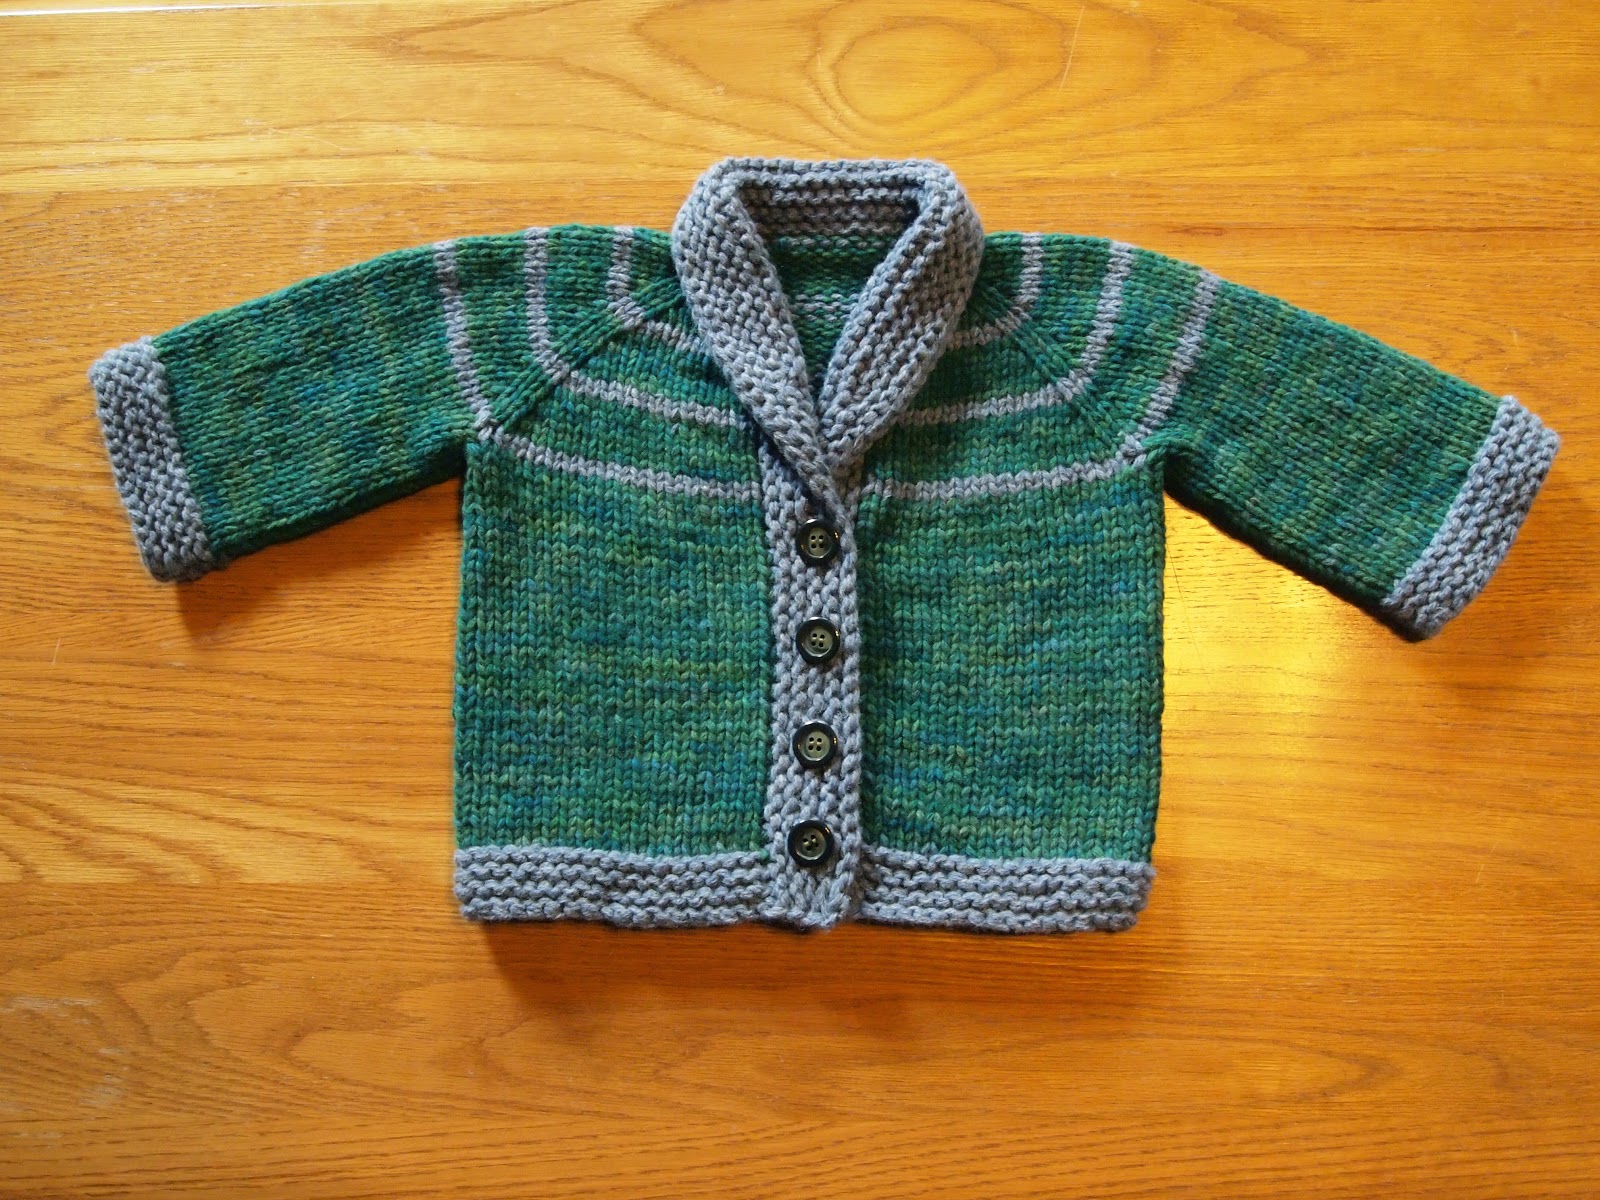
It wasn't done in a weekend, but the little sweater for my co-worker's child is done.

There was some drama with the dyed yarn and whether I would have enough. I ended up making the sleeves a little shorter than the pattern called for, but I think they look a little long so I'm glad.

The sweater has been waiting about a week for the buttons. Not my favourite part of the job.

But while I was sewing them on, I thought I'd show you a few tricks I've picked up over the years.

First, I use doubled thread for buttons. That's pretty common. I used to thread the needle over one strand and then knot the two cut ends together.
But that leaves you with a knot and some loose threads after the knot. Also, it means you're restricted in how close you can sew to the end of the thread because the needle is stuck in the loop and needs room to turn around.

So a better way is to thread the needle with the two cut ends and leave a loop at the other end.
 Now, when you start to sew, you can catch the loop with the needle after taking the first stitch,
 and in that way, secure the end:
Take one more anchor stitch, and you're ready to sew on the button.

When you're sewing buttons onto knits, you usually have to watch that you don't sew them down too tightly. There needs to be room behind the button for the fabric around the button hole. Otherwise, the buttons are hard to do up and the button band won't sit properly.

You can convince yourself that you will just make loose stitches, but it's hard to do. Like, it's an absolute delusion to think you can do it. The stitches will have uneven tension and it's almost impossible not to make them tighter and tighter.

So, prop a match stick (or a toothpick) between the button and the fabric after making your first stitch through the button. Continue to sew the button on over the matchstick.
Now you can pull evenly on the stitches and be sure that there will still be a space between the button and fabric.

After stitching the button securely, knot it on the backside by taking a stitch and then pulling the needle through the loop before pulling the thread tight (twice). Then remove the matchstick and pull the thread to the front side of the fabric but behind the button. Wrap the thread around the stitches a five or six times (between the button and the fabric) and then knot it again in the same way.
 Wrapping the stitches makes a sort of post for the button and reinforces the thread as well.

And with four buttons, my little sweater was finished:
I think it looks rather smart and I hope it will fit the little tyke next winter.

Project Stats
Started
: 21 Mar '15
Finished: 28 Mar '15
Pattern: Baby Sophisticate by Linden Down (free)
Materials: 120 grams of ravelled wool, used double. The green was dyed with KoolAid.


It looks rather proud of itself here, doesn't it!

May I suggest?

I Say! or at least I did once...