Showing posts with label pressing seams. Show all posts

Sunday, May 24, 2020

Rectangles Squared Quilt Started, Stalled, and Resumed

Back in 2012 I saw a quilt on Ravelry in the show and tell thread, and it has stuck in my mind ever since! I love the pattern of the light and dark and then the added layer of the coloured squares that seem to float behind the dark lines.
Here's a link to the maker's post on Flickr. I did not see that she ever identified the pattern.

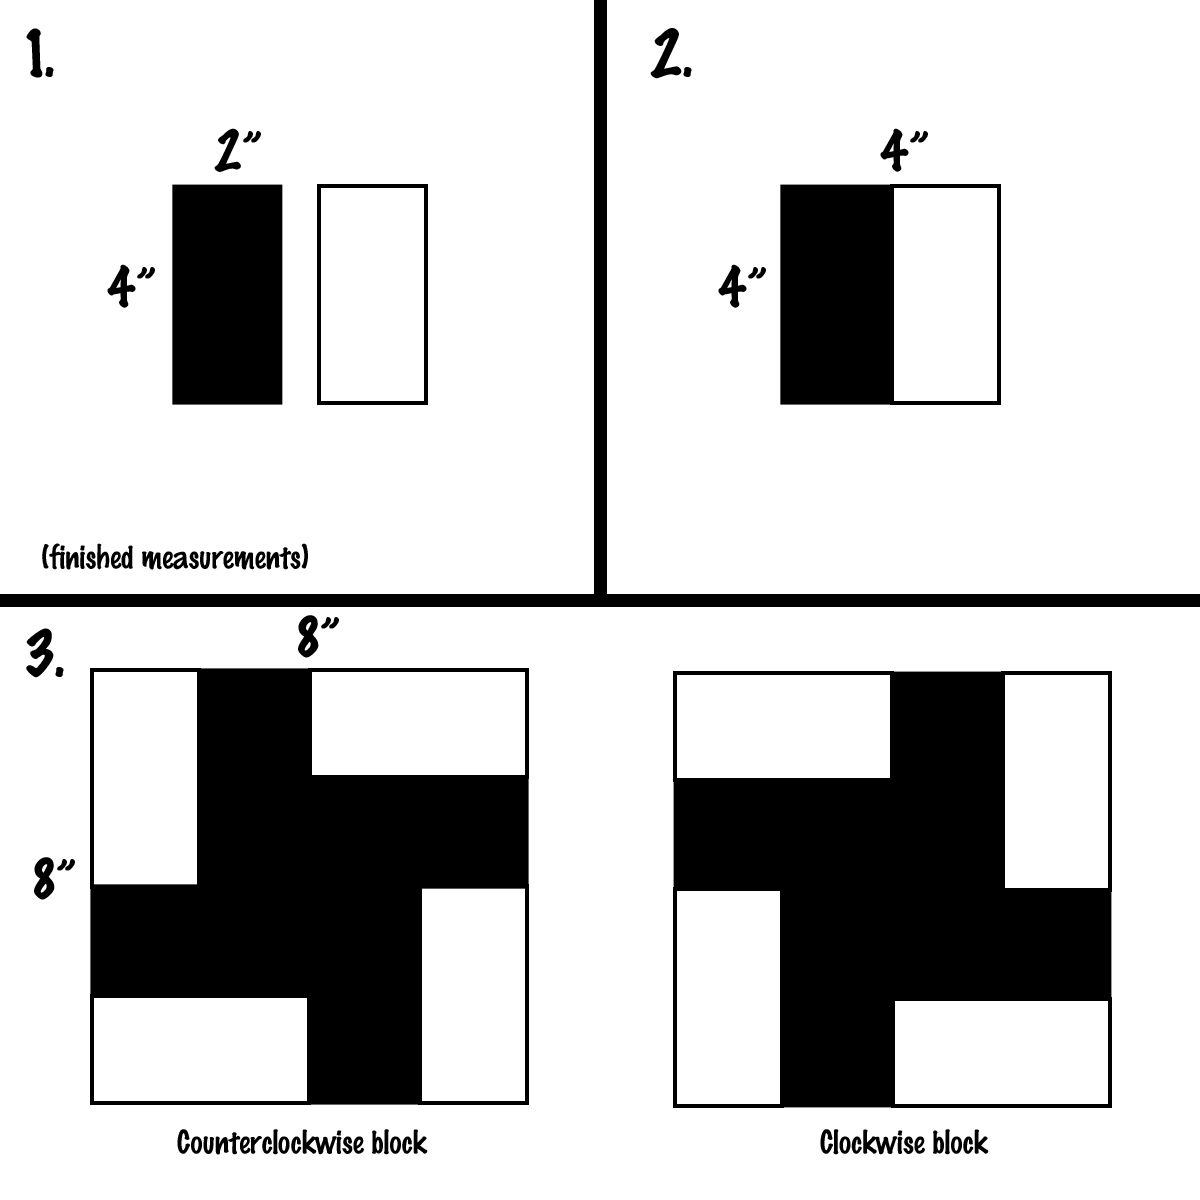
But as I looked at it more closely, I realized it was a very simple construction. I've diagrammed it:
You put two rectangles together to make a square. You put four of those units together to make the block. You do need to watch how you assemble them because you'll need half spinning clockwise and half spinning counterclockwise. (I choose 2x4" rectangles but of course you could use any dimension as long as the height finishes twice the width.)

When you put them together you get:
There's another way to get almost the same result with fewer seams to match in assembly:

Here they are side by side:
Except for how the pattern ends at the edges, these two methods produce the same result.

Unless you take into account how the colour falls in the pattern.
On the left is the quilt I admired. The squares of colour don't line up with the black lines and add an extra layer of interest. On the right you can see that the colour is confined inside the black lines and produces a flatter result. You could also say the one on the right is calmer and easy to line up the colours to emphasize the woven look. Neither is better; it just depends on what you enjoy and choose to make.

Who knows what made me decide now was the time for this quilt I have been thinking about since 2012, but I got started in early March.
I decided to make half of the blocks pairing dark blue with light yellows and greens and the other half pairing dark green with light blues and whites. I ended up not having enough fabrics in some of the colours so I didn't strictly follow that colour scheme. I organized everything in these stacking trays that used to be used for eyeglasses orders.
You might be scratching your head because these pieces do not look 2.5"x4.5".
No, they're not. When there was a big enough piece of fabric, I cut the pieces at 2.5"x9", and sewed them together before trimming them to 4.5"x4.5". It makes for a little less matching up while you're sewing.

I sewed a lot of the seams as leaders and enders while finishing my Joy to the World quilt.
That was a lot of improvisational sewing with scraps, so there were a lot of starts and stops perfect for fitting in some leaders and enders.

Once that top was done, however, I did some sewing with this quilt as the main project.
I completed the first few blocks and put them on the design wall to make sure I was pressing so the seams would nest.
It's a good thing I checked because I had to make a correction. If you're thinking of making this pattern, for the blocks turning one way, press the first seams toward the dark and the second seams away from the sewn seam. (This will make sense when you're doing it.) Press the blocks that turn the other way toward the light and toward the seam. Everything will nest that way.

By April 19, I had all the blocks sewn that I could make from the fabric I had.
I have quite a bit of blue so that was no problem. The dark green was not so plentiful. Here I have all 40 blue blocks done and 20 green ones. I put the project on pause then because I was waiting for some green to come from someone I had sent fabric to. (I had a certain design she needed and she agreed to swap.) I never did get anything from her. :( On the other hand, my sister came to the rescue and sent me a nice package with a good selection of greens.

It wasn't quite enough to do all 20 blocks in green, but I had already decided to fill in some of those blocks with blue. (And I snuck in some of that black that I have so much of!)

By mid-May, I had all the blocks done and laid them out on the spare bed.
I want to put them somewhere I can see all of them at once on a flat surface to double check the balance of colour and of lights and darks, but I think this is pretty close.
It's laid out in an 8x10 grid. At 8" a block, the quilt will be about 64x80, a twin size or so. I suppose I could border it, but right now I'm not planning to.

Linking up with:
  -"Oh Scrap" at Quilting is more fun than Housework.
  -Quilting Patchwork and Applique

Thursday, May 26, 2016

Block 22: Old Red Barn

 Every farm needs an old red barn, doesn't it?

While I was growing up, we had four chicken barns. Three had layers in them and the fourth was used for raising the chicks.

As I recall, they were identical except that one was shorter. But from the front, they all looked just about the same. I assume that is why someone decided to paint the trim on the barns different colours.

The first one was red, then blue or was it brown? Wait...let me see if I can find a picture...

Here we go:
You get the picture now, I'm sure. Then you could tell someone to go to the red barn or the blue one, etc. Except we never did. We always referred to them by number. Simply "#1" or "#4". Not even "Barn 1" which is what I heard others sometimes say. We would just say, "Dad's working in #2." Never seemed odd at the time...

Anyway, all this is to say that we didn't really have an old red barn, but if you stretch the truth a little, I could at least say we had a red barn. And now I've also had a nice little trip down Memory Lane.

Back to the quilt block, this is one of the 12" blocks I'm doing (to match the farm house). So although there were quite a number of pieces in the block, they weren't unmanageably tiny.

The barn door is made up of quarter-square triangles. The designer had you do them in a curious way. The technique works well and is common enough, but you ended up with four blocks and three are extra that you don't use!! (There are other methods just as easy and simple that don't make extra blocks.) I decided this was an opportunity for experimenting with seam pressing.

So here are two of the blocks. Can you tell which one has the seams pressed open and which had them pressed to one side?
How about these ones?
Here are the backs of the first two:
And here's the second pair:
Did you get them right? I think the open seams lie a lot flatter on the front and in this case that is what I wanted.

Here is the door in the block with little duckies in the window:
Here's the back of another part of the block:
I chose to press all the seams that I could toward the red fabric. That would make the barn stand up a little from the background. So in this case, although the peak of the roof is made from a flying goose unit and the seam would normally be pressed toward the outside, I pressed them toward the center. It makes the point bulkier but it worked.

You can also see that I made the unusual choice of dividing the one horizontal seam. It's pressed up in the middle (to keep the red dominant over the window), but there was no way the seams on the side were letting me press them up and back on themselves. So I snipped the seam allowance and pressed it as shown. (No quilting police showed up at my door either.)

Here it is from the front:
I don't know how obvious it is in the picture, but I think you can see that the window is slightly depressed compared to the red barn. Subtle I know, but I can't help trying to manage it.

And, finally, here is the whole block:
A nice classic red barn with a quilt block door and duckies inside. :)

Here are all the blocks in the virtual layout:
_____________________
Here is Kim's (first) block:
Yes, she did a 6" one first. I don't remember exactly, but I think she meant to do a 12" but cut the 6" pieces out of habit and put it together anyway. And then the red fabric she used was too thin to make a nice block so she decided to do it again and made the 12" version below.
 I love the red barn board fabric she used. It will go so nicely with the muted tones she is using. (Better than the bright classic red that I used.)

And of course, the animals in all her windows are cute as anything!

Saturday, May 21, 2016

Block 21: Haystack Block (Making Hay)

The haystack block was just a matter of adding strips to an ever-increasing center. I didn't like all of the fabrics that were in the "kit" I made earlier, so I replaced a few.
I have to decide whether to put in the quilt with the longest strips horizontal or vertical.
I'll probably make the final decision when I know where it ends up in the quilt and what's around it.

This block was proof that my seams are a little big. I stitched by hand and made sure to stitch inside the marked quarter-inch line, but apparently I need to adjust. You can see that it pulls in where there are more seams and every time I added a strip, I had to stretch it a bit to make it fit.
I pressed the first two seams open so the centre is nice and flat. After that, though, it made more sense to press the to the newly-added strip of fabric with no seams in it.

Here is a look at all of the blocks so far.
_______________________
Here is Kim's block:
She went with mostly oranges and yellows since it's a Haystack Block. :)

Saturday, March 19, 2016

Crossroads and Crops

I finished the next block in my Farm Girl Vintage quilt at least a week ago. I think I even started it early because it was one I was looking forward to. Why? I'm not sure, but I like the block.
The designer calls it Country Crossroads. I think the crossroads is pretty obvious. I don't know if the four octagons are fields, but they remind me of fields watered with circle irrigation.

Now when I hand sew the seams, I don't stitch through the seam allowances, meaning when I have to stitch across a previous seam, I hold the seam allowance out of the way and stitch only through the two layers of fabric that are being sewn together.

This has a couple of advantages. First, it means I'm only ever sewing through two thicknesses of fabric. This is physically easier than sewing through four at a time and it makes it easier to keep the stitches small and even. The second advantage is that I can iron the seam allowances either way when I'm done the block.
How does this help? Well in the block above, I would have pressed the seam allowances toward the long thin crossroads pieces. They have no internal seams and it is easier to press the seam allowances of the octagon pieces toward the plain rectangle than the other way. But, when I got to the end of the block, I realized that in order to furl the seams (see the four intersections in the centre), I would have to press some of the seams the other way. (The vertical ones in the picture above.)

You may think I'm particularly obsessed or pre-occupied with seams and the backs of my blocks, but it makes a difference. When you press to one side, the piece on that side sticks up a little bit. So when you have a choice, you need to think about what you want to emphasize. In the block above, if I had pressed all the seams towards the crossroad pieces, those grey stripes would stand up a little more than the rest of the block.

I think you can see in the first picture that the vertical grey stripes look like they're sunken a little and the horizontal ones don't. Ok, it's subtle, but it does make a difference.

Of course, each block requires you to balance all those things to decide which way to go: furling seams, what pieces are going to "stand out", whether the seam allowance will show to the front side through a light fabric and even more things. It doesn't make you dizzy only because you start to recognize the patterns and have favourite ways of dealing with them. And you have to remember there's rarely (never?) one right and perfect way. It's all about choices that you want to make. (Or don't make and leave it to chance, if that's what you want to do.)

Well, I'm sure that's enough quilting "theory" for you. Here is a collage of all the blocks so far:
_____________________________
And I waited so long to post this that I have pictures of Kim's block to post as well:
Oh wait! What's this? Yes, Kim did two blocks this week!
She told me she knew she already chose and cut fabric for this block but without taking it out, she decided she didn't like the combination. So she chose and cut a new set. Then when she brought out the original set, she liked it. So she sewed both. We know we'll need a few more blocks that the 44 we're making from the book so the extra will not go to waste!

Oh, but wait again! I have a second block as well. Being convinced Kim was going to get ahead of me (and not knowing yet that she was doing two crossroads blocks), I started the block for the next week (which is now this week).

It is the Crops block:
My choices for leaf colours were somewhat limited because I needed a light(er) and dark(er) of whatever colour I chose that would work well together. When I was laying out the pieces of the block to see where each should go I noticed that I ended up with the same colours that the designer had (yellow, green, blue and orange). Once I saw that, I just put them in the same place that the designer did and called it good.

Here is the back:
Since the squares were made with "flippy corners", the seams were pressed toward the outside. But you can see that the outer seams were pressed toward the plain border strips. And the green stem up the middle has the two seam allowances pressed toward it and meeting together nicely in the center. This causes it to stand out and emphasizes the strong vertical line in the block.

And here are all of the blocks done so far:
____________________________
And here is Kim's Crops block:
I love all of her fabrics! (But especially the orange dragonflies!)

May I suggest?

I Say! or at least I did once...