Showing posts with label triangle. Show all posts

Sunday, February 24, 2019

Snips Baskets

I mentioned in my last post that I made some snips baskets (or thread catchers if you prefer) to give away at the craft retreat. I have for you a little tutorial in case you would like to make your own.


Cut out two triangles that are 9 inches on each side. 9 inches with the seam allowance or without, you ask? It doesn't really matter. One choice will result in a little smaller basket than the other but either will work.

One triangle is your "outside" fabric and one is the inside. Put them right sides together and sew 1/4" seam all around the outside, keeping 2-3 inches unsewn on one side, but making sure to sew all three corners. Trim the seam allowance around the corners and flip it inside right. Press.

Ok, I am seriously lacking in pictures so far but hopefully you get it.

Here is my triangle after it has been sewn and flipped:
There is still an opening that is not sewn on one side. The seam allowance should be pressed to the inside along the same line as the seam.
If you are planning to do the rest of the sewing with a machine, you can top stitch around the triangle close to the edge and that will close up the hole. Specific instructions below are for hand stitching, which is what I did.

Now fold one edge in half with the inside fabric on the inside. Just make sure it is not the edge with the opening. (You can use the opening to get inside and hide your knots.) Mark half-way with a pin.
Then mark half the half way with another pin.
You can double check that the second pin is in a good place by folding over both corners and making sure they just reach the corner and are even.
If they aren't even, adjust the second pin (yellow above) until they are.

Now sew the two sides together along the edge between the two pins, either starting or ending at the fold. (I prefer to end at the fold because things are less likely to get misaligned.)
You can do it by machine (sewing right on top of the top stitching) or by hand, which is what I did, sitting by the wood stove. Mmmm, cozy.

Here the seam is sewn and you can see that the top half of the edge is left unsewn:
Now do it again to the second side (the remaining side without the opening):
Now it's time to close the opening.
The basic idea is to sew the opening closed and then sew the folded seam as on the other two sides.

More details: I folded the edge in half as with the other sides so I could check which end of the opening was furthest from the halfway pin.
Sew the opening shut starting at the end furthest from half way. When you get to the other end, tie off with a knot but do not cut the thread. Then insert the needle next to the knot and move it between the fabric layers to the halfway point. Pull the needle through, sew a knot to anchor your thread and then sew the seam.

Finger press from each sewn corner to its neighbours to shape the bottom. and now you have a triangle pyramid with loose flaps on top.
What you do with those is anchor them down with a button, bow, yarn, or just a stitch - whatever you want.
Fold each side down so the point is just above the folded edge of the bottom and centered between the sewn corners. Secure with your doo-dad of choice.

And when you want to make some gifts to take to a craft retreat, you do it all a few more times!
I had fun going through my button collection and finding some to complement each fabric combination.

The thing I liked about this little basket is that if you're working away from home, you can just fold up the basket and throw it in your project bag. The threads or yarn ends won't fall out.
I will find this very handy as I bring my knitting or hand sewing with me to plenty of places and am always making little piles of cut offs that I hope I will remember to throw out when I leave.
Compelling little shapes, aren't they!

Monday, November 26, 2018

All the Way Around Robin's Barn

That's another way of saying "the long way around" in case you're unfamiliar. (Listen to A Way with Words and you'll learn about lots of interesting phrases!)


This project started with a collection of yarn I thought might suit each other in a project. Rummaging around in my stash brought out the pale yellow angora mix from Fleece Artist and I got an urge to use it up.
I knew I had some mohair remnants that I thought might work well with it.

I first tried a stitch from a free pattern I got from a yarn store that was written for a light mohair yarn.
I held the angora with one strand of the mohair, switching colours every two rows.
With the two strands of yarn, the fabric was not airy enough. I soon took it out.

I tried again alternating one strand of angora for two rows with one strand of mohair for two rows, while changing which colour of mohair I used from stripe to stripe.
I didn't mind the effect, but quickly realized that I would not have enough of the mohair to get very far. My Ravelry listing for the light purple has a lot more yardage listed than I have. I wish I could solve the mystery of where that yarn went, (I'm one of those who likes to keep their Ravelry listings up to date) but in any case, there wasn't enough for this idea. I considered making a narrower rectangle, but that didn't really appeal to me.

These are the bits I was left with after the second try since I had cut the yarn between stripes:
Then I bagged up the mohair and put it away for another day and started again with just the angora.

I had just seen a pattern from Churchmouse Yarns on Kristy Glass's video of her visit there which looked like just the thing. It was an airy triangle "kerchief" designed with a mohair/silk blend.
It's a repetitive pattern done on large needles and it didn't take long to make some serious progress:
A good stretch during blocking really opened up the pattern and the large eyelet borders:
It's not a very large piece,
but is just right for wearing around your neck
and adding some fluffy warmth on chilly days.
Even though the kerchief is more holes than yarn, it is seriously warm. I had it on the other day and I felt like I could feel heat radiating from it!

It does shed. Little hairs drift off and tickle my nose while I'm wearing it and my clothes look like I have a pet after I take it off. Some days worth it; some days not.

Project Stats
Started
: 17 Oct '18
Finished: 22 Oct '18
Pattern: Blackberry Kerchief by Churchmouse Yarns and Teas
Materials: Fleece Artist Peter Rabbit (colour Cornflower), 45 grams

Friday, September 18, 2015

Mesh Stripe Kerchief...Success!

I finished the linen kerchief I was working on. It is a smallish triangle of fabric to wear around my neck when I want a little warmth. It's cool feeling against my skin (even as it's keeping me warm) which is lovely in summer.

I had a hard time stopping this one. I really didn't want it to get too big but I was so enjoying knitting with the linen and the simple pattern.

I believe I mentioned before that I alternated rows of stocking stitch with rows of the mesh. The mesh is a simple combination of knit-2-togethers and yarn overs on one half and the mirror image SSK and yarn overs on the other. You wouldn't have to mirror image, but I can't help myself.

For the shape, I increased two stitches at the center on every other row and one stitch on each edge every row. The extra increases on the edge made the ends extend a little further than a regular 45-degree angle would have done. I thought that would make the ends a little more suited to tying.

I wasn't planning to add a border on the edge but as I got closer to the end, I realized that it would roll horribly if I didn't do something.
So I added a few rows of seed stitch, which mostly does the job. I thought the texture of the seed stitch would also play off of the mesh texture nicely. I finished off with what I would call HJSSBO (Half Jeny's Surprisingly Stretchy Bind Off) because I added a yarn over on every other stitch only. It came out the perfect amount stretchy.
I am really pleased with the final scarf. I looked a few times for a pattern that matched what I wanted and couldn't find one. This came out pretty much just like I was thinking.
Even though I think it's a pretty colour, it's a bit odd and I don't seem to have a lot to wear with it. But as you can see from these pictures, sometimes I don't care and just wear it anyway. :) These were taken when I had a chance to walk along the river in Niles and enjoy a day where the sun was just warm enough and the breeze just cool enough to make it perfect outside.

I have plenty more linen from the sweater I raveled to get it so now I'm considering what other things I could make from it. I really did enjoy working with it even though it should feel more like cotton (ew) than wool (yum) while I'm knitting it. I briefly considered a skirt, but I know I don't have enough for that!

Project Stats
Started
: 15 Jul '15
Finished: 13 Aug '15
Pattern: Mesh Stripe Kerchief (my own) More details here if you want to make your own.
Materials: 81 grams raveled linen (lace weight)


Monday, May 30, 2011

Starting and Restarting

I mentioned a new project that I said I was obsessed with--I've started a stole. I plan to give it to my church if it turns out nice enough. I asked someone there a while ago if they needed a new red one because I had this project turning in my mind. If they had said yes, I would have got right on it. But I never heard back. Then I decided I had to get this project out of my mind whether they wanted it or not! If not, I'll find something else to do with it.

So what is a stole? It's a little confusing as the word is more commonly used for a fur wrap worn about the shoulders. (Well, not that I see too many of those these days.) But this type of stole is basically a long scarf that is worn with its center at the back neck and each end hanging down over the front of the shoulders.

The only difference between what I'm knitting and a long scarf is the shaping given at the back so that it turns the corner while lying flat. That's the basic idea anyway.

I wanted to use my colour changing wool and I wanted to make the gradation mirror itself on the two sides. I did not want to start at one end, knit all the way around and have the colours just fall where they may. So where did that leave me?

I decided to start at the center back, knit a bias square and then knit the two long pieces off of two adjacent sides. (So it would be like two long pieces meeting at a 45^ angle.) Except I couldn't knit the two long parts separately--I would have to knit them at the same time by casting on a few extra stitches and steeking it down the middle when I was done. That way the colour changes would be the same on both sides. Brilliant right?

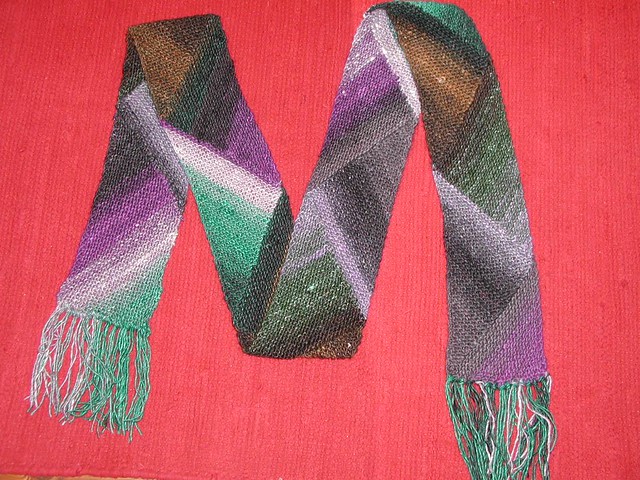
But what pattern to use? I was drawn to the Multidirectional Diagonal Scarf which I had suggested to Amy as a Red Purl knit-along a while ago and it's been a big hit ever since:
It's constructed from triangles in a garter stitch and you can see that it really does interesting things with colour changing yarn. After knitting about a third of mine, I think the scarf is better on quicker colour changes than what I'm working with, but it will still be effective. I like the triangle construction because it's interesting and because of the shape's association with the theology of the trinity. (Or Trinity? Do you have to capitalize that?)

After making some headway on the two long sides pieces, I noticed that the beginning square was wider than my pieces were now. I mulled on that for a while and finally realized that I had let my math training down (again) and failed to realized that I needed to apply a basic geometric principal. The way I had put it together I had assumed that the side of the triangle was the same length as the base. But it's not. So although my beginning square was the right dimension, my long scarf parts were too skinny.

For a while I figured it wasn't "that bad." Then I figured I could "block it out," but yesterday morning at church (before the service) I finally acknowledged that I had to redo it. So I tucked it away and on the way home, I ripped and ripped and ripped. (I really had quite a lot knitted.)

So now I am back to the beginning. I have figured out the math (thank you, Pythagorean Theorem!), how many stitches to increase and when. I have a feeling I won't be quite as obsessed now that I have a better feel for how the project is going to go (when I start something like this it's always, "just one more triangle" or "just until I finish the colour change") but it's a very easy project to take along with me and knit anywhere. That is always a good thing for finishing projects.

The only disadvantage to knitting this in public is the funny looks and blank stares when I answer the question of what I am knitting. "A stole." Yup, then comes the blank stare or funny look. People just don't know what to do with an unexpected response.

Maybe I'll just tell them I'm knitting a scarf. That should keep them happy.

May I suggest?

I Say! or at least I did once...