Showing posts with label shaping. Show all posts

Monday, May 14, 2018

Wool-Aid Vest

I recently finished a vest for Wool-Aid. I had a bunch of Lopi wool in all the same colour. (My sister actually found one ball in a second hand store for me and it happened to match a few I already had!)

I did some figuring and was not confident I had enough for a sweater, which was my first choice to put it to good use. I also didn't have any more of this wool in another colour, so I couldn't "stretch" the wool by adding some stripes or other colour work.

Finally it dawned on me that I could knit a vest instead. The simplest of solutions are so elusive sometimes!
I based the design on the sweater I finished last fall, which itself was based on the Steppe Ahead Sweater by Irina Makarow. I've made a few more changes so I'm not sure you can call this the same pattern, but I did use her percentage system.

The new thing in the vest was the armhole treatment. I knit the edging along with the body of the sweater to save myself from having to pick up stitches and knit it separately. I did it in garter stitch to match the collar and because garter stitch would "pull in" compared to the stocking stitch of the body.

But there is the issue of what to do about the armhole shaping. I wanted the edging to curve around with the rounded shape.
The trick is that you have to decrease several stitches on one row to get the flattened shape at the bottom of the armhole. I decided to try some short rows in the edging to see if I could get the right fit.
I knit the body in the round (front and back at the same time), so when I got to the armhole I had to separate the front and back to knit them separately. Before starting the front, I cast on 5 stitches for the garter edging. Then I did 6 rows where I knit to the body of the sweater, knitting together the last stitch of the edging and the first stitch of the body (decreasing 1 st of the front), and then turned the work and knit back to the outside edge

The three stitches marked by red were decreased with short
rows, making them all happen on the same row of the front
body. The orange and yellow decreases were made on
subsequent rows while the front was also being worked.
(Note that the stitch marked by the right red arrow is
"off the edge" and can't really be seen from this angle.)
That completed the 3 decreased stitches (red arrows) on one row of the front. Then I worked across the front. I did the same thing on the other side, and then when I came back to this side, I decreased one stitch the same way (orange arrow) before continuing across the front to the other side. I did that one more time (yellow arrow), and that took care of all the shaping.


Here it is from the side with the coloured arrows marking the same stitches:
When I started the back, I did the same thing, but instead of casting on 5 stitches, I picked them up from the cast on edge of the front edging (white line).
I think it came out very well. (If you want more detailed line by line instructions to try it on your own project, see my Ravelry project page.)
I still have a little more of this wool so I'm going to see if I can eke out a pair of mitts.
Project Stats
Started
: 17 Mar '18
Finished: 3 May '18
Pattern: Loosely based on the Steppe Ahead Sweater by Irina Makarow
Materials: Lopi by Reynolds in 101 Teal (386 g)
Size: Chest: 32" / Hem to armhole: 13.25" / Armhole to shoulder: 8"

Saturday, June 1, 2013

Starting Scarpetta

A while ago I showed you a swatch for a shirt,
where I was alternating between two colours of madeline tosh merino light. I like to mix a variegated with a solid to calm it down, but now that I've been working with it, I think this orange is making this fabric more lively, instead of less. The variegated is much darker than I really thought it was and maybe should have been combined with a darker brown. But I'm ok with it--I like the effect; it's just not exactly what I initially planned.

About a week into May, I cast on the project. It's starts with the hem of one of the sleeves, which is a fold over hem. After that you add increases as you work up the arm. When you reach the underarm, you stop working in the round and decrease at each edge to shape the armhole. When it's long enough, you put it aside and start the front.

The front is cast on along what will become the side seam and worked toward the centre for about a dozen rows. Along one edge, you increase for the underarm shaping (you'll see another picture in a minute that will help make sense of this).
The increase called for in the pattern is to knit in the front and the back of the stitch. I did this, trusting the pattern writer. But when I was finished the increases, that edge was too tight compared to the body of the piece:
You should be able to see how the
top edge is pulling in--not good.
And I certainly didn't want it to be tight along the underarms. (Doesn't that drive you nuts in shirts?) So I undid the whole thing (like I said, only about a dozen rows) and cast on again. This time I did a twisted loop increase which adds some extra yarn, and it definitely wasn't too tight. (Maybe even a bit loosey goosey, but I'll adjust that during seaming.)

The second improvement I made while redoing the front part was that I did the provisional cast on over a spare cable needle (thinner than the working needle) instead of waste yarn. The pattern tells you to provisionally cast on both the front and back at the side seams and then sew (Kitchener) them together at the end. Can I get a "Hell to the no!"? So once the front part was done, I started the back by knitting the stitches from the provisional cast on on the front. No seaming. Less time. More elegant. (How bout giving me a "Hell, ya!"?)

Once the little bits of the back and front are done (not very long because it's just the part under the sleeve), you put all the stitches on one needle and start knitting the front, sleeve (which is now really the shoulder) and back all at once. So you're knitting from the hem, up over the shoulder, and back down to the hem.

I've been doing this for a while now (so it seems) and have a ways to go before I do any kind of shaping for the neckline. Today I thought I would try it on to make sure I'm going in the right direction.
It's a little shorter than I expected, but otherwise fit well. The hem still covered the waistband of my pants, and will only stretch further down, so I think it's all systems full ahead.

Here's a close up of the underarm shaping that will have to be sewn later:
The back and front make one "V" and the sleeve makes another, and they all meet and live happily ever after, etc. I've not done this type of shaping before (I don't knit a lot of things side to side), but it will give a better fit than what I think is the usual method of just knitting straight from the sleeve to the body. That leads to too much bulk under the arm and not enough ease over the shoulders (in my opinion), especially for something fitted.

One thing I didn't see coming is just how far up the seam will come:
That is definitely going to be visible and not hidden under the arm, so I am going to have to do some pretty good sewing. But that's a problem for later...

Meanwhile, this is a project that will most likely find it's way into my bags for Squam for some travel knitting. I expect pretty much everyone will be knitting there all the time, but someone on Ravelry warned not to get too ambitious with the projects you bring (or how many) because there's really not a whole lot of down time to get it done. Hmmm....

I have some airport and plane time to fill anyway, so I'll definitely be bringing stuff to do. Troy's socks will end up in there too, I'm sure. (I wouldn't mind if some elves came and worked on them during the nights, but so far no luck. Maybe I'll stop "hiding" it in my purse so they can find it. Right now they're spending way too much time throwing dust around.)

Saturday, February 9, 2013

A Question Answered?

Someone commented on my last post that they couldn't visualize the short row shoulder shaping that I referenced. I'm not going to do a full tutorial, but I thought posting this sketch might help: (This is how I conceptualize it.)
This is the garment shown "right side up." The direction of knitting is
from top to bottom, so this would be upside down of what it would
look like coming off your needles.
The drawing shows shaping for a garment with 75 total stitches, 3 "steps" in the shoulder shaping (of 7, 8, and 8 stitches respectively) and 29 center stitches for the neck.

Follow the line from the top left--this is the cast on of 75 stitches, across the full width of the piece. Then you turn the work and knit until you reach the far side of the neck stitches (7+8+8+29). Then you turn the work and knit across the neck stitches and one shoulder step (29+8). Then turn the work and knit to the far side of the neck plus one shoulder step on that side (8+29+8).

Keep turning the work (short rows), knitting across one additional shoulder step on each side. By the time you knit across all 75 stitches, you can see in the drawing that you have built up a lot more rows in the center than on the edges. This is what gives the sloped shoulder shaping.

Hope that helps a little!

Monday, May 30, 2011

Starting and Restarting

I mentioned a new project that I said I was obsessed with--I've started a stole. I plan to give it to my church if it turns out nice enough. I asked someone there a while ago if they needed a new red one because I had this project turning in my mind. If they had said yes, I would have got right on it. But I never heard back. Then I decided I had to get this project out of my mind whether they wanted it or not! If not, I'll find something else to do with it.

So what is a stole? It's a little confusing as the word is more commonly used for a fur wrap worn about the shoulders. (Well, not that I see too many of those these days.) But this type of stole is basically a long scarf that is worn with its center at the back neck and each end hanging down over the front of the shoulders.

The only difference between what I'm knitting and a long scarf is the shaping given at the back so that it turns the corner while lying flat. That's the basic idea anyway.

I wanted to use my colour changing wool and I wanted to make the gradation mirror itself on the two sides. I did not want to start at one end, knit all the way around and have the colours just fall where they may. So where did that leave me?

I decided to start at the center back, knit a bias square and then knit the two long pieces off of two adjacent sides. (So it would be like two long pieces meeting at a 45^ angle.) Except I couldn't knit the two long parts separately--I would have to knit them at the same time by casting on a few extra stitches and steeking it down the middle when I was done. That way the colour changes would be the same on both sides. Brilliant right?

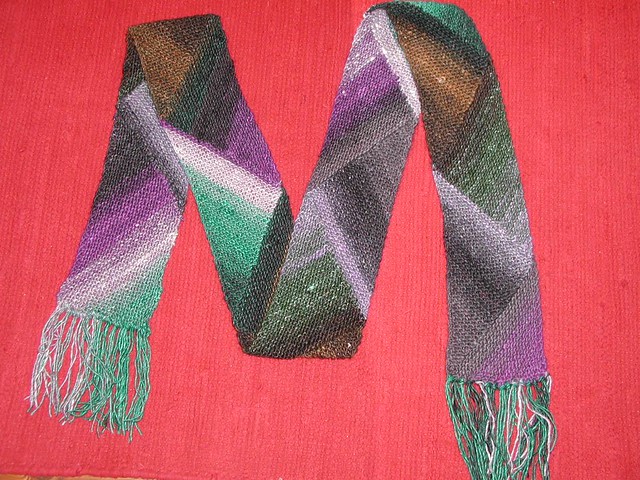
But what pattern to use? I was drawn to the Multidirectional Diagonal Scarf which I had suggested to Amy as a Red Purl knit-along a while ago and it's been a big hit ever since:
It's constructed from triangles in a garter stitch and you can see that it really does interesting things with colour changing yarn. After knitting about a third of mine, I think the scarf is better on quicker colour changes than what I'm working with, but it will still be effective. I like the triangle construction because it's interesting and because of the shape's association with the theology of the trinity. (Or Trinity? Do you have to capitalize that?)

After making some headway on the two long sides pieces, I noticed that the beginning square was wider than my pieces were now. I mulled on that for a while and finally realized that I had let my math training down (again) and failed to realized that I needed to apply a basic geometric principal. The way I had put it together I had assumed that the side of the triangle was the same length as the base. But it's not. So although my beginning square was the right dimension, my long scarf parts were too skinny.

For a while I figured it wasn't "that bad." Then I figured I could "block it out," but yesterday morning at church (before the service) I finally acknowledged that I had to redo it. So I tucked it away and on the way home, I ripped and ripped and ripped. (I really had quite a lot knitted.)

So now I am back to the beginning. I have figured out the math (thank you, Pythagorean Theorem!), how many stitches to increase and when. I have a feeling I won't be quite as obsessed now that I have a better feel for how the project is going to go (when I start something like this it's always, "just one more triangle" or "just until I finish the colour change") but it's a very easy project to take along with me and knit anywhere. That is always a good thing for finishing projects.

The only disadvantage to knitting this in public is the funny looks and blank stares when I answer the question of what I am knitting. "A stole." Yup, then comes the blank stare or funny look. People just don't know what to do with an unexpected response.

Maybe I'll just tell them I'm knitting a scarf. That should keep them happy.

May I suggest?

I Say! or at least I did once...