Showing posts with label Wool-Aid. Show all posts

Wednesday, August 7, 2019

Sweater for Wool-Aid

Here's a project I've been working on in the background. I had a good quantity of wool raveled from a sweater. I believe I purchased it from someone on Ravelry, but I can't find any record of it.

If that memory is correct, what I actually purchased was a half-finished project. I raveled it and ended up with a lot of different balls (about 25) from large (182 grams) to small (7 grams).

It was a nice colour of red and quite a bit of yarn so I thought I would make a garment for myself with it. But after a few years of not doing anything with it, I let that idea go. It was enough that I could make a sweater (or two?) for Wool-Aid.

In February I finished my last vest for Wool-Aid and when I went to post it in the group (we all like to share finished projects), I saw their posted theme for February:
We have a special request from the Kyegu Monastery in Gamrau, India, for turtleneck or high mock-turtleneck sweaters for next winter (maroon, brown, red, and gold items are appropriate). The young monks in Gamrau are between 12 and 18 years old (I’m figuring sizes 32” to 40”). Perhaps we can get a good start on this special request, so we have enough sweaters in their sizes to ship by early fall.
This seemed like a good way to use this red yarn--it was the right colour, I had plenty for a sweater, I like doing the larger sizes, and my favourite shawl colour Vneck style would work great.

So I cast it on and worked on it for the following three months. Then it sat waiting for buttons until the week before the fair. (I entered it in the Pullover-Child category.)
Since they asked for high necks, I adjusted the shawl colour so that it didn't angle in from the lower point. The collar was worked straight until I increased for the upper collar portion.

I had thought I might be able to put a button near the top so that it could be a full turtleneck if the top button was done up,
but decided it was too tight around the neck to actually wear that way.
I also thought about putting the top button further up (see finger below) and spacing three buttons from there to the bottom of the collar. (The top button would not be done up most of the time.)
But in the end, I went with just two. You can still pull the collar up if more warmth is needed on the back of the neck.
Once I had the position of the buttons, I crocheted some loops on the one side.
I slipped stitched from the bottom, working just inside the selvage stitch (along green line). When I got to the place for the button loop, I chained 10, and then continued slip stitching in the next stitch.
After both loops were done, I slipped stitched twice and then pulled the end to the back through the last loop to finish. I thought about doing the trim all the way around the collar because it was a nice finish, but decided not to because both the top and bottom of the collar are seen and the slip stitch looks good only on one side.
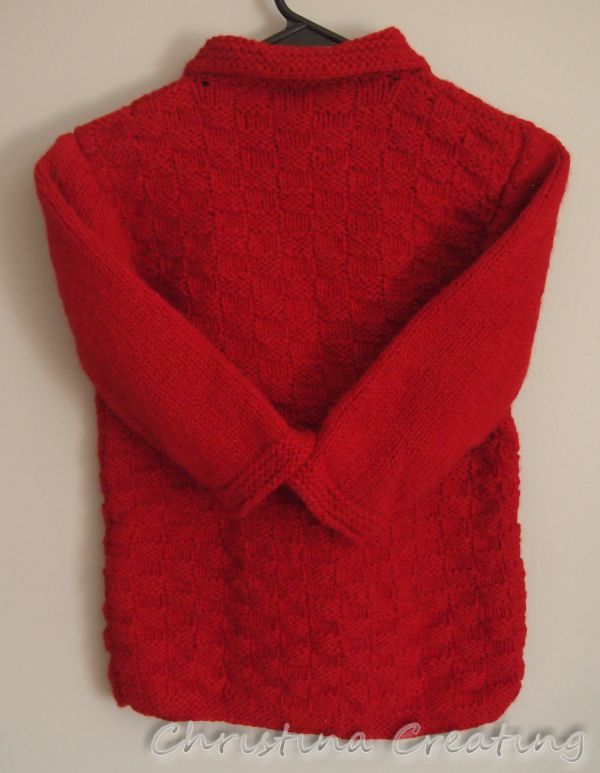
I did a 4x4 basketweave stitch for the main part of the back and front (the texture makes it warmer) with stocking stitch on the sleeves. I did my usual garter stitch edge for the hems of the sleeves and body.
I tried it on to check the collar fit but you can see the sleeves are way too short.
Wool-Aid likes the sweater body to be longer than usual for extra warmth, but it makes the sleeves look really short. I try to make the sweater into "realistic" proportions, but in the end, I figure anything close to reasonable will fit someone!

Project Stats
Started
: 27 Feb '19
Finished: 21 May '19 (the knitting; buttons not until July)
Pattern: Based on the Steppe Ahead Sweater by Irina Makarow
Materials: wool (485 grams); raveled from unknown sweater
Ravelry project page: Wool-Aid Sweater 2019-1 (4)


Monday, May 14, 2018

Wool-Aid Vest

I recently finished a vest for Wool-Aid. I had a bunch of Lopi wool in all the same colour. (My sister actually found one ball in a second hand store for me and it happened to match a few I already had!)

I did some figuring and was not confident I had enough for a sweater, which was my first choice to put it to good use. I also didn't have any more of this wool in another colour, so I couldn't "stretch" the wool by adding some stripes or other colour work.

Finally it dawned on me that I could knit a vest instead. The simplest of solutions are so elusive sometimes!
I based the design on the sweater I finished last fall, which itself was based on the Steppe Ahead Sweater by Irina Makarow. I've made a few more changes so I'm not sure you can call this the same pattern, but I did use her percentage system.

The new thing in the vest was the armhole treatment. I knit the edging along with the body of the sweater to save myself from having to pick up stitches and knit it separately. I did it in garter stitch to match the collar and because garter stitch would "pull in" compared to the stocking stitch of the body.

But there is the issue of what to do about the armhole shaping. I wanted the edging to curve around with the rounded shape.
The trick is that you have to decrease several stitches on one row to get the flattened shape at the bottom of the armhole. I decided to try some short rows in the edging to see if I could get the right fit.
I knit the body in the round (front and back at the same time), so when I got to the armhole I had to separate the front and back to knit them separately. Before starting the front, I cast on 5 stitches for the garter edging. Then I did 6 rows where I knit to the body of the sweater, knitting together the last stitch of the edging and the first stitch of the body (decreasing 1 st of the front), and then turned the work and knit back to the outside edge

The three stitches marked by red were decreased with short
rows, making them all happen on the same row of the front
body. The orange and yellow decreases were made on
subsequent rows while the front was also being worked.
(Note that the stitch marked by the right red arrow is
"off the edge" and can't really be seen from this angle.)
That completed the 3 decreased stitches (red arrows) on one row of the front. Then I worked across the front. I did the same thing on the other side, and then when I came back to this side, I decreased one stitch the same way (orange arrow) before continuing across the front to the other side. I did that one more time (yellow arrow), and that took care of all the shaping.


Here it is from the side with the coloured arrows marking the same stitches:
When I started the back, I did the same thing, but instead of casting on 5 stitches, I picked them up from the cast on edge of the front edging (white line).
I think it came out very well. (If you want more detailed line by line instructions to try it on your own project, see my Ravelry project page.)
I still have a little more of this wool so I'm going to see if I can eke out a pair of mitts.
Project Stats
Started
: 17 Mar '18
Finished: 3 May '18
Pattern: Loosely based on the Steppe Ahead Sweater by Irina Makarow
Materials: Lopi by Reynolds in 101 Teal (386 g)
Size: Chest: 32" / Hem to armhole: 13.25" / Armhole to shoulder: 8"

Monday, October 23, 2017

Sleeves + Seams = Sweater and Shipped

It is finally finished! It only took two years....

Well, sometimes that is what it takes. The main hold up for this one was that the colours I had weren't right for any kind of striping but there wasn't enough of any one colour to use. I decided I could dye two of the colours, but that didn't get done for a long (long) time.

I did finally get to it earlier this year and was able to continue the sweater. Fortunately the notes I made in the printed pattern, which was more like a recipe than a pattern, gave me enough information to carry on.

Last time you saw this sweater, the front and back were done and the collar was knitted on. Everything was ready for the sleeves.

Yes, the sleeves.

The first problem was to address the amount of yarn I had in each colour. I first attempted to knit them in the same stripe pattern as the body, but I didn't have enough of a couple of the colours. I worked on both sleeves at once so I could know right away if I had enough. When I realized I didn't, I had to rip out both of them and decided on a different striping pattern you'll see in a minute.

Then I had decisions to make about the shaping. The pattern called for sleeves with flat tops - no armhole or shoulder shaping at all. This works, but it's not a very nice fit. With wool this thick, it would be especially uncomfortable because of all the unnecessary bulk under the arm.

So I worked on figuring out a shaped sleeve cap that would work. Hmmm, I don't know what I was thinking the first time, but you can see it on the left:
If you can't see how wrong that shape is, let me assure you that it is way wrong. Of course, I had to try sewing it in anyway just to see if it would work. It didn't. So I put it aside and worked on the second sleeve, making a few improvements. You can see it on the right - much better. Once I ripped out the left one and knit it to match, I was able to sew them on to the body.

I decided to use a thinner and stronger wool to sew the seams. As I mentioned before, the yarn it is knit with is a single ply and doesn't hold up very well for seaming. It would also make the seams much too bulky. So I grabbed a leftover ball I had in a sort of "neutral" matching colour and used it instead.

Here is a shot of the mattress stitch before I pull out the slack:
Give a gentle persistent pull, and your seam is all sewn up:
You can't even see the sewing yarn anyway. Here is the seam from the inside:
Still a little bulky. Sometimes people will sew the seam using only half of the selvage stitch instead of the whole stitch. That would cut this bulk in half. I decided not to do it because I didn't think it would work well with the slipped stitch selvage stitches that I do.

Here is a shot of the sleeve seam as well:
And here is the entire sweater:

I don't think you can tell that purple strip had to have surgery:
I adapted the collar of the pattern and I think it worked out well:
I finished the sleeves and hem with a garter band. I prefer it lately to ribbed bands and it matches the garter collar.
Project Stats
Started
: 7 Jul '15
Finished: 17 Sep '17
Pattern: The Steppe Ahead Sweater by Irina Makarow
Materials: Various balls of Lopi, picked up here and there.
Once this was done, I felt it was worth sending a box of woolly goodness to Wool-Aid.
The organization was just recently able to reconnect with a monastery in Gamrau, India. We haven't been able to send to them since 2015. We didn't know why but now know it was because of internet problems and no one who spoke English. Somehow a sponsor in Belgium is now able to act as a go-between and organize things.
There are now 32 young monks, ages 7 to 17 living there (up from 19 a few years ago), plus six elders. Winter weather in Gamrau is severe, and this group has always struggled to stay warm. They have restrictions on what colours they can wear, but my red socks will work perfectly. (And don't worry, the other socks and sweaters will work perfectly well for another group.)

After finishing this sweater, I didn't have a big quantity of any of these colours. I sent them to my sister who's always knitting hats so she could use them up. It will be fun to see what she comes up with.

ETA a picture of the hats she made:
She had them done so fast she was able to get them to me before I shipped the box!

Saturday, September 16, 2017

Project Roundup

I'm not really up to pulling together a narrative today, so I'm going to give you an overview of the projects I have on the go, showing progress since the last time you've seen them.

1. I'm on the second sock of this pair that I started during a trip in July. This might be the first time you're seeing these.

I think this is the prettiest stitch pattern I've ever made:
It reminds me of stain glass somehow.

2. I'm making steady progress on my "Jeans socks" with the yarn I dyed. It's lovely to work with. The rayon in it gives it a very silky feel to my hand.

3. It took a few tries, but I got the sleeves done on this sweater for Wool-Aid. It's partially assembled, as you can see.

4. I like to sit and sew sets of these squares in the evening. I'm keeping them organized in sets for each star.

5. This bit of kntting will turn into a cowl. I've made the pattern before as a gift and wanted one for myself.

It's actually just a start to the set. I really started on it because I want to use a big fur pompom I bought myself a while ago on a chunky hat that will match.

6. This red and yellow quilt is on my list of projects to work on with the UFO* club on Ravelry.
We make a list each quarter and cheer each other on. And hopefully congratulate each other when we finish projects.

The quilting is finished except for the yellow squares so I've been making my way through them. This morning I got the second of three sections of the quilt done.
And there finishes this virtual tour of projects I have on the go.
________________________
*UnFinished Object

Saturday, July 22, 2017

What Happens When I Try to Declutter

Two years ago I started a sweater for Wool-Aid. Remember them? I haven't been knitting much for them. I think it was getting stuck on this project that kept me from doing anything else for them.

I'm using a pattern that's more like a recipe. You provide the measurements and it tells you how to get there with your gauge. I had a bunch of Lopi that my sister found at a second hand store and I figured out a way that I could use the different colours and have enough (I hope) for a sweater.


I liked the various colours (teal, plum, light purple) and I liked the tweed colour and thought it would be good for a stripe between the colours. But the "oatmeal" and "light brown" weren't going to contrast with the tweed enough.

So I tried to dye the light brown to a green with KoolAid. It was not pretty. It was mostly green, but the brown came through as an orange undertone and highlights. Really not pretty.

And the project sat for two years because continuing meant I had to figure out what to do about the dye and included the risk of ruining the yarn for this project.

In the meantime, I had purchased some Wilton icing dyes, something I had read a lot about from others who have dyed with KoolAid. Being an icing dye, it's still food safe and can be easily handled in my kitchen. But it also comes in many more colours and the liquid ones can be combined in many ways to make even more colours. It's also a little more complicated because you have to add acid separately to set it (unlike KoolAid which contains the acid).

So just recently, (probably when I was trying to clear up some clutter and found this project bag in a corner of my living room), I decided to give it another try. I took the horrible green and put it in the pot with a recipe for a deep brown. I took the "oatmeal" and put it in a pot with Wiltons Juniper Green.

Besides adding more green to the pot, I was very happy with the results. The colour was very even and deep. The tone is not perfect with the other colours but is within the acceptable range.

Here's the brown:

And the green:

And so I picked up my needles again and was able to continue the project.
It's a very thick wool being knit into a dense fabric, so not the best summer knitting, but I like to be warm so it's all ok. :)

I'm also happy to say that I kept good enough notes that I could decipher them and think I know the plan for this sweater.

May I suggest?

I Say! or at least I did once...