Showing posts with label sweater. Show all posts

Wednesday, August 7, 2019

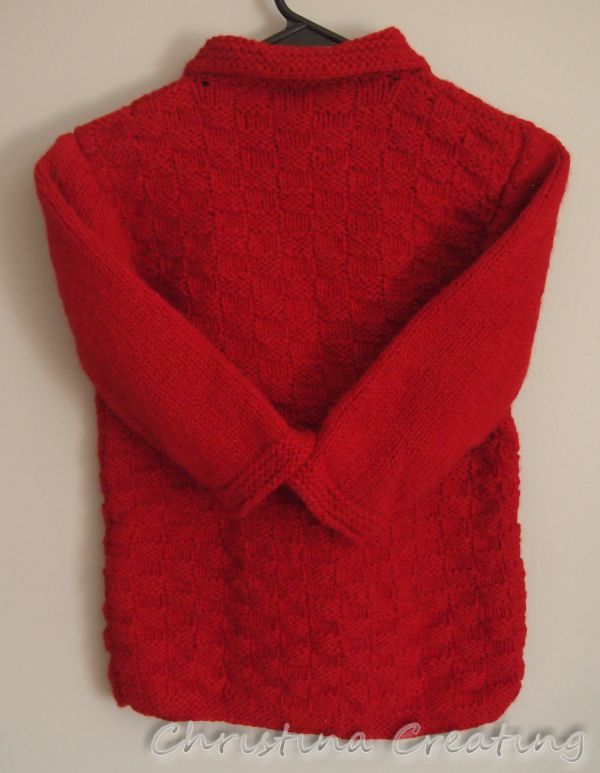
Sweater for Wool-Aid

Here's a project I've been working on in the background. I had a good quantity of wool raveled from a sweater. I believe I purchased it from someone on Ravelry, but I can't find any record of it.

If that memory is correct, what I actually purchased was a half-finished project. I raveled it and ended up with a lot of different balls (about 25) from large (182 grams) to small (7 grams).

It was a nice colour of red and quite a bit of yarn so I thought I would make a garment for myself with it. But after a few years of not doing anything with it, I let that idea go. It was enough that I could make a sweater (or two?) for Wool-Aid.

In February I finished my last vest for Wool-Aid and when I went to post it in the group (we all like to share finished projects), I saw their posted theme for February:
We have a special request from the Kyegu Monastery in Gamrau, India, for turtleneck or high mock-turtleneck sweaters for next winter (maroon, brown, red, and gold items are appropriate). The young monks in Gamrau are between 12 and 18 years old (I’m figuring sizes 32” to 40”). Perhaps we can get a good start on this special request, so we have enough sweaters in their sizes to ship by early fall.
This seemed like a good way to use this red yarn--it was the right colour, I had plenty for a sweater, I like doing the larger sizes, and my favourite shawl colour Vneck style would work great.

So I cast it on and worked on it for the following three months. Then it sat waiting for buttons until the week before the fair. (I entered it in the Pullover-Child category.)
Since they asked for high necks, I adjusted the shawl colour so that it didn't angle in from the lower point. The collar was worked straight until I increased for the upper collar portion.

I had thought I might be able to put a button near the top so that it could be a full turtleneck if the top button was done up,
but decided it was too tight around the neck to actually wear that way.
I also thought about putting the top button further up (see finger below) and spacing three buttons from there to the bottom of the collar. (The top button would not be done up most of the time.)
But in the end, I went with just two. You can still pull the collar up if more warmth is needed on the back of the neck.
Once I had the position of the buttons, I crocheted some loops on the one side.
I slipped stitched from the bottom, working just inside the selvage stitch (along green line). When I got to the place for the button loop, I chained 10, and then continued slip stitching in the next stitch.
After both loops were done, I slipped stitched twice and then pulled the end to the back through the last loop to finish. I thought about doing the trim all the way around the collar because it was a nice finish, but decided not to because both the top and bottom of the collar are seen and the slip stitch looks good only on one side.
I did a 4x4 basketweave stitch for the main part of the back and front (the texture makes it warmer) with stocking stitch on the sleeves. I did my usual garter stitch edge for the hems of the sleeves and body.
I tried it on to check the collar fit but you can see the sleeves are way too short.
Wool-Aid likes the sweater body to be longer than usual for extra warmth, but it makes the sleeves look really short. I try to make the sweater into "realistic" proportions, but in the end, I figure anything close to reasonable will fit someone!

Project Stats
Started
: 27 Feb '19
Finished: 21 May '19 (the knitting; buttons not until July)
Pattern: Based on the Steppe Ahead Sweater by Irina Makarow
Materials: wool (485 grams); raveled from unknown sweater
Ravelry project page: Wool-Aid Sweater 2019-1 (4)


Tuesday, May 7, 2019

Then and Now Vintage Striped Blouse, Start and Progress

I'm getting pretty close to finishing a vintage "Then and Now" blouse so I thought I'd give you the full tour.

Gauge swatch. The gauge didn't match the
pattern but it was what worked for this yarn
so I resigned myself to recalculating all the
stitch counts in the pattern.
It started with a Then and Now knit-along suggested in the Vogue Knitting Magazine group on Ravelry in 2018. The idea was to knit something from a current year (2018) issue ("now") and knit something from the selection of Vogue "flashback" patterns where they take a vintage pattern and update it with modern materials and colours ("then").

My "now" pattern was the pink and black cowl from the Winter 2017/18 issue. I started it in January and finished in April.

I knew pretty early that my "then" pattern was going to be a striped blouse from a 1984 issue but I didn't have any idea what yarn to use.
I wanted something drapey, probably silk. And as usual, I was hoping to get the yarn from a second hand sweater. I couldn't find anything. I purchased a couple sweaters from other unravelers online to try, but they weren't well suited either. (Too thin or wrong colour.)

I looked a little further in the stash and decided a white silk I bought from colourmart.com would work with a tan rayon/linen blend from this sweater. Because I had less white than tan, I figured I had to switch the main colour from white to tan. That was probably better for my colouring anyway.

I knit up a swatch at the end of December to technically meet the knit-along requirement to start the project in 2018. The group is pretty relaxed anyway. I mean, it's not like they won't want to see a finished project just because it was late or that we're competing for cash prizes! :)

After all the calculations for gauge and size, it didn't really look like I had enough yarn, but it seemed to me like I should. Normally ignoring the math for a feeling isn't advisable, but yardage numbers aren't always reliable. So, I started anyway. (Spoiler alert - it's going to be fine.)

The blouse has an interesting construction. The front and back panels are knit side to side, and those are the pieces done first. Besides recalculating stitch counts for gauge, the only change I made was to finish the shaping with short rows instead of casting off stitches over a series of rows.
Along the sides, the top and bottom are knit a little wider
to give waist shaping.
The final effect gives a smoother edge that is easier to seam. No one else will ever notice but I like to take care of the little details.

The next piece is a monster. The yoke and sleeves are knit in one piece that stretches from the cuff of one sleeve to the cuff of the other. Over 300 stitches and each row took a while.
With this many stitches, I had to work on
a circular needle. I switched back to my
straight bamboos after I split for the neck.
I only had a couple small misadventures while working on this piece. While doing the neck shaping, I misread the instructions. Probably more accurate to say I assumed the directions. In many, many cases shaping (increases or decreases) is done on every other row. Well, the neck shaping needed to happen a little faster and should have been done on every row. I realized after 18 rows were knit.
Fortunately that was when I was working on just one side of the neck, so the rows were only about 140 stitches, not 300.

As I got close to finishing the second shoulder, I noticed I had dropped a stitch far below.
I was not eager to rip all the way back. I thought about just sewing the stitch in place, but didn't like that idea other. So I dropped the stitch beside it all the way down too, and then "knit" them both back up. Dropping the extra stitch gives you a little more slack in the yarn to even out the tightness over two stitches. With a final blocking I don't think it will ever be noticeable.

I was happy to finish this massive piece:
I think the neck hole is obvious. The slit will go in the back and be closed up with three buttons. (So vintage, right?) The left and right sides, will curl into tubes and form the sleeves.

Here's the front panel in position below the yoke to give you a bit of an idea (and give me a little motivation that this is actually coming together):
The piece I'm working on now is one of the cuffs:
The cuff in progress under the end of the sleeve.
My first effort was far too narrow. I added about 20 stitches and I think I'm in the ball park now. The size is forgiving as long as it's big enough to be loose around my forearm and small enough to have to gather the sleeve to fit. (Again, so vintage, right?) This cuff shouldn't take too much longer and then I have to knit the second one.

After that, I only have to knit two pieces for the collar. It's nice to be knitting these small portable pieces. I'm looking forward to having this together. I should be able to wear it even in warmer weather so I won't have to wait until next winter to wear it! :)

Tuesday, March 26, 2019

Fond Memories of Iceland

It's inconceivable to me, but apparently I knit a whole sweater and didn't write about it on this blog the entire time I did it. I posted updates on my Instagram feed, but that's not the same, is it.

This sweater started last August when I found the yarn department at a grocery store in Iceland.
I was hoping to find some of the Lopi yarn Iceland is known for. I bought what I hoped would be a sweater quantity of a medium grey,
and a few colours to go with:
I didn't have enough sense to get a white or natural and had to order some after I got home!

It took me a while after I got home to get started, but by the end of September I had picked a pattern and gotten started. Seeing the Telja sweater on Instagram led me to Jennifer Steingass's designs. She has a lot of great colourwork patterns, but after admiring the rest, I stuck with the Telja design.

I decided to avoid colourwork that required three colours to be carried in one row.
I had done that on my Whistler sweater and decided next time it was required, I would skip the third colour and duplicate stitch it on after the knitting was done.
So that's what I did with the yellow and blue (above) and later in the pattern with the green. (I see in the picture above that I didn't wait until all of the knitting was done to start stitching. I think I remember a late night when I wanted to see how it would look.)

Here's the inside of the yoke after the blue and yellow were done:
Instead of three rows of carrying an extra strand, I just have one strand of blue or yellow going from one spot to the next.

Another thing I added to the sweater was a repeat of the colours from the yoke in stripes on one sleeve.
After knitting the first half of the first sleeve, it was obvious that it was going to be far too tight. I redid the sleeve starting with more stitches and re-figuring the increases so that I would end up with the same number of total stitches as the pattern at the same height of the sleeve.

I have made a few sweaters that have no real front or back (which is usually the case with yoke sweaters) and I always end up deciding one should be worn to the back (because of a seam or the colour jog) and then spend too much time trying to figure which is which when I go to put the sweater on.

So this time I took a small piece of red and wove it into the back in the same place a tag would be.
And then found out it wasn't necessary because the designer had added shaping to bring up the back of the neck and lower the front. (Obviously I knew there was shaping because I was knitting it, but I didn't know how effective it would be.)
Sweaters are a lot more comfortable that way. This picture also shows the I-cord bind off that cleanly finishes the edge of the neckline.

The sweater was worked from the bottom up; the sleeves were done first (to the underarm) and then the back and front together.
The pattern included waist shaping so the fit isn't quite so boxy. I ended up having to rework all of those decreases and increases as well because my waist is a different size than my bust and hips. I also shifted the side seam shaping above the waist so the front is wider than the back.
The sleeve cuffs and hem were started with a few rows of stocking stitch before a bit of ribbing.
This gives a rolled edge that looks like the I-cord on the neck edge.
Once I got going, this sweater really flew off the needles. It is a little thicker than yarn I generally work with, but it was still done on fairly small needles (3.75 mm). I really loved working with this lightly spun Icelandic woolly-wool.
Project Stats
Started
: 28 Sep ‘18
Finished: 20 Oct '18
Pattern: Telja by Jennifer Steingass
Materials: Léttlopi in 57 Grey Heather (378g), 0051 White (42g), 1403 Blue (2g), 1703 Mimosa (9g), 9434 Crimson Red (9g), 1406 Spring Green Heather (1 g)


I've never recorded a video of a finished object before, but I was bowled over by all the noise the birds were making and this was my excuse to record them.

May I suggest?

I Say! or at least I did once...