Showing posts with label colour change. Show all posts

Wednesday, July 24, 2019

Entrelac Socks

While preparing another post, I realized I had never posted about these socks. Not even that I didn't post when they were finished, but I didn't post when there were started or any of the middle either.

These socks were the result of two things coming together: I decided I was going to use the sock yarn I had purchased in Iceland and a sock idea taken from a fellow Raveler.

User carolkimball regularly shows off her entrelac socks with replaceable soles in our "Unravelers" group and I decided to try it for myself. Entrelac results in knitting on the bias which results in stretchy fabric for a comfortably snug fit.

I found a pattern for an entrelac sock to get me started and would make the rest up from there. I started at the cuff and knit them top down. The yarn changed colours gradually,
and since the squares are built up in horizontal rows,
by the time you work your way around the sock, the colour has changed for the next row.
Which gives a really delightful effect that looks far more difficult than it is. (It also makes for some rather addictive knitting. Entrelac itself is bad enough since you do it in tiny chunks (one square at a time), but add changing colours and you don't have a chance of resisting "just one more"...)

Once the leg was done, I left the pattern completely and started my version of a replaceable sole. A picture of the parts might help:
When the leg was done, I cast off half the stitches, which would become the top of the heel. (In the picture above, the leg is on the right and the cast off can be seen to the left of the dark blue squares.) I then cast on the total number of gusset stitches at each end of the remaining live stitches. (This is the long flat side of the triangle wing parts.)

I worked back and forth on these stitches, decreasing the extra stitches I cast on as I would for any gusset until I had the original number of stitches again. Then I knit straight (this is the top of the foot) until it was time for the toe.

I debated whether the toe should be part of the main sock or part of the replaceable sole. I think most people would put it with the sole because the toes wear out quickly as well. But I've never had a toe wear out--I get most of my wear on the heel and balls of my feet. So I put it on the main sock. I did a short row toe so it flowed over the front of the foot to the back. (Seen on the left in the picture above.)
For the sole, I cast on half the total stitches for the leg (which is the same number as for the straight part of the top) and worked back and forth. I started with the heel flap. In this case I used a slip stitch variation. I did twice as many rows as the number of stitches cast on for each gusset and then did some short rows to turn the heel.

All that was left was to knit straight until the length reached from the heel to the start of the toe. In the picture above, the sole pieces look like flat rectangles, but there is a bump in there for the heel shape; you just can't really see it. (It's most apparent on the left sole--you can see some wrinkles where the red changes to purple.)

Once my pieces were blocked, I sewed them together. I decided on a whip stitch (also called an overcast stitch, I think). It's visible, but it's also very flat which is important for comfort.

Deciding to add the toe to the top of the sock instead of the sole meant the seam was on the bottom. I debated about this for a white because that doesn't sound like a good idea. But the seam really is flat enough I don't notice it.
I used a different sock yarn for the seaming. I wanted to make sure that it wouldn't felt in with the sock and become impossible to pull out. The main yarn was fuzzy and very feltable so I went with a smoother yarn. (It may not even be all wool.)
The colours were similar but it matches in some spots (below) better than others (above).
But that's hard to avoid pretty much no matter what you do when you're working with a yarn that changes colours!
The changing colours that make the entrelac so pretty also really emphasize the way the sock is constructed. It's hard to miss the fact that the sole and top of the sock were knit separately.
Project Stats
Started
: 2 Apr '19
Finished: 15 May '19
Pattern: Started with buttercupia: Noro Entrelac Socks by Jamie Fritz
Materials: Hjertegarn Kunstgarn (colour 07)
Ravelry project page: Memento of Iceland - Entrelac socks

Now I only have to wear them long enough to wear out the sole and then I can let you know how easy or difficult it is to replace the sole with a newly knit one!

Tuesday, April 29, 2014

A New Project: Mesa

I'm working on a new project! With all the time I had on my recent vacation, I got a lot done:
"What the what is that?" right? I know. It's a strange one.

Let me break it down.
Well, the top looks like it might be the
neck-hole.
Here we have a sleeve-hole.
And I guess this is the other sleeve-hole.
Well, that looks like a sweater, right?

Here I am trying it on:
It's not as loose as I was hoping, but I'm going with it.
The pattern is written in one-size only. You up- and down-size it by changing your gauge. I did one gauge swatch and then went up a needle size when I started the project. Not the most thorough way to do things, but I figured this whole thing was crapshoot anyway. (With the bias shaping, it's not quite as simple as (gauge)x(number of stitches)=(inches around).)

I saw this sweater pattern on Ravelry and was instantly intrigued. You should be able to see more examples by clicking here: Enchanted Mesa by Stephen West. It's by the same designer who brought you "swants." I didn't buy it right away but when later on I saw another design of his that I liked and realized they were available in the same e-book, I went ahead and bought it.

Although I believe West is American, he lives in Amsterdam. When my mom and I started to make plans to go to the Netherlands this June, I thought it was the perfect excuse to go ahead and make the project! (It doesn't take much to start a project you want to do!) I think it will be about the right weight for the weather and fun to see in all of the photos I'll be looking at after the trip.

Most people used multiple colours on the top wedge sections and made the rest of the sweater neutral. Since I wanted to use the colour-changing yarn I had, I decided to make the wedges more neutral. I used the coloured yarn between the wedges, using a different colour for each insert. This meant I had to wind the ball to the right colour, cut it, use what I needed from the ball and then cut it off. Then I rejoined the two ends of the ball. The colour changing still works, but there was just a little less of each colour. (I also got to show my mom the magic of spit splicing. She was suitably amazed.)

I started below the collar with a provisional cast on so I could decide later what kind of neck I want (and what yarn to use). I'm not sure I want the cowl. A few people have done just a ribbed collar--like a wide crew neck. We'll see.

I've got a couple more inches to do to make it longer and then I start a short-row section so the hem ends up straight across. Then I will move on to the sleeves. It would be nice if I could get the one sleeve (the left one as I'm wearing it above) to sort of match the stripes in the body, but I don't think that's going to work out.

I really like the colour-changing yarns, but they are challenging to work with if you really like to plan things out. West really encourages using left-overs and whatever you have for this sweater, so we'll see if I can get into the improvisational swing of things.

Monday, May 30, 2011

Starting and Restarting

I mentioned a new project that I said I was obsessed with--I've started a stole. I plan to give it to my church if it turns out nice enough. I asked someone there a while ago if they needed a new red one because I had this project turning in my mind. If they had said yes, I would have got right on it. But I never heard back. Then I decided I had to get this project out of my mind whether they wanted it or not! If not, I'll find something else to do with it.

So what is a stole? It's a little confusing as the word is more commonly used for a fur wrap worn about the shoulders. (Well, not that I see too many of those these days.) But this type of stole is basically a long scarf that is worn with its center at the back neck and each end hanging down over the front of the shoulders.

The only difference between what I'm knitting and a long scarf is the shaping given at the back so that it turns the corner while lying flat. That's the basic idea anyway.

I wanted to use my colour changing wool and I wanted to make the gradation mirror itself on the two sides. I did not want to start at one end, knit all the way around and have the colours just fall where they may. So where did that leave me?

I decided to start at the center back, knit a bias square and then knit the two long pieces off of two adjacent sides. (So it would be like two long pieces meeting at a 45^ angle.) Except I couldn't knit the two long parts separately--I would have to knit them at the same time by casting on a few extra stitches and steeking it down the middle when I was done. That way the colour changes would be the same on both sides. Brilliant right?

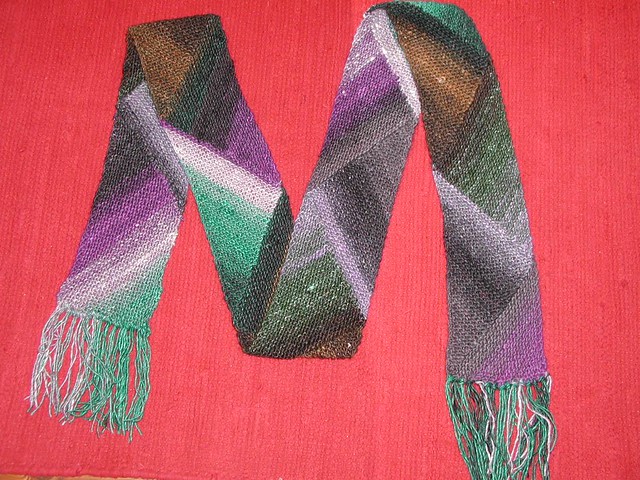
But what pattern to use? I was drawn to the Multidirectional Diagonal Scarf which I had suggested to Amy as a Red Purl knit-along a while ago and it's been a big hit ever since:
It's constructed from triangles in a garter stitch and you can see that it really does interesting things with colour changing yarn. After knitting about a third of mine, I think the scarf is better on quicker colour changes than what I'm working with, but it will still be effective. I like the triangle construction because it's interesting and because of the shape's association with the theology of the trinity. (Or Trinity? Do you have to capitalize that?)

After making some headway on the two long sides pieces, I noticed that the beginning square was wider than my pieces were now. I mulled on that for a while and finally realized that I had let my math training down (again) and failed to realized that I needed to apply a basic geometric principal. The way I had put it together I had assumed that the side of the triangle was the same length as the base. But it's not. So although my beginning square was the right dimension, my long scarf parts were too skinny.

For a while I figured it wasn't "that bad." Then I figured I could "block it out," but yesterday morning at church (before the service) I finally acknowledged that I had to redo it. So I tucked it away and on the way home, I ripped and ripped and ripped. (I really had quite a lot knitted.)

So now I am back to the beginning. I have figured out the math (thank you, Pythagorean Theorem!), how many stitches to increase and when. I have a feeling I won't be quite as obsessed now that I have a better feel for how the project is going to go (when I start something like this it's always, "just one more triangle" or "just until I finish the colour change") but it's a very easy project to take along with me and knit anywhere. That is always a good thing for finishing projects.

The only disadvantage to knitting this in public is the funny looks and blank stares when I answer the question of what I am knitting. "A stole." Yup, then comes the blank stare or funny look. People just don't know what to do with an unexpected response.

Maybe I'll just tell them I'm knitting a scarf. That should keep them happy.

May I suggest?

I Say! or at least I did once...