It was a great privilege to participate in the worship service this morning wherein our new minister was ordained. As part of that, I got to present a stole I had made for her. Here are a couple pictures I got from Facebook:
 |
| In my hand, ready to present. (I'm on the left.) |
Thankfully someone from her family got pictures because I didn't dare have anyone take some during the service (although I was trying to think of some way I could get some).
Now that you've seen how the stole looks on, I'm going to get into some of the details of how it was made.
I talked about knitting the stole
here and
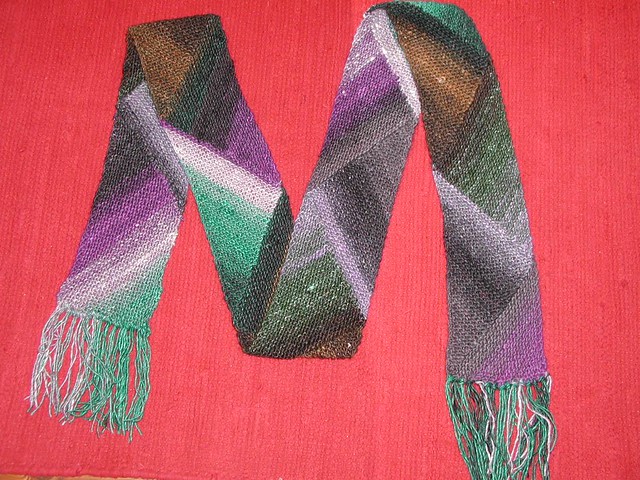
here. The summary is that I took a scarf pattern and knit two scarves side by side and then cut a steek up the middle to separate them. They were joined at the back with a 45 degree angle. (I knit them side by side to make the colours match.)
 |
| Knitted item. |
 |
| Sewing along both sides of the centre stitch. |
 |
Cutting up the centre stitch. I did the centre
three stitches in a P-K-P rib so the centre
stitch would be very easy to follow. |
The knitting was completed in August of 2011. I really enjoyed the process, but once it was done, I didn't think the colour change was dramatic enough to really make the triangles enough of a design element. The stole ended up in a ziplock bag in a box. I figured I would unravel it one day when I had another project I wanted to use the yarn for.
But then I found out that we were calling a new minister and she said she was interested in a stole made by me. (It's amazing how motivating a little appreciation can be!) And so I started to rethink this stole that I had knit. What if I just used it as a base? A starting point for something more...
So I thought of embroidering on top of the garter stitch scarf. More like weaving really:
I got the idea from a
cowl pattern by Franklin Habit. It ends up looking woven and I thought that might be just the thing. Plus the yarn worked through the stitches would help to stabilize the fabric. (Garter stitch is very stretchy and on top of that the weight of the stole hung along the bias.)
I used a silk blend that I had in a pale gold colour. The more I did, the more perfect I thought it was.
It would have been too much if I did the whole stole and I did just the bottom portion:
Yes, there's a pale red triangle on the bottom without the embroidery. I can't remember if I decided to do that on purpose or if I just forgot at the time. But when I noticed it, I decided to keep it that way.
Next step was to work on the embroideries I wanted to apply. First I traced the triangle shapes they were going to fit on and then I drew several symbols (based on ideas from a Google image search):
I traced the symbols onto embroidery cloth with a water soluble pen:
Yes, the lines are a little messy, but they're just a guide so it's ok.
Here you can see the first layer of embroidery. In order to make it have more body, I stitched perpendicular to the direction I wanted the final stitches to be. Then I worked over them with the same colour in the other direction. This way the stitching stands up higher and the layer underneath fills in for any gaps in the stitches so white won't show through.
Here are three finished designs:
I decided to use a red silk blend for some accents on the cross and then decided it would be good to fill in some of the gaps on the other shapes to make them easier to cut out and make into a patch to be sewn on. (The red was done in one layer only to allow the design to "pop up" and stay dominant.)
Meanwhile, I had to continue finishing the body of the stole. I decided batting (my first idea) was too thick and heavy to use to stabilize the knitting. Instead, I spray basted some flannel to the back side of the knitting, trying to make the knitting as square and "straight" as possible.
 |
Yup, sometimes you use what you've got.
Even when it's pigs and pink roses. |
Once the knit fabric was stabilized with the flannel, I cut out the correct shape from batik fabric for the backing. I put the layers together, right sides together, and sewed around all the edges. I made sure to cut the batik extra big and sewed from the knit side so that I could follow the edge. (Although stable, it still wasn't perfectly straight and square.) I left a gap along part of the edge and turned it inside right more easily than I thought I would.
Here is a view of one end:
It already looked so much better. Fabric was stable. Edges were straight and even with each other and I corrected both the length (had to come up half a triangle) and the angle at the back (had to make it steeper than 45 degrees). It sat on my shoulders really well and I was starting to think this was really going to work!
Next step was a little quilting to hold the layers together and give a little depth and texture. I started at the bottom of each side and went up to the centre back by following the zig zag path of the lines between the triangles.
I was using the walking foot to keep all the thick layers moving together, but it was catching and pulling on the silk embroidery thread, so I switched to my new clear round quilting foot. It worked wonderfully!
I did one more patch based on a celtic design to represent the Trinity.
After I had stitched the gold parts, I was thinking it would be nice to have a contrasting colour for the circle. And then I remembered I had silk in white. It's wonderful to have a stash so that whatever you wish for is already there! :)
To make it into a patch, I trimmed a wide margin of the base fabric and then turned it to the back side with the help of an iron. I basted it in place and then hand stitched muslin to the back along all the edges:
I was going to sew them onto the stole but I decided that pinning them in place would work better.
The original plan was to have the Trinity sign on one side and the three symbols of the persons of the Trinity on the other, but when I "dry fit" it, it was way too much going on. So I decided to finish the one patch and pin it on. I'll finish the other three and then they can be changed depending on the season. (They can also be easily removed when the stole needs to be laundered.)
One last view of her wearing the stole as she ends the service with a blessing:
What a great project this has turned out to be for me, especially as I had once given it up for useless!
Project Stats
Started: 16 May '11 / Finished: 3 Jun '16
Pattern: Adapted from Multidirectional Diagonal Scarf by Karen Baumer
Materials: Evilla Artyarn 8/2, A-85 red variegated, 160 g ($35) and small amounts of silk blends for embroideries; two yards batik for backing ($25); flannel for lining.