Showing posts with label embroidery. Show all posts

Monday, June 6, 2016

Ordination Stole

It was a great privilege to participate in the worship service this morning wherein our new minister was ordained. As part of that, I got to present a stole I had made for her. Here are a couple pictures I got from Facebook:
In my hand, ready to present. (I'm on the left.)
Thankfully someone from her family got pictures because I didn't dare have anyone take some during the service (although I was trying to think of some way I could get some).

Now that you've seen how the stole looks on, I'm going to get into some of the details of how it was made.

I talked about knitting the stole here and here. The summary is that I took a scarf pattern and knit two scarves side by side and then cut a steek up the middle to separate them. They were joined at the back with a 45 degree angle. (I knit them side by side to make the colours match.)
Knitted item.
Sewing along both sides of the centre stitch.
Cutting up the centre stitch. I did the centre
three stitches in a P-K-P rib so the centre
stitch would be very easy to follow.
The knitting was completed in August of 2011. I really enjoyed the process, but once it was done, I didn't think the colour change was dramatic enough to really make the triangles enough of a design element. The stole ended up in a ziplock bag in a box. I figured I would unravel it one day when I had another project I wanted to use the yarn for.

But then I found out that we were calling a new minister and she said she was interested in a stole made by me. (It's amazing how motivating a little appreciation can be!) And so I started to rethink this stole that I had knit. What if I just used it as a base? A starting point for something more...

So I thought of embroidering on top of the garter stitch scarf. More like weaving really:
I got the idea from a cowl pattern by Franklin Habit. It ends up looking woven and I thought that might be just the thing. Plus the yarn worked through the stitches would help to stabilize the fabric. (Garter stitch is very stretchy and on top of that the weight of the stole hung along the bias.)
I used a silk blend that I had in a pale gold colour. The more I did, the more perfect I thought it was.

It would have been too much if I did the whole stole and I did just the bottom portion:
Yes, there's a pale red triangle on the bottom without the embroidery. I can't remember if I decided to do that on purpose or if I just forgot at the time. But when I noticed it, I decided to keep it that way.

Next step was to work on the embroideries I wanted to apply. First I traced the triangle shapes they were going to fit on and then I drew several symbols (based on ideas from a Google image search):
I traced the symbols onto embroidery cloth with a water soluble pen:
 Yes, the lines are a little messy, but they're just a guide so it's ok.
Here you can see the first layer of embroidery. In order to make it have more body, I stitched perpendicular to the direction I wanted the final stitches to be. Then I worked over them with the same colour in the other direction. This way the stitching stands up higher and the layer underneath fills in for any gaps in the stitches so white won't show through.

Here are three finished designs:
I decided to use a red silk blend for some accents on the cross and then decided it would be good to fill in some of the gaps on the other shapes to make them easier to cut out and make into a patch to be sewn on. (The red was done in one layer only to allow the design to "pop up" and stay dominant.)

Meanwhile, I had to continue finishing the body of the stole. I decided batting (my first idea) was too thick and heavy to use to stabilize the knitting. Instead, I spray basted some flannel to the back side of the knitting, trying to make the knitting as square and "straight" as possible.
Yup, sometimes you use what you've got.
Even when it's pigs and pink roses.
Once the knit fabric was stabilized with the flannel, I cut out the correct shape from batik fabric for the backing. I put the layers together, right sides together, and sewed around all the edges. I made sure to cut the batik extra big and sewed from the knit side so that I could follow the edge. (Although stable, it still wasn't perfectly straight and square.) I left a gap along part of the edge and turned it inside right more easily than I thought I would.

Here is a view of one end:
It already looked so much better. Fabric was stable. Edges were straight and even with each other and I corrected both the length (had to come up half a triangle) and the angle at the back (had to make it steeper than 45 degrees). It sat on my shoulders really well and I was starting to think this was really going to work!

Next step was a little quilting to hold the layers together and give a little depth and texture. I started at the bottom of each side and went up to the centre back by following the zig zag path of the lines between the triangles.
I was using the walking foot to keep all the thick layers moving together, but it was catching and pulling on the silk embroidery thread, so I switched to my new clear round quilting foot. It worked wonderfully!

I did one more patch based on a celtic design to represent the Trinity.
After I had stitched the gold parts, I was thinking it would be nice to have a contrasting colour for the circle. And then I remembered I had silk in white. It's wonderful to have a stash so that whatever you wish for is already there! :)

To make it into a patch, I trimmed a wide margin of the base fabric and then turned it to the back side with the help of an iron. I basted it in place and then hand stitched muslin to the back along all the edges:
I was going to sew them onto the stole but I decided that pinning them in place would work better.

The original plan was to have the Trinity sign on one side and the three symbols of the persons of the Trinity on the other, but when I "dry fit" it, it was way too much going on. So I decided to finish the one patch and pin it on. I'll finish the other three and then they can be changed depending on the season. (They can also be easily removed when the stole needs to be laundered.)

One last view of her wearing the stole as she ends the service with a blessing:
What a great project this has turned out to be for me, especially as I had once given it up for useless!

Project Stats
Started
: 16 May '11 / Finished: 3 Jun '16
Pattern: Adapted from Multidirectional Diagonal Scarf by Karen Baumer
Materials: Evilla Artyarn 8/2, A-85 red variegated, 160 g ($35) and small amounts of silk blends for embroideries; two yards batik for backing ($25); flannel for lining.

Friday, September 11, 2015

My Little Sister is Taller than Me

I have finished the embroidery work that I started at Squam in June. Last time I showed it I had finished the figures. Or I thought I had. I believe I added some outlining since then.

What I also did was add various circle shapes toward the outside of the piece. The whole thing is kind of "floaty."

Once everything was stitched, I gave it a good bath. I then let it dry flat and once dry, ironed it from the back side.

Here are the central figures again, now with the blue marking ink gone:
I'll get a little closer:
Isn't she cute? It looks like the threads got ironed funny but that's a white stripe on the dress.

And here is the entire piece:
I'm not sure how to hang it. The teacher I had at Squam just pinned her pieces up directly onto the wall, which somehow seems fitting for pieces done on linens. (I guess linen makes me think of hanging up laundry.) But she tended to do large pieces, up to bed linen size. I'm not sure this little piece could pull it off. I thought about a shadow box, but now I'm thinking I'll cover a board a little larger than this in fabric or old wall paper and pin this piece to the board. That way it won't have a formal frame but it will still have some context.

I would like to do more of these but it does seem like "work" to me. I need to get over that....

Saturday, June 13, 2015

Spring Squam 2015: Thread and Memory (Embroidery Project)

My second class was an embroidery/stitching class with Joetta Maue. As I mentioned, the first half of the class on Friday afternoon was spent working out the topic of the piece and how to narrow down ideas to what you're actually going to stitch.

I had come to Squam with the idea to somehow stitch about memories I have of driving to meet the school bus every day with my younger sister. We spent hours in the car over the years we both attended high school. A lot were spent in silence, but we also had good talks, times singing with the radio and, regretfully (inevitably), times when I wasn't at my best and we bickered and I exhibited other unkind behaviour.

I didn't know how I would do this at all, and my options ended up being limited by the only photograph I had brought along of the two of us. I certainly wasn't going to (I would say, couldn't) draw something original so I worked from this picture of our two young selves:
(Aaah...isn't that a sweet picture!?)

With Joetta's advice and help, I got the basic lines of the picture copied to tracing paper:
And then I traced it to a napkin I had brought along to stitch on:
We used a water soluble pen so don't worry, the blue marks won't be on the final piece. This is as far as I got the first day, but it was a difficult process for me. (I get so frustrated trying to draw anything.) But I got through it with Joetta's encouragement and was happy to have a design to stitch by the end of the day.

The next morning, I made it to the second half of the class looking forward to getting to the stitching. I was most worried about the faces so the others encouraged me to start with that.
While I was working with a bunch of colours, I worked with the others in the cabin porch.
I had a whole mess of floss that I had taken with me. (Thank you, sister Bonnie, for passing them on to me!)
Once I had done some of the details and knew I would be working with a limited number of colours for the clothing, I chose the colours and moved into the sunshine on the dock.
It was a glorious way to spend the morning!

Toward the end of class, we all gathered again and each of us showed what we were working on and talked about the piece for a minute. I love hearing about others' projects and what they were about. I think only one person was close to finishing her piece. (Joetta complained that the problem with teaching embroidery is that she never gets to see a finished product and asked us to email her pictures later!)

I didn't take any more progress pictures, but I can show you the current status of the piece. I just finished the figures last night:
There are some things I'd like to be different, but I kept reminding myself to just move forward. When I show people how to knit, I find it unhelpful when they constantly want to undo what they've done because there's a hole or loose tension or other problems. In the early tries, you have to just keep going for a while. So that is what I told myself about this piece.
Sure, I think my eyes are kind of freaky, and I could go on and on, but really I need to just continue to see how the rest will come out. Stop holding it six inches from my face and look at it from a reasonable distance. And, if I continue with this, there's a good chance I will do a series on the same theme, even based on the same picture. But this is where it is right now.

And you know I'll keep you updated as more develops.

Saturday, December 13, 2014

Socktoberfest (or is it Desockember?)

So it's been a long time since Socktoberfest but I honestly have not been hung over for all this time. I swear. (Even though I did have really bad hiccups this afternoon. While shopping. It was embarrassing. Wait...are hiccups a stereotype for when you're drunk or hung over? I have no idea. And are we still using the word "stereotype" or do I have to say "meme" now? It's hard to keep up when I've been doing all this Socktoberfesting...)

The bulk of my sock knitting in October was on a Christmas gift. I wasn't sure if I was going to show them to you all, but I just finished the last fiddly finishing work and I don't want to wait!

Apparently the first picture I took of these socks was when the knitting was completed:
I mentioned that they were a special shade of blue and now you can see why.

I had seen similar socks on Ravelry and decided to make some as a gift this year. When I went looking for specific patterns, the one I ended up liking the best was actually just a chart for the leg design. You were on your own for the rest of the sock. Considering I usually ignore everything but the pattern design in sock patterns, this was perfect for me.

The chart was writen for 80 stitches, however, and I reduced it to 60. Many people reported that 80 was too big and I was making them for a smaller foot. (Although I am really, really nervous right now that they won't fit. Let's hope that's paranoia talking and not experience.)

Although I worked quite steadily on them in October (as far as I remember), they were not done until November 8. Then they sat, waiting for the final touch--the embroidery.
The original pattern called for the letters to be knit in fair-isle style but since I was converting from 80 stitches to 60, I thought it would be easier to do them at the end. My first plan was to duplicate stitch them, centering the letters on the front of the sock, but the thought of duplicate stitching over the black background just made me sad.

So I copied another Raveler and stitched the letters with simple embroidery stitches. It was still a little saddening to try and get the letters even and matched. (Those four "O"s were stitched a number of times each, I can tell ya!) But it's done and I like it.
As long as they fit...
Project Stats
Started
: 13 Sep '14
Finished: 8 Nov '14
Pattern: Tardis Socks by Gina Waters (free)
Materials: Cascade Yarns Heritage Solids & Quatro Colors ($14.75) in a pretty convincing Tardis blue colour of 5603 Marine (.6 skein). I also used bits of black wool and white wool/angora raveled from sweaters.


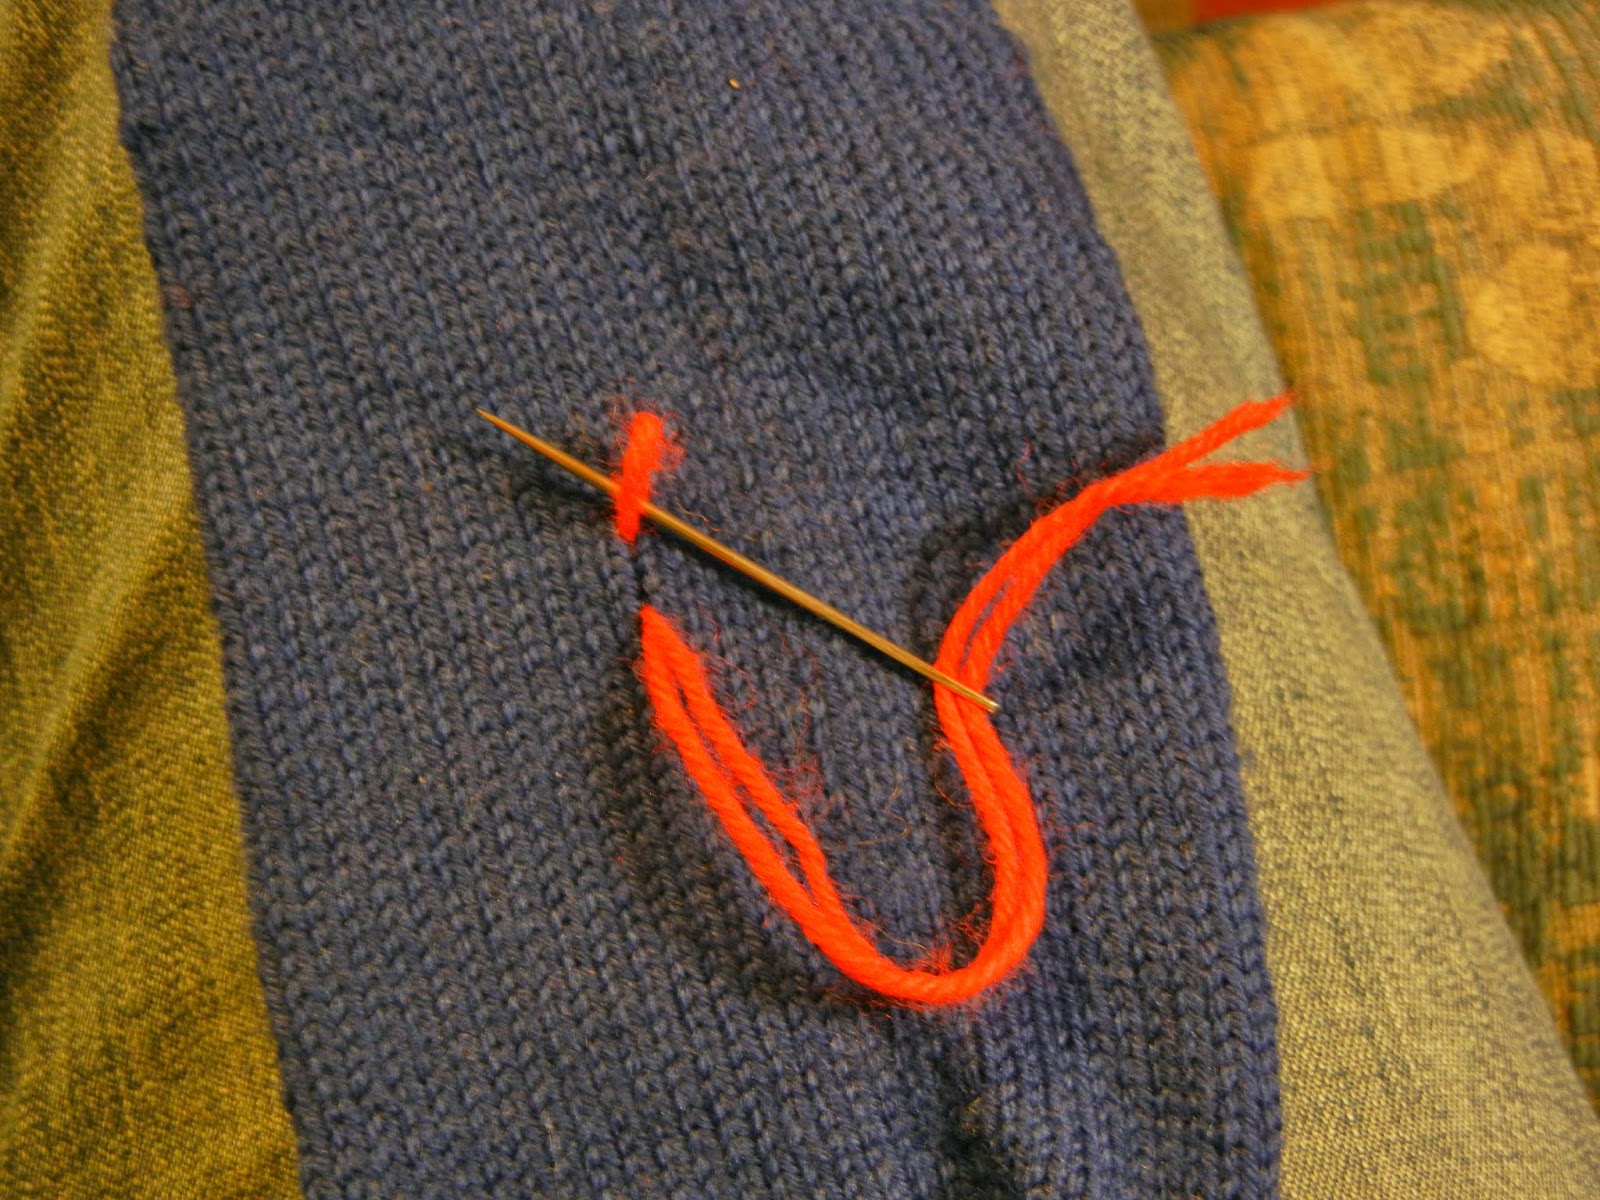
Since I don't have a lot of progress pictures to show you, I'll give you a little tip instead. I stitched the letters with a double strand of white yarn. Now I used to thread the yarn on the needle, pull the two halves even, and make a knot:
But then you've got a knot at the end and ends to work in. (This is for sewing. For embroidery, I would skip the knot but leave a length of yarn that had to be worked in later.)

Instead, I now thread both ends of the double strand through the needle like so:
That leaves you with a loop at the other end. When you start stitching, you can put your needle through the loop on the wrong side after the first stitch:
and there will be no knot and no end to work in:
This is still showing the wrong side. Now that the end
is secure, you can continue stitching.
I thought this was genius when I first saw it. Hope you like it too.

Monday, March 10, 2014

Little Sister's Dress

I finished another project!
Isn't this the cutest little dress ever!!
It's knit top-down and starts with some alternating bands of stocking stitch and reverse stocking stitch.
The simple stocking stitch skirt was just begging for a little embellishing.
I free-handed a flower and stem on there.
I tried to do a chain stitch with a crochet hook, but it was nearly impossible. Especially since I was using raveled yarn and it was very splitty. After a few tries, it finally occurred to me that I didn't have to do it with a crochet hook. I found my blunt needle and did an embroidered chain stitch. This was definitely one case where a twisted yarn would have been much better. Not just for ease of working with it, but it would have looked better too. Now I know.

When I crocheted around the top opening, I added a little loop for a button and the last thing I did was sew on a little button:
When I sewed it on, I anchored it with a button on the back. I chose a nice smooth one so it wouldn't be scratchy or pokey. It serves as a cushion for the shaft from the top button so it won't poke either.
I followed the directions for the 6 month size but with this yarn and gauge, it came out closer to the 18 month size. But the versatility of this design means it can be worn as a dress as soon as it fits, then worn as a tunic and then a shirt as baby grows taller. As long as the neck fits, it should be good.

One more look? Sure...
Project Stats
Started
: 15 Feb '14
Finished: 3 Mar '14
Pattern: Little sister's dress (Kjole til lillesøster) by Tora Frøseth Design
Materials: 73 grams cotton (~DK weight) from a Jeanne Pierre sweater ($5.00) and a little bit of mustard-coloured raveled cotton


May I suggest?

I Say! or at least I did once...