Showing posts with label Scarpetta. Show all posts

Friday, July 26, 2013

Scarpetta: Finished (and Fixed)

I know you're wondering...did the blocking work miracles? The short answer is: yes. :)

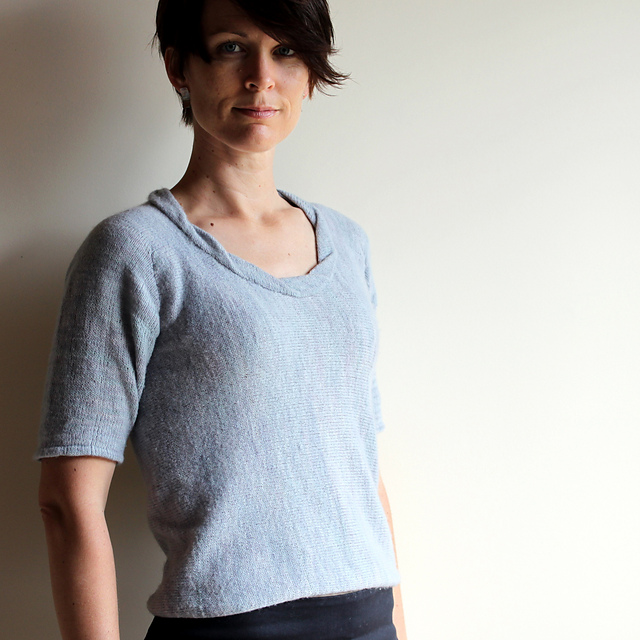
I thought I'd let you see the finished (and modeled) Scarpetta before it went out to the world (i.e. was entered in the fair).
I won't have a chance to wear it this week. For one it's a little warm for a wool shirt. But I also don't want to ruin the fresh blocking before the fair. (Or chance anything happening to it. I don't have a back up for this category.)

The good news is that when I tried it on, I could tell most of the problems I had with it pre-blocking had mostly disappeared.

1. The length hit just past my waist band,
and this is on a relatively low rise pants. The shirt also doesn't pull up when I raise my arms so I don't need any extra length to make up for that.

I'm really happy with how the I-cord hem is sitting. I'm half-tempted to knit or twist up a little cord to thread through the rolled hem and tie on the outside. I wouldn't really pull it any tighter, but it might be a cute detail. The rolled hem just seems to be asking for it.
Here's a more detailed look at the front and back of the rolled hem:
It's very narrow, but that suits the scale of the fabric.

2. The sleeve length was shortened since I pulled aggressively to increase the width.
They now hit the tiniest bit below my elbow. Not as good as if they were an inch higher, but I can live with it. (For now. When I made this observation to Troy, he told me to fix them. I said it would be too hard because one of them is knit from the hem up--you can't ravel that direction. But then I realized since I want to make them shorter and not longer, it wouldn't be as much work as I think. Instead of raveling from the edge, I would just have to cut the yarn and take out one row the hard way. I'm not up to it now, but maybe one day you'll see this shirt in a Fix It Friday segment!)

3. The underarm seam was stretched out enough that it no longer pulls up uncomfortably into my underarm. I still think it looks a little odd, though. You can see here just how high toward my shoulder it goes:
But on the other hand, when I was trying to take pictures, there were lots of poses that I couldn't use because it didn't show the seam off well enough...in other words, I realized, it's usually not obvious at all.

Another thing I struggled with while blocking was getting the collar to lay nicely. I first pulled it to the outside of the neck opening, but it wasn't working. When I re-examined the pattern pictures I noticed they blocked it to the inside of the neck opening.
I think that provided the maximum amount of fabric for the opening so that you could get more drapes and folds. I was worried it was going to be thick and bulky, but it blocked quite flat and I think it is fine.

I also thought that it was too small compared to what I want it to be, but I no longer think so. I don't think I would want it more open. So that is all good.

(I feel like I'm writing "Disaster averted" at every turn!)

This was a great knit. It was always an adventure since I was working with two colours and alternating every row. While working in the round, this is not a big deal. But once I was working back and forth (everything but the bottom part of the sleeves) I had to adapt everything. Because when you're alternating colours you can't knit a row, purl a row like you always do. Once you knit a row with colour A, your next colour (B) is at the "wrong" end. Fortunately, with cable needles, you can go back to the beginning of the row and knit it again with colour B to make your stripes work. Then you purl with A, then purl with B. On and on...knit, knit; purl, purl. But of course, the directions are written for knit, purl, knit, purl. This assumes you're working from a certain direction, and that the wrong or right side of the pattern is facing you on particular rows. Anyway, it keeps you on your toes, and I enjoyed it.

And I loved the colours. I mentioned that I bought the mostly-solid orange to tame the variegated brown, but the result was rather to liven it up because there wasn't a lot of orange in the variegated. It was fun to see how the colours interacted. There are small spots of a brighter greenish yellow in the brown and every time I came to it, I though "ew...that doesn't go with the orange at all." But in the overall effect, they are wonderful bright spots in the pattern of colour.

It's also funny to observe that I don't think I would ever buy a shirt in this colouring from the store. But I love to work with it...and then I get to wear it. I noticed the other day that it very much matches the Nutkin socks that I made a couple years ago. Apparently I like these colours more than I think I do.

Project Stats
Started
: 8 May '13
Finished: 21 Jul '13
Pattern: Scarpetta by Kirsten Johnstone
Materials: madelinetosh tosh merino light, about 1.3 skeins each of 'terra' and 'stephen loves tosh' ($90)
Because I had so many issues with the fit, I measured my gauge after blocking to compare it to the given pattern gauge. (Something I never normally do.) My stitch gauge was very close: 27 sts/4" (pattern was 26). Although this is very close, if anything it would have made the length and the depth of the underarm a little shorter than prescribed.

My row gauge, on the other hand, was 44 rows/4" versus the pattern's 36! That is a big difference. This should have made my sleeves far too short (which, as I've said, they definitely are not), and affected the width of the shoulders and neckline. This is ameliorated, however, by the fact that the pattern prescribes knitting a certain number of "inches" rather than a certain number of rows. (As in most patterns, stitch gauge is more important than row gauge--not that row gauge isn't important, but usually less so.)

That's all I've got on this one. Hopefully I will enjoy wearing it. Thanks for coming along for the ride and for all of your encouraging words when things weren't going well!

Sunday, July 21, 2013

Scarpetta Finished but Maybe Not up to Snuff

Less than a week ago I said I was going to knit, and knit I did.

Escaping the heat by sitting inside knitting a sweater may not seem like the most intuitive plan, but it worked for me!

Once I [finally] got the front and back sections Kitchenered together, I could start on the sleeve section. Since I started at the shoulder, it was decreases all the way to the cuff and every fourth row I had few stitches to do. That helps to keep things moving!

In "no time" at all, I reached the cuff and did a turned-over hem to match the first sleeve. Unlike the first sleeve where I started on the cuff and turned over the hem and knit together with the cast on row, this time I had to turn over the hem and knit together with the stitches from the 10th row previous. But I didn't want to have a big bulky cast off line around my cuff, so I Kitchenered the live stitches off the needle to the 10th row below instead. Yes, "seamless" knitting seems to require a lot of Kitchenering. Good thing I like it.
Hem is partly done. I am working the live stitches off the
needles.
If you've noticed that I have switched to dpns, I'll explain that I did that because working from the cable needle just wasn't convenient for the Kitchenering. I needed to be able to work with smaller groups of stitches at a time.
And the final result! Isn't it pretty? (This is the wrong side.)
Both sleeve hems tend to flip out and I really think I should have taken EZ's advice and decreased 10% of my stitches. But I wasn't thinking that far ahead when I started the pattern.

Once the main body (including sleeves) was knit, I could turn to the collar. First I had to pick up stitches all the way around:
I did my usual "pick up as many stitches as seems right" and then adjusted the number of stitches to match the pattern on the next row. Sometimes you have to decrease; sometimes you have to increase. In this case I needed 192 and was about 20 stitches short. That's about 10% and I can live with that. (On the other hand, if I had picked up stitches and then had to increase 50%, let's say, I would probably redo the pick up row.)

Then I knit and knit and knit in rounds until I had three inches.
Almost there!
I was worried about the gauge of the collar and thought I should have maybe increased my needle size so it wouldn't be too stiff, but I didn't. Once the collar is long enough, you're once again supposed to knit the stitches together with the cast on row as you cast off, but this time you don't match up the stitches with their first row counterparts (directly under them). No, you are supposed to find the stitch 20 stitches over and knit it together with that. This puts a pretty bias twist in the collar.

I had a very hard time picturing being able to do this very well. I could barely find my cast on stitches. Plus I wanted to encase the ugly sort-of "seam" that is made when you pick up stitches.
So I cast off the collar stitches and sewed them to the body of the shirt. I did make sure to shift the stitches by 20 and pinned it all in place before I sewed. I'm still not sure I got it "right," but I got something that works so that's ok.

Once the collar was done, I sewed the underarm seams. You may recall they were funny shaped V seams and I will say they weren't very pretty. The quick decreases and increases you need to do to get the right angle made the edges ugly to work with and I'd say six of the eight of them pulled in too tightly compared to the body. (Even after my changes to the types of increases used.)
Long story short, I did get them sewn (mattress stitch, in case you're wondering), but I wasn't overly  happy with them. I redid one of them and it was a little better the second time, but really I don't think I'm going to like it. The seams come up really high toward the shoulder--something I missed on the pattern pictures. (I think they had a very clever and tricky photographer, and I wouldn't be surprised if a lot of pictures were rejected because those seams didn't look good. Or maybe the designed just did a far better job than I did. If so, I would appreciate her tips on how.)

Anyway, there wasn't much else I could do about.

So. :big breath: I tried it on. The underarm seams were too tight. (They didn't look horrible, but the shirt just wasn't comfortable.) The length is too short (like I feared all along). And the sleeves are too long. On the model, they are a good inch above the elbow (nice) and on mine they are a good inch below the elbow. Just that awkward length were it's uncomfortable to bend your arm because the fabric bunches up there. I guess my row gauge was off? (Except the body of the sweater was too narrow, so that doesn't compute.) Oh yes, I hadn't said that yet. I made it with a little ease (I thought), but it ended up being quite fitted. But not tight, so I can live with that.

It's so pretty though. The colours are gorgeous and I love how they blend. The collar also came out pretty good. I thought the neckline would be a little bigger, but the collar really pulled it in.

I was able to block the shirt tonight:
I first blocked it "by eye" but then went and got the pattern out and looked at the schematic drawings. I made some adjustments and am just hoping it fits better after the block. (The measurement from underarm to shoulder was a full inch smaller than the pattern gave. That's not promising.)

Ah yes...did you notice I have some colourful blocking mats? I found them at a yard sale a couple weeks ago for $2. I've had my eye out and this set was still in the zippered pouch and everything. I was sold on the idea of using these "play mats" for blocking pads from reading online, but I have to admit when I got the blocks out I thought there was no way they would be sturdy enough to hold a garment in place. But, nope, they worked great!

It will be a day or two before this is dry and I can try it on again. Whether it fits or not, the important thing is that it's ready to be entered in the county fair this Saturday!!

Tuesday, July 16, 2013

Scarpetta: One Step Forward...

Last time I wrote about it, I had basically put the Scarpetta to the side because I wasn't emotionally ready to finish it. Since then I have realized that it is only two weeks until the fair and it's the only chance I have at an entry in the pullover category. (I did also do the snowflake sweater this year, but I don't own that one anymore...)

And I was starting to miss it.

So I knit through the shoulder part, and then put the sleeve and back stitches to the side while I knit the part of the front that goes under the arm. When you reach the side "seam," you're supposed to cut the yarn and then knit the equivalent part on the back. But I thought, why have more ends to sew in? So I continued from the side seam to where I had stopped working on the back (reversing the shaping along the way).

Apparently I was having too much fun because before I knew it, I had gone six rows too far! I tinked those rows back, counted my stitches to make sure it was good and then set about Kitchenering 136 stitches together.
You can see I was doing a great job! After a nice blocking you wouldn't be able to tell where the "seam" was at all. Only problem was when I got a little further along, I noticed that I had a lot more stitches on one needle than the other--the count wasn't going to work out even. A more comprehensive analysis showed me that I had been Kitchenering the front to the sleeve stitches instead of the back stitches! GAH!

I took out all that Kitchenering and in the process had the yarn break. It's just a single ply so it really isn't tough enough to take all that wear from sewing the two sides together (and then undoing it). The whole point of re-engineering the side portion was to avoid working in ends, so I split wet spliced the yarn and carefully Kitchenered the correct stitches again.

When I got close to the end of the seam I noticed that my stitch count was two off. (One side had two more stitches than the other.) One stitch off is normal depending on where you are in the process, but two is not good. I took a closer look at my seam and realized I had messed up a good 30 or so stitches back. I carefully took out the seam to that point--no yarn breakage this time--fixed it up and carried on. This time I got it done and it looks great.

Since then I have been going like a steam train on the sleeve. I'd say I'm about half way and that makes me hopeful that it make it to this year's fair yet. Then I remember I have to knit the collar... The thing working in my favour, though, is that there's not going to be any seaming to do when the knitting's done. (You can see I'm on an emotional roller coaster/seesaw on this one!)

The best thing to do would be to knit, so I'm going to go do just that.

clickety-clack!

Sunday, June 30, 2013

Scarpetta Progress (Don't Finish Too Soon Please)

I've been making good progress on the Scarpetta. It went with me to Squam and back. After the first sleeve, I made it through the first shoulder, then across the front with the neck shaping. Then the front gets put aside and you work across the back including neck shaping.

Once the back is done to the second shoulder, you start working on the front and back all in one piece again. That's where I am now.

Once the shoulder was joined on the left side, it was a good time to try it on and see if there are any problems going on.

And the verdict is...I think it will fit well, but I have the same concern about it being too short.

I think you can see that it just hits my waist band. It may "grow" during blocking, but knitting usually grows in the direction it was knit, and on this shirt that means side to side, not up and down. But it's not bad enough that I'm going to rip it out.
If blocking doesn't fix it, my plan B is to knit a "fake undershirt hem" or ruffle from underneath the hem. I think I'll do it in the brown multi colour. I'll certainly have plenty of yarn for it. I'm still working on the first two balls, and probably will just barely use any from the second two balls I have (one of each colour).

I'm also considering a matching cowl to make for the shirt. I really like the "detachable collars" or coordinating cowls that I've seen with several designs over the last year or two. (Noticed after I did the Truffle Tunic with its detached turtleneck.)

When I was done all the shaping on the back and realized that all I had left to do was 36 rows of the shoulder and the last sleeve, I started to feel regretful that it was almost done. I know this is a little silly, but it's a bit like wishing you weren't getting to the end of a good book.

So I put it aside and started something new. I was at a fabric store the other day and was browsing their magazine rack while waiting. The latest Interweave Knits (Summer 2013) had some designs I was immediately smitten with. They used cotton and just cried out to be made! Although the cover one was the one that really caught my eye, after looking at what cotton I had available in my stash (from raveled sweaters), I ended up casting on for this one:
I'm not usually crazy about "kerchief" hems, but I really like this piece. And I had just the right cotton for it:
It used to be a Croft and Barrow "sweatshirt" style sweater. I think it will be happier as a lace tunic.

I started with one of the square shapes that are used to make the kerchief hem as a gauge swatch. The stitch gauge was good, but the row gauge was a little short. I also learned that I should not have slipped the first stitch of each row like I normally do. I ripped back the square and started again. I purled the first stitch on each row so the edge stitch is in stocking stitch. I find it a lot easier to seam than garter stitch edges. (Always thinking ahead!)

I added a couple extra repeats to the pattern and got a 15" square, or it will be after a block the crap out of it!
I started the back next. I've done a couple repeats of the lace pattern. I figure when I'm done the back, I'll be half way and I can weigh my yarn and pieces and see whether I'll have enough to finish...

Saturday, June 1, 2013

Starting Scarpetta

A while ago I showed you a swatch for a shirt,
where I was alternating between two colours of madeline tosh merino light. I like to mix a variegated with a solid to calm it down, but now that I've been working with it, I think this orange is making this fabric more lively, instead of less. The variegated is much darker than I really thought it was and maybe should have been combined with a darker brown. But I'm ok with it--I like the effect; it's just not exactly what I initially planned.

About a week into May, I cast on the project. It's starts with the hem of one of the sleeves, which is a fold over hem. After that you add increases as you work up the arm. When you reach the underarm, you stop working in the round and decrease at each edge to shape the armhole. When it's long enough, you put it aside and start the front.

The front is cast on along what will become the side seam and worked toward the centre for about a dozen rows. Along one edge, you increase for the underarm shaping (you'll see another picture in a minute that will help make sense of this).
The increase called for in the pattern is to knit in the front and the back of the stitch. I did this, trusting the pattern writer. But when I was finished the increases, that edge was too tight compared to the body of the piece:
You should be able to see how the
top edge is pulling in--not good.
And I certainly didn't want it to be tight along the underarms. (Doesn't that drive you nuts in shirts?) So I undid the whole thing (like I said, only about a dozen rows) and cast on again. This time I did a twisted loop increase which adds some extra yarn, and it definitely wasn't too tight. (Maybe even a bit loosey goosey, but I'll adjust that during seaming.)

The second improvement I made while redoing the front part was that I did the provisional cast on over a spare cable needle (thinner than the working needle) instead of waste yarn. The pattern tells you to provisionally cast on both the front and back at the side seams and then sew (Kitchener) them together at the end. Can I get a "Hell to the no!"? So once the front part was done, I started the back by knitting the stitches from the provisional cast on on the front. No seaming. Less time. More elegant. (How bout giving me a "Hell, ya!"?)

Once the little bits of the back and front are done (not very long because it's just the part under the sleeve), you put all the stitches on one needle and start knitting the front, sleeve (which is now really the shoulder) and back all at once. So you're knitting from the hem, up over the shoulder, and back down to the hem.

I've been doing this for a while now (so it seems) and have a ways to go before I do any kind of shaping for the neckline. Today I thought I would try it on to make sure I'm going in the right direction.
It's a little shorter than I expected, but otherwise fit well. The hem still covered the waistband of my pants, and will only stretch further down, so I think it's all systems full ahead.

Here's a close up of the underarm shaping that will have to be sewn later:
The back and front make one "V" and the sleeve makes another, and they all meet and live happily ever after, etc. I've not done this type of shaping before (I don't knit a lot of things side to side), but it will give a better fit than what I think is the usual method of just knitting straight from the sleeve to the body. That leads to too much bulk under the arm and not enough ease over the shoulders (in my opinion), especially for something fitted.

One thing I didn't see coming is just how far up the seam will come:
That is definitely going to be visible and not hidden under the arm, so I am going to have to do some pretty good sewing. But that's a problem for later...

Meanwhile, this is a project that will most likely find it's way into my bags for Squam for some travel knitting. I expect pretty much everyone will be knitting there all the time, but someone on Ravelry warned not to get too ambitious with the projects you bring (or how many) because there's really not a whole lot of down time to get it done. Hmmm....

I have some airport and plane time to fill anyway, so I'll definitely be bringing stuff to do. Troy's socks will end up in there too, I'm sure. (I wouldn't mind if some elves came and worked on them during the nights, but so far no luck. Maybe I'll stop "hiding" it in my purse so they can find it. Right now they're spending way too much time throwing dust around.)

Friday, March 1, 2013

Still Like Knitting

I sat down to work on a project I might even finish with just a little stick-to-it-ness. Instead I couldn't resist some new madelinetosh I had sitting on the couch. I have a pattern in mind but this is a different weight yarn so I definitely have to swatch.

Sometime last year I was in Red Purl and Amy showed me a new pattern she just loved, Scarpetta by Kirsten Johnstone.
I caught her enthusiasm and bought the pattern with no immediate plans to make it (something I don't often do). After I got home, I filed it away and didn't really think I would ever make the sweater. It's knit side-to-side (not a feature I'm fond of) and I just didn't have that "must-knit-it" vibe from it, although I loved the neckline and collar.

Months pass and then I see some yarn in Red Purl I really love, two colours of madelinetosh merino light:
I loved them both and thought they looked good together--Amy said she ordered them because they worked so well together--and I started to wonder how they would work for the Scarpetta. But I thought they might contrast a bit too much for the look I would want. But then I had the thought of using them together, alternating between the two skeins every row so they would blend into a third unique colour.

So last night when I could have been finishing other projects, I started a swatch so I could see what it would look like:
Pretty good, I think.
It was a nice evening of almost thoughtless knitting. Next up I block it and see which of the four sizes of needles I used most closely matches the pattern gauge.

May I suggest?

I Say! or at least I did once...