Showing posts with label cast on. Show all posts

Wednesday, November 21, 2018

Blooming Brioche KAL - Stages 1 and 2

Knitting has continued on the Blooming Brioche shawl. Each "stage" of the knit-along is being released on a Thursday.

It's been a lot of knitting and I am enjoying the brioche and the new-to-me techniques of decreasing and increasing stitches to create the flowing pattern on the front.

Depression has grounded me to the couch recently and sometimes I can't even knit, but a lot of the time I have been able to at least work on this project.

I decided to go with the green and red combination.
It was softer with more drape than the red and black, and my sister assured me it did not look like Christmas. BTW, I just got this comment on one of my Instagram posts: "that screams Christmas !" Hmmm....

I decided to ravel the swatch to use the yarn again. (Some people keep their swatch for reference during the project - I usually don't bother.) I'm glad I did. You can see in the picture below how much of the red bled onto the green during the soaking:
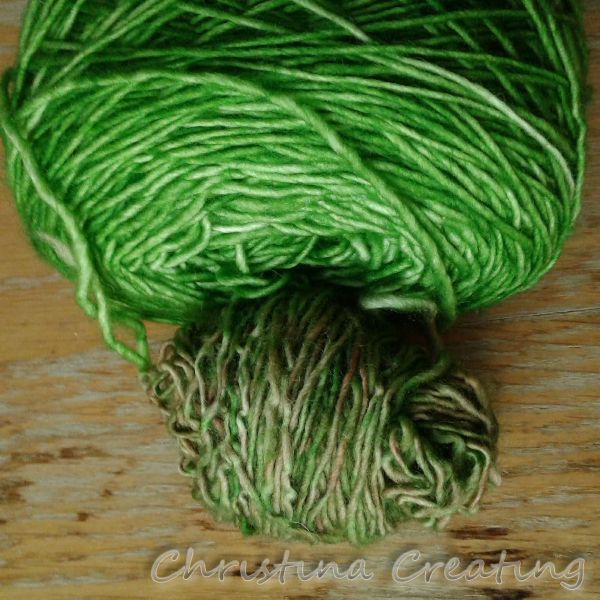
The little (lower) one is from the swatch.
I wanted a bright vibrant green in my shawl, so I set about rinsing the red yarn. It turned the water of several rinses vivid red so I tried a vinegar rinse. (Vinegar helps dyes to set.) The water came out almost clean and so did the next rinse. But the following rinse (just to be sure) was bright red again. Apparently the yarn had enough vinegar in it going into the first rinse that it still had an effect.

So I did another vinegar rinse but heated the yarn. Heat and vinegar should really do the trick. But I got the same result: rinse 1 was clear; rinse 2 had lots and lots of red in the dye. I was out of ideas but still wanted to use the yarn, so I decided I will just have to always rinse the shawl in vinegar water. How's that for cutting the Gordian knot?

The designer (Xandy Peters) has organized the pattern into different sections within each stage. The first was the "roots", i.e. the cast on:
It's a simple but brilliant cast on that gives a completely smooth beginning to the pattern -- a bunch of stitches coming from one point. The red is bordered by a green selvage all the way around. It really is great.

Next was short section of seeds:
And then the bulbs. Here I have the first repeat of the bulbs done:
The back, if you're curious:
Although the back is neat and has an interesting pattern of its own, the shawl is not reversible in the sense that the front and the back are the same.

And now all three repeats of the bulbs are finished:
I'm making the smaller version of the shawl, or I would have had more bulb repeats to do.

That was the end of Stage 1. I finished it the day that Stage 2 was released so I was not feeling very much behind the knit-along.

The first section of Stage 2 was the sprouts. You can just see the first leaf shapes in the picture below:
Here the sprouts and the next section of leaves are done:
And finally the "vines" are done as well and that is the end of Stage 2:
I've had to tink back several times as I missed some part of the pattern. Once time I took back a couple rows for something I thought was a mistake. I realized it wasn't a mistake but I had missed something on the following row so all my tinking was not a waste.

There are parts of the pattern done on the wrong side and it was a real exercise of trust to just follow the chart stitch by stitch without being able to see the pattern on the front. One of the reasons I like using charts is that you can see the pattern or design develop and can see how the row I'm doing builds on and fits with the previous rows. I couldn't do that from the wrong side in brioche and found myself often peaking over to the other side to make sure things were "ok". I did get a little better at working from the wrong side as I went.

The shawl is definitely growing in size. The stitches fill up my 40" needle cable and the shawl makes a half circle shape:
In the next pic you can see the various stages of the pattern and how they each develop from the previous:
I'd like to knit a rectangle shape from this pattern at some point because I think it shows the development of the pattern more clearly than the half circle shape. That is what I really love about the pattern.

Stage 3 is to be released tomorrow. (Yes, even though it's Thanksgiving!) I am ready. :)

Friday, March 25, 2016

Hats for Little Heads

I mentioned about a month ago that I started a hat for my "take along" knitting.

I did indeed take it with me wherever I went. I didn't always work on it, though.

One time I pulled it out and realized I had decreased enough stitches that I had to switch to using double-pointed needles. I didn't have them with me.

The next time Troy was driving, I pulled it out again...and the same thing happened. I still didn't have the dpns with me!

But eventually, it all came together and I had a finished hat.

But as soon as I had that finished hat, I knew I had to fix it. You may recall that I had cast on with a provisional cast on and started with a (version of?) Turkish cast on. Or maybe I didn't tell you that? Anyway that's what I did because I didn't want a tough non-stretchy edge. But it was too loose. It's pretty easy for it to be loose. At least in my experience.

But it's all one continuous piece of string, so you can pull on it and adjust the tension and that's what I did. I hope you can see in the picture below that on the left side of the bottom edge, the stitches are smaller, do not spread out as much, and are more even.
I'm at the same point in the process in the next picture, but I wanted to let you see how  much yarn I had pulled out already. At this point I had made it half way around the hat, and that was how much extra length there was in the cast on.
The brim edge is still stretchy, but not nearly so sloppy.

Here is a shot of the swirling decreases:
The hat is a little small for my head. (Not surprising since I made the child's size.)
I would say the colour is the most
accurate in this picture.
Project Stats
Started
: 19 Feb '16 / Finished: 10 Mar '16
Pattern: Barley by tincanknits (size: Child = 19")
Materials: 65 grams vintage Brown Sheep Co. (85/15 wool/mohair), colour 160


But wait! There's more!

When I finished this hat, I had 56 grams of wool left, so I thought I could make another hat. I would just go down a size and should have enough yarn.

But since I wasn't sure how far the yarn would go, I started at the top and knit the hat from the top down, reversing the pattern directions.
I picked the wrong increase to use. My favourite is to knit into the stitch in the row below. But if you do that every row (like you need to in the beginning of this pattern), then you are always knitting into the very same stitch every time you do that. So all of the beginning increases come out of the same stitch on the second row. That is why it is all "bunchy" at the top of the hat...except in the garter section. That is smooth because I used a kfb (knit into the front and back of the stitch) for that increase, and that has no unintended consequences when you do it every row.

I decided it was ok to leave it and just made the hat a little longer than I would have otherwise. Maybe I should have gone a little longer. ¯\_(ツ)_/¯
When it was time to add the brim, I decided not to do ribbing all the way around again. I did ribbing under the garter section and did garter under the stockingnette section. Nice little turn-about there, right?

Since garter has a shorter row gauge (it takes more rows to make up the same length compared to the ribbing), I added two extra rows at the end on just the garter stitches. (I just turned the work as if I was doing short rows, which basically is what I was doing.)
Then I bound off with Jeny's Surprisingly Stretchy Bind Off. (Although we're not so surprised anymore, are we?)

Now I have 13 grams of yarn left. I won't be starting another hat, but maybe it will be part of a hat one day when I have yarn that will work well with it.
Project Stats
Started
: 13 Mar '16 / Finished: 18 Mar '16
Pattern: Barley by tincanknits (size: Toddler = 17")
Materials: 42 grams vintage Brown Sheep Co. (85/15 wool/mohair), colour 160


Both hats will go into the pile to be mailed to Wool-Aid.

Friday, July 17, 2015

When the Cat's Away...

At the end of May, we took in a cat that was apparently abandoned. We couldn't keep her because of Troy's allergies, but we really enjoyed her cuteness while we had her.
Her cuteness was enough for me to forgive her inability to resist my yarn, but only because I knew it was for the short term. (Well, and because she was just so adorable.) On this occasion, she repeatedly pounced on my lap to attack the yarn ends as I tried to finish my skirt:
Again, I could live with it in the short term, but this week when she went to her "forever home", I had a real sense of release. I could work on anything! I could leave it out! I could spin! I could wind yarn! I could knit! Unfortunately, I've had meetings both nights since she's been gone so I haven't had time for these things, but I could!

One thing I started this week was a kerchief out of some linen that I raveled from a sweater. (I tried to wear it because it was a nice summer cardigan, but it was a size too small.) I was a well behaved knitter and made a swatch:
The lower portion was on 2.75mms and the upper part on 2.00mms. Of course I liked the fabric made on the smaller needles so the project is going to take a lot more knitting. But if using them makes an end product that I like, it will certainly be worth it.

I had decided to do something with the linen because I wanted to have a project I could work on during a camping trip next week. ("Car camping", so nothing where I have to limit the weight I'm carrying or anything.) To me, linen was a much better choice than something in wool.

I've have spent some time looking for a pattern, but I never found one that had all the elements that I wanted. So I am going to make it up as I go.

I looked up how to make different shawl shapes and found this article on Craftsy very helpful. The "wider, shallower triangle" was the closest shape to what I had in mind so that is what I'm going for.

I started with 5 stitches cast on over a double loop of the yarn end. That way I can cinch up the yarn end and have a "seamless" start. (Similar to how I start hats, but in this case I would work flat instead of in the round.)
It looks pretty good, I think.

I then started my increases along the centre line and edges while working a little stockinette stitch and then a simple mesh lace stitch:
I hope to end up with an elongated triangle scarf or kerchief with stockinette and mesh stripes. At first I thought the stripes would have varying widths, but now I think I'll keep them all the same. We'll see...

Sunday, March 27, 2011

Super Scarf!


It's a bird!

It's a plane!

It's a SUPER SCARF!
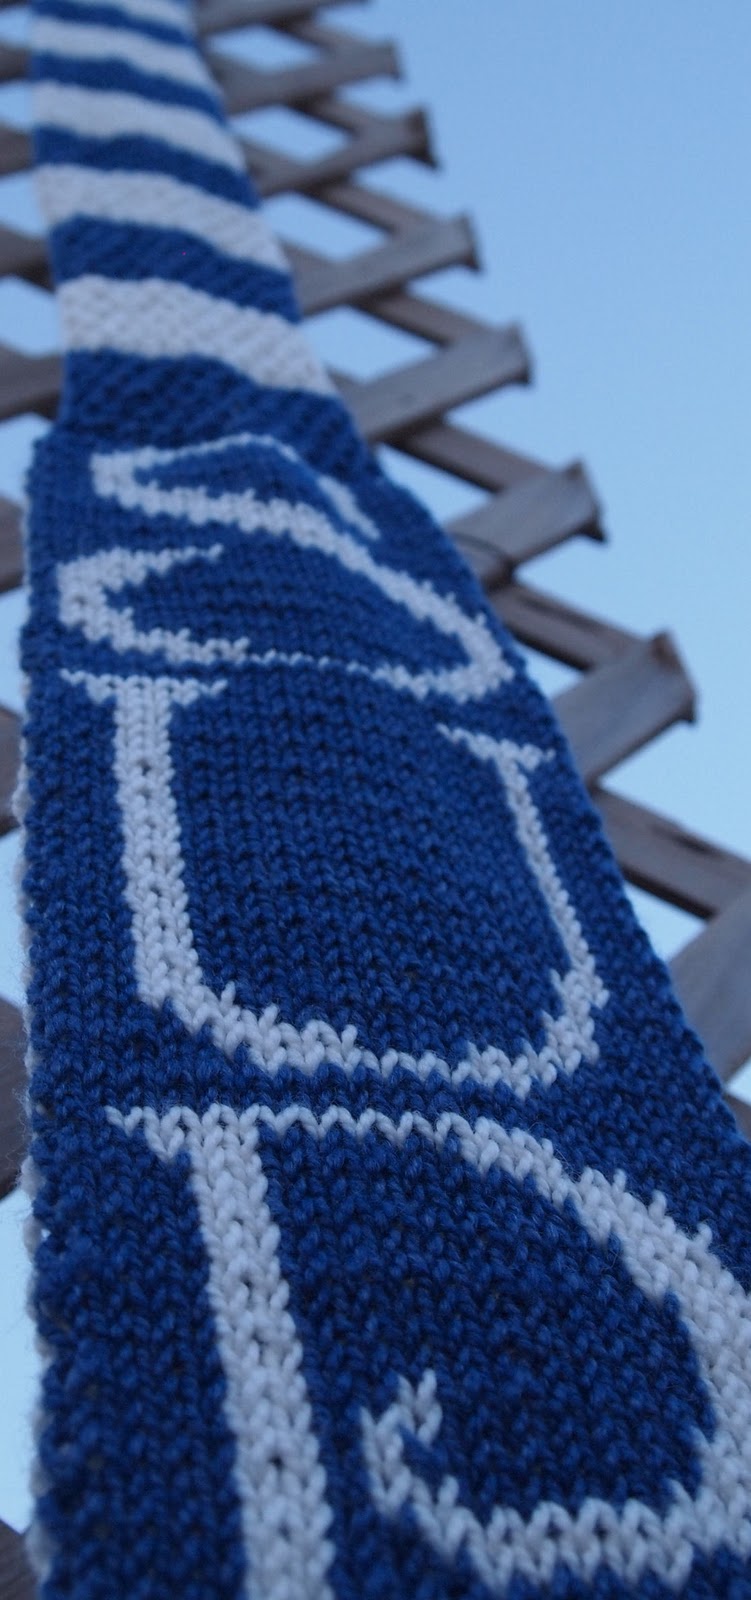
I have finished my scarf for the Superbowl XLVI in Indianapolis. I was relieved to have enough yarn to make the center [striped] section long enough that the words were still visible even when the scarf is wrapped around the neck.
All I did for that section was 12 rows for each stripe. The stitch is K1 P1 ribbing which is offset every two rows. (In other words, each wrong side rows lines up with the previous row, but on each right side row you knit the purls and purl the knits.) I knit right up to the end of my blue. (In fact, I had to knit the last row with a smaller needle so that I had enough to be able to anchor the end!) And I had a couple meters of white left--that's it!!

Another thing that worked out was the shaped letters "XLVI." I graphed them with a curved bottom so that the 3" patch that the organizers are sewing onto all the scarves will fit under the letters. (ETA: actually, I've since learned that female inmates are sewing them on!) With a little help from Photoshop, I can show you that it should look something like:
I'm glad I found a way to make the patch belong instead of looking like it was slapped on later.

Project Stats
Started
: 5 Feb '11
Finished: 20 Mar '11
Pattern: my own design
Materials: Alpaca with a Twist, special Superbowl blend, 2 skeins ($24)
I will remind you that I knit this scarf from the bottom up, doing each side separately. I started the stripes as soon as the letters were done and joined the two halves with a Kitchener stitch. Once I got to the striping, I actually knit both halves at once with the white going on one half and the blue on the other. This way I only had to count rows half as much: if one side was long enough the other side had to be too!

I started each half of the scarf with a two-colour version of a provisional cast on:
I'm very happy with how it came out. The blue and white stitches seem to just grow out of each other without a cast on getting in the way.

On the next pic I've drawn down the center of a few of the columns so you can see that the two layers end up being offset by a half stitch:
This doesn't really affect the final project, but it is a necessary piece of the puzzle if you want to understand how it works. If you don't really care how it works, but just want to see how to do it, try these two videos I have recorded for you.

Part 1: Getting Started.

Part 2: The First Row.

I hope that helps you get started on your next two-colour double knitted project! (And now that you know how to get started, that may be sooner than you would have thought!)

And since I couldn't put it on the scarf, I will say it here, "Go Colts!" Let's hope there are some NFL games played next season, and let's hope the Colts can pull off the never-done-before and play--and win!--the Superbowl in their home stadium!! Now that would be super!

Tuesday, December 7, 2010

Christmas Cast Ons

Just a warning...more Christmas presents shown in this post. I don't, however, reveal all so it's really just a little peek. You may decide if you wish to read on...

I won't tell you exactly what this project is but I wanted to write about it because it is the first time I have done the Turkish (or tubular) cast on.

I took my directions from the TECHknitter. (I love her work.) Her diagrams and pictures are well worth looking at.

I should have actually used her directions for the Turkish cast off for my last pair of socks but they were sort of done under a deadline (it was the last day of Socktober) and I was too lazy at the time to learn something new. But it was the perfect situation as the socks ended in 1x1 ribbing and the top of socks need to be stretchy, which the Turkish cast off is.

But anyway, enough about when I didn't use the technique. I decided to try it on ...well, on this current project. It is a little fiddly, as TECHknitter promises, but it can be done. She also recommends not doing it in the round because she doesn't think it's worth the extra fiddling. Of course, purist that I am, I did it in the round anyway:
Well worth the fiddling!
It's called a tubular cast on because you make a tube out of the stitches. You do a provisional cast on, then knit the stitches as if you were doing double knitting. And then once you've done a couple rows like that, you start knitting all the stitches in a 1x1 ribbing. The knit stitches are the stitches you were knitting on the front side; the purl stitches are the stitches you were knitting on the "back" side, so to speak. End result, you have stitches that continuously roll from front to back and there is no binding thread or chain at the cast on to keep the stitches from stretching.
It is very stretchy, and yet recovers very well so it doesn't stay stretched out.

I will admit that it is more time consuming and takes some concentration, but it is definitely a step in taking one's knitting to the "next level."

Now about the yarn, I bought it because I couldn't resist the colours. A very nice mix of purples and reds. A little more lively than the subtle shading on my Firestarter socks.
It's Fleece Artist Nyoni which is a mix of wool, mohair, nylon and silk. Fleece Artist is a Nova Scotia company so I have to admit I'm biased toward them, but they do make some really nice stuff. It's been a pleasure working with this yarn.

And another yarn I couldn't resist taking home with me is this ball of madelinetosh tosh DK (colourway terrarium):
I was making something else with this. Another project in which to use the Turkish cast on. After a few inches, I realized it wasn't working so I frogged it all. I was too demoralized to do the Turkish cast on again and used my dependable cable cast on. I kept at it even though it became obvious that the cable cast on was not nearly as good.

Then about half way done the project, I realized I was reading the chart wrong; I had to frog 3/4 of what I had done.

I reknit it using the right chart and got back to the same point again. It then became very obvious that it was way way too big. Time to frog again. But by then I was so angry I threw it across the room, much to Troy's surprise. I thought it was a perfectly logical reaction given the circumstances.

Both these projects were in time outs at that point. (I won't get into it, but the first project had its own hurdles.) I have since sorted out the first project and it is humming along again. Once it is taken care of, I think I will be up to the task of attempting the second project for the fourth time. This time I will take the pattern recommendations on needle sizes with a large grain of salt. And I will read the right chart. And I will use the Turkish cast on.

And I will hope it all works out. Troy doesn't like it when double pointed needles are flying across the room.

May I suggest?

I Say! or at least I did once...