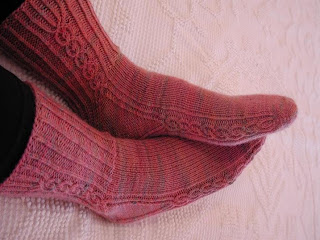
It's been a while, but I've finished a project!
These socks have been going on in the background of other projects. I love them very much, but they are still intended as a Christmas gift. (Can you imagine I am that far ahead!?)
The pattern was a very nice design from Marjan Hammink, aka Yarnissima. Her aim is to make designs that allow designer yarn to shine. ("Great yarn deserves a great pattern.") And I'd say she's done a good job of it.
I love the subtle shading of this wool/nylon yarn; it changes from pink to grey but manages to give a nice overall impression instead of looking like a jumble of different colours.
The pattern itself combines side cables with a plain foot and ribbed leg:
Yarnissima uses twisted knit stitches to really make the cable and rib patterns pop right off the surface.
The pattern started with a short-row toe (my first). It yields a nice rounded shape with a smooth finish.
There are no ridges from increases and decreases, just a little "hiccup" where the short rows end and are picked up again:
This toe is the closest you'll find to a commercial sock toe. (Think the ones with a seam across the top.) They have a seam because they've taken the bottom stitches, continued them up and around the toe, and then seamed them to the top stitches. Project Stats
Started: 5 Feb '10
Finished: 2 Jul '10
Pattern: Firestarter by Yarnissima (free)
Materials: Pagewood Farm St Elias in Butterfly, $26.75
(Hand knit socks would have a Kitchener seam instead of a sewn seam which would make them perfectly smooth.)
But as I said, these were started at the toe, and that makes them a little different. You cast on half the stitches you need with a provisional cast on, knit up and over the toe (using short rows to shape) and then pick up the stitches off of the provisional cast on. Presto! That gives you the number of stitches that you need, and you start knitting the foot.
From the sample of patterns I've seen, Yarnissima favours unusual gussets. This sock has a reverse stocking stitch panel with increases along one edge. This creates the wedge you see below and provides all the increases you need:
The ribs of side cables are separated to run along either side of the gusset panel and then join up again with a little twist at the top. Besides being pretty, this mini-cable also serves to eliminate the common problem of a hole where the front and back join after the heel. Very clever, Yarnissima!
The heel used a slip stitch pattern which transforms smoothly into the twisted rib.
The slip stitch results in two layers of yarn at the heel which helps it stand up to the heavy wear it usually sees. It also makes the reverse side very smooth against your skin.
After the heel, the side cables resume and an all-over twisted rib pattern is added. Once again I changed needle sizes as I went up the leg, increasing twice to make the sock fit better.
All in all a nice looking pattern that was fun to do. A little work at the beginning before I caught on to the cable pattern (like usual) but once that was memorized, or became logical, the socks were a very interesting portable project for me. What more could I ask for?
I did struggle with some elbow and wrist issues during the second sock if I knit on it for too long. 2.25 mm (US size 1) needles are very very tiny! and there's only so long I could work on them comfortably. But that's why I started them so early. No arm-numbing knitting marathons in December for me!!
Sewing long rows...............
-
These are the 2 new blocks I made yesterday, actually 2 of each of them. I
didn't take a photo of the final layout.
I had 3 sewing sessions and this ...
2 hours ago


No comments:
Post a Comment
Comments are moderated so you will not see yours post right away. Thank you for leaving a comment; I enjoy reading each one!