Showing posts with label double knitting. Show all posts

Sunday, March 10, 2019

True Hope Cowl

About a year ago, my sister and I went to Vogue Knitting Live Chicago. One of the things we picked up was a kit for the True Hope cowl.

Profits support Handspun Hope, an organization providing work and training to women in Rwanda.

The program started with their spun yarn. I don't know if they had sheep in the beginning, but they do now. Besides being handspun, the yarn is also organically dyed with natural plant materials from the area.

I chose one undyed skein and a subtle pink dyed from avocado pits. (Avocado pits! Who knew.)
I didn't start knitting on the cowl until August. It was just the thing I needed when I didn't want to make any decisions and wanted a project that was ready to go. It also filled the time before I left for a trip because I didn't want to start on my travel knitting!

The cowl is double knit so you get the same pattern on the front and back but in reversed colours. I was cruising along pretty well until...
one of my yarns ran out! I had three rows left to go plus the bind off. !! What !! I didn't know what to do about that for a while.

I finally decided to shorten the pattern by three rows (even though that wrecked one of the crosses). It's always fun to ravel double knitting because you can see the two layers so clearly:
I got through the new last three rows and used the undyed for the bind off since I had plenty of that. I tried a bind off with the needles first but I didn't like the look of it. I went with a Kitchener bind off instead knowing it would match the cast on and would perfectly marry the two layers together.

Here it is on the right side of the cowl:
You can see that it's quite a bit looser than the cast on. Instead of trying to adjust all those stitches to pull it in, I went with a "faux" bind off; i.e. crocheted a chain stitch.
The top edge is just the Kitchener stitch
bind off. The lower edge has the crocheted
chain stitch.
This looks a lot like a line of bind off stitches while bringing in the length. I had to experiment to find the right length of chain stitch to avoid it being too tight. And with that done (and a blocking), the cowl was ready for wear!
The cowl is quite thick. It's knit with a heavy aran weight and a double layer on top of that. Because of the thickness it doesn't drape very well. It also bunches up quite a bit behind the neck:
I tried it folded over as well:
The cowl doesn't work very well under a coat, but for an extra layer over a sweater on those "in between" days, it's great.

Project Stats
Started
: 6 Aug '18
Finished: 21 Sep '18
Pattern: True Hope Cowl by Ann Turley Dreith
Materials: Handspun Hope Organic Merino Handspun in undyed and avocado pit, 179 grams total


Friday, February 14, 2014

Ravellenic Games 2014 Report: Day 7

So I was home Friday because I wasn't feeling great. I felt bad for the new guy who was at the office alone and then especially bad when he called and said that there was water in the basement, but I was also glad I didn't go in because I sure wasn't up to dealing with all of that.

All this is to say that I got more progress done on some Ravellenic projects, even though it wasn't nearly as productive (or enjoyable) a day as Wednesday was.

But between watching mens figure skating live, mens curling (Canada over Norway with an exciting 4-ender), and napping, I finished this bib:
A true quick project as I just started it the day before, and had to ravel the first try when it was half done. (Too small.)

The reverse side. Not quite as nice, but not so bad.
I had the idea to make a chevron bib, since zig zags are still a going craze and I thought the shape lent itself rather nicely to the function.

It's a really simple project and when I have a few minutes, I will jot down a "pattern recipe" so you can use my notes to make your own, if you would like. (In the meantime, notes on the Rav page would give you a pretty good start.)

So that's medals in Free Dance, Junior Ravellenics, Nordic Colorwork Combined and Stash Skeleton. More importantly, it's one bib done for that baby shower!
But wait! There's more...

While I'm talking about bibs, I'll show you the other one I finished on Thursday:
I believe I could have technically entered it in the Ravellenic Games as a WIP, but I didn't bother.

The center section is double knit so you can see the reverse colours here:
I had thought the all-blue side would be the "right" side but now I kind of like the white side better. Of course that is the point of double knitting it--both sides look good even with a colourwork motif.
The elephant is from the Elephant Sock pattern that I used recently. A nice little elephant.

Games Update, Friday, Feb 14:
1. Rainbow Cowl DONE!
2. Rainbow Hat DONE!
3. & 4. Ravel Sweater 1 and Sweater 2 DONE! DONE!
5. Dye Green Yarn DONE!
6. Spinning DONE!
7. Woven Band
8. Baby Bib DONE!

Not a lot of choices of what to do next, is there! We'll see if I can push through one more event.

Sunday, May 5, 2013

Happy Mother's Day!

No, don't panic. It's not really Mother's Day yet; you haven't missed it. But my family is celebrating a week early. And so I had to have my present ready.

This year I knit her a pair of slippers. I knit her a pair before (click here to see) but they were in garter stitch and she admitted once that the ridges hurt her feet when she wore them. I didn't think of the solution right away, but one day while I was enjoying the cushy sole of my "travelling slippers" I realized that was the solution. The soles of those slippers were double knit, so they were twice as thick and none of the bumps were against your feet.

I didn't want to repeat that pattern, however, so I modified a basic sock pattern. I started with a basic short row toe, but once it was half done, I joined a second strand and started double knitting the bottom.
Part way up the foot, I added a gusset to give a little extra room. I started with too many stitches the first time, but over compensated a bit so the slippers are a little snug. The extra stitches really helped with the fit. Once I worked far enough over the top of the foot, I worked back and forth across some of the top stitches on each side of the foot and the sole stitches.

When they were long enough, I did a couple short rows to shape the heel and then knit the sides around the back, knitting stitches together with the heel stitches as I went.
After that was done, I picked up stitches all around the top and knit about eight rows before casting off.
The stocking stitch curls back on itself which makes it a very durable finish. (All the wear isn't on one line of yarn.)

Here you can see the knitted sole inside the slipper.
I hope she enjoys them.

Wednesday, December 26, 2012

Out of Season Gift

Project Stats
Started
: 11 Dec '12
Finished: 18 Dec '12
Pattern: The SkullKerchief by Knitty Or Nice (free)
Materials: 40 g each of Caron Simply Soft in white and black ($6.58)
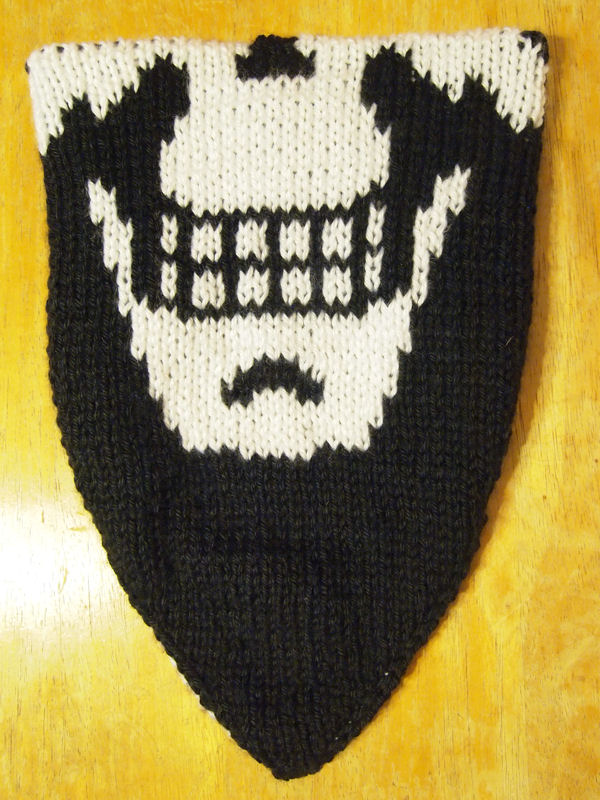
I didn't make many gifts this year, but I have one I can show you today. The person it's for isn't really a blog reader, so I think I'm pretty safe in revealing it even through it hasn't been given yet.

I saw this pattern for a SkullKerchief and couldn't resist! What's a SkullKerchief, you ask? Well, when worn down, it looks like a generic black and while scarf:
 But when you pull it up over your nose, look what you get:
Isn't that great!! One person on Ravelery went so far as to make a matching hat with the top of the skull on it, and I was really tempted (like really, really tempted), but I have resisted (so far).

I double knit the project so (like the Skull hat) it would be warmer and have no long floats on the back.


I knit it from the bottom (point) up, and finished with a Kitchener cast off (above). Since the pattern changes colour, I had to switch colours a couple times in the bind off to match. I pulled harder than usual on the tension to make sure the top wasn't too loose, but I think it still may benefit from an elastic through the top. We'll see how it fits the recipient.

The pattern calls for you to knit in some button holes and then to sew buttons on the other side to fasten it. But I think doing up buttons behind your head is a pain in the butt, so I sewed the seam shut at the back.
And since I can't resist, I have to show you the same thing on the other side too:
I made it out of acrylic, in part because it's a gift and many people can't wear wool (especially around their neck and face) and also because it's hard to get a true white and true black in wool. I wanted a lot of contrast on this one. I have plenty left over, so maybe the hat will come next year...

Sunday, December 16, 2012

Double Knit Skull Cap

It was a bit of a forced march at the end, but I got the skull hat done this week. After all the adjustments made for size (both circumference and height), it's the right size to fit Troy so I'm assuming that's good enough!

There was more finishing work to this hat than most because of the double knitting, but it was all easily handled one step at a time.

When I got to the end of the pattern, I knit a couple rows in the main colour (on each side, so to speak) and then was ready to cast off.
Of course, you can't just cast off like normal--each stitch slipped over the next stitch--because you've got stitches from two different layers. So I separated the layers, putting the inside layer (light stitches) on one cable and the outside layer (dark stitches) on another
You can see the two layers curling away from each other
once they are put onto separate needles.
While I had the opportunity to hide the yarn between the layers, I ran the light yarn end through the back of the stitches. I made a couple zigs and zags (changing direction helps to keep the end from working out) and then left a longish tail between the layers.
I couldn't do the same with the dark yarn end because I was going to use that to cast off. I cut the yarn to a length about 4.5 times around the circle, put it on a blunt needle and started to Kitchener the inside stitches to the outside:
It took a while, but the final finish is definitely worth it. (And let's be honest, it takes a while to do a regular cast off as well.) If you are really opposed to Kitchenering, you could do a three needle bind off. Just make sure it's stretchy enough.

Then I put the dark yarn end onto a sharp needle and worked it into the back of the stitches between the layers as best I could. You don't have a lot of room, but you can still pull the layers apart even if they don't open up like when I worked in the light yarn end.

Then I had to go back to the top of the hat and take care of the slit from when I was working flat. I used the long tail from the cast on and mattress stitched just the dark layer. Also, instead of sewing one stitch in from the edge, I went half a stitch in. Since I didn't decrease a selvage stitch when I started working in the round, I didn't want to pull it in too much on the upper part.
Once the dark layer was done, I did the same thing to the light layer:
I'm working the yarn end in by switching to a sharp needle
and pulling it through the back of the stitches. I zigged
and zagged a couple times and then left a long end between
the layers. If you do it right you won't see it from the
outside at all.
And presto, you have a hat that you can way either way:
Project Stats
Started
: 11 Nov '12 / Finished: 9 Dec '12
Pattern: Skull Hat by Gina Doherty
Materials: half ball of each color, Patons Classic Wool Merino (Dark Grey Mix and Natural Mix)


Wednesday, November 28, 2012

Double Double Take (or A Hat is a Gauge Swatch)

I've started a hat I've had in mind for a while...something with a skull on it for someone I work with. (No, I don't want him dead--it's the haunted house thing again.) He always admires my knitting and extols the virtues of wool and alpaca. There's not much more you can do to make yourself knit worthy! (Ok, maybe actually buying me wool would raise you up a little higher, but that's not necessary.)

I had already decided to double knit the hat for warmth and to avoid the long floats the colourwork would require. I found two complementary shades of brown of the same yarn in my stash and set to work.

The slit in the top is from when I was working in rows.
Once the increases were done, I started working in the
round. It will be short work to sew the seam shut with
the long tails I left at the cast on.
The first start was not very successful. I started at the bottom as the pattern suggested, but the number of stitches was way off--the hat would have been huge. The double knitting part, however, was making it hard to get a good sense of my gauge. I had the brilliant plan to start over from the top so I could just stop increasing when the hat was big enough.

That worked fairly successfully. I did the crown of the hat on straight needles in the flat (i.e. not in the round). It was a new skill to do increases in double knitting, but it went pretty easily. I would increase 8 times around in the one colour on one row, and on the next row I would increase in the other colour. That way I never had to increase both colours at the same time (and I could do all the increases on knit rows instead of purl rows), and each colour got a plain row of knitting in between the increase rows.

By the time I got to the right size, I had one pattern repeat less than the pattern called for (14 sts). No wonder my first try was so big!

Then I followed the pattern's instructions and did 12 rows of plain knitting--no increases and no colourwork.

Then I started the colourwork pattern:
I'm not quite half way through the colourwork, and I can tell that this hat is going to be way too tall. (This is making me think my gauge is way different than the pattern's, but I'm telling you it does say to use worsted weight and that's what I'm using--on smaller needles, no less.) After a brief phone consultation with my hat-knitting sister, we've decided that if I rip back to where the increases end and skip the 12 rows of plain knitting, the hat should come out alright. Maybe a touch long, but that's better than short.

One side:


the other side. Double knitting makes a perfectly reversible hat. I think it's like magic...only real.

Sunday, March 27, 2011

Super Scarf!


It's a bird!

It's a plane!

It's a SUPER SCARF!
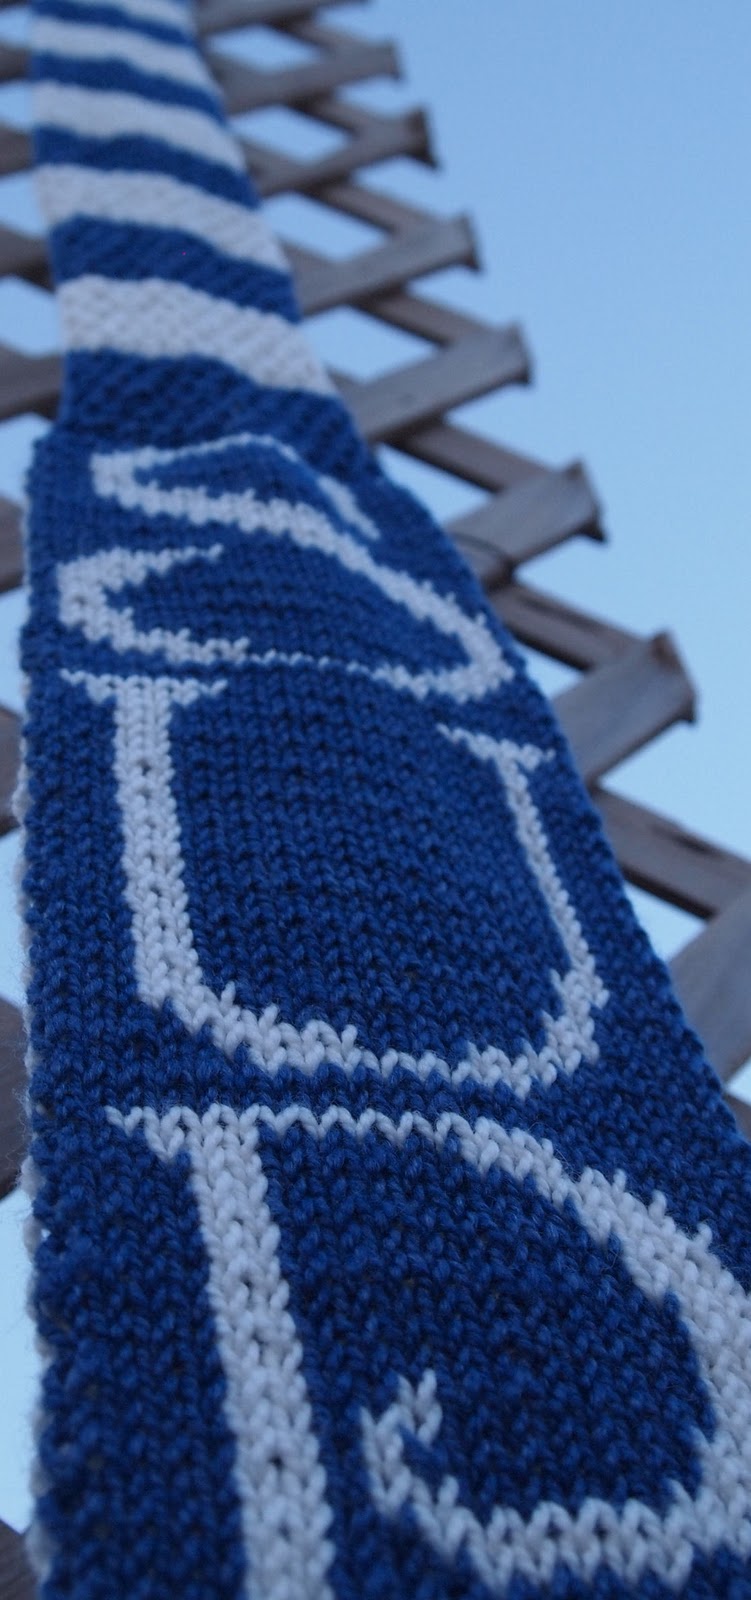
I have finished my scarf for the Superbowl XLVI in Indianapolis. I was relieved to have enough yarn to make the center [striped] section long enough that the words were still visible even when the scarf is wrapped around the neck.
All I did for that section was 12 rows for each stripe. The stitch is K1 P1 ribbing which is offset every two rows. (In other words, each wrong side rows lines up with the previous row, but on each right side row you knit the purls and purl the knits.) I knit right up to the end of my blue. (In fact, I had to knit the last row with a smaller needle so that I had enough to be able to anchor the end!) And I had a couple meters of white left--that's it!!

Another thing that worked out was the shaped letters "XLVI." I graphed them with a curved bottom so that the 3" patch that the organizers are sewing onto all the scarves will fit under the letters. (ETA: actually, I've since learned that female inmates are sewing them on!) With a little help from Photoshop, I can show you that it should look something like:
I'm glad I found a way to make the patch belong instead of looking like it was slapped on later.

Project Stats
Started
: 5 Feb '11
Finished: 20 Mar '11
Pattern: my own design
Materials: Alpaca with a Twist, special Superbowl blend, 2 skeins ($24)
I will remind you that I knit this scarf from the bottom up, doing each side separately. I started the stripes as soon as the letters were done and joined the two halves with a Kitchener stitch. Once I got to the striping, I actually knit both halves at once with the white going on one half and the blue on the other. This way I only had to count rows half as much: if one side was long enough the other side had to be too!

I started each half of the scarf with a two-colour version of a provisional cast on:
I'm very happy with how it came out. The blue and white stitches seem to just grow out of each other without a cast on getting in the way.

On the next pic I've drawn down the center of a few of the columns so you can see that the two layers end up being offset by a half stitch:
This doesn't really affect the final project, but it is a necessary piece of the puzzle if you want to understand how it works. If you don't really care how it works, but just want to see how to do it, try these two videos I have recorded for you.

Part 1: Getting Started.

Part 2: The First Row.

I hope that helps you get started on your next two-colour double knitted project! (And now that you know how to get started, that may be sooner than you would have thought!)

And since I couldn't put it on the scarf, I will say it here, "Go Colts!" Let's hope there are some NFL games played next season, and let's hope the Colts can pull off the never-done-before and play--and win!--the Superbowl in their home stadium!! Now that would be super!

May I suggest?

I Say! or at least I did once...