Showing posts with label bib. Show all posts

Wednesday, May 25, 2016

Let me explain. No, there is too much. Let me sum up.

I haven't been knitting too much lately, but I picked up the needles enough to finish these three bibs I've been working on since the end of March.
A couple people I know have just had a baby or are about to, so I felt a deadline on these. None of them are exactly the same because I was making them up as I go. They're all double knit in the centre with a garter stitch border.

And just because I am obsessed with Kitchenering and managed it in garter, I'll show that too:
Can you find it? Don't worry, you're not really supposed to!
I used it to join the end of the neck band to the beginning.

I'm also working on a liturgical stole. I knit the base a while ago and finally figured out how I could use it. I'm also going to apply some embroidered symbols:
Three down, one to go. Deadline for this is June 5 when it will be presented to our new minister when she is installed that day.

I applied to have my orange and grey zig zag quilt in the Shipshewana Quilt Festival and just found out Monday that it was accepted!!
Wow...it's my first time and I am very excited.

This also means I have to add an identification label and a hanging sleeve to the back of the quilt before June 18 when I have to turn it in.

I've done a little more quilting on my Mt Robson quilt. Here's a piece of the sky
 and a bit of the water:
The quilt is too thick for my machine to free motion quilt comfortably and I have to go painfully slow. But I did get the sky and water done and now I only have the ground (very little area) and the mountains left! The only deadline associated with this project is that I hope to enter it in the county fair at the beginning of August.

Of course, I have been keeping up with the Farm Girl Vintage I'm doing with my sister. In addition to sewing blocks, I took some time to play with layouts.

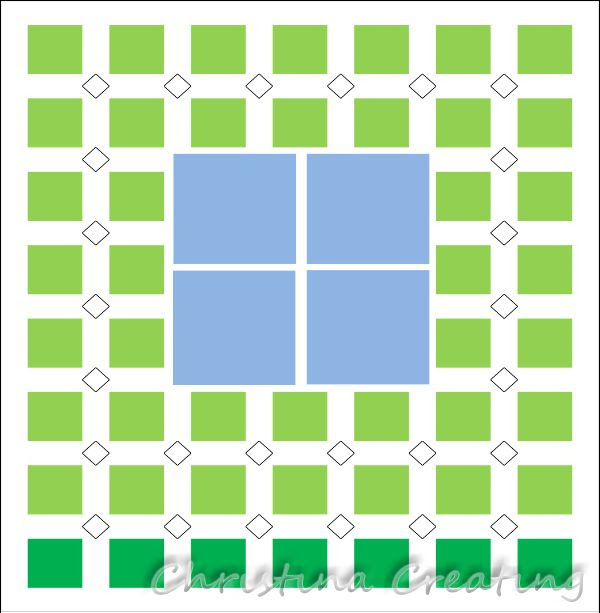
My first idea with to have the four 12" blocks in the corners with the 6" blocks filling the rest:
So the blue squares are the 12" and the green are the 6". The black outlined squares are like cornerstones, but set on point. Currently I am thinking they will be a brighter print--all of them done in the same fabric.

But I realized that this would make the 12" squares hard to see on a bed because they would be hanging off the edges. So I looked at a layout that would put them in the centre, sort of like a medallion quilt:
I wasn't happy with the spacing around the larger blocks, so I kept trying. This is the design I landed on:
It gets the larger blocks toward the centre but still has a nice spread out grid feeling to it. There are also fewer cornerstones so that makes it easier! :)

Yes, I have a new block to show you, but I'll do that in its own post later this week.

And finally, briefly for now, I fell in love with a fabric line, had to have it, and had to start a new project with it right away.
I did four blocks to try out the idea I had. I need to get a little more fabric to get some more variety in the striped sections and to complete the pattern I have in mind, but I am itching to work more on this project. No deadline--just fun!

Sunday, January 25, 2015

Go, Lions! Go!

Yes, I realize the Lions are out of the playoffs. But I have this coworker. And he loves the Lions. It's been a trip watching him this season really believe that this could be the year. But it wasn't. But maybe next year will be...

Anyway, this coworker is expecting a baby this spring and I was invited to a shower. I can't make it to the shower but I can certainly send a gift--personalized and hand-made because that's how I roll.

Bibs are pretty much my go-to shower gift. I'm sorry if you didn't register for them; you're going to need them. When I first read the invitation, I thought I had only one week to finish the gift and got kind of uptight about it. But a more careful reading revealed that I had a week to RSVP and more like three weeks to finish. Ohhh, much better. (Sort of.)

So while I was still in panic mode, I found a chart on Ravelry for the Detroit Lions logo. The chart was made for a reverse stocking stitch lion on a stocking stitch background. I thought it would do, but when I found out the pattern was only written out row by row and not charted, I knew I had to make a chart in Excel. Once I had entered all that info, I figured it wasn't much more work to tweak it for my use.

I added the eye and the lines to separate the front legs and the mane details. And I redid most of the tail and the lower feet. You know, just a little tweaking. I didn't go so far as to add the open (roaring) mouth of the real logo. Sometimes close enough is close enough.

Like any bib with two-colour work, I did this with the double-knit technique. Makes it reversible and eliminates and floats. I used blue and cream cottons that I had raveled from sweaters. (The same I used for the elephant bib.) I went down a needle size, however, because I needed more stitches and didn't want it to get too big. I think the result was better than on the larger needles. The blue and white aren't quite the right shades, but I'm not making this to sell in the pro shop.

The border is done in garter stitch with just the blue.
After the lower border, I knit the first row of the pattern holding both colours. On the next row I knit the one colour and purl the other, starting the double knit portion.
It's very clean on the "right" side. (I consider the side with a contrast border to be the "right" side. It's purely subjective and mostly irrelevant since it's really double sided.) On the "wrong" side, you can see a little of the contrast colour:
When I get to the top I just knit the paired stitches together to decrease down to the original number of stitches. The contrast yarn is even less noticeable there.

I know many people don't use buttons on baby things, but I dare. I just hate the thought of ties and Velcro. (Both applying it and using it on a baby.) I found one in my button jar that I thought would work. And it fit the button hole I made so that's a bonus.
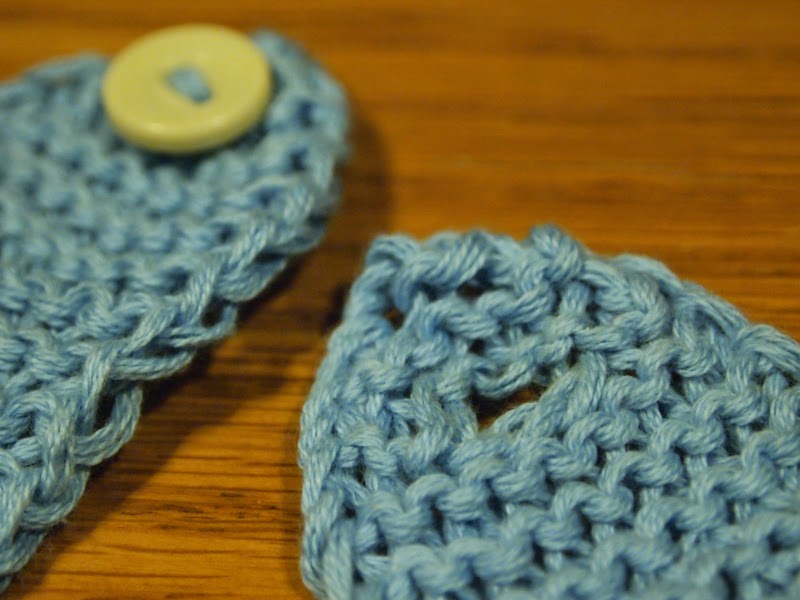
The buttonhole was an easy affair. I just cast off two stitches in the middle of the row. On the next row I knit into the front and back of the stitch before the hole and after the hole. It came out neater than casting on two stitches.
I hope they like it. If not, well, it will be covered in baby spit soon anyway.

Saturday, April 12, 2014

Bib Set

Ready for more bibs? I have completed another set:
The one on the right was shown in this post with the pattern.

The middle on is a repeat of the blue and white one I made recently.
It's double knit in the center section so the colours on each side are reversed.
This time I angled the straps toward the center by increasing on the neck edge and decreasing on the outside edge, one stitch on each edge on every other row.

The third one is another chevron variation:
The zig zags are created by increasing and decreasing in pairs with three stitches in between.
I did it in garter stitch to keep it thick and absorbent.
These straps I knit straight up. I made the first one 4" like on the other bibs. But then it seemed too short, so I made the second one longer and added two buttonholes so there would be options to make it fit.

I found two matching buttons in gold and a third one that matched close enough.
I just love this gold and red colour combination.

I think that's all the bibs for now. I like them for quick, easy projects but it will be nice to move on to other knitting projects whose siren call I have been trying to resist...

Wednesday, March 19, 2014

Chevron Bib Recipe (and Tips)

I knit this chevron bib during the recent Ravellenics Games. I didn't have time then to write up a pattern (or in this case, more of a recipe), but have taken the time to do so now.

I still enjoy seeing chevrons, zig zags and jagged stripes on all articles of clothing and it occurred to me that babies should not be left out.

On top of that, the shape lent itself very well to the function of the bib. The concave part of the chevron nicely fits around the neck and the angle means there is no additional shaping needed for the straps to conveniently meet at the back.

Recently I knit up a new version, which turned out very nicely:
Although I picked these colours just
because I liked them, some friends and I
had some fun thinking of who would like
the combination: Griffyndor fans, of course.
And my alma mater, Calvin College.
But don't you dare say USC!!
For both bibs, I used cotton I had raveled from second hand sweaters, but of course you can use any cotton you like. I think the popular dishcloth cotton would work particularly well. 50 grams total should complete your project. (Obviously your stripe pattern and colour placement will determine how much of each colour you will need.)

I worked with 4mm needles (US 6), but use what you need to get a firm fabric.

Pattern Recipe
Cast on 61 sts.
S1, knit remaining stitches
S1, Kfb, K26, K2tog, (place marker if desired,) K1, SSK, K26, Kfb, K1

Repeat last two rows, changing colours as desired for stripes. (See notes below.)

When piece is 7” point to point, begin straps: Knit 11, cast off to last 11 sts, K11. (See tutorial below.)
Work garter stitch strap on one side until it is 4” long. (Continue to slip the first stitch to maintain the selvage edge.) Cast off.
Rejoin yarn and make second strap to match. When you have 2 or 3 rows to go, make a buttonhole on a row that starts on the neck edge by S1, K1, YO, K2tog, K7.
Work 2 or 3 more rows as needed.
Cast off.

Notes:
Slip stitches: All slip stitches are done purlwise. This is the default unless a pattern states otherwise.

When changing colours, I find the colour transition looks better if you knit to the last stitch of the row with the old colour and then knit the last stitch with the new colour. (Details: With one stitch left on the row, move the working strand to the front (between the needles). Carry the new colour to the back of the work and knit the last stitch. You are now ready to knit the next row in the new colour. (Slip first stitch, etc.))

As you work wider stripes, be sure to carry the colour you are not using up the back of the work so there will not be long loops. I found it easiest to twist the working yarn around the non-working yarn between the first and second stitches at the beginning of the row. (And in this case you are only wrapping the non-working yarn on every other row.)

I like to make my straps two-at-a-time by using both ends of the ball, but you can do them one at a time too, if you prefer.

If you don’t want to use a button, then skip the buttonhole and crochet a chain from the last stitch left at the end of the cast off row to make ties. In this case, make sure to start the cast off row on the outside edge (not the neck edge) of the strap.

Tip for avoiding that dreadful gap between the strap and neckline.
I don't know about you, but when I cast off stitches in the middle of a row for a neckline, I always end up with an ugly gap where I start the cast off. Sometimes I can sew it shut while working in the ends, but it never looks good. While working on these bibs, I discovered ("unvented" more likely) a way to solve the problem. It only takes one extra step and then you're done!

Follow the directions under each picture:
Here I have knit the 11 stitches for the right strap and
am ready to start casting off the middle stitches.
Insert the left needle between the last two stitches on the
right needle. You are going to "knit" a stitch between
those two stitches, by wrapping the yarn around the
left needle (as shown above)...
...and then pulling the yarn between the stitches with your
left needle to form a new stitch on your left needle.
Pull on this new stitch until it is large enough to put over
the tip of the right needle. Remove the left needle and pull
on the yarn so the stitch is snug (but not tight).
Here you have the new stitch (pink arrow) next to the last
stitch of the strap (orange arrow). You are now ready to
start casting off.
Knit the next stitch on the left needle like normal. This will
be the first stitch to be cast off. (The pink and orange arrows
are repeated to give context.)
Now pass the stitch marked by the pink arrow over the
stitch you just knit. This will anchor the cast off stitches to
the strap. Now continue to cast off normally--knit 1, pass
last stitch over, etc.
After you have cast off the rest of the stitches, you can
see that they are nicely anchored to the strap stitches.
The small gap between the last stitch of the strap and the
rest will disappear once you begin knitting the strap.
Hope that helps!

Please post comments or send pictures if you make any bibs using this recipe. Enjoy!

Friday, February 14, 2014

Ravellenic Games 2014 Report: Day 7

So I was home Friday because I wasn't feeling great. I felt bad for the new guy who was at the office alone and then especially bad when he called and said that there was water in the basement, but I was also glad I didn't go in because I sure wasn't up to dealing with all of that.

All this is to say that I got more progress done on some Ravellenic projects, even though it wasn't nearly as productive (or enjoyable) a day as Wednesday was.

But between watching mens figure skating live, mens curling (Canada over Norway with an exciting 4-ender), and napping, I finished this bib:
A true quick project as I just started it the day before, and had to ravel the first try when it was half done. (Too small.)

The reverse side. Not quite as nice, but not so bad.
I had the idea to make a chevron bib, since zig zags are still a going craze and I thought the shape lent itself rather nicely to the function.

It's a really simple project and when I have a few minutes, I will jot down a "pattern recipe" so you can use my notes to make your own, if you would like. (In the meantime, notes on the Rav page would give you a pretty good start.)

So that's medals in Free Dance, Junior Ravellenics, Nordic Colorwork Combined and Stash Skeleton. More importantly, it's one bib done for that baby shower!
But wait! There's more...

While I'm talking about bibs, I'll show you the other one I finished on Thursday:
I believe I could have technically entered it in the Ravellenic Games as a WIP, but I didn't bother.

The center section is double knit so you can see the reverse colours here:
I had thought the all-blue side would be the "right" side but now I kind of like the white side better. Of course that is the point of double knitting it--both sides look good even with a colourwork motif.
The elephant is from the Elephant Sock pattern that I used recently. A nice little elephant.

Games Update, Friday, Feb 14:
1. Rainbow Cowl DONE!
2. Rainbow Hat DONE!
3. & 4. Ravel Sweater 1 and Sweater 2 DONE! DONE!
5. Dye Green Yarn DONE!
6. Spinning DONE!
7. Woven Band
8. Baby Bib DONE!

Not a lot of choices of what to do next, is there! We'll see if I can push through one more event.

Wednesday, July 4, 2012

Travelogue with Fireworks

I had a bit of a whirlwind trip home for Canada Day this past weekend. It was a fun time with most of the  family there. Sunday was spent on the beach and was capped off with a great fireworks display.

I left on Friday and crossed the border at Sarnia. I had read about a yarn shop there, so I did some research and found three that I could visit within a close area. The first was Heaven is Handmade on Christina Street. I really liked the selection, especially since they carried brands I don't see much in my LYS.

I took home a couple skeins of aran-weight washable wool for a project I'll talk about later:
I started swatching on the trip because I couldn't wait to try it out.

I also took home a skein of sock yarn dyed by a local woman. I'm developing a habit of picking up a skein of sock yarn when travelling!
The colours were gorgeous and I chose this green because I thought it would be a nice darker colourer to wear with jeans (without getting too dark to work with or to see a pattern). When you open it up:
you can see that the colours are fairly spotty or random so I don't expect it to stripe too much when knit. We'll see. It's merino with 20% cashmere and feels very soft and squishy.

The second shop was Feather Your Nest on Front Street. It was a nice shop split about 50/50 with home decorator items, with the yarn in the back. (And chocolate. I shouldn't forget that they sell Godiva chocolate there too.) I had first heard about it because they hosted Stephanie Pearl-McPhee recently and I considered going. They stocked a lot of yarn that I can get at my LYS (Lorna's, madelinetosh, Handmaiden). It's all great stuff, but not what I'm looking for on vacation.

I did find it interesting to recognize their shop samples. They had a Honey Cowl out of madelinetosh. Oh wow, I made one of those for a shop sample. And they also had a Color Affection Shawl, which I haven't made but recognized right away because I've thought long and hard about making it. It soared in popularity after Stephanie mentioned it on her blog.

The address for the third shop turned out to be an empty store front. :( No hattrick for me.

The following day, we went out to the "Blue Box," which is a second hand place. (A "blue box" being the municipal container that you use to put out your recyclables.) My sister found some yarn leftovers to use for her constant making of hats. I found some old plastic needles:
I enjoy them so much, and these will be nice additions to the ones I have from my grandmother's supply. I really liked finding the dpns; I didn't have any of them. I love the bright colours, and even if they were the cheapest of the cheap needles at the time, a few decades have bestowed on them value and worth.

Later on Saturday I attended a baby shower for my niece, and now I can reveal the little package I showed a few weeks ago. This:
contained all this:
Two receiving blankets ("spit" cloths) and two bibs. I couldn't believe it when I found this pink elephant fabric. (I always have my eyes out for elephant fabric but there's not a lot of nice options out there.) I actually resisted it the first time I saw it because I didn't think I had a use for it. Well, then I invented a use and went out and got some. The coordinating fabrics are part of what sold me on it. Pink argyle elephants! Come on, how could I resist that?

Here is a detail of each bib:

And Brooke opening her gift:
Here is another handmade gift:
One of my sisters likes to make play blankets from two pieces of flannel with satin trim. Very simple, but very cute. She's happy because the trim company has finally come out with some updated colours.

Later in the day, I went to visit a friend who built a new house over the last year. She and her family were out of town for the weekend, so I actually just visited the house! But they said I was welcome and I decided it was worth it because I didn't know when I would be home next and really wanted to see the new house. I had prepared a gift to leave as a house warming, but forgot it at my mom's. Complete bummer. I'll show you anyway:
It's the latest set of "walking dishcloths" that I finished right before leaving for the trip. I truly hope that it's the thought that counts, because it isn't worth mailing them! (Sorry, Y!)

Sunday was spent on the beach and in between food runs, trips to the shoreline and visits to the art tents, I knit on my latest socks:
I decided on the Harris Tweed pattern by Ali Green. I think the pattern is perfect with this yarn combination. I finished the first sock before I left, and took the second one to work on. I made some good time on it on Sunday.

Monday I got zero knitting done because I had to drive the whole way home. Next time I won't forget to pack the hubby so he can drive!!

May I suggest?

I Say! or at least I did once...