Showing posts with label Orange Zig Zag Quilt. Show all posts

Monday, July 4, 2016

The Shipshewana Quilt Festival

I mentioned that I had a quilt accepted to the Shipshewana Quilt Festival. Troy and I went to the awards ceremony the Tuesday evening before the show started. I wasn't sure what it was, but as an entrant I was admitted for free and I wanted to do the whole shebang since it was my first time.

Turns out they served a little bit of food (fruit, cheese, crackers) and then we sat as they announced the winners. Then we could walk around and see all of the quilts hanging in the show. (That's what I was really hoping for.)

Here I am standing proudly beside my quilt!
 Here is the grand champion quilt:
"On This Winter Day" by Nancy Prince (Orlando FL)
quilted by Linda French
The background cloth was painted and then the details were added with thread painting (see below)
and the buildings looked like they were printed on fabric and then appliqued on in one piece. It was an incredible quilt.

The show had a special exhibit of antique quilts owned by Eleanor Burns (one of the show speakers/teachers). The show took place in a car museum and the antique quilts were displayed on the cars. They complemented each other well.

 Here's a good one for today, being July 4:
I'm glad those setting up the display noticed the sticker on the car and picked an appropriate quilt to go with it.

Following are some of the other quilts in the show. There were so many more that would be worth showing to you, but we did not have time to see everything properly and I didn't have a chance to go back to the show another time.
"It Takes the Case" by Karlyn Bue Lohrenz (Billings MT)

"A Letter Bit of Baaltimore"* by Janet Stone (Overland Park KS)
*Not a typo--she likes sheep.

"Weather the Storm" by Elizabeth Bauman (Lakewood OH)

"Joyous Hope" by Mary Woltjer (Byron Center MI)
quilted by Terri Watson

"A Long Way from Home" by Amy Pabst (Le Roy WV)

"Best Buds" by Darla Parks (Grand Haven MI)

"Icing on the Cake" by Jennifer Rose (Hugo MN)
 This orange one was hanging next to mine:
"Weeping Sun" by Kathy Koch (Middlebury IN)
quilted by Doris Goins
It was a design from a sweater she had knit a couple times and she wanted to see what it would look like as a quilt. So each stitch of the knitting pattern became a small square!
"Bohemian II: Ferris Wheels and Kites" by Sandra Peterson (Muncie IN)

"Family Nucleus" by Dawn Cavanaugh


"Nantuckety Day" by Wendy Coffin (Rye NH)
quilted by Margaret Solomon Gunn

"A Dying Breed" by Patricia Kennedy-Zafred (Murrysville PA)
a tribute to the American family farmer.

"Perseverance" by Linda Neal (McKinney TX)
quilted by Jackie Brown
 Here is a detail of the above quilt:
Those hexies are barely bigger than my thumb nail!
"Crazy for Log Cabins" by Kathy Boxell (Marion IN)

"Red December" by Gail Smith (Barrington IL)
quilted by Angela McCorkle

"Hibiscus" by Pat Sims (Howe IN)

"Jasper and Emerson" by Karen Penrod (Parma MI)
quilted by Doris Goins
It was an interesting experience to enter a show and have my quilt accepted. I'm disappointed that I didn't get to attend to the show and "bask" in it a little more. On the other hand, I've heard it's a very bad idea to hang around your quilt and hear what people say. I'm not sure I could have resisted, so maybe it's a good thing I didn't return!

Mine definitely had one of the simplest constructions and simplest quilting so in that way isn't impressive. (Not made with 10,500+ pieces or 2,000+ hours like some of the winners!) But it sort of fits into the modern movement with its chevron pattern and limited colour palette and sort of with Amish quilts (Shipshe is big Amish territory) with its abstract design. So I thought it might be the right quilt for this time.

I'll close with something Troy and I overhead when we were at the awards night. We walked past two ladies and the one (who I think won a ribbon this year) said to the other, "This show (the Shipshe show) was the very first show I ever entered a quilt in, years ago. I didn't know any better." By then they walked off and we didn't hear anymore but we independently inferred from the remark and how it was said that it was ambitious (or fool-hardy) to start with this show because it's hard to get into. I guess one day I'll be saying that because that is exactly what I did! And no, I didn't know any better either.

Wednesday, July 29, 2015

Quickly about Quilting

I'm going to try to keep this short because Troy says it's my bedtime, but I can't wait to share this news....I finished the grey and orange quilt!!

Now backing up just a little, a couple weeks ago I was splitting wood on a Saturday morning when the sky got very dark (black). I finished up what I was working on, scooped up everything and made my way into the house quick. Less than 10 minutes later it was pouring. So I told myself, that's it for splitting wood today--go quilt a quilt. And I did.

Ok, faster, faster. I followed the seam with the foot while putting the needle to the far side of the opening:
 I did this on both sides of the zig zag stripe.

Then I put the needle in the middle and sewed in between the previous two rows.
In this way I sewed three stripes on each zig zag and ended up with quilting about 1" apart across the quilt. I did all the orange in the same light orange thread and all the grey/black in a light grey thread.

I got the quilting done that same day!! It was quite a long day, but I did take breaks. (But not long after stopping, I would look at the quilt and think, "I really want to get that done." And off I would go again.)

Then it was time for binding. I had purchased an ombre fabric which went from light grey/white at each selvage edge to grey/black in the center. I cut strips selvage-to-selvage to preserve the gradation and pieced them together with a bias seam:
With the splotchy colours, you can hardly find the seams. It's great. (I even managed to match the stripe colour when I sewed the beginning to the end when attaching it to the quilt!)

Once the binding was sewn onto the quilt, it was time for the hand sewing.
I got to try a new thimble I bought (if we're being honest) because it was less than a dollar and came in really bright fun colours. The colours went by sizes so I didn't really get to pick (since I had to pick the one that fit), but they were all fun so that's ok. Anyway, it's a plasticky, rubbery thimble and you would think that I wouldn't like it for that reason, but it worked really well. Soft enough and hard enough at the same time.

I really wanted to take the quilt with me last weekend for the drive to a family campout, but there was no room in the car. (Seriously no room.) So I finished it up this week. Last night, actually. Then I washed it and dried it and here it is!!
I'm just going to throw out some pictures because I'm sure you can figure it out. Front, back, detail shots, etc.


I am so excited to have this done and in time to enter it in the county fair!

Saturday, July 11, 2015

"I am So Basted"

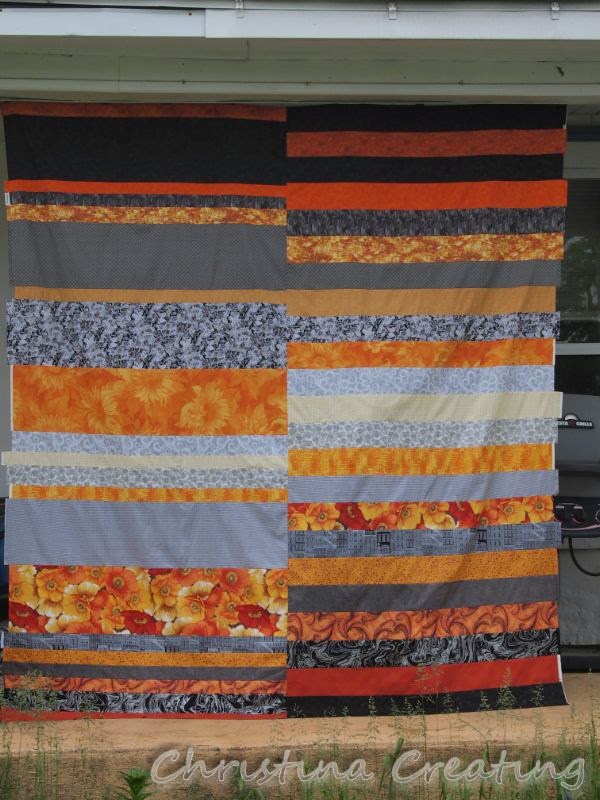
said my quilt today. Yup, I finally packed up the things I would need including the top:

and the back:

and got my quilt basted together. I've been ready and wanting to do it for a few weeks now, but stuff. But today it all came together.

I haven't been able to do it at home because 1. no space to lay it out and 2. so much mess from blowing insulation last weekend. So I packed it up and went to my church to use their large tables. I couldn't get three together, so I made do with two.

I taped the back of the quilt to the tables so it would stay taut.
I didn't pull it tight because I didn't want the fabric to "bounce back" when released. But I had to secure it from moving around and getting wrinkles or folds.

Then I laid on the cotton batting I was using:
I smoothed it out over the backing and didn't tape it down. The batting sticks to fabric like flannelgraph so no tape is necessary.

Then came the top:
I could easily line up the centre with the back because I had put the centre along the join where the two tables met. I methodically smoothed the top over the batting so it was lying flat and wrinkle free. Again, no need for tape.

And then I started pinning.
(and pinning and pinning...) I used my trusty spoon tool to save my fingers. It's ideal for helping the pin through the fabric layers and then lifting the end so it's easier to clip shut.

I only pinned in the orange zig zags. My plan is to quilt the grey zig zags first, without having to remove any pins, and then to quilt the orange zig zags after removing all the pins. The stitching on the grey areas will hold everything in place well enough.

That's the theory anyway. I figure it should work similar to how it worked out when I quilted circles on the crossed canoes quilt. (I quilted circles twice as far apart as I wanted, removing the pins. Then I could quilt between the circles without having to remove any pins.)

It saves a lot of time and makes the quilting smoother if you don't have to stop to remove pins all the time. I think it should work fine even if the pins are a little further apart than I would normally do them. All the quilting will be in one directions with the quilt fairly stable, and I'm not moving it all over like for free motion.

Once everything on the table was done, I folded one edge over and slid the quilt enough to pin the side.
Then I did the other side. And presto! I was done. It look me two hours. Any quilters out there--does this seem long or short to you? I'm curious, but have no idea.

The table height was adjustable and I moved them up, but I still had to bend over to work on the quilt. I think I was better off than my usually position (working on the floor), but two hours of standing and bending over is still pretty taxing. I didn't have enough energy to start sewing, although I had my machine in the car in case it got that far.

But I hope to be stitching soon...I would like to get this puppy done!

Saturday, May 30, 2015

Got My Back

Once the front of my orange and grey zig zag quilt was done, it was time to turn my attention to the back. It had been a while since I cut out the pieces, so I had no idea what fabrics I had left over or if there would be enough for the back. I was quite certain I didn't have any fabric in the stash that would match this quilt.

So after a few days break, I pulled out the fabrics and was happy to find that I had pieces 7" wide by the width of the fabric (42"-44") from all the fabrics that I had purchased a half yard of. And there were a few fabrics I purchased more, either because I liked it, it was cheap, or it was the end of the bolt.

Next I figured what width of stripe I would need to get the full length of the quilt and came up with 4". I cut a matching piece from each fabric and lined them up in the same order as on the front of the quilt. Here is a sample:
That got me a strip of fabric that would cover one half of the back of the quilt. What to do with the other half?

I looked at what I had left of most pieces (3") and figured what I would need of the other fabrics to make the full length. I had enough to cut wider stripes of those and made up a striped piece to cover half of the back.

Since all fabrics are slightly different widths, I just made sure to match the selvage edge on one side consistently.
Once both halves were sewn and all seams were pressed open, I matched the even edges of the two pieces and sewed them together with a wide 1" seam. Once sewn, I cut the seam allowance to 3/8". That cut off all of the selvage edges, which are more tightly woven than the fabric and don't lie the same. Leaving them in would have likely caused puckers and folds in the final quilt.
And now I have a finished back for my orange and grey zig zag quilt made from the same fabrics:
I realized after I was done that I could have just cut all my 7" pieces in half lengthwise and sewed them short end to short end so they would cover the full width of the quilt and then made wider stripes from the fabric I had more of. Then there would have been one simple stripe pattern the full width of the quilt. But oh well, I did not think of that. If nothing else, I have a more "interesting" back now! ;)

The quilting I'm planning to do is perfectly suited to being done on a long arm quilting machine, so I tried to look up the shop in Kalamazoo that rents out time on their machine (after appropriate lessons). I had always thought that would be a great alternative to owning a machine. But it looks like they don't do it anymore. If you happen to know of a place near me that does, please let me know.

Otherwise, I'll be able to do it pretty easily on my home machine as well.

Saturday, May 16, 2015

Quilt Top

I finished the last seam in my orange and grey zig zag quilt top this morning. I was glad to be done that stage since it is necessary to get to the next stage, (repeat last step as many times as necessary) to get the quilt done.

But then I threw it on my bed so I could make sure I didn't get mixed up by the diagonal seams and did actually end up with a rectangle.
And then I got excited to have finished the last seam in the quilt top. It happens every single time: I am amazed at what a difference it makes to have all the seams sewn as opposed to loose pieces on a design wall (or curtain as the case may be). I love this top. I still love that with straight seams and no triangles, you get wonderful zig zags.

I don't know how well you can see it (maybe at the bottom), but I have left all the edges "sawtooth" and did not cut them straight. I'm not going to put a border on the quilt and I'm going to layer the top like it is with the backing and batting. I'll cut it all straight after all of the quilting is done. That way I won't have any cut bias edges that can stretch and distort.

And speaking of the backing, I have no idea what I'm going to do! I'm not sure I have enough leftover fabric to piece together a back. My preference would be to have several large pieces I can put together, but I used a lot of fat quarters for this quilt. I'm going to have to dig out the "extras" box and see what I have.

Otherwise it will be a trip to the fabric store. I'll look through the extra-wide backing fabrics first to see if there's anything that will do but somehow I doubt they're going to have a lot of orange options. We'll see.

Saturday, May 9, 2015

Half Way Sewn

Only one picture today:

But don't be deceived by your first glance...the quilt top isn't done yet. And don't get me wrong...I'm still pleased to be this far!

I could lay out most of the quilt on my bed, but couldn't quite get the edges so that made laying it out more difficult. I was also surprised by just how hard it is to lay out a design that must be sewn diagonally but has a horizontal pattern. So yes, I laid it out an extra time or two to make sure I had it right. And I hung it up and took a picture so I could stand back and check it again.

The reason the quilt top can hang even though it is only half sewn together is because I tried a new way of assembling the top. I sewed all the seams going in the same direction, but I didn't cut the threads when I went from one block to the next. So now the blocks are held together in their proper places and I should be able to easily sew the seams in the other directions without having to lay it out again and again.

I had read about this method but not tried it yet. So far, it makes a lot more sense for the sewing, but makes it take quite a bit longer and more fiddly to press the seams. I'll probably decide on future quilts based on my mood at the time.

But the best news of all is that I have next week off of work and I really, really think I should be able to find the time to sew this top together! wOOt wOOt

Tuesday, February 3, 2015

Orange to Zig and Grey to Zag

We went to visit my in-laws in Missouri over Christmas and one thing I like to take advantage of is all of the quilt shops there. My mother-in-law likes to quilt and it's something fun to do together. (In this case, she enjoyed helping me spend my money!!)

The fabric prices there used to be about half of what I would spend in my area, but not so much anymore. The shops set up in people's homes or garages are still a lot cheaper, but the larger commercial shops are now about the same price. But they have nice shops, good selections, and it's always more fun to shop with someone else.

So I may have picked up a "few" new fabrics. I got the idea to do a grey quilt, but of course I needed a least one other colour with it. I decided on orange. And then I went to see what I could find:
We found a lot of great fabrics. I have arranged them from dark to light to dark and the order above is the final one I settled on.

I wanted to make a zig zag quilt pattern that uses no triangle pieces. I mean, triangles are fine and all, but the simplicity of the rectangle pieces this pattern was made from really appealed to me.

So I cut three length-of-fabric strips from each colour:
I then arranged them so that 1.5 strips got sewn to the colour on its right and 1.5 to the colour on its left.
It was quite an organizational process!

I then pressed the seam and then the strips open:
Pressing is so satisfying!
Then I cut the strips into squares:
Arrange the squares right and you get zig zags:
The top half of the quilt.
And the bottom half.
(Obviously the whole thing doesn't fit on my
curtain/design wall.)
The width didn't fit on the curtain so although it looks a little long and skinny, the final quilt will be two blocks wider.

I got all of this progress done in one weekend (!) and had a great time doing it. For no good reason, I don't enjoy sewing in the room where my machine is set up right now. Being disappointed that I wasn't getting more sewing done, I pulled the machine into the living room and sewed on the large coffee table. It worked.

I've put it away again and I think I will be happy with this progress for now. And I'll enjoy looking at the squares on my curtains. A little brightness in what can be a colourless season.

I hope to have it done in time to show at the fair (end of July) and putting together the top shouldn't take long. It's all straight piecing and besides the corners of the squares, there are no seams to line up to make the design.

May I suggest?

I Say! or at least I did once...