Showing posts with label Mt Robson Quilt. Show all posts

Thursday, July 28, 2016

Mt Robson Landscape Quilt

I did it! I finished my Mt Robson landscape quilt:
The final size is 20" x 13.5". Large enough to hang on a wall but not so large as to dominate. (If you compare it to standard picture sizes, it's roughly the same as a 20x16, if that helps.)

Making this quilt pushed me in a few new directions. Strictly following a pattern, for one. Not something I do a lot of in quilting. Although I did have to pick my own fabrics since the store was out of kits. I followed the suggestions of the pattern but the lower line of dark green trees coming from the left blends right into the hill of dark green behind it. If I had noticed that, I would have gotten an additional green fabric. But otherwise, I'm pretty happy with the tones and textures of the batiks.

Another thing I've done some of, but not a lot, is free motion quilting--especially on a realistic design. Here is a close up of some of the quilting:
The pattern instructed you to outline each piece with monofilament (or "invisible" thread), but obviously I went my own way. I made rough branch shapes in the trees, the ground is covered in round "pebbles", the water is rippling, the winds in the sky are swirling and in the mountains, I tried to imagine which way the layers of rock were oriented. And I think it was artistic license to imagine the center patch of steele blue was a giant glacier coming down so I quilted it in "flowing" shapes following the design of the fabric.

Here is a picture of the back were you can see all the different quilting lines:
(The triangles at the top corners are for hanging the quilt--you insert a
dowel into each pocket and you're good to go. So it looks like there is
no quilting, but there is.)
You may recall I had a lot of trouble with my machine on this many-layered quilt. It couldn't free motion quilt at regular speeds. So after doing the trees, I did the rest at super slow "clunky" speed. (That's the sound the machine makes when you go that slow, as opposed to a good steady hum.)

It was a new experience to work with the fusible for the applique. Being a bit of a purist, I'm not partial to raw edge applique, but it was certainly the way to go for this quilt. Next time I will definitely look for something much more lightweight. For most of the quilt, you have multiple layers as the scene builds and it is stiff and hard to work with. Being rigid will make it hang nicely, but I think having a quilt that's easy to work with and then layering it with one stiff layer at the end would be a better option.

The pattern called for a border that looked like a traditional frame. I debated different options but decided in the end to just put on a narrow binding. I didn't really want it to be much bigger and didn't think I would be happy with a faux wood frame around the outside. I looked through the stash and found a brown I was happy with for the binding.

I have no idea where the idea came from, but when I went to stitch down the back of the binding I thought of a way to do it so that the stitches are even less visible. I'm going to apologize for not having pictures, but if you've sewn binding I trust this will make sense.

The Evolution of Sewing Down Binding
1. You use a whip stitch and just keep the stitches neat and uniform. This will show a small diagonal thread for each stitch.

2. You modify the whip stitch so that your needle enters the quilt back directly under the spot where the needle came through the binding. This will show a small vertical thread for each stitch. But sometimes the diagonal thread leading to the next stitch shows a little too.

3. This is what I started using on the landscape quilt: a modified hem stitch. You bring the needle from the back of the binding to the front close to the folded edge. * The needle enters the back of the quilt just below the spot on the binding where it came out, moves inside the quilt (between the layers) to the next stitch location and comes out the back of the quilt, just below the binding. The needle picks up a small piece of the binding from the back to the front. Repeat from *.

In this case, the only visible thread is the small piece over the edge of the binding. The rest of the stitch is hidden inside the quilt. It also includes only "straight" stitches--nothing diagonal--so it will not shift or distort.

It's noticeably slower because you can only make one part of the stitch at a time and you can't load multiple stitches onto the needle, but I found it was worth it.

I'm sure I'm not the first to invent or use this stitch, so if it has a name, please let me know!

Saturday, July 23, 2016

There and Back Again

I don't know if I mentioned that we were going away, but we spent a lovely week on the shore of Lake Superior in Michigan's UP. About 15 of my family was there and we were able to stay in three cottages (and a couple tents) on the same property. My sister was firmly informed by the border guard (coming in from Canada) that they call them cabins up here. Ok, then...

Troy and I had about six hours of driving time and I was looking forward to some prime making time! Now that we have the GPS unit, I am off navigating duties and I can sew, knit and whatever to my heart's delight. Or til my hands give out.

First up was to finish these socks that have been neglected for far too long:
All I had to do was work in the ends. Done. Just last night I gave them a bath and they are now drying on my sock blockers. I made them smaller than usual because I'm tired of having my hand-knit socks be too loose. Of course, then I was worried they would be too tight and scrunch my toes. But they fit the sock blockers (which are just my size) very easily and I am relieved.

I then pulled out the Farm Girl Vintage block for the week and finished up some embroidery that the block needed:
I won't show you the whole block yet. Since I was getting together with Kim, we skipped Skype and revealed them to each other in person. We covered three weeks while we were there so I'll be posting those separately when I can get to it.

And then I also sewed on the binding of my Mt Robson landscape quilt.
Oh, did I not tell you that I finished all the quilting before we left? Yes, I did. And it felt great to get it done. I'm even pretty pleased with the results. I pushed myself so I could then sew on the binding with the machine and have it ready for the hand sewing when I knew I would have all this time available to do it. I also "unvented" a way to sew the binding that's even more invisible, but I'll get to that when I show you the whole quilt.

While I was at the cottage cabin, I continued to work on the Mt Robson quilt. I finished sewing the binding and I worked on burying all the ends.
There were a lot of them! I saw a great method for how to bury them without having to rethread the needle all the time on some quilting show or online video and was glad to put it to use! I couldn't find the original source, but this video on youtube shows the same thing, if you'd like to see. It works just as well on really short ends, which I needed because sometimes I didn't cut long tails as I moved from section to section.

Even with a really great method, it was still a lot of ends to work in! I didn't finish at the Lake but have since finished that task at home. Pushing through those multiple layers of the heavy double adhesive backing used for the applique was not a joy.

When I wanted more fun at the cottage, I worked on some of my red nine patches. Here are a couple sewn and one in progress:
I did not want to do a random layout so I matched nine squares together (sometimes all the same fabric, sometimes not) and then safety pinned them together. Now I have lots and lots and lots of blocks that I can sew together.

I did the math and I need 288 blocks--that's 2,592 individual squares to cut! I have pieces cut and matched up for about half that many blocks.

On the way home, I worked on one of my Farm Girl Vintage blocks. I had finished one more at the cottage and this was the last one I had with me to do.

That accounts for the block that was due the day before we got there, the day after we got back and today. So I'm on schedule and will start the next block next week if I can tear myself away from the nine patches!
Although I had less to stitch on the way home, I made up for it by stopping at three different quilt shops!

I'm intrigued by the Row by Row program that started a few years ago and takes place each summer. Participating quilt shops have a free pattern and a kit you can purchase for a row that is 36" long. The idea is that you can pick them up while you're traveling and assemble them into a quilt because of the uniform length. (They also have very active Facebook groups for each state/province and it's fun to see everyone's quilts.)

Suffice it to say, I mapped each quilt shop on the way and warned Troy to allow for extra time! :) I had planned to catch a few on the way up, but all of them were closed on Sunday. So the way home was it. I was happy to hit three and by then we were bumping up to closing time for most of them. I discovered new quilt shops and a very nice one (pictured above) is right on the route we take. Easy to hit next time!

I have a few Row by Row patterns now and I'm still not sure I'm going to do anything with them. There are a lot of applique designs and I'm not sure I'm up for it. But it was a fun way to collect some souvenirs of the trip.

Wednesday, May 25, 2016

Let me explain. No, there is too much. Let me sum up.

I haven't been knitting too much lately, but I picked up the needles enough to finish these three bibs I've been working on since the end of March.
A couple people I know have just had a baby or are about to, so I felt a deadline on these. None of them are exactly the same because I was making them up as I go. They're all double knit in the centre with a garter stitch border.

And just because I am obsessed with Kitchenering and managed it in garter, I'll show that too:
Can you find it? Don't worry, you're not really supposed to!
I used it to join the end of the neck band to the beginning.

I'm also working on a liturgical stole. I knit the base a while ago and finally figured out how I could use it. I'm also going to apply some embroidered symbols:
Three down, one to go. Deadline for this is June 5 when it will be presented to our new minister when she is installed that day.

I applied to have my orange and grey zig zag quilt in the Shipshewana Quilt Festival and just found out Monday that it was accepted!!
Wow...it's my first time and I am very excited.

This also means I have to add an identification label and a hanging sleeve to the back of the quilt before June 18 when I have to turn it in.

I've done a little more quilting on my Mt Robson quilt. Here's a piece of the sky
 and a bit of the water:
The quilt is too thick for my machine to free motion quilt comfortably and I have to go painfully slow. But I did get the sky and water done and now I only have the ground (very little area) and the mountains left! The only deadline associated with this project is that I hope to enter it in the county fair at the beginning of August.

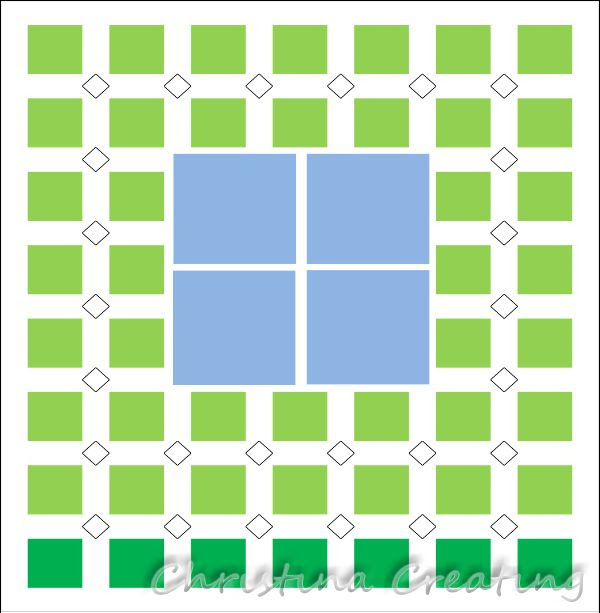
Of course, I have been keeping up with the Farm Girl Vintage I'm doing with my sister. In addition to sewing blocks, I took some time to play with layouts.

My first idea with to have the four 12" blocks in the corners with the 6" blocks filling the rest:
So the blue squares are the 12" and the green are the 6". The black outlined squares are like cornerstones, but set on point. Currently I am thinking they will be a brighter print--all of them done in the same fabric.

But I realized that this would make the 12" squares hard to see on a bed because they would be hanging off the edges. So I looked at a layout that would put them in the centre, sort of like a medallion quilt:
I wasn't happy with the spacing around the larger blocks, so I kept trying. This is the design I landed on:
It gets the larger blocks toward the centre but still has a nice spread out grid feeling to it. There are also fewer cornerstones so that makes it easier! :)

Yes, I have a new block to show you, but I'll do that in its own post later this week.

And finally, briefly for now, I fell in love with a fabric line, had to have it, and had to start a new project with it right away.
I did four blocks to try out the idea I had. I need to get a little more fabric to get some more variety in the striped sections and to complete the pattern I have in mind, but I am itching to work more on this project. No deadline--just fun!

Sunday, April 24, 2016

Quilting Trees

I don't think I've ever mentioned that I sometimes participate in a quilt-along on Ravelry. I'm a member of the Quilters Knitting group and each quarter they have a "UFO" club. (That's UnFinished Object.) You have to have at least five UFOs, you list them at the beginning of the quarter, and then share progress and (hopefully) (sometimes) finished projects.

They always offer two groups--one where you send a fat quarter of fabric to anyone who finishes a project and one where you do not. I signed up for the "send group" this quarter, but no one else did so I was moved over to the no-send group. (You can imagine that members of this quilt-along are frequent repeaters and I'm guessing they didn't want to keep up with the postage and sending. And many are not interested in accumulating more fabric anyway.)

All this is to give context for progress I made on the Mt. Robson quilt. It's amazing how knowing that a few people are expecting to see progress and/or will celebrate when you make some is motivation to get stuff done! (I think they call that accountability...)

After a week of vacation in which almost every day I told myself I would work on this quilt, I did not put it under the sewing machine needle until Saturday. I did a little sewing and didn't enjoy it that much. The quilt is very stiff because of the multiple layers of fabric and adhesive and the machine doesn't sew perfectly smoothly in free-motion mode.

The machine skips stitches. I think I figured out that if I go a lot slower, it doesn't happen nearly as much. It has more trouble sewing in some directions than others so I have to be aware of that too. (Apparently this is common among sewing machines.)

But then there are other times the top thread gets caught up below the quilt, makes knots, and prevents the quilt from moving around. There are a couple blobs of thread in this section:
 And here's the worst one:
It's frustrating. I'm sewing with a Husqvarna. They make chainsaws. (Troy has one.) So I think it should be able to handle it, but I guess it still needs to be handled carefully.

Sometimes I can pull a little harder to get past the snaggle spot and continue sewing, but for the one above I had to stop sewing and remove it all. In the other areas, I noticed the top thread was cut so I trimmed off the loose ends. I'm not too worried about the thread ends coming loose because of the adhesive.

Here is a view of some of the trees that I did:
The top two sections of green slopes have not been quilted yet.

Here's the back, if you want to see the pattern a little better:
I changed it a little from the drawing on glass I did. On the glass, it was drawn like scallops, but I decided to stitch it more pointy to look like abstract tree-top shapes.

Here's the back after the top two sections of trees are done as well:
You can also see that the top thread is showing more on the new sections. (The little green dots.) I never did figure out why that was. I didn't change the tension but obviously something was sewing differently. It may have been connected to increased trouble with the machine, but I couldn't tell for sure.

Here is the other side of the quilt:
 I enjoyed sewing the dark trees in the foreground.
At first I just outlined the bright green area in the back, but that left the background puffy while the foreground trees were tacked down. That makes the background project more prominently than the foreground and that won't do.

So I went back in and quilted some vaguely tree-like angles to press it down:
The second day of quilting was more enjoyable despite the hangups of the  machine. I did have to push myself a bit (telling myself "do just one more section"), but I got all of the green areas done using the same green thread for all of the fabrics. I couldn't quite push myself to do the next colour, but I'm going to consider this a successful session! :)

Tuesday, April 5, 2016

Moving Mountains

So I've been thinking about my Mt Robson quilt lately. You know, how you think of unfinished projects: oh, I should work on that some time... and recently I actually did.

I've been stalled at sandwiching it (finding batting, finding a backing) and by not knowing how to quilt it. At some point, though, you realize that no quilting is the ugliest kind of all so you should just try something. And I had an idea of how I could make this a little less scary.

I asked Troy out of the blue if he had a piece of clear plastic or material about this big (holding out my hands to indicate a rough rectangle). Not 30 minutes later he came back with a pane from an old window that we had around somewhere.

I had to cut off some of the glazing and some caulk (and clean it), but then I did this:
Yes, the edges are wrapped in elephant duct tape.
My sister found it for me and promptly
bought me four rolls so I would have enough
that I could feel free to use some! :)
I set the glass over the quilt and guess what I can do now...
Draw all over that glass with Vis-a-Vis (dry erase) markers! When I didn't like something I could wipe it away and I could experiment with different patterns. I expect the sewing will not be exactly like this, but I wanted something so I would at least know what I was aiming for.

Here is a close up where you can see more of the red, which I used for the trees.
It looks a little funky because you can see
the line and its shadow.
Feeling like I had at least taken steps toward a solution to my creative block, I decided I could also find the energy to sandwich the quilt. I pulled out all my batting scraps and found a piece that will work. I pulled out my cotton fabrics and found a piece for the back. I ironed them all nice and smooth.

And then I remembered this little uncovered spot on the landscape:
Right in the center of the picture are some white spots where the fabric of one group of trees didn't quite meet the fabric of the neighbouring group of trees. I know your first thought is going to be "That doesn't look bad." or "You are too picky, Christina." but seriously, you can see it on the quilt and it was time to fix it.

I had been thinking that I would just touch it with a black or green marker, but that never works as well as you think it will. Since it's on a very dark green, I thought that it would be hardly noticed if I just patched a piece on top.

So I got out the double sided adhesive, stuck it to a piece of fabric and cut out some more trees:
I tried it on the quilt and realized that flat bottom edge was not going to work, so I cut some "tree shapes" in the bottom as well:
Here it is lying loose in place (with the paper backing still on, which is why you see some white outlines):
And here it is stuck on:
I really don't think anyone is going to notice now!

With that done, I got out the spray adhesive and stuck the backing, batting and front together. You're right, I don't like using spray adhesive, but I really couldn't see putting this together with pins or basting it. The double sided adhesive used to stick on the pieces makes the fabric quite stiff, and it doesn't "heal" from pin marks very well. (Which brings up another nightmare: I do not want to contemplate having to unpick any quilting!)

I bought different coloured threads a few weeks or months ago for this quilt so I am about ready to sew this! And once I settle on the design, I can take it with me to the sewing machine for reference by carrying along my glass pane.
The quilting is not overly dense so once I get sewing, it probably won't take that long. (Assuming nothing goes wrong.) :knocking on wood:

Tuesday, September 22, 2015

Mt Robson Quilt Comes Together

About a week after I started the Mt Robson quilt, I had all the pieces cut out. I did go out and get a new pair of scissors: the "medium" size Perfect Scissors from Karen Kay Buckley. It was the only brand carried by my LQS, but I was able to try them at the store and they felt pretty good.

Cutting with them was certainly much better than with my little embroidery scissors, so once I had those, cutting was fairly quick, easy, and (happily) painless.

Assembling the layers was supposed to be easier done over a light box. (The directions actually recommended using a window, but I don't know how they get the pieces to stay on the background.) I don't have a light box, but I had heard of people using their sewing machine extension tables and I do have one of those.

So, take one clear extension table:
put the pattern on upside down (so that the picture's not reversed):
 add a light bulb underneath:
 and you have a light box!

I put the background fabric over the pattern (the blue piece is the sky which had already been affixed) and then started to add the pieces in numerical order following the pattern underneath.
But it didn't work very well because I just couldn't see the pattern through the layers of fabric.

So I had the brilliant idea to trace the pattern with a marker on the side I could see:
and tried again. Well, it still didn't work. There's just not enough light to get through the multiple layers of fabric that build up. So eventually I gave up on my brilliant idea and just placed the pieces by eye-balling and lots of referring to the pattern.

You put all the pieces on and arrange them until you're happy and then fuse them all at once. And here is the final top:
A lovely little scene, isn't it? All the pieces are stuck down. I had no problem with the iron-on adhesive so switching to a lower heat setting worked! :)

What this quilt needs now is some batting and a backing and then some quilting. I think I'll be doing a lot of free-motion quilting with a lot of different colours of thread. I looked at thread when I was shopping for the scissors, but I decided to wait until I could bring the piece in and look at the thread colours on the quilt. I'm not sure how many shades of green, grey and blue I'll use.

I expect I'll do some sewing to just hold down the edges of the pieces, and then add more to give texture to the trees, water, sky, etc.

And before I forget to tell you, I heard back from the store where I bought this pattern and they do have a Mount Rundle pattern! I just need to find a time when I can call them and they're open and then it will be winging its way to me.

And now there's very little pressure on me for this quilt. I can use it for practice and do the Mount Rundle piece "for reals".

Saturday, September 5, 2015

Landscape Quilt: Mt Robson (The Case of Mistaken Identity)

Picture from the front of the pattern. "Mount Robson" by
Vicki Andrews of Rocky Mountain Designs.
I recently started a new project--another quilting project, if you can believe it. And when I say "new", I mean newly started. Because I bought the pattern in 2012 when Troy and I took our trip to the Rockies in Alberta.

The quilt shop we visited in Canmore had a number of patterns depicting famous peaks of the Rockies. I liked this pattern best and picked it in part because I thought it was the peak we could see from our hotel in Banff.

Only in doing research for this post have I realized that this peak is in British Columbia and we did not see it on our trip! This is Mount Robson and I was thinking of Mount Rundle. I'm guessing I got confused by the number of patterns they had. I've decided to press on. (I did contact the shop to see if they have a Mt Rundle pattern. If so, I will consider this my practice piece. If not, then this will be my memory quilt and I will think of my mistake every time I look at it but no one else will know the difference.) You can see a picture of both at this nice post about the famous faces of the Rocky Mountains.

All of the patterns were available as kits, which is what I was planning to buy. Not something I normally do, but I liked the idea of getting everything all at once. Except the one pattern I liked best (and thought was Mt Rundle) had run out of kits and they only had the pattern available. Oh well, more room in the suitcase!

The pattern traveled home and then sat in my craft closet for a while. I think it was last year when I decided to pull it out, study what I needed and buy the fabric. I got it all at once from a local quilt shop.
I got a lot of batiks because of the nice colours and patterns. Batik fabrics also are generally a tighter weave which means you get less fraying. Which is a good thing for raw edge applique. I didn't not get a lot of "landscape" prints where you use a water print for water, and tree print for trees, etc. I prefer the more abstract look.

Sometime last weekend I was struck by the urge to get started on this and wondered why I had been hesitating. I don't do applique very often and I haven't had the best of luck with fuseable adhesives. (They wouldn't stick for me. Now I'm thinking I used too hot of an iron.) But really, how hard could it be?

So I took out the pattern and traced all the individual pieces. They number them for you so you can keep track (and it also indicates the order that you put them onto the background fabric).
This is just a part of the pattern for demonstration. I didn't think
the designer would appreciate it if I published the whole thing!
Once they are traced to the fuseable, then you cut around them. And me being me, I organized them. Since we have lots and lots of manilla folders from Troy's old files, I got one for each fabric.
I labeled the piece numbers on the outside so I could double check I had them all, and on some of them I even stuck a piece of the fabric to the outside so I could remember which was which. (I'm working with four shades of grey alone, so you have to know which is which.)
Once organized, I took a folder at a time and stuck the fuseable to the fabric.
The back side of the fabric. (Not that batiks have a back side, but it doesn't stop me from checking closely in case there's a difference.) I only pressed one piece to the right side of the fabric by mistake and had to retrace that one. Not a bad percentage.

I am now working on cutting out all the shapes. It's slow going with all those peaked and straggly trees. I'm using a pair of embroidery scissors so they're small and pointy (and Troy keeps them sharp for me) but the handles are very uncomfortable so I can't work on it for very long.

It's been the perfect activity for me after my long days at work, once I recover enough that I no longer need to lay on the couch. Go back to kindergarten--cut out shapes with small scissors.

But I think today I'm going to the shop to see if they have some more comfortable ones....

May I suggest?

I Say! or at least I did once...