Showing posts with label pattern. Show all posts

Monday, May 12, 2014

Brioche Cowl - AIDS Walk Prize

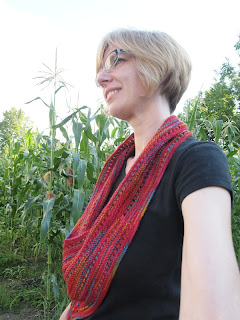
Not too long after the Walk, I finished up the cowl I was working on to give as a prize. I would have gladly knit on it until the yarn ran out because it is so wonderful to work with, but at some point you have to stop. (So they tell me.)

Before blocking, it measured 11" long and was 15" wide at the cast on edge and 12.5" at the cast off edge. I blocked it to 16" long and 13.5" wide. The cast on edge still was wider than the cast off, but I kind of like that the one edge is tighter than the other. I find it gives you different options for arranging the cowl around your neck.
Doubled with the tight edge rolled over
to the outside.
Doubled with the tight edge rolled over
 to the inside.
Not doubled, with the loose side pulled
over your head first.
Ok, when it's cold enough, it can double
as a snood. I know, even that word
makes it unfashionable. But I like
to be warm, and if this is what it will
take, I will do it.
And, I realized as I was trying it on,
it is big enough to be pulled down as a
sort of capelet. For those who can pull
off this look.
The loose edge on this one was a little too loose for my taste and next time I think I'll do the provisional cast on, start the brioche right away, and then come back later to do the ribbing rows and cast off. That way both edges will be neater.

Project Stats
Started
: 5 Apr '14
Finished: 6 May '14
Pattern: My own
Materials: 100 grams of cobweb weight cashmere from an Old Navy sweater ($3.50)
I had the idea of a big bulky cowl out of this cashmere and was surprised not to see any patterns that fit the bill on Ravelry. So I had to make one up.

I chose brioche stitch because it is very thick and cushy, and done on big enough needles it is still light and airy.

It was a gamble on how many stitches to do. (I think I did actually do a small gauge swatch before I started.) It turned out about what I wanted--bigger than a neck-hugger and smaller than a long double-wrap loop. It won't fit easily inside the neck of a coat (which is how I tend to wear cowls and scarves), but it's a big bulky cowl--it's not supposed to. It's got enough size and bulk to be worn outside a coat and make a statement.

I was able to deliver the cowl to the drawing winner on Sunday. Congratulations, again, Clair! And good luck to the rest of you next year!! :)

Pattern Notes:
I used four strands of cobweb (or lace) weight cashmere (100 grams) and size 3.75 mm (US 5) needles.

Cast on 110 sts. [I can’t remember the name for it, but I did a provisional cast on over a waste yarn, and then K1, P1 the first round. Later I just extracted the waste yarn.]
1x1 rib for a total of 4 rounds.
Start brioche stitch in the round til it is long enough (11" pre-blocking in my case.)
Then 1x1 rib for 4 rounds.
Cast off with Kitchener bind off [or your favourite stretchy bind off].

Wednesday, March 19, 2014

Chevron Bib Recipe (and Tips)

I knit this chevron bib during the recent Ravellenics Games. I didn't have time then to write up a pattern (or in this case, more of a recipe), but have taken the time to do so now.

I still enjoy seeing chevrons, zig zags and jagged stripes on all articles of clothing and it occurred to me that babies should not be left out.

On top of that, the shape lent itself very well to the function of the bib. The concave part of the chevron nicely fits around the neck and the angle means there is no additional shaping needed for the straps to conveniently meet at the back.

Recently I knit up a new version, which turned out very nicely:
Although I picked these colours just
because I liked them, some friends and I
had some fun thinking of who would like
the combination: Griffyndor fans, of course.
And my alma mater, Calvin College.
But don't you dare say USC!!
For both bibs, I used cotton I had raveled from second hand sweaters, but of course you can use any cotton you like. I think the popular dishcloth cotton would work particularly well. 50 grams total should complete your project. (Obviously your stripe pattern and colour placement will determine how much of each colour you will need.)

I worked with 4mm needles (US 6), but use what you need to get a firm fabric.

Pattern Recipe
Cast on 61 sts.
S1, knit remaining stitches
S1, Kfb, K26, K2tog, (place marker if desired,) K1, SSK, K26, Kfb, K1

Repeat last two rows, changing colours as desired for stripes. (See notes below.)

When piece is 7” point to point, begin straps: Knit 11, cast off to last 11 sts, K11. (See tutorial below.)
Work garter stitch strap on one side until it is 4” long. (Continue to slip the first stitch to maintain the selvage edge.) Cast off.
Rejoin yarn and make second strap to match. When you have 2 or 3 rows to go, make a buttonhole on a row that starts on the neck edge by S1, K1, YO, K2tog, K7.
Work 2 or 3 more rows as needed.
Cast off.

Notes:
Slip stitches: All slip stitches are done purlwise. This is the default unless a pattern states otherwise.

When changing colours, I find the colour transition looks better if you knit to the last stitch of the row with the old colour and then knit the last stitch with the new colour. (Details: With one stitch left on the row, move the working strand to the front (between the needles). Carry the new colour to the back of the work and knit the last stitch. You are now ready to knit the next row in the new colour. (Slip first stitch, etc.))

As you work wider stripes, be sure to carry the colour you are not using up the back of the work so there will not be long loops. I found it easiest to twist the working yarn around the non-working yarn between the first and second stitches at the beginning of the row. (And in this case you are only wrapping the non-working yarn on every other row.)

I like to make my straps two-at-a-time by using both ends of the ball, but you can do them one at a time too, if you prefer.

If you don’t want to use a button, then skip the buttonhole and crochet a chain from the last stitch left at the end of the cast off row to make ties. In this case, make sure to start the cast off row on the outside edge (not the neck edge) of the strap.

Tip for avoiding that dreadful gap between the strap and neckline.
I don't know about you, but when I cast off stitches in the middle of a row for a neckline, I always end up with an ugly gap where I start the cast off. Sometimes I can sew it shut while working in the ends, but it never looks good. While working on these bibs, I discovered ("unvented" more likely) a way to solve the problem. It only takes one extra step and then you're done!

Follow the directions under each picture:
Here I have knit the 11 stitches for the right strap and
am ready to start casting off the middle stitches.
Insert the left needle between the last two stitches on the
right needle. You are going to "knit" a stitch between
those two stitches, by wrapping the yarn around the
left needle (as shown above)...
...and then pulling the yarn between the stitches with your
left needle to form a new stitch on your left needle.
Pull on this new stitch until it is large enough to put over
the tip of the right needle. Remove the left needle and pull
on the yarn so the stitch is snug (but not tight).
Here you have the new stitch (pink arrow) next to the last
stitch of the strap (orange arrow). You are now ready to
start casting off.
Knit the next stitch on the left needle like normal. This will
be the first stitch to be cast off. (The pink and orange arrows
are repeated to give context.)
Now pass the stitch marked by the pink arrow over the
stitch you just knit. This will anchor the cast off stitches to
the strap. Now continue to cast off normally--knit 1, pass
last stitch over, etc.
After you have cast off the rest of the stitches, you can
see that they are nicely anchored to the strap stitches.
The small gap between the last stitch of the strap and the
rest will disappear once you begin knitting the strap.
Hope that helps!

Please post comments or send pictures if you make any bibs using this recipe. Enjoy!

Sunday, December 22, 2013

MORE Hats and Cowls?!!

Yes, indeed! It is the time (and weather) for hats and cowls, isn't it? This time it's a gift for my mother-in-law. I'm not good about giving gifts every year (and I certainly don't always make them), but considering we were driving out to visit I wanted to have something.

I happened to have just purchased some recycled yarn from another unraveler, including some worsted weight cashmere. I thought a bulky cowl might be just the thing and the yarn was really lovely. (So lovely in fact, that a little girl who saw me knitting couldn't stop petting it and saying "nice...soft." I apologized to her parents for introducing her to cashmere so early. Well, it was more like one of those "sorry-not-sorry" apologies...)

Anyway, I found an interesting yet simple pattern I thought would be just the thing. You knit a rectangle in garter stitch and then do one small seam (about 4.5") along part of one long side to part of the other long side:
 Looks a little odd like this, but if you turn it inside out and fold down the top you get this:
Ok, still not quite cowl-looking. But how about this:
Now we're talking, right?

Oh, and that picture gives away a peek of the second part,
the matching hat--a cute little thing I whipped up while Troy did a bit of the driving yesterday.
I knit it flat and seamed it when it was done. A bit of garter (about 4.25") and then decreases (8 per row, every other row) and boom, a hat.

The cashmere is fluffy and warm and cushy. That hat is not very tight, which I like. The cowl can be worn in a surprising number of ways considering how simple it is. Here let me show you with a ridiculous lot of pictures:

First, with the seam in front and the points lying more in the front than back:

Second, with the seam on top of the shoulder and the points lying to the side:

Third, with the points dead center. This would be great for filling in that gap at the top of your coat's buttons or zipper:

Fourth (finally), with the seam at the back and the points lying more on the shoulders:

I briefly thought about crocheting a decorative edging around the outside or perhaps doing a knitted picot edge, but I talked myself out of it. KISS [Keep It Simple, Sweetie]. But, of course, you could easily add it to one that you made. Or maybe I'll do it on the next one should I make one to keep. I think I need another snug cowl that will fit under my jacket. (Um, yes, I used the word need.)

Project Stats - Cowl
Started
: 18 Dec '13
Finished: 21 Dec '13
Pattern: Miss Sadie's Scarflette by Sara Kay
Materials: 90 g of worsted cashmere, held double.


Project Stats - Hat
Started
: 21 Dec '13
Finished: 22 Dec '13
Pattern: My own (see below)
Materials: 74 g of worsted cashmere, held double.


Pattern - Miss Peggy's Hat
I used bulky weight cashmere and size 7mm needles.
Cast on 72 sts. (I use the cable cast on.)
Knit in garter stitch for 4.25 - 4.5"
Purl next row.
(Knit 7, K2tog) across row
Repeat last two rows, decreasing the number of stitches knit by one each time (I.e. Knit 7 becomes Knit 6, then Knit 5, etc) until there are 16 sts. You should have just finished a knit row.
Purl 2 together across row.
Cut yarn leaving about 10", enough to pull through the stitches and sew the seam.
Work in ends.
Wear and enjoy the toastiness.

Friday, September 7, 2012

Hat for a Cowl with a Point

When I finished my Cowl with a Point, I had enough yarn that I decided to try and make a hat to match. I'd use the same stitch pattern, but convert it to a circle so I could make a tam-style hat. Then it was a race to see who would finish first--the hat or the yarn. Lucky for me the yarn outlasted the hat.

I started at the centre back with a little bit of I-cord, then increased out while repeating the pattern. I increased eight times in a round, and maybe I should not have lined up the increases because I ended up with wedges instead of a smooth circle. But it's pretty close to a circle.
When it seemed like it was big enough, I stopped increasing and started decreasing. If I wasn't worried about running out of yarn, I would have worked an inch or two straight with no shaping first.
Then when I had decreased enough that I thought it was the right size for the band, I cast on some more stitches and worked in the perpendicular direction, taking up a stitch of the hat on every other row. Working in perpendicular garter stitch is as good as using ribbing in most cases.
Project Stats
Started
: 24 Jul '12
Finished: 1 Sep '12
Pattern: my own design
Materials: 35 g of Fleece Artist Blue Face Leicester Socks (Hercules, I think)
I was convinced the hat was way too small before blocking, but I decided to put it on a plate anyway (also known as "blocking") figuring that I had to know how big/small it really was before I could know how to change it. I had about 8 grams of yarn left over, so I did have enough to adjust the size some if needed.
But after blocking, I tried it on and decided that although the band is pretty snug, it isn't too tight. That sounds like a good recipe for keeping your hat on!
So I'm not going to change it at all. Now I can tuck my matching set away for a few months (weeks?) until cooler weather comes!

For those who are interested in making their own, here's what I did:

Cast on 3 stitches and do 3 rows of I-cord.
Incr 1 st and beginning working in round
Kfb across (8 sts)
Continue in garter increasing 8 sts evenly on every other row.
Garter for 4 ridges, then switch to eyelet pattern (continuing the increases on every other row):
Knit
Purl
Knit
Purl
Knit 2 rounds
(K2tog, YO) to end of round
Knit 2 rounds
Purl
Knit
Purl
Knit 2 rounds
Repeat from beginning for pattern.

Continue increases until third eyelet row, then start decreasing (8 times per round) on every other row until 64 sts remain.
Do one extra knit round, then start garter band, as follows:
Switch to smaller needles.
Provisionally cast on 8 stitches at EOR.
S1, K6, P2tog with one stitch of main hat.
S1 knitwise, K 7.
Repeat these two rows around hat.
Kitchener end to provisional cast on.

Send me a link if you make your own...I'd love to see it!

Wednesday, July 25, 2012

Cowl with a Point

I had a hard time resisting this colourway of Fleece Artist's BFL Sock wool...and then I stopped trying. It's gorgeous. Beautiful tones of red shot with yellow and peacock blue. So I bought the skein.

I knew I wasn't going to make socks out of it, however. But what else to make?

An idea started to percolate and I got itching to make a cowl. A long looped cowl (sort of like the Honey) that I could wrap around twice and wear at the office when I'm cold.

The colours are beautiful enough, but I really love how
well the yarn blended from one to the next. No short
choppy transitions here!
But I wanted something that would lie flat in front, so I thought it needed to have a corner, or a point. I started the project once but wasn't pleased with the stitch pattern and threw it into a box while I got distracted with other projects.

I pulled it out recently when I realized I only had socks to work on and thought to myself that socks are meant to be the easy project to work on between projects, or when a project is too big to leave the house; not to be the main project. So I remembered this cowl and pulled it back out.

Project Stats
Started
: 16 Jul '12
Finished: 21 Jul '12
Pattern: my own (see bottom of post)
Materials: Fleece Artist Blue Face Leicester Socks, 1 skein, I think the colour was Hercules (they're not labeled) ($24)
Before I had thrown it into a box, but after I had ripped back the first attempt, I had made a swatch of variations of the stitch pattern I had in mind. There were about five different stripes. I considered them. And then decided to alternate two of them. And then I started knitting...

It didn't take too long for me to have a cowl pretty close to what I had envisioned.

I really like how the bottom layer can lay flat because the point turns the corner.
It's a little bit "kerchief-y" but kerchief's are hot right now (well, knit ones are), so that's ok. I think the next one (and, yes, I think there will be a next one) may have a twist knit into it. (Like a Mobius strip.) So both layers will lie better, and they won't get "crumpled up" where they have to twist over each other to make the double loop.

Someone who is not me might even like to wear the cowl as a shoulder wrap. Not too bad from the back,
but really not my style from the front:
Too howdy-doody or giddyup, or something.

The construction is pretty simple,
and it is knit from bottom to top. If you would like to knit your own, here is what I did:

Cast on 240 sts, join in round
Knit
Purl
Knit
Purl
Knit 2 rounds
(K2tog, YO) to end of round
Knit 2 rounds
Purl
Knit
Purl
Knit 2 rounds
Repeat from beginning for pattern.

Like I said, pretty simple, right? Knit and purl rows for the most part. Now to make the point, you need to do the following:
At the same time place marker after stitch 60. On every other row do a centered double decrease at the marker. (CDD=slip 2 tog as if to knit, knit1, pass the two slipped stitches over). On the alternate rows, make sure to knit the center stitch of the decrease even if it is a purl row.

You will need to move the marker to the right as you do the decreases. Don't worry, that is normal.

Knit as wide as you'd like. When you're ready, just cast off (bind off) on the second last row of the pattern. Mine is about 7 inches wide and took 200 m (220 yds).

Oh yes, and since someone will ask, I used 4 mm needles (US 6).

Go forth and make a point with cowls...


Saturday, December 3, 2011

Little Christmas Pieces

It's certainly "that time of year." Time to worry about all the little Christmas gifts you need for the people in your life. I'm not talking about your kids or your parents...they're kind of a given. But where to you draw the line? Co-workers? Friends? Friends' kids? Mailman? Teller at the bank that always gets your deposit wrong but he's so nice about it you're not supposed to hold it against him?

I usually draw a pretty tight circle. Partly because most people I know have so much (more than they need) that worrying about giving more seems almost improper. Not that I won't pick something up if I think a certain person will like it, but I don't worry about it. Except for work...

I know we are having a Christmas party at the end of December. I know that my coworkers will be giving gifts around (based on last year's precedent). And I will feel bad if I have nothing to give in return. A little resentful that we are playing this game, but bad nonetheless. Last year you may recall that I made mini knitted stockings. This year, I have just finished little mini quilts (about 6"x8") that can be hung or used as a "mug rug." (Think coaster, but a little bigger so it can hold a drink and a snack.)

I have to admit I think they are pretty cute. Maybe I will even have to make one for myself.

Before I show them all to you, I will give you advance notice that I will be asking you to vote for which one you think should grace the front of my Christmas card this year.

And so, without any further comments, here they are:

(1)
(2)
(3)
(4)
(5)


Ok, here's the poll. Please vote on which mug rug you would like to see on my Christmas card. You may vote for more than one, if you'd like.


You have until December 10 if you want your vote to count.

Returning to the quilts themselves, the backs of the quilts are all single pieces of fabric.
I quilted them all the same. I think you can see it here pretty well:
It's a basic outline of the tree and the box around it. (The inside edge of the border.) And then of course, I stitched around the appliqued star as you can see in the very first picture. I used my "light neutral" piecing thread for all of the quilting on all the quilts, regardless of fabric. And I used my shiny gold "lame" thread for zig zagging around the star.

The design itself was paper pieced and you can get a copy of the pattern for yourself here. (You're welcome!)

You may have noticed that even though I said the mug rugs could be hung if desired, I didn't add any pockets (like these) or loops to hang it with. I didn't want any hardware on the back which would unbalance a glass and decided a simpler, less permanent solution would work:
A safety pin! The quilts are small enough that they will hang from the pin--all you need to do is get it reasonably centered. Here's proof:
There it is merrily hanging on a wall from a safety pin. And if you don't want to hang it, just take the pin off.

And now's the part where I give you a little tip. It's something I picked up from my sister when we were having a quilting bee. We had four of us set up on four sides of a quilt we were binding so we could all work on the same quilt at once. I couldn't help but notice that my sister really was just whizzing along. Finally she showed me her secret, and now I'll show you:
I love simple tricks.So obvious once you're told.

I think I have gone on long enough now. I hope you've voted. I hope you are able to use my tip one day while binding. I hope you have a merry advent season, giving with a cheerful heart! (Set me a good example.)

May I suggest?

I Say! or at least I did once...