With some calculations about what it would take (I was surprised it was more than 3 yards), I realized I didn't have enough of any one fabric for all of the sashing. So, first good chance I had, I was off to the fabric store! :)
I pulled out fabrics I thought would work and then spread them out on a table in the classroom to audition blocks on them.
Some options included a classic red with white polka dots.
A soft blue with larger white polka dots.
A small print on black. Not very traditional but I thought that the blocks might really pop.
A pale orange...not a colour I really thought would click but I wanted to try something unexpected in case it worked.
I was really tempted by this busy brown print. I know it's not the prettiest option but I somehow thought it was closer to what would be available at the time. It felt more "authentic" to the 30s repro prints in this quilt.
A darker blue with the white polka dots.
And a similar blue with the smaller polka dots. Obviously I had a thing for polka dots!
After multiple comparisons, I narrowed it to two finalists: the busy brown and the darker blue with medium polka dots in white:
I made my choice, added a completely different fabric for an outer border and made my purchases.
I couldn't start cutting or sewing right away because I had to determine a layout and I had to decide how I was going to do the sashing. I like to add a strip to one side and the bottom of each block but this wouldn't help me hide the fact that my blocks vary in size by 1/2". Instead, I planned to sew a narrower strip on all four sides of each block, which would then form the right width sashing when I sewed two blocks together. (Got all that? Don't worry if you don't!)
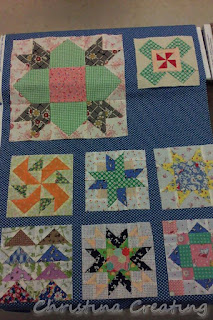
First step is the layout:
I had to know where the blocks were going because the strips on the outside edges had to be the full width of the sashing. I laid the sashing fabric on the spare bed and arranged (and rearranged) the blocks. Yes, I know, I know...you're all happy I picked the blue sashing. Me too! :)
Once I had the layout, I did all of the calculations for how many strips I would need and what sizes they would need to be. I ended up having to cut 176 strips with 5 different dimensions.
 |
| A few of my many, many cut strips! |
Instead of the most common way to border a block (sewing strips on opposite sides and then sewing strips on the remaining two sides), I decided to sew on the strips rotating around the block. This way the sashing didn't dictate a vertical or horizontal vibe to the quilt and all the blocks would be the same.
Here's how I did it in this quilt:
Start with a bare block.
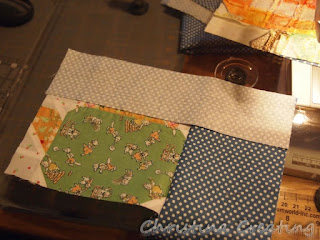
Place the first strip on the block, matching one end of the strip to the edge of the block. You then have to start sewing in the middle of the edge somewhere and sew a partial seam. You can't start sewing at the start of the seam.
And you get something like this. You may note that the top edges are not exactly aligned. I "overshot" the edge on purpose and then cut it even with the block edge after it was sewn. It's much more accurate than trying to match up the raw edges. (It shouldn't work that way, but it does.)
Then, since the lined up edges were on top, you rotate the block clockwise and add a sashing strip to the edge of the block and the edge of the first sashing strip. You can sew the whole seam this time.
This is the result.
Rotate the block in the same direction and add the third strip, same as the second.
Three sides done, one to go!
Rotate the block one more time in the same direction and add the fourth sashing piece. I went ahead and pinned back the loose part of the first sashing strip to make sure it wouldn't get caught in the seam.
And now it looks like we're done.
But of course we're not, because the first strip is still only half sewn!
But now that the fourth strip is in place, we can flip the first strip so it is right-sides-together with the block and sew the remainder of the seam.
And now we're done!
So far, I have finished all four corners, the four 12" blocks (which needed yet another size of sashing strips), and all of the outside pieces. (Hmm...it almost sounds like I'm putting together a puzzle!) All of the blocks on the outer edge needed thicker strips on one or two sides. By only working on blocks that were oriented in the same way and by adding the wide strips first, I was able to keep track of what I was doing.
Now I have only 14 interior blocks to go and they have the same four pieces on all four sides. I'll just have to continue to make sure that I rotate the sashing in the same way and that they get back into the layout right-side-up (as in not up-side-down).
After that they will all get a good pressing and then be cut to size. I made sure the sashing was sized for the smallest square and that means I'll have to cut most of the blocks down--the price to pay for being able to assembly-line sew this step. It also means I'll be able to make sure each block is centered in its section no matter what size it is.
Also, I have one more surprise in the setting of this quilt that this method of sashing allows for! :)


No comments:
Post a Comment
Comments are moderated so you will not see yours post right away. Thank you for leaving a comment; I enjoy reading each one!