Saturday, August 25, 2012

AQS Quilt Show in Grand Rapids

Today I zipped up to Grand Rapids for the AQS's first show there. I knew I wouldn't have time for classes, etc., as I did when I went to the show in Des Moines, but I thought it would be worth a trip just for the exhibit hall.

There were a lot of quilts to be seen. I can't show you any of them. Photography is allowed, but putting them online is not. So if you want to see them, you'll have to visit me and ask.

Besides the usual stunners in the usual categories, they also had a show by tent makers of Cairo. The quilts were unbelievable works of precision applique. Most of the quilts looked like big works of mosaic tile designs, a lot in blues and whites. They were incredible. One thing that surprised me was how far apart their applique stitches were. Makes me think the rule I've heard of a 1/4" is too demanding. Maybe I'll relax it on whatever I might next applique!

I also really enjoyed an exhibit of quilts from 50 award winning Japanese quilters. I am quite enthralled by the Japanese aesthetic. I don't find it easy to incorporate into my own work, but I love to look at it and study it.

In addition to seeing the exhibited quilts, I went to a lecture by Sue Nickels where she talked about her collaboration with her sister, Pat Holly. They have worked on a number of wonderful quilts, including probably their most well known, the Beatles quilt. As if the front of the quilt wasn't enough, they hand wrote the lyrics to every Beatles song on the back of the quilt!
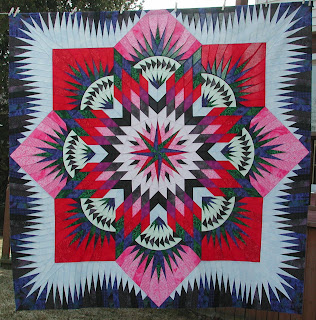
My version of the Hawaiian Star (still waiting for quilting).
Oh, one more thing before I go on to things I can show you pictures of. I was very interested to see versions of Judy Neimeyer's pattern that I have done, the Hawaiian Star, and her similar Dragon Star pattern hanging at the show. A version of the Hawaiian Star was at the Des Moines show as well, which was the same year I did the quilt. Apparently it is still a popular pattern to do.

The one in the Grand Rapids show played with the colours so that there was more unity to the quilt. (Although I changed what colours were used, I positioned them exactly as prescribed by the pattern.)

Ok, so what can I show you? What I bought, of course!

First some fat quarters:
Nothing too exciting there, except the red ones on the right will be going to my sister who is doing a "sister's choice" quilt (wall hanging, I believe). She has asked all four of us to send her two fabrics which she will use in blocks with fabrics she has picked out. It will be fun to see what comes of it! I have no plans for the other two fabrics; they were nice and finished out the "4 for $" price.

Second, I bought an Asian or Asian inspired fabric.
The price was good; I loved the orange; and I think it may go well with the Asian wall hanging I am thinking about. If not on the front, then as a backing.

Lastly, I stopped at a quilt store on the way home. We saw the billboard from the highway on the way home from the cottage but did not stop. (No way I'm making an 7-hour drive longer.) But today I decided to go for it. The shop was nice and I found this Kaffe Fasset fabric (on sale, no less):
Yup, it's small scale, very busy and pretty bright. I am thinking it will be the perfect binding for the quilt made with these fabrics (which I bought last time I was in Missouri):
I tried to buy a Fassett book they had on quilts as well, but their only copy had a torn dust jacket. When they said that was the only copy, they offered a discount of 10% ($3.50). I don't think so. Don't you think a damaged dust cover is worth more than that? It was a big noticeable rip. Anyway, I'll go look on half.com or something. (But LYS owners should realize, I tried!)

Then the side trip took a worse turn as I tried to get back on the highway. There was construction and a bridge was closed and I ended up driving circles in town looking for the detour. (GPS, which I deigned to take along, was no help as it kept telling me to turn where the road was now a sand pile.) The detour took me east (away from the highway), then north (when I wanted to go south), then back to the highway. That's when I learned that there was only a north-bound ramp and no access to the highway south bound!! The detour continued further west (away from the highway on the other side now), then south again, and then finally back to the highway. I was beginning to regret my little spontaneous adventure!

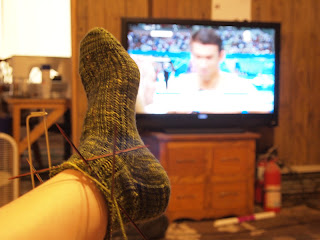
And what was I knitting through the day, as I had a chance? I've been working on a scarf in brioche stitch, something I haven't tried before. It looks like a loose ribbing and acts like a double-sided fabric. Let's see if you can see in it the following two samples (ignoring the top few inches for now):
Look closely at the two pictures and you can see that the two sides are not identical. Follow the bottom green stripe on one, and you can see that the same area is blue on the other. There are two things to note: not only is the fabric reversible and different on the two sides, the brioche stitch also causes the colours of a variegated yarn to fall in such a way that you get these long wavy stripes.

Compare the two colour patterns in the picture below:
The bottom is the brioche stitch with the long full-width stripes. But the couple of inches just below the needle is regular rib. You can see that the colours sort of start a pattern, but the stripes of green or blue are relatively short and the colours are spread out in smaller chunks. I can't say exactly why Brioche brings more of a colour together at once, but I sure like the effect.

In the big picture, however, I am going to have to tear this all out. It's been a good practice at brioche stitch, but the part I had done took about 25 grams, and I only have about 125 in total. That would make for a very short scarf! (Brioche does tend to soak up the yarn as it's thicker (front to back) than most other stitches.) There's no more of this yarn at the store (I can't even remember exactly what it is), so I am thinking of getting a second colour. Then I would knit a two-colour brioche and you would get this colour on one side and the new colour on the other. I'm excited to try it.

Thursday, August 16, 2012

Crossed Canoes Congratulations

Detail of the back.
Last time I mentioned the Crossed Canoes quilt, it was the end of May and I had just finished all the quilting. What a happy day that was! But it was a classic example of a job seeming so huge, but becoming quite nothing if I just worked on it steadily.

If you look closely, there are some jogs in the quilting, but that happened less and less with practice and getting beyond the centre area. Doing the second half of the quilting where I was just running between two previous lines of sewing was a lot easier, plus I wasn't stopping to remove pins. In any case, the quilting gives the general effect that I wanted (concentric circles; ripples, if you will) and that's the main point.

In order to do the next step of binding, I had to trim the edges of the quilt even. This turned out to be easier than I anticipated. Since the border seams were running pretty straight (I checked them with a laser level!), I just lined up my 6" ruler with the edge of the border and cut all the way around the quilt.

I didn't have as much excess as I thought in some areas, but I had 6 inches so I guess that's all that counts.

Next I had to make yards and yards of binding. Ready-to-use bindings are never in very good colours so I always make mine from fabric I buy to match. (Or you can use a border fabric if you want it to disappear. I probably would have done that in this case if I had had enough.)

I use a method where you cut a square on the diagonal and then sew the pieces back together. Then you mark lines however wide you want your binding strips to be. Then you sew the pieces together again to make a tube. Then you cut and cut and cut on the line, which is now a spiral. You don't have to start with a very big square, and it seems like you cut forever!
I bought the binding fabric long after any of the other fabrics in the quilt. (There's some rule floating around "out there" that border and binding fabrics have to be one of the fabrics that you used in the main part of the quilt or it looks like you ran out and "tacked it on." I say "RUBBISH." I seldom buy borders and never buy binding until the quilt is together so I can see what it looks like and what it needs. Each to their own, though.)

In this case, by the time I got this top quilted, batiks had become all the rage. I'm not normally a fan of mixing batiks and prints, (it's hard to do well) but I went with it. It was the best fabric choice I had and I liked having some blues out in the border.

Some of the greens really do not match the green border (or backing), but other shades in the fabric are spot on. So I can live with that.

Ready for some full views?

Here is the quilt on a bed so you can see how it will lie:
It is a square quilt (about 85" square, I think). Here is the back:
You may recall that I used two different pieces of fabric because the quilt shop said they didn't have or weren't getting more of the green. (They were wrong; I saw more there the next month.) But I found some of the same fabric in tan and I went for it. I'm very glad because I really like the checkerboard back.

Final step in making a quilt (these days) is the label. Some people hand- or machine-embroider elaborate labels. I've done one with the alphabet tool on my machine, but didn't want to do that this time. I wanted simple.

So I went to the fabric store and bought a fabric marker. I wrote out what I wanted to say on a piece of paper with the marker. I could then lay a piece of white cotton over the paper and trace the letters. This was a very good way of making sure everything was centred. After each line, I could shift the paper a little left or right as needed. Easy peasy. I then bordered the white cotton with some leftover fabric from the back and sewed it to the back. (Unbelievably, I gave the quilt away without taking a picture of the final label!!)

Here is a full view:
Hindsight is 20/20, I know, but I definitely would lay this quilt out differently if I had a chance. As it is, the dark and light canoes make zig zag lines across the quilt. Every other row of canoes should be turned so that the dark canoes make large "circles" and then the light canoes would make interlocking circles. That way your eye would have a way to travel around the quilt. I'm happy with the balance and overall look of the colours in the quilt, but I find the light/dark movement jarring. Live and learn! (Or should I say, "Quilt and learn"?)

And not to leave you wondering who got the quilt,
I gave it to Troy's son Isaac to celebrate his gradation from high school.
I think he looks like he likes it, no?

Tuesday, August 14, 2012

Harris Tweed Socks

Are we tired of socks yet? Apparently I'm not!

I finished these socks the same day I finished the Ravellenic Games socks. They were almost done and I had to put them aside for the Games. (These were the ones that felt like baler twine after the cashmere of the Ravellenic socks.)

I bought this yarn at a yarn shop in Goshen. It was the best of what I could find. After the busyness of my Hourglass socks, I wanted to try a pair where I toned down a variegated yarn with a matching solid.

I think it worked pretty well. I knit with both yarns, alternating rows. That made it kind of tricky to do short rows on the toes and heels, but since I was on double pointed needles, it was possible. (Instead of knitting across and back, I had to knit across with one and then go back to the beginning and go across with the other. Then once both yarns were at the same end, I could do it again. I just had to remember to work each row one stitch shorter than the previous.)

You can see in the picture below how there is subtle striping on the plain knit (see the sole on the right), and how the colours got mixed up by the pattern on the left.
I think this is one of my best marriages of yarn to pattern. It's very pleasing to look at.

Unlike the Ravellenic socks I just posted about on Sunday, I did my own thing with these socks while plugging in the pattern (which I didn't bother to download, but just picked up from the picture). I tried something different with the heel after having trouble with some socks being too tight across the top when I used the short row heel. I think I had heard/read the idea before, but Cat Bordhi's Sweet Tomato Heel also inspired me to try it.
I did the first half of the short row heel, and then knit eight rows all the way around the sock. (You can see the funny looking band in the middle of the heel.) Then I did the second half of the short row heel. It worked pretty well, but not as well as the heel on my Ravellenic socks that I will trying on future socks.
I added some fullness on the leg at the centre back. It's not the prettiest gusset, but I just added stitches in pattern as I went. By the time I increased enough stitches, it was time to do the ribbing.
I would have went a little further on the ribbing, but I had to watch the yarn. I ended with two little balls each no bigger than a large marble. (Why are you giving me that look? I didn't run out...)


Project Stats
Started
: 17 Jun '12
Finished: 11 Aug '12
Pattern: Harris Tweed Socks by Ali Green (free)
Materials: Shibui Knits Sock, 1 skein each Honey (1395) and Brown (3001) ($18.80)


Sunday, August 12, 2012

Ravellenic Games...Will She Medal? [Commercial Break where we see her appearance on tomorrow's Today show wearing the medal]

Oh sorry, was that a spoiler?

Yes, despite joining up with Team Apathy whose motto is "We don’t care if we finish or not," I finished my Ravellenic Games project. Just shows what you can do if you lower your expectations. No Norwegian sweater this time. One pair of socks. And I still feel like I barely made it.

But I did!
I finished up the cast off while watching volleyball Saturday morning.

Speaking of, here's a close up:
Still loving the "invisible" cast off.

I followed the pattern on this sock more than most. (As opposed to just plugging the lace pattern into my usual formula.) I did have to change the lace because I adjusted the stitch count, and then I had to start the gusset way sooner. I did follow the pattern's method for a traditional flap heel (done toe-up in this case).
It worked very well, and I think it will be my new go-to heel.

Another thing I did yesterday was make some sock blockers out of wire coat hangers.
Now I can block my socks, and more conveniently, I can take pictures without wearing them. The shape looks a little odd and they're not tall enough for the long socks I like to make, but I think they'll work.

Project Stats
Started
: 27 Jul '12
Finished: 11 Aug '12
Pattern: Jane Fairfax by Mary the Hobbit ($1.28)
Materials: Zen Yarn Garden Serenity 20 (Romi's Garden) 1 skein ($32)
As a general note, these socks were knit from the yarn that I bought in Sarnia (Ontario) on a trip home. It was dyed by a local woman. It was a little pricier than I usually go but I decided to get it anyway. When I started knitting with it, I could tell it felt different than the usual sock wool. That's when I looked at the label and realized they were part cashmere. Ohhhh, well that changes things. It was wonderful to work with, and I have to say it made any other project I picked up feel like baler twine!!

By finishing the socks, I crossed the finish line in the three events I could enter with them: Sock Put, One Skein Sprint and Lace Long jump.

Here are my badges to prove it:


I was called to the Ravelry "podium" with the following declaration:
Now will Ravthletes and spectators alike bow your heads for the stately yet thrilling Ravellenic Games anthem... dum de dum dum … dummmmmm .. DA DUMMM!and the crowd roars with excitement at yet another successful bid for Ravellenic Glory is achieved!
And, as the title of this post implied, you can look for me tomorrow on Today. (Ok, just kidding.)

Saturday, August 11, 2012

A Little Souvenir Shopping

A sample of banded agate
I joined some of my family in the UP (Michigan) earlier this week. We had a wonderful time in some cabins right on the shore of Lake Superior. I practically grew up on the shores of Lake Ontario so it was familiar yet different. The lake was warm enough to swim in and we had some good waves a couple days. Lots of fun!

We also had some cooler weather and that was a perfect excuse to visit a "local" craft store. (Local is relative...this was a good 30 minute drive.)

I kept up my habit of picking up souvenir yarn. They had some lovely sock wool from Schoppel-Wolle that I fell for.

Containing a good red doesn't hurt!
Orange isn't bad either.

You can see it's not packaged in a normal hank or skein. They have dyed two strands at the same time and then wound them onto a spool. You can then unwind two balls that should match and produce "identical" socks. This is one solution to the "problem" of fraternal socks. I don't really mind fraternal socks, but this will be fun to try.

The final push was my sister Judy who loved how these samples:

looked a lot like agates. (She is just a little obsessed with finding an agate on the beaches there.)

Maybe to emphasize the sameness of the two socks, I'll knit these two at a time. I've been itching for an excuse...

Friday, August 3, 2012

Show and Tell: Quilts at the Fair

Ready to see what else was at the fair? I have a few things I can show you.

I think in general there were fewer quilts this year. It would have been a good year to put in one of my own! But it didn't work out. Oh well...

This was a popular one made from old calendars: (You can click on any picture to see a larger version.)
It was tied to the backing at the corners and not quilted. I don't think it had anything for batting. I think that technically makes it a coverlet, but I'm not positive about that.

You can see this one got a grand champion ribbon:
It's a lovely simple pattern with nine patches on point.

And for the first year that I have noticed, a tshirt quilt made it to the fair:
This one is particularly ambitious with a lot of shirts included. I have one in mind that I would like to have done by next summer. I hear they are a pain to do. We'll see.

Here are some cheerful penguins:
It's a cute idea, but a little busy for me.

This is a very lovely design, and could be a very nice "charm" quilt (where no fabric is used more than once):
I couldn't tell if this was a magic piecing method or applique. If anyone recognizes it, let me know, would you? Thanks.

I thought this was a nice patriotic quilt:
Even though the red, white and blue theme can get overbearing awfully quick, they always catch my eye. I like this one.

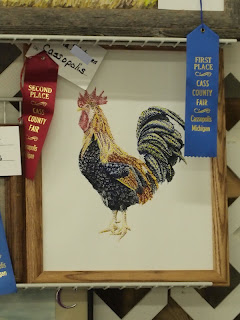
A nice rooster quilt--fussy cut blocks with log cabin borders:
And a smaller wall hanging to match the larger wall hanging (I guess):
The next one is a cute idea for a baby or child quilt. They've added a ribbon ruffle into every seam. Very sweet.
For Julie, I have to show the crayon art that came in:
There were two of them, but this one got a 3rd place ribbon. I thought it was a rather simple one after what Julie showed us she could do. But then I saw this one in the 4-H section:
They knew what they were doing!

They had a lot of furniture at this year's fair:
and you can't miss the grill someone entered. Fabulous.

One more for my mom:
This lovely rooster painted with toothpicks.

Of course, there was a lot more to see. It's always fun to see what people are doing and making.

Thursday, August 2, 2012

Ravellenic Project Progress

Friday, Jul 27, 6:38 pm
A toe. My third one since the first two were the wrong size. What do you mean, "Did I swatch?" A sock is a swatch!
Friday, Jul 27, 9:00 pm
Making some progress on the foot and new stripey lace pattern.
Saturday, Jul 28, 9:39 pm
I've turned the heel!
Sunday, Jul 29, 1:19 pm
Making progress up the leg. For the first time in a long time, I've done the heel as directed in the pattern. Instead of a short row heel, it's a traditional "flap" style.
Sunday, Jul 29, 2:01 pm
Like some of my previous socks, it was way too tight across the top of my foot. I decided to do something about it and ripped back to half way up the foot.
Sunday, Jul 29, 7:42 pm
I started the gusset a lot sooner. This gives more ease and results in a bigger gusset, which worked for a better fit.
Monday, Jul 30, 6:51 am
I've turned the heel (again). (My sock now has had three toes and two heels. ;) It fits much better.
Although I followed the general idea of the heel in the pattern, I still ended up making up my own as I went.
Tuesday, Jul 31, 7:02 am
Further progress up the leg. Soon I'll have to decide how to increase the circumference as I move up the leg.

May I suggest?

I Say! or at least I did once...