Showing posts with label raffle quilt. Show all posts

Friday, July 20, 2018

Rookie Mistake

I've had a couple people ask, and yes, my county fair is coming up soon. Check in day is July 28, so I have about a week.

A couple months ago, I started thinking about what I was going to do this year for the raffle quilt block. I couldn't find the kit and then I realized I couldn't remember a theme either. Did I somehow neglect to buy a kit last year???

I contacted one of the organizers and was grateful to be able to get a kit at that late date. The theme was "Harvest of the Grapes", which didn't sound at all familiar to me so I really do think I forgot to buy a kit last year.

Here are the fabrics they included:
plus a light background which didn't get into the picture. The rule is that you must use each of the fabrics included and you may add no more than two additional fabrics to go with them. If forced to say, I would have to admit I was not very inspired by the fabrics, but I really wanted to get a block done.

So I resorted to a technique that would get me inspired...you guessed it -- English paper piecing! I poked around on the interwebs and found a design for a bunch of grapes using hexies. I adapted this placemat pattern from the "Wild Olive" blog.

First up was to print the pattern on cardstock and then cut the pieces apart. I then chose fabrics for the grapes. I decided on purple grapes and pieced together this bunch:
(The grapes are on a piece of white paper; it's not sewn onto anything yet.) I added a green fabric to the kit for the leaves and I added a purple to give some variety in the grapes. If you have a good eye, you will have noticed that I have three purple fabrics but only added one.

Well, I used the purple print provided in the kit both right side up and right side down! I don't know if the fair judges will consider this cheating, but the rule says I may not add more than two fabrics and I haven't. Whether they approve or not, I thought the grapes looked better this way so I went for it.

I decided one bunch of purple grapes on a 12" block would be kind of lonely, so after trying out some border or framing ideas, I added a yellow bunch of grapes instead.
This time I used two yellows from the kit and added a yellow. But wait! I've already added a purple and a green - how can I add a yellow? Well, the yellow and green are from the same fabric; I just did some careful fussy cutting to get what I want. (I'm going to include a sample with the block so the judges can see that it really is one fabric.)

Do you see anything else wrong with the two bunches of grapes in the picture above? I meant for them to be the same as far as the light and dark grapes, but I sewed the yellow one together in a different pattern! Grrr.

I gave myself a day, and then I took the yellow bunch apart and sewed them together to match the purple.

Once that was done, I settled on a layout and proceeded to applique the grapes to the background fabric.
Instead of using traditional applique stitches, I decided to sew them down using the same method I used for my English paper piecing. It's called the ladder stitch, I think. You take a small stitch in the background (as above) and then take a small stitch along the edge of the grapes, always entering right above/below where the needle just came out.

It made for stitches you can barely see and the back looks neat as a pin:
Here's a detail view from the front: (the blue marks will wash out later)
And here's a shot of the stem I tucked in as well:
I used a short bias strip, folded in thirds to get the raw edges tucked in. The bias allowed me to curve it to the shape I wanted.

When it was all stitched down, this is what I got:
Then I decided to add a loose grape to each bunch:
I soaked the block, let it dry and pressed and starched it. Then I cut it to size and thought I was done.

/ominous music starts playing

A couple weeks later (this week) when I was physically gathering things together to get ready to take to the fair, I thought I should double check that I had actually cut the square to size. It had been a few weeks; maybe I thought I remembered cutting it but hadn't yet. I would hate to be disqualified for such an easy thing to fix. So I measured it, and then measured it again.

/ominous music builds and gets louder

I was measuring 12". It is supposed to be what you call a 12" block, but that means you cut it at 12.5" so you have room to sew it together. My block was useless.

There wasn't too much wailing and gnashing of teeth because I didn't have time for anything but finding a solution. My options were pretty limited because I had very little of the fabrics left and absolutely none of the background because I had thrown out the pieces I trimmed off the sides! After considering using more of my two additional fabrics, I cut the Gordian knot and contacted the organizer for another kit. I got one.

So now all I have to do is take the appliqued pieces off of the too-small background piece and sew them onto the new background square. (Isn't it a good thing I like hand sewing? sigh) And then I have to make extra sure that I cut it at 12.5".

Maybe I'll go put some masking tape on the 12.5" lines of my ruler right now....

Saturday, August 5, 2017

3...2...1...County Fair Results (2017)

3. My long cable socks came in third. Not what I was thinking they deserved!
You can see the second place socks right beside them. Stocking stitch socks made with a self-striping yarn.

Here are the first place socks:
You can't really see it because of the tweedy or coloured yarn, but I'm pretty sure I could see a lace pattern.

I would say that the judges value lace work and colour work above cables, except that my elephant socks,
didn't even place and the colourwork there is a lot better than either of these. Oh well. At least I get to take them home with me and wear them!! (And today I found two pair of skinny jeans I can wear them over. Yes, you heard right...I'm planning to wear these socks over my jeans like boots. Just try and stop me.)

2. My striped knit dress received a second place ribbon:
I didn't see what it lost to--it was hanging with sewn garments and it's hard to pick out stuff in the "other" category.

1. My shawl made from handspun received first in the handspun category.
I wouldn't be surprised if it was the only entry. I think it's a good category to have but there aren't many entries (if any) most years. That's why I figured I could get a way with submitting something that was mixed with commercial yarn. (I did declare that very clearly on the card label.)

And my Farm Girl Vintage quilt received first!
That's out of all of the full, queen and king sized quilts pieced* and quilted by the same person. (They added a separate category this year for quilts quilted by others--meaning a professional long-arm quilter.)

*Pieced, meaning not applique or combined with applique.

The quilt entries were way down this year, but still...I'll take it! :)

My quilt block square for the raffle quilt got honorable mention:
That means it didn't place in the first six but did make it onto the quilt.

Here are all the blocks:
And here are the ones that will be made into pillows:
There was some drama about the second block not being on the quilt, but since I wasn't there, I don't know any details!

They have changed the raffle system this year.
The finished quilt from the 2016 raffle blocks.
My block is in the second row, third from
the left.
A little recap in case you forgot...it used to be that the raffle winner of 2016 (let's say) got a quilt made out of the 2016 blocks. Of course, that meant the quilt wasn't ready for a while after the drawing. It also meant that you couldn't see the final quilt. To me, that would be a plus because I could have some input on how it was finished. But for many people--especially those with no quilting experience--it was impossible to imagine the quilt they were buying a ticket to win. And 100% of the time, the finished quilt (which was displayed the following year) looked far better than the individual blocks.

So, they have decided to raffle the quilt made out of the 2017 blocks in 2018. They can display the finished quilt and the winner can take ownership of the quilt right away.

But that has left a gap year in 2017 with no quilt to raffle--the 2016 blocks were raffled in 2016 and the 2017 blocks will be raffled in 2018. What to do?

The solution was a generous quilter making a quilt for this year's raffle:
I bought my tickets. The drawing is tonight. I'll let you know if I win! :)

_____________________
UPDATE! I DID WIN!!

I just got the call. We had an amusing start to the conversation where she didn't know who I was because I only wrote my first name on my raffle tickets. (People were waiting and my last name is too long!) Once she realized who I was, she said "Oh you're my Christina." Ha ha, yes I am.

So tomorrow I will be able to bring home the quilt pictured above with my entries. How awesome!

PS: I'm crediting this to slightly crumpling my tickets so they don't lie flat and are easier to grab. But now that I've said that, don't use the same trick and lessen my perceived advantage!!

Saturday, April 9, 2016

Keeping Twitchy Fingers Occupied

I have been so eager to work on the quilt blocks for the Farm Girl Vintage quilt that I have to admit that I have worked a week (or two) ahead. Not so bad, but I am getting ahead of Kim who was sick this week, and that's no fun.

So I put my mind to other projects that I could work on that would involve the same work. And I thought of the Cass County Fair raffle quilt block. As you may recall, the theme is Farmers Market and the fabrics I get to use are these:
(I can add up to two additional fabrics if I want.)

A while ago I decided that I wasn't going to attempt an applique scene and did some research on some pieced blocks I could do. Since I have corn fabric, I concentrated on blocks with corn in the name and found this great "Corn and Beans" block from Patchwork Square. (There are a lot of nice patterns there for free.)
I have a bit of a conundrum about how to place the fabrics though. It looks great in the three colours shown here, but I have to use all of the fabrics in the kit. So I have to use at least five. How to place them?

I also like to keep in mind that most blocks that are appliqued will have the cream fabric as the background and likely it will appear in a lot of the blocks. I also thought that I have to add a bean fabric (most likely green) to complete the block name.

So I did a couple of rough mock ups in Excel to experiment with different colour additions and placements. (I know these samples only have four colours--I figure I can fussy cut green from the seed packet fabric to work with the bean fabric and will use the corn and solid yellow in the yellow triangles.) Take a look and tell me what you think. Have any preferences or thoughts?

1. Black in White

2. White in Black

3. Diagonal 1 (dark on dark; light on light)

4. Diagonal 2 (dark on light; light on dark)
I would love it if you would take a second to rank them in this poll:
Create your own user feedback survey

and love it even more if you left a comment with your reaction or reasoning. Thanks!

Meanwhile, I have ordered some green bean fabric online (surprisingly hard to find!) and will wait for it to arrive before I start deciding--or cutting--anything.

So meanwhile meanwhile, I will have to think of some other project to keep my fingers from sewing too far ahead on the Farm Girl Vintage quilt!!

Friday, August 7, 2015

2015 County Fair Raffle Quilt

The 2015 theme for the raffle quilt was "Up North". There was a wide variety of blocks this year:
The largest majority fell into the broad range of camping or "woodsy" (think bears and moose) and then there were a couple snow or ski blocks and a couple based on actual places in northern Michigan.

Here are the top six:
The bridge block (top right with red ribbon) was close to what I was first imagining doing. But I knew I couldn't pull it off without more time and effort than I was willing to give. But I'm glad someone did it! (And I'm not sure it would have been good to have two.) For those not in Michigan, it is the Macinac bridge in northern Michigan.

A lot of people were surprised the bridge block didn't win. Apparently the judges didn't like that the trees on the right of the block were too large in proportion to the bridge and the rest of the scene. I guess that's true once it's pointed out, but considering the first place block is a collection of scenes and not all of the items there are proportional to each other, it seems a little unfair.

Apparently we had new quilting judges this year. One of them in particular came very highly recommended for her quilting knowledge and a local expert quilter who was helping the judges (like I do in canning) said she learned a lot from just hearing her talk about the quilts. Now I'm hoping that if she returns next year, I'll be able to stick around and just listen in.

Here (again) are the six pillows, sort of a group of "also rans":
Mine is on the bottom left. I put the superintendent on the spot and asked if she remembered a specific reason mine wasn't on the quilt, but she couldn't remember. Some of these didn't use all of the right fabrics or their borders were unequal. Stuff like that.

My only serious question about the judging this year is how the square in the bottom right of the quilt made it into the quilt. It is a nice enough pattern (maple leaves) and done well enough, but the two additional fabrics they chose are the dominant colours and don't blend well with the main colours. (I don't know if you can see it in the picture above, but they are quite a jarring orange/brown and light/bright green.) But whatever...

There were three blocks that didn't make it into the quilt or pillows.
That was me last year. I know one of them didn't use all of the fabrics. I think one was sewn onto a stiff backing (strictly against the instructions). The one on the left was done from a picture of Tahquamenon falls (in the UP). It was well done from the picture, but I think the general feeling was that without the source picture, it was hard to know what it was. We don't think of falling water as brown.

Here is a picture of the completed quilt from last year's blocks (based on the underground railroad quilt):
The raffle winner gets to choose the colours for the sashing and borders. Every year it is great to see the transformation from loose blocks to assembled quilt.

And for next year? The theme is "Farmers Market" and here is a shot of the fabrics:

I'm very happy to see some brighter tones in there. (They got the message that we have had dark tones for far too many years.) And they chose four different fruit or vegetable fabrics in different dominant colours. So whereas I got a yellow corn fabric, other kits included a blueberry, a red (strawberry or cherry--I'm not sure) and a green (beans?). I think this will add a great variety to the blocks. Not only dominant colours differences but also different design ideas since you may not display cherries the same as corn, for instance.

The raffle winner for this year's quilt is pulled on Saturday night and I'll let you know if I win! :)

Tuesday, July 14, 2015

County Fair Quilt Block

Yes, it's almost time for the Cass County Fair again. (The 164th!) It opens August 3rd and runs through the 8th, which means I have to have my projects ready to turn in on August 1st.

I have a number of projects I am trying to finish up and prepare for entry, and one that I didn't even start until last night was the raffle quilt block.

I bought the $5 fabric pack last year and the theme was "Up North." I had a few ideas to do with the Mackinac Bridge but I couldn't get excited about a landscape or applique project. I finally decided to do a Bear Paw block. Bears live up north, right? (Right?)

I'll skip to the end and show you my final block:
I put it together in one evening. It is 12.5" this year (I swear), except for a tiny notch out of the right side. (At about the mid point. Don't pretend you can't see it.) But I'm not replacing that piece and will take my chances with how strict the judges are. (They are strict.)

Here is a close up to show the fabric a little better:
The kit came with a dark blue, a green with red dots and a brown and tan with the same vaguely-animal stripe on it. Oh, and the pale pale blue that I used on the outside of the block. I really wish they would chose some more modern, or at least bright and cheery fabrics one year. They are always the same dark drab tones. Ok, ok, I'll stop criticizing before another person asks me why I participate if I hate it so much. (I don't.)

Here is the basic unit of the block:
Make four of those, add the sashing and you're done.

I followed this great tutorial by Delaware Quilts. Except I did the half-square triangles eight at a time instead of four. I followed the Fons and Porters tutorial here for that. (The key formula is that your starting square is 2 times the finished block size plus 1.75".) It worked great except for the missing notch on the right side and I think that was because the block got distorted when I was marking it with a pencil. (Not their fault.)

If I did different colours in each corner, then the four at a time would have been perfect. But since I matched opposite corners, I needed eight total and why not do them all at the same time then!? :)

If all goes according to plan, my block is not actually finished. I have a surprise in store. I'll show you later, assuming it works out!

Wednesday, August 6, 2014

County Fair Raffle Quilt: Underground Railroad (2014)

As I have explained before, this year's County Fair Raffle Quilt was based on the Underground Railroad quilt. You had to make one of the 15 quilt blocks designs. They were a little worried at check in last Saturday because three of the first four blocks were the bear claw design!! But don't worry, they started to see more variety after that. Here are the winning squares that will end up in the quilt.
Here is a close up of the top six blocks:
I was not the only one to note that the winner was a log cabin block. The easiest block to make (in my opinion), especially as you can trim the block after each piece is added. I am dying to listen in on the judging to fathom what their reasons are for their choices. Enough said on that I guess.

Here are the six pillows that people could bid on:
I really liked the top centre one, even if it is simple. I find it really striking. I also like bottom center Jacob's ladder.

And once again, here are the reject squares, mine being the bottom centre one.
There were no judges' notes on the card. I thought the silver lining of being a reject was that I would at least get to take my block home. But when I went to get it on Sunday with the rest of my stuff, they said that they had auctioned them off. They've never done that before. (And in fact I saw one of last year's reject blocks submitted this year in the sewn pillow category. When I mentioned that to them, they didn't know what I was talking about.) Oh well.

Here are the other Carpenter Wheel blocks in case you want to compare them to mine.
This one placed sixth. the maker made the same colour arrangement that I did except switching the green and blue.
This one was on the quilt and the maker added a contrasting colour. (You were allowed to add one new colour.) I like how she made the outer shapes echo the inner star by using two colours, but I don't think the new colour improved the block.
This one was also on the quilt. The red in the outer shapes was a different fabric. It was also stitched down with a zigzag stitch. I don't know if they appliqued it on to cover something else or if that was supposed to be decorative, but I really didn't like it. Also, what is with the green/tan split blocks in the outer border? That definitely didn't fit the pattern as given and in light of that I don't think this block should have even qualified.
The final Carpenters Wheel was made into a pillow. I think this was my favourite. I like the blue and red in the middle (same as mine), but this maker made the points a contrasting colour in the outside shapes. (This was the option I said I would have liked to have tried after I finished mine. Here at the bottom of the post, if you want proof!)

So that is a lot of Carpenter Wheels and maybe I would have been better off with a different pattern. (Seriously, I would have been better off if my square would have measured a solid 12.5". That's all on me.) Certainly there were other blocks that were the only one of a particular design, and well done as far as I could tell, that didn't make it into the quilt. Once again, I would love to listen in on the judges...

One thing I did get to listen in on was a fellow quilter checking in her things, including a quilt block. She was complaining that they told us to make certain blocks but didn't provide the pattern for any of them. I'm thinking they're all made with squares and triangles...pretty easy to calculate. She said she was rescued by a quilt store owner who lent her the book with the patterns. When I got a look at her block, I saw she had made one of the circles. Like, literally, you could trace a bowl or plate from the kitchen to make the pattern! I just had to shake my head.

I'll finish with a look at last year's blocks, now all made up in a quilt:
Mine is the second one on the bottom row. Simple, but with a little fussy cut bird in the "hole" that I thought was really cute.

And next year? Next year the theme is "Up North" and the fabrics are really dark and dreary. We'll see what I can do...

Saturday, August 10, 2013

In Which I Realize It IS Me (and the Construction of a Quilt Block)

I mentioned that I bought a kit for the 2014 county fair raffle block. (By the way, they got their raffle license on Thursday of the fair and were able to sell some tickets. I didn't know and didn't have a chance to win, but at least we know the blocks will be made up into a quilt. I found out on Sunday when I went to pick up my things.)

Anyway, back to the quilt block. I bought the kit on the Saturday when I was helping with the check in and judging. The theme is the underground railroad and the entries are limited to the 15 blocks listed and pictured in the kit. All piecing (no applique)...yay!! In case you're not familiar with the story, these blocks were touted as a code for helping slaves to escape along the underground railroad. It's complete bunk but people love the story so the tradition has continued. (Read here for a thorough debunking.)

Over the weekend I studied the blocks because I was determined to not have a last minute entry next year. Plus I was interested in the blocks. My personal choice was quickly narrowed down to two of them, the Carpenter's Wheel and the North Star. I started googling how to do the Carpenter's Wheel because there were several possibilities that came to mind.

A Google Image search shows lots and lots of blocks that look like this:
Source
Which was not the way it looked in the kit. I liked the ones on the web better and started to wonder if the blocks had to look exactly like in the kit's picture, or if it was a block with the same name but an alternate design would that be ok. I debated about asking about it, and in the end, when I saw the superintendent on Monday night at the fair, I asked her.

I showed her the picture above and explained that that was the most common way the block was done according to my web search. No, she said, it has to be exactly like the kit. We talked for a few more minutes but I basically got the same response to anything I said: It has to be exactly like the kit. "Even if the kit is wrong," I thought.

Anyway, I quickly dropped it and debated whether to do the block I liked better the "wrong" way or my second choice. Then I did a search for the underground railroad quilt and got this result. It shows the Carpenter's Wheel just like it was in the kit. That made me feel better that the fair didn't have it wrong, but I think it's funny that not only is the story behind the quilt complete bunk, but they can't even get the blocks right.

Then I took a big breath, decided I wasn't going to create problems that don't need to exist and started my own Carpenter's Wheel block in the design prescribed by the kit. It's the most complicated piecing of all the choices and I plan to do it the "purist" way.

The picture above shows the block done in all half-square triangles. All the seams are straight and you can assemble it in a grid. But all the sections that are made of one fabric are chopped up into little triangles. So if you have a print, there will be no continuity. I decided that was not for me. I will make a pattern with as big of pieces as possible, even if it meant tonnes of inset seams. Bring it on!!

As always, first step was to make a plan:
I drew out the pattern (over a grid so I could easily see measurements), and listed out the pieces I would need to cut. The finished block needs to be 12", so each square on the grid will finish at 1.5". That's small, but not tiny.

Then I pulled out the quilt scrap box and started pulling out some options.
(Because there was no way I was going to make my first attempt on the kit fabric!)

I got the pieces cut and sorted:
and even "dry fit" the center star to make sure it was going to fit together the way I thought it would:
(Plus it's just kind of pretty.) I was very proud of myself for noticing that these pieces were mirror images of each other (by colour group) before I cut out the first set. Yay, me!

That was Tuesday evening.

Next was the plan of assembly, what parts had to be attached to other parts, and then how it would go together:
I would start in the center with the star. A lot of inset seams here. The most important thing to do is to mark all your 1/4" seam allowances. Do not let yourself think you can eyeball it! Especially on these angled pieces.

Lay two together,
and start sewing toward the corner. Start at a distance that you'll do 3-4 stitches before you get to the corner:
Then stop the needle right at the corner with the needle in the down position:
If you can see your next stitch is going to take you past the corner marking, then turn your stitch length down. (I did these seams at "2", but often switched to "1" at the end to make sure the needle hit in the right spot.)

Then pivot the piece and sew the length of the seam:
When you get to the other end, once again put the needle down right at the intersection, pivot the piece and sew 3-4 stitches the other way to anchor it.

Normally I would anchor the end of the seam by going back and forth, but machines are a little unpredictable at when they start changing direction after you push the button. Often they take one more stitch than you expect and that will be death to your inset seams. This pivoting method may seem like more work, but it doesn't take much and it's very reliable.

I continued around the star, adding pieces and here you can see it finished with the side pieces being dry fit:
That was Wednesday morning.

Next step was to fit in the side pieces in the same manner. Line up one edge, sew it from intersection to intersection, then sew the next edge. I soon had all the side pieces done and was looking at adding the corner pieces:
Apparently I didn't photograph the corner pieces being
assembled but I did them as two squares plus a rectangle.
One less seam than doing a 4-patch.
That is where I ran into a problem. The corner pieces didn't fit onto the star--the star was too narrow.
That stopped me in my tracks. I looked at the plan and thought about it some more but I just couldn't see it. It was obvious what was wrong, but if I didn't see where it came from then it was going to be hard to fix it.

Not ready to quit, however, I started doing the outside "border" strips. First thing was to assemble the flying geese units. My favourite method so far is to use squares to add triangles to the base rectangle. So you start with a rectangle the size of your finished piece. You add a square that matches the length of the shorter side. Lay the square on the rectangle so three sides line up and sew along the diagonal, point to point.
Yes you need to mark the diagonal. If you think you can eyeball it you are a proud fool destined to fail. (Ask me how I know!)

Once the seam is sewn, cut off the excess (the part toward the corner of the rectangle, not the  middle).
Usually I do use a rotary cutter, but I didn't have mine handy so I used my scissors. Not quite as accurate or straight, but since the seam is already sewn, it doesn't really matter now does it.

Then you flip the triangle-that-was-a-square and press it with your wooden "iron." You can also use your fingernail, but the wooden tool works great, it's pretty and cheap. So why not.
Then put a square of the same dimensions on the other side and sew across the diagonal:
Note that the seams have to come to a point in the middle. Sewing across the other diagonal would not make a flying geese unit.

Cut off the excess:
Press over with the wooden iron and you have a flying geese unit:
I chain stitched these (meaning I did the same seam on all eight pieces before moving to the next step) so it was quick to get them done. (It would have been quicker if I hadn't put four of the blocks on the wrong side of the rectangle the first time, but that is what a seam ripper is for.)

Then I lined up the flying geese units with some solid squares and rectangles in the appropriate order and got the border strips done:
That was Wednesday night.

The whole evening while I was sewing I was also pondering my error in the star measurements. By the next morning, I thought I had it figured out. First step in any case was to remove the side pieces from the star, and so my seam ripper got another work out:
Pieces separated.

Then I worked on my new pattern. I thought my problem was the bottom edge (as seen in the following picture) of the star piece. It was supposed to finish at 1.5" and so I cut it at 2". With 1/4" seam allowances that should work.
But I started to think that it only works when the seam is perpendicular to the cut. In the star piece those seams are at a 45^ angle and so just adding 1/4" on each side wasn't going to work. What was?

Well, I decided to do this a more empirical way instead of a theoretical way. I drew the finished piece I wanted on the paper above. Then I went around and added the 1/4" seam allowances. Then I measured the length of the bottom edge. Sure enough, it was closer to 2.25" than 2". I was ready to start again. Except that I had to go to work.

That was Thursday morning.

When I first cut the star pieces, I was able to measure the 2" on the bottom edge on my cutting mat's grid. But it doesn't have 1/4" markings. What to do?

I laid my ruler on the mat so that its markings matched up with the mat's. Then I laid the strip I was cutting against the edge of the ruler so that the point was at 1/4" mark.
Then I could count back 2 1" blocks back on the mat and cut my other edge:
Worked like a charm.

Then I marked the seam allowances again
When I cut the pieces out from the other fabric, I was having trouble figuring out the angles and directions to cut them in a mirror image to the first. Then I realized I could follow the exact procedure as long as I laid the fabric wrong side up.
Again, worked like a charm, and I once again took the time for a dry fit:
I switched two of the purple pieces in the final layout
as I wanted the two with the most purple to be opposite
each other. I know it's only a practice piece, but
you still have to care!
Then I started sewing the star. I certainly did not sew the whole thing before I checked if I had fixed the problem. As soon as I had two pieces together, I added a side piece:
Add one more star piece and I could check the "troublesome" corner pieces:
Looks like a perfect fit...yay!!

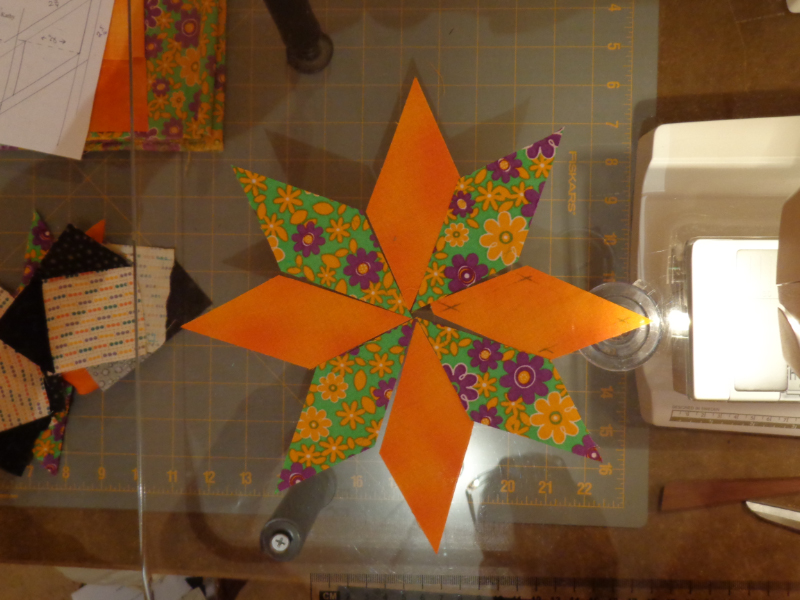
I continued around and got the center portion done:
I finished at 10:58, and seeing as it wasn't quite bedtime, I continued on. I added the border strips and here it is, fresh off the machine:
Although it was now 11:17 and I really should go to bed, there was no way I was going to be able to sleep without pressing it!!

I took my time and got all the seams going in the right order.
(I had been pressing them with the wooden iron as I went so I knew they had all worked out--meaning they alternated directions in all the right places.) But boy, it was nice to get them flat!!

I even managed a nice little pinwheel in the center of the star where the eight seams meet:
And voila! a Carpenter's Wheel block:

That was Friday evening.

What a lot of work for one block!! I took measurements and it is 12.5" on one side (the correct measurement to finish at 12"), but the other side is only 12.25". That might get me disqualified. I also noticed the star is a little puffy and I had to ease it into the seams that were too short before. So now when I cut into the kit fabric, I will know to back off the size a little bit on those pieces. (This is why we practice!)

I also may make the border pieces a little too wide so that I can trim them back down if necessary. Cheating a little, I know, but that's what will get the job done.

Although I'm raring to get this done and put it in the can for next summer, a few other things around the house are calling for my attention. Will I be able to wait?? Tune in next time to find out! :)

May I suggest?

I Say! or at least I did once...