Showing posts with label bag. Show all posts

Friday, January 4, 2019

Snappy Project Bag

For Christmas this year, I made a project bag for my sister. Now that she has it, I can share it here.

The steps are basic, but the result is cute and useful.

Step 1. Cut fabric for outside and lining.
For a bag that's 10"(height)x13"(width), I cut the two pieces 10.5"x13.5" for the outside and two pieces 12.75"x13.5" for the lining.

If you have a large enough piece and your fabric doesn't have a directional print, you can use one piece for the outside 20.5"x13.5" and one piece for the lining 25"x13.5".
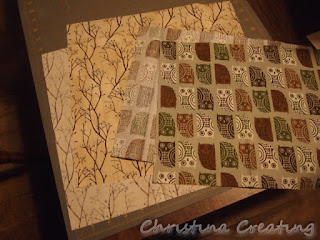
The owls will be on the outside and the trees will be the lining.
2. Sew side and bottom seams.
Put right sides of outside fabric pieces together and sew a 1/4" seam on both sides and along the bottom. Do the same with the lining pieces. (If you used one piece of fabric, you don't need to sew the bottom seam -- just fold the fabric in half and sew the side seams.)
3. Press seams open.
I find it easier to turn seams inside right when I iron the seam allowances open first.
4. Box corners.
On the two bottom corners of both the outside and lining, fold the side seam to lie on top of the bottom seam (or the bottom fold if you used one piece of fabric). Sew a line perpendicular to the seam from fold to fold.
To make it even, I line up a line on the ruler with the seam and make sure it is an even distance to each fold. In this case, the 2.5" line is on the seam and the 1" and 4" lines are at the fold. It is 1.5" from 2.5" to both 1" and 4", so it is even.

Draw a line along the edge of the ruler and sew.

If you want a bigger boxed bottom, you sew the seam further from the corner. For instance, you could line up the .5" and 4.5" lines with the folds.

5. Trim seam allowance.
Cut the seam allowance of the boxed corners to 1/4" and sew over the raw edges to keep them from raveling. Instead of a zig zag or a regular blanket stitch, I used a blanket stitch where the "arms" are made of multiple stitches. It doesn't pull in the edge as much as a simple blanket stitch.
6. Insert lining.
Insert the lining into the outside fabric, wrong sides together. Match side seams, bottom seam and the boxed corners. You can see the lining is taller than the outside fabric.
7. Finish edge of the lining.
Fold over the raw edge of the lining fabric evenly around. 1/4" - 3/8" is good.
8. Cut and cover tape measure.
Didn't see this one coming, did you!? For the top closure, I used pieces of an old metal measuring tape.

Cut two pieces at 13". (You can use regular scissors - just don't use your best pair! :) Round the corners and be careful, because they're sharp! Then cover the end with electrical or duct tape. This will help prevent the tape from wearing through the fabric.
Want to hear a funny? When I first went to cut the tape, I was wondering whether it would be easier to measure the length on the cutting mat or with a ruler. Duh! The measurements are printed right on the tape!

9. Insert snaps.
Fold the excess lining length over a piece of the measuring tape -- one on each side. Insert with the concave (inny) curve facing the inside of the bag. To make it easy, this is the side with the numbers printed on it.
10. Pin and sew.
Pin the lining to the outer fabric. To make sure it was even all the way around, I used my hem measure. You can also use a ruler or measuring tape, or just make a mark on a stiff piece of paper and use that.
Sew along the folded edge of the lining. This is obvious, but make sure not to sew on the measuring tape! I put the needle in the right position so the foot could ride further away from the measuring tape.
I also sewed along the top edge to finish it off. This isn't strictly necessary for the bag's function but I thought it would make a nicer casing for the measuring tapes.
11. Enjoy!

The top pops open and snaps shut. It's tight enough to hold things inside but you can pull the yarn through it as you're knitting.

Friday, March 25, 2011

That Wasn't So Bad!

My first March Mulligan is done! Woo hoo!

I finished this red plarn bag in January, 2009. After a couple years of service, a piece of the plastic failed and my handle started to ravel.
No need to panic...

I cut up another bag (one bag sufficed for this repair)

and started with a new strand of plarn in what is the top center of the hole in this picture:
I single crocheted to the side where the stitches were raveling and then chained a new chain to pull through the existing stitches. Then I continued the single crochet to where I started. Next I went around again with a slip stitch with a smaller needle to reinforce everything. All there was left to do was to work in the ends of the broken strand.

I then went around the other handle with a round of single crochet and then with a slip stitch even though it wasn't ripped (yet).
The second handle was quite stretched out and doing the repair on both made them match again. Plus I think they're both stronger now than they were originally.

My bag is slightly stretched out, but otherwise good as new again!

I am very happy to have it hanging with my other bags again (well, some of my other bags; I really do have a lot), ready to be useful.

When we put the coat rack in the entryway, I told Troy to leave part of the bar sticking out past the hanger for my bags. He finished it with a plastic cap and I have a perfect place to put all my bags.
Keeps them off the floor, and they are still very handy right by the door.

That makes one mulligan done; three more to go!

Tuesday, March 15, 2011

Kentucky Check In

Yes, I am in Kentucky and having a good time. Not coincidentally, I'm working on some good driving/vacation knitting!

One project I brought along is socks I'm making with the wool I just got on my Ottawa trip. I'm doing the Hourglass pattern from knitty.com. I tried to get them going before I left (navigating doesn't always leave a lot of room for paying close attention to your knitting) but the first start was way too big. I went down a needle size and it was still too big. So when I restarted in the car, I took out a repeat of the pattern (10 stitches). I maybe should have gone up a needle size at the same time, but didn't think of it. Wool stretches...it looks like it'll be fine.
Once again, red is nearly impossible to photograph, so you'll probably have to squint a little bit at that picture. As feared, the yarn is a little busy for the pattern, but I'm just going to go with it. I really like working with it and the colour is really pretty striking.

By the end of the evening, I had the heel turned and finished. Now I have to work the hourglass pattern all the way around the leg. I'm converting this sock from cuff-down to toe-up, so that is taking a little time as well. (Part of the time is simply recording what I did so I can repeat it on the second sock.) The design is completely reversible top to bottom so it is a pretty easy conversion.

We stayed at the lodge at Natural Bridge State Park last  night. Great views from the rooms. (Great park.)

I also have a new knitting bag I am trying out for this trip. I picked it up at Goodwill a couple weeks ago. The red handles are leather and it's still in good shape. It's also Etienne Aigner. That's some quality stuff!

It has three inside pockets: two on one side that each fit a piece of paper folded in half (perfect for patterns printed on my printer) and a zippered one on the other side for things you don't want floating around the bottom.

It's a nice size as it's not huge yet still holds my sock project and my Super scarf project comfortably. (More on that later.) And since it is a purse, I can easily carry it as a purse and not look like I'm carrying around a knitting bag. So far, it's getting a good grade!

All for now. Time to drive off to the next location!

Tuesday, October 12, 2010

A Little Discovery

So I was "strolling" around Ravelry a while ago looking at projects, and I came across this fabulous bag:
I just think she did a great job. (Click on the picture to go to her blog post about it.) But of course, when I saw what she did, I thought maybe I can do that...to David Bowie.

Around the same time as seeing this bag which is done in Tunisian crochet, I read about a technique of pixelating a photograph to convert it to a knitting pattern. Seeing the method laid out convinced me that I could maybe get this to work.

My first thought was to use an image from this Bowie poster that I have:
But I thought it might be a little too detailed to capture in a two-toned image. Plus, Bowie is completely over that Ziggy stage (he was over it for most of the time that he was doing the tour, actually) so why should I keep  him in it?

I started looking on the web and settled on this pic:
I know, I know he's smoking. But let's be honest, smoking is cool...when you do it right. (If only it weren't so expensive and didn't kill you...big sigh...) I find the image very appealing, it's at a good age, it's not too stagey and shows Bowie, I think, not one of his many characters.

Now imagine, I am looking through a knitting book in the store and I come across a project where the author has an image of a "poster boy" on the side of a bag. I look at the image:
I am completely bowled over. That is the picture of David Bowie. Really...look again:
It's reversed, but it's the same image. I find it interesting that the author never identifies it as Bowie. But it's got to be, don't you think?

I am writing about all this now because I just got the book the pattern is in Stitch 'N Bitch Nation from the library. I've been stalking it at my LYS and Hobby Lobby and finally clued in that I could request it from the state library network and peruse it for a while before buying. I've been enjoying it, even though a lot of the patterns are a little too "slap dash" for me.

Now to decide if I have time to make this bag or if I have to just dream about it. Looking through the book in more detail now, I see that the bag is not felted (which I thought it was) and that makes it somewhat flimsy and floppy. I'm considering redoing the design so I can felt it, but then I get tired out just thinking about it. I may just knit it as is, but with nice leather handles instead of the knit ones.

Meanwhile I had fun looking at Bowie images. I thought this one might be a good one:
I could do just his right eye in the bright blue. (His other eye is darker...they don't match.)

This is another nice one:
Much younger one there! So fresh.

Alright, I'm going to go back to looking through my pattern book...

Thursday, June 10, 2010

Beyond Plarn

Any guess what this is?

About half the people who've seen it have known right off the bat: it's VHS tape.

I've been wanting a new lunch bag, so I started knitting with an old movie no one had ever watched (and never was going to watch!).

One old movie and a garbage bag lining plus some creative work yielded this result:
Now I'm thinking it's too nice for a lunch bag and may claim it as a purse. Decisions...decisions...

First step in making the purse was to take apart the cassette tape to get at the video tape.

Then I knit a large rectangle of mesh. Not having a pair of super-large needles, I just wrapped the tape around my needle twice while knitting each stitch. Then when I came back to knit them, I knit one loop and let the second one drop. This is an easy way to fake a large needle. (Stitch size is related only to loop size.)

It was also a way to make the tape slide over the needles a little easier. The tape stuck to the needles like crazy. It wasn't pleasant. And while I'm complaining I'll add that the tape was very noisy! Crinkling and squeaking. I couldn't knit while watching TV! Ha ha, but somehow I made it through:
Once it was knit, I slip stitched down each side with a crochet hook to make it the right shape. Project Stats
Started
: 22 May '10
Finished: 09 Jun '10
Pattern: I made it up!
Materials: one reel VHS tape, one purple garbage bag, $0
It was very amusing at this stage because it would stretch every which way and not hold any particular shape.

The next question was what to line it with. I've been thinking quite a while about doing some plastic fusing and yesterday decided to try it out. My mother-in-law sent me a couple of big garbage bags that were a beautiful colour of purple. It would set off the black beautifully.

First step was to cut off the bottom and fold it into thirds.
This gave me six layers which I thought was a good thickness to try, and also gave me the right width for the pieces I would need for the purse.

To protect my iron, I laid the plastic between two layers of an old poster. (Parchment paper works too, but I didn't have any.)
And then ironed away. Not too hot, keep the iron moving. Flip it over and do it on the other side:
Eventually you have a sheet of fused plastic. My sheet did not come out as smooth as some I've seen in pictures. Apparently it depends on the plastic composition (which varies widely in plastic bags) but I was pretty content with how it came out.
The plastic shrank quite a bit. (No surprise.) It was no longer wide enough for my original measurements, but turned out to still be wide enough for what I needed. Nice when that works out!

So then I cut out the pieces that I needed. One large rectangle for the front, back and bottom (all in one), and two pieces for the sides. Sew it together, remembering to use your teflon foot because it won't stick to the plastic:

Then cut out narrow strips and sew them on for handles.
The plastic turned out to be perfect for folding into shape. I pressed two creases to shape the bottom, and pressed the seams so it formed a nice "box" with handles to fit into my VHS bag.
Slip it inside and finish by sewing around the top edge.

The finished bag has a great shape
and looks pretty sweet!

I can't wait for the next project that absolutely must have some fused plastic!

Thursday, January 1, 2009

Better Plastic Bags

Last spring my aunt sent me an article about cutting up plastic bags and using them to crochet bags. The idea struck a cord and I went to town. My first bag was a black and white book/magazine tote made completely from WalMart bags for my mom (bottom left). She loved it. From there I made a couple larger totes which my co-workers admired so much that I gave them each one (below right).

The detail pic of the red bag (below left) was actually made from purchased fabric strips with a few stripes of white plastic bags thrown in for interest. That one went to my MIL who likes red almost as much as I do.

And then I did two more for myself: a smaller bag (above right) which I used as a purse for a while and a large yellow and white tote (not pictured). Then I ran out of bags (and wasn't getting any more because I was in the habit of using these better plastic bags when shopping) and ran out of steam as well.


Well once my family saw what was being produced, they started to collect nice or interesting bags for me, especially the red ones available where they are in Canada. After Thanksgiving and Christmas visits when they were able to get the bags to me, I'm starting to feel a little overwhelmed! I spent a whole evening this week sorting and folding the bags so they wouldn't take over the room. Now I'm feeling pressure to do something with them. At least I have enough red ones now that I am ok with using them. (Scarcity breeds hoarding in me...)
There are, however, a few really pretty ones that I only have one or two bags of:
I will have to think carefully of what to use them for.

After a search through Ravelry for a suitable pattern, I may start with this paperless grocery bag from Coats and Clark. I especially liked this version
by Ravelry user knitgranny. If I can figure out how to do the appliqued leaves in plastic it would be a perfect use for the limited special coloured bags I have.

It takes about 60 bags to do a smaller bag and I'd say up to 100 for the larger totes so if I got going on a couple bags I could use up this supply handily. I also have a store of the new WalMart bags (they switched from the preferred black and white to a funny grey and blue bag) to use as a base colour. I have a strict policy of using only "used" bags (i.e. I will not grab a bunch of new bags at the checkout just to crochet them up). I also have let myself get lazy about having the bags with me when I shop. Perhaps that is partially due to winter weather and the extra trouble it brings.

To make the strips, I fold the bags flat (as pictured above) so I can cut off the bottom seam. Then I cut .5" to 1" strips (depending on the thickness of the bag and what I need) from the bottom to the top. At the top I cut as close to the handles as I can and then discard the handles. You crochet with these loops like you would with a yarn, but when you get to the end of the loop, you slip knot the next loop into it...and repeat...and repeat. One loop makes about 3 dc stitches, so you are adding more loops all the time! But on the other hand, it does break up the crocheting...

I'll let you know how the new bag goes...

May I suggest?

I Say! or at least I did once...