Showing posts with label purse. Show all posts

Sunday, October 8, 2017

I Can See Right Through You

I was given tickets to the Colts game this weekend, when Peyton Manning's jersey number was retired. My two favourite things: football and Peyton Manning. Ok, so maybe that's the same favourite thing, but anyway.

When I finally did some research about getting to the stadium and getting in the stadium, I learned that the NFL has a "clear bag policy". That is exactly what it sounds like - any bag you bring in has to be a clear, see-through bag. (Women are allowed a small hand clutch, but that's it.)

I thought about packing light and putting everything in pockets. It wouldn't be too hard as I usually put all my valuables on my person instead of in my purse when I go to games. But I just couldn't picture going through Saturday (when the same policy applied to the statue unveiling) and Sunday without a bag. What about my extra camera? What about my sunglasses? What about my knitting? (You know, in case of an emergency. Like the 7 hour weather evacuation I had at a Notre Dame game - I was very happy I had my knitting that day!)

Of course, I also didn't like the idea of buying one of the licensed Colts or NFL bags, and I didn't have a clear shopping bag. (Also, ew. They're just not nice to carry.)

So when my eyes lit on a clear case that I was using to store yarn, I hatched a plan. A simple, quick plan - add handles to this zippered case. (It's one of the cases that sheet sets come in.) In addition to being available, it was close to their size guidelines.
I was out of bed a little early on Friday morning and I finished this before going to work. I had leftover strips of black fabric from cutting out another project.

I sewed two together end to end to get the length. Then I folded it in on itself twice the long way so that no raw edges were showing. I then top stitched along all four sides. Repeat for strap two. I sewed them onto the plastic bag and done.

I didn't make the straps very long. In fact, I didn't really measure the length at all. Two of the scrap pieces end to end seemed like it fit in the acceptable range for purse straps, and I didn't consider it any further. (This was a quick project I was doing before work in the morning, after all.)

But much to my delight, when I got ready to go out on Saturday, I discovered that it was the perfect length for wearing over my shoulder. Truly the best way to carry a bag.
I couldn't have been happier!
I have no pictures of it in action at the game, but trust me, it worked perfectly.
I posted this pic on IG and it was of the ones
they displayed on the scoreboard!
 And I did manage to fit in a little knitting before the game and between plays:
In keeping with my habit of attending long football games, this one went into overtime. I'm not going to say it was my awesome clear bag that helped Vinatieri kick the winning field goal in my end zone, but you can't deny it didn't hurt! ;)

Tuesday, June 3, 2014

Paper or Plastic? I'll Take Cashmere, Please.

I didn't expect to post anything more before I left, but I managed to fit in one more project...

I had been pondering what purse/bag to take on the trip because it needed to be big enough to carry a lot, small enough not to be bulky, comfortable, easy to carry, somewhat secure from sticky fingers...the list goes on. The one I preferred is this sad and sorry looking messenger bag:
I've had it since at least 1999 and it looks it! It's in good shape and not very worn but the fabric is faded and stained. But I couldn't let it go because I love how it works (all the pockets and spaces are perfect) and how it fits. It can hold a lot but still sits flat against my body.

So I've been thinking about adding a "skin" to freshen it up. Since it seemed to be the only good candidate to take on my trip and there was no way I was going to appear in all those vacation pictures with this sad thing, I decided to take action.

My thought was to cover it with a felted sweater. I could have used regular fabric but then I would have to deal with raw edges etc. The felt could just be cut and applied.

I went through my stash of sweaters and narrowed it down to these two options, both cashmere but not suitable for raveling:
Yes the zebra print is cashmere. (Who would do that to cashmere? Anyway...) I decided the argyle was more my style, plus it was already felted whereas the zebra print was not. If I had a chance to make this project move along a little faster, I was going to take it!

Next step was to make a pattern from the bag:
 1. Trace
2. Cut. Then draw a second line in from the edge the same width as the binding on the bag that I was going to leave visible and cut again.
 3. Test. Close enough was close enough as the felt has enough give.
4. Cut out the pieces from the sweater.

I carefully cut the pieces from the front so that the argyle would line up on the two pieces above and below the zipper.

The argyle pattern was only on the front of the sweater, so I ended up using some of the plain black from the back as well.

5. Sew in place. No pictures. I guess I was too busy stitching! I did a small section by machine where I could, but most of it was done by hand. I just took small stitches on the front so the thread wasn't visible.

And by the end of a couple hours, I had a new (looking) bag!
Front.
Back
Looking at the pictures I almost like the back better with its contrasting fabrics and started to regret I didn't do that on the front above and below the zipper. But oh well. It is done and I like it. The cashmere feels soft and warm against my skin. It is perhaps a bit "winterish" (in colour I mean) for a trip in June, but again, "oh well."

This is a project I've been meaning to do for a while so it feels really good to have accomplished it. I'll keep the pattern pieces so I could always change the look again if I want. (I suspect what's really going to happen is that I'm going to end up recreating the whole bag, but that is for another time.)

And I think I will have to do something about the aging strap...something woven in black and red diamonds I think...(but again, another time).

For the final touch, I added a little pull to the zipper:
Now all I have to do is fill it with everything I need for the trip!!

Thursday, June 10, 2010

Beyond Plarn

Any guess what this is?

About half the people who've seen it have known right off the bat: it's VHS tape.

I've been wanting a new lunch bag, so I started knitting with an old movie no one had ever watched (and never was going to watch!).

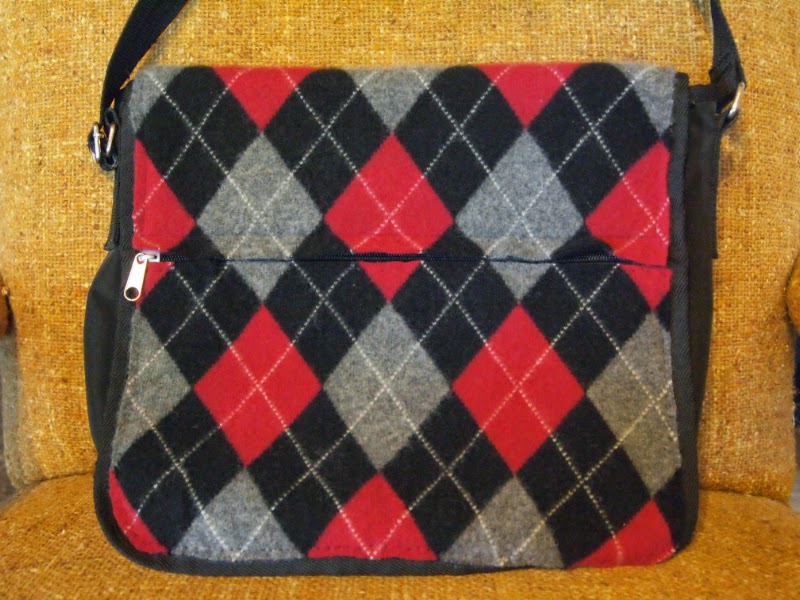
One old movie and a garbage bag lining plus some creative work yielded this result:
Now I'm thinking it's too nice for a lunch bag and may claim it as a purse. Decisions...decisions...

First step in making the purse was to take apart the cassette tape to get at the video tape.

Then I knit a large rectangle of mesh. Not having a pair of super-large needles, I just wrapped the tape around my needle twice while knitting each stitch. Then when I came back to knit them, I knit one loop and let the second one drop. This is an easy way to fake a large needle. (Stitch size is related only to loop size.)

It was also a way to make the tape slide over the needles a little easier. The tape stuck to the needles like crazy. It wasn't pleasant. And while I'm complaining I'll add that the tape was very noisy! Crinkling and squeaking. I couldn't knit while watching TV! Ha ha, but somehow I made it through:
Once it was knit, I slip stitched down each side with a crochet hook to make it the right shape. Project Stats
Started
: 22 May '10
Finished: 09 Jun '10
Pattern: I made it up!
Materials: one reel VHS tape, one purple garbage bag, $0
It was very amusing at this stage because it would stretch every which way and not hold any particular shape.

The next question was what to line it with. I've been thinking quite a while about doing some plastic fusing and yesterday decided to try it out. My mother-in-law sent me a couple of big garbage bags that were a beautiful colour of purple. It would set off the black beautifully.

First step was to cut off the bottom and fold it into thirds.
This gave me six layers which I thought was a good thickness to try, and also gave me the right width for the pieces I would need for the purse.

To protect my iron, I laid the plastic between two layers of an old poster. (Parchment paper works too, but I didn't have any.)
And then ironed away. Not too hot, keep the iron moving. Flip it over and do it on the other side:
Eventually you have a sheet of fused plastic. My sheet did not come out as smooth as some I've seen in pictures. Apparently it depends on the plastic composition (which varies widely in plastic bags) but I was pretty content with how it came out.
The plastic shrank quite a bit. (No surprise.) It was no longer wide enough for my original measurements, but turned out to still be wide enough for what I needed. Nice when that works out!

So then I cut out the pieces that I needed. One large rectangle for the front, back and bottom (all in one), and two pieces for the sides. Sew it together, remembering to use your teflon foot because it won't stick to the plastic:

Then cut out narrow strips and sew them on for handles.
The plastic turned out to be perfect for folding into shape. I pressed two creases to shape the bottom, and pressed the seams so it formed a nice "box" with handles to fit into my VHS bag.
Slip it inside and finish by sewing around the top edge.

The finished bag has a great shape
and looks pretty sweet!

I can't wait for the next project that absolutely must have some fused plastic!

Sunday, April 25, 2010

Purse: Finished!


Today it was raining, so I couldn't get siding checked off the "Spring to Finish" list. (Aw shucks!)

I did, however, get my sewing machine set up and supplies pulled out for the purse I wanted to make.

And what do you need to make a purse?


Well, I started with a square knit from some bulky&thin wool, two handles, fabric for lining, magnetic clasp, and trimmings. Project Stats
Started
: 29 Jan '10
Finished: 25 Apr '10
Pattern: none, I made it all up
Materials: wool (gift), ribbon ($10), flowers ($6), handles ($6), clasp ($2.15), lining ($2.10)
And a plan! I wrote up some measurements and jotted notes on what should be done first to make sure I didn't get stuck somewhere.

Up first: sew the knit fabric up the sides to make the purse shape. The bulky&thin nature of the wool did not make it a good candidate to use for seaming. But I happened to have a thinner wool in a colour close enough to work wonderfully. (The wool from the J Crew sweater I used for the Bella Mittens.)This is what I measured to get the numbers for the rest of the pieces. You may recall I knit this up with a skein that my mom gave me this winter. I didn't follow a pattern, but just knit it as big as I could with what I had.

Then it was time for a lining.I bought the trim at Soutache last week and thought it would be a nice way to finish off the top of the lining and give it some structure. In the picture, I have the lining right side out so you can see the "nice" side but of course it will go into the purse the other way around. Notice there are a couple pleats to give the purse a little fullness.

Once the lining is together, you need to add the magnetic clasp and handles:Isn't that some lovely basting?! ha ha. The lining fabric was so slippery and "shifty" that I had to baste--pins wouldn't hold it. The sleeves that hold the handles on were sewn so they would end up between the lining and the outside knit fabric. The magnetic clasps are not visible in the picture but were installed through the ribbon, just below the handles.

Then I pinned the lining into the bag and sewed it in by hand.My stitches are nothing to show off, but the red thread on red ribbon hides it pretty well.
I'm really happy with the look of the lining, and I even managed to get the lightest colour to land in the middle--centered and matched left to right sides. (A wonder!)

And unable to leave well enough alone, I added a little bling bling. (Do people still say bling bling? I suspect not. But, really, what else can you say about gold, silver and bronze sequined flowers?)I love it!

May I suggest?

I Say! or at least I did once...