Sunday, January 30, 2011

In Sickness and in Health

Quilting, that is.

I stayed home from work Friday because I was blowing my nose every four minutes and thought I'd save my coworkers from the sights and sounds, and from sharing the germs, of course. But I wasn't actually feeling that bad. (That hit the next day.)

Earlier in the week, I had hauled out the brown and tan fabrics that I bought two summers ago with my mother-in-law:
As I wrote at the time, I am making the quilt for a friend's son's graduation gift. (I still have a couple years, thankfully.)

It's been on my mind and lately I've really been itching to see how the block would come out. How many I could make from a fat quarter's worth of fabric and just where things stand. Whether I would enjoy making the block or not! So I got started. I finished one block the first day I pulled it out and was very pleased with it:
Sharp and crisp. (The brown's darker in person. The white's from a Banana Republic shirt I picked up second hand but was never happy with the fit. I'm very happy, however, with how its colours fit in with this quilt!)

So Friday afternoon, I started on some more:


I love this dark fabric. I think it looks so old fashioned.

This one is also one of my favourites.

So I have five done. The pattern (yes, I'm following a pattern--can you believe it?) calls for 30 of these blocks. I'm not sure how many I will actually do. If it stops being fun, I'll stop and find some other arrangement. Plus I think their quilt size is a little big for a twin. I don't know; I haven't decided yet.

Needless to say, I'm keeping the "Plan" for this quilt rather loose. The last thing I wanted to do was cut everything out all at once and then sew it all together like a "chain-gang" piecing. I know it's more efficient, but if I wanted to be efficient about it, I'd go buy a made-in-China quilt from Walmart. That would be efficient. Instead, I'm having fun.

I did cut out fabric for two blocks every time I made one. (Slightly more efficient while still fun.) So I am getting ahead in the cutting and have little stacks of fabric for blocks:
Some day when I don't have the concentration to cut pieces, I can sew some of these together.

I am just combining lights and darks at will. If I come up with some combinations that don't "match" the rest, then they'll stay with me while the rest get put into the quilt. That's alright; you can't always tell what's going to work ahead of time.

I think I have 6-8 darks and lights so the look will be somewhat scrappy. I'm starting to realize that I don't use enough variety in my scrap quilts to really make them scrappy, but that's alright too. I don't have the stash for it, and I'm not buying 30-60 fabrics for a quilt! I'm just not. I think I'm doing well enough to have improved my light/dark contrast. It's a lot better in this quilt than my cross canoes scrappy quilt top:
This is a mess! As far as colour values and placement. (But don't worry, I still like it anyway!!)

Since Friday, I have not been feeling up to any quilting, but I pinned my blocks up on my curtain to take the pictures and have enjoyed looking at them hanging there.

Friday, January 28, 2011

Whistler Hat: Calling on Plan B

I worried about it. And it happened. I ran out of the natural colour.

Now I know I said I would buy another ball no matter how little I needed, but I when I was at the point that I was sure I wouldn't have enough, I couldn't stand the thought of stopping and waiting for more yarn.

So I went to plan B.

I knit as far as I thought I could while still leaving enough yarn to work the remaining stitches in duplicate stitch. It wouldn't be quite the same, but not stringing all the yarn along the back would save a lot of yarn.

This is how much yarn I had left to add all the white stitches left.

This is the hat when I was finished knitting.
Side
Front
You can see that the colourwork stops rather abruptly!

After some work with a needle and about half of the remaining yarn, the hat looked like this:
Side
Front

But I wasn't done yet. The pattern also called for some red patterning, so I added that too:
These were the little details in the sweater that caused all the three-colour stranding that I went on and on about. Should I ever make it again, I'll be duplicate stitching it on the sweater instead.

The hat looks a little rough because it hasn't been blocked yet. I have it soaking now, and will show you the finished project in a little while.

PS: It occurred to me that I ran out of yarn because I used it for those dang Christmas gifts I was complaining about!! They strike again!

Saturday, January 22, 2011

I'm Nervous

Maybe I should say obsessed and nervous.

To start at the beginning, I need to say that I am going to visit my sister in Ottawa next month. Besides being the capital of Canada, Ottawa is the greatest city ever because they have 7-8 km ice rink! The city clears and maintains one of their canals for skating every winter. It's awesome. (Have you ever seen people skating to their downtown office for work in the morning? I'm telling you, it's awesome.)

Anyway, I was picturing myself skating on this amazing rink wearing my Whistler sweater. I was thinking of how amazing it would be skating on the amazing rink wearing my amazing sweater in that amazing city. Well, anyway...you get the idea.

And then it occurred to me that something amazing was missing from this picture: an amazing matching hat!

So I started the hat with a deadline of mid-February. I thought it might be a challenge but I wanted to do it, to try to do it.

I began with the Turkish cast on:
See the contrasting yellow yarn I cast on around?
It is getting easier and more natural every time. It helps that I did it on my favourite straight bamboos instead of some dpns in the round. The effect was well worth it in this case as the cast on edge is folded under for a hem and needs to be stretchy.

Once I got started, there was no stopping me. I got quite obsessed and have been working on it quite a bit. It has been very reminiscent of working on the sweater but much, much faster!
The only problem is that this,
is all I have left of the "natural." I am nervous about running out.

Running out would give me a story, though. "I had to buy another ball for just 10 more stitches." And you know I would!

Meanwhile I am living out the old joke: I'm knitting as fast as I can so I can finish before the yarn runs out.

By the way, there's a live webcam on the canal. Look for me on February 19 and 20! (And I will be wearing the Whistler duo!!)

Monday, January 17, 2011

Knock Your Socks Off

I had to share this knit that I saw on Ravelry today:
 It's by Soile (NeulovaNarttu on Ravelry). Have you ever seen anything more stunning or eye-popping? It's colourwork with embroidery added afterwards. (And don't those clasps look a lot like the ones on my Whistler? I think so.)

Go to her blog (I mean it--go!) and see even more great pictures. Unless you know Finnish, you won't be able to read the text, but it doesn't matter because you'll be so distracted by the gorgeous pictures you wouldn't be able to concentrate on reading anyway.

Thoroughly awesome.

Sunday, January 16, 2011

Three Turtleneck Hats

And then there were three:

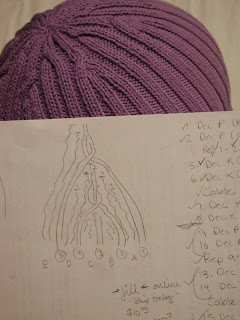
Yes, I have finished the third turtleneck hat: my most ambitious. I sketched out some cables to complement the decreases and charted out a plan:
(Crude but effective.)

But when I got this far,
I decided I didn't like how the cables were stacking up. I undid numerous rows and staggered the cables instead. I ended up with:
I'm not sure it's an improvement, but it's not getting redone. The hat is done, and it is good.

Now, is it just me, or is this a beautiful shot?
Something about the angle of the chin and the play of the light. Silly, I know, to say this about a styrofoam head and yet I think it's true.

Saturday, January 15, 2011

Remember Those Goals for 2010?

It's time to look at how I did for my goals of 2010. Last January, I listed a few "big" projects I wanted to do in 2010 in this post. Don't worry if you don't want to go back and read the whole post, I will summarize here:

First was to quilt my Hawaiian Star quilt top. I set my goal low, actually, and only challenged myself to start the quilting on this top.

I didn't.

But I'm not calling this a complete fail. I think my piecing skills are way ahead of my quilting skills. So, I bought Marti Michell's book, Machine Quilting in Sections, to help me handle this large quilt in my home machine.

I also finished my mini Crossed Canoes quilt, which involved lessons about quilting. And, in fact, quilting on my Kaffe Fassett quilt this fall has also taught me a lot.

Another part of the goal was to quilt each month on what had been my afghan Sundays. This actually worked out really well; I think I only missed one month all year. And I did a lot more quilting than I ever had before.

Summary: I didn't meet the goal, but progress was definitely made.

Next was a trench or rain coat made from plarn. I had in mind this pattern:

(It was available from the Moda Dea website, but that has since been discontinued. You may now find it on the Coats and Clark website.)

I went so far as to swatch this stitch pattern and found out that there was no way I was getting gauge with the plarn. Plus the stitch design just didn't look good.

I've tried to find other patterns but I've come to the conclusion that I'm going to have to swatch a basic stitch and then design the thing myself with the top down method. So no, I haven't gone any further. I'm finding this daunting to start. (And there are so many other fun distractions...)

Like this sweater:
Who is surprised that the one goal I met was a knitting project? Nope, not me either.

But let that not detract from the fact that I did get it done and it turned out great. I was wearing it the other day and was amazed again at just how well it fits and feels. The sleeves are the perfect length; it just skims my hips.

Hurray! One done.

I'm not setting new specific "target" projects for 2011, but I would be happy to continue quilting at the rate that I am and to just get a start on that plarn trench. (The start will be the hardest part anyway.)

I also would be like to add a little more charity knitting into the mix. I notice I've done less of it in 2010. Getting those three turtleneck hats done and shipped off would be a good start.

All for now! Keep those needles clicking, sewing machines humming, or your tool making whatever sound it makes as you get going and do stuff!

Sunday, January 9, 2011

Christmas Mini: Quick Like a Bunny

We may be well into January, but I'm not done with Christmas yet. I bought some flannel fat quarters to repair the corn bags a mouse had destroyed. (Or maybe it was "mice" as we have caught quite a few but there seems to be always more.) Anyway, I had enough left over fabric to make me think that I should do something with it. (In case you're still wondering, corn bags are little "pillows" filled with corn that you heat in the microwave and take to bed to warm it for you. They stay warm for at least 30 minutes. So cozy. Really.)
I was so enamored with the reds, greens and pop of orange in the right one. The snowmen and plaids didn't hurt either.

Then yesterday, I was looking at some quilting books that a friend had passed on to me. This pattern jumped out at me and said, "Here I am! Make me! Make me!" (It's from Marti Michell's Weekend Log Cabin Quilts. Yeah, Marti Michell is the one whose book I'm using to quilt in sections. Obviously I like her stuff!) I really like log cabin blocks and all the layout options you have with them. But not being in the mood for all that piecing, and not thinking I had enough variety or quantity of fabric, I decided to do the same design with half-square triangles.

I thought about the fabric choices of what goes where. Some things were easy--the light plaid was the only one that qualified as a "light" colour and the red was an obvious choice for the star points. Some were harder--where to use the green and the small-scale plaid. When I thought I had a good idea in my mind, I went ahead and drew it out to see what I thought:

Good enough!! You can see I also did some figuring on what I needed for pieces on the bottom. It never hurts to write something down so you can be sure.

From there, I cut some squares, pieced some triangles (sewing a 1/4 inch from the diagonal on all squares to get 2 half-square triangles from each set of squares--not only easier with less cutting, it helps to keep the bias stitching from stretching), and then stitched pairs and then rows together.

Et voila! A mini quilt to hang at Christmas:
It's just under 12" square. You can see that I added a red  border around the piecing. It's actually laid in like piping (without the actually piping) so it does cover up all my points. This may look like a way to hide sloppy piecing, but really I just like to do it that way. (It's the same trim I did on my recent Kaffe Fassett pillow (which the mice also chewed up by the way!!), and on the outside border of the mini crossed canoes quilt, except that one did have piping. Wow! Three of my last three finished projects had it--I must really like it!!)

I then added a border of the small-scale plaid, but cut it on the bias. I wanted something to contrast with all the straight lines of the quilt center. The fabric wasn't long enough to do the usual border (add strips to sides, add strips to top and bottom) or a log cabin (add strips in a circular direction). I thought about using cornerstones but really didn't want to.

I ended up adding strips that were each the length of the piece plus one border width. You go around adding the strips, but you have to sew the first strip on in two parts because you need the butt end there to sew the next strip but you can't sew to the end until the last strip is sewn in. (If anyone knows the name of this style, please let me know. I can't think of it, and it's driving me crazy.)

I layered the back, front and a scrap of cotton batting and quilted a big X across it. Then I echoed the X in the four quadrants to emphasize the angle of the star points. I judged the distance between lines as an 1/8" from the edge of my walking foot. They're not all exactly even, but close enough. I was disappointed at first that I would be quilting right over the loose red trim, but then decided I wasn't going to worry about it.

I then finished it off with the red binding. I cut it 1" wide and used it single thickness. (Lots of quilt bindings are done doubled, but with this being a wall hanging and the flannel already being so thick, it just wasn't necessary or practical.) I will say 1" is too narrow and I don't recommend it. But I got it done.

Three of my four binding corners came out impeccably and I'm very pleased about it! (The fourth was "good enough.")

Out of all the green fabric I used, only one snowman survived. He peeks out at you from the top corner of the quilt...too cute:

The back was pieced from leftovers. I had the most of the green, but still not enough. So another scrap of the small-scale plaid (on the bias again since that's the only way it would cut out) made it big enough to use.

I almost forgot to add the hanging triangles, but remembered in time that I didn't have to rip anything out to get them on there. I didn't have enough of a single fabric so the are pieced as well. (More half-square triangles, but this time I folded them over on the seam.)

I had a lot of fun making this. I kept myself from worrying about the "why" and what I was going to do with it in the end, and just enjoyed making it. It was a hoot. It didn't hurt that I managed to get it done all in one day. It might be my first quilting project that got done before it could be considered a UFO! Yay, me!

Thursday, January 6, 2011

Doing it the Easy Way

So I started with this:

Three turtlenecks I bought at Goodwill (or some other used clothing outlet, I don't remember) in order to harvest the cotton they were made from. I've mentioned them before because I used them for my cotton cloth project last summer. (Wrote about it here; no, it's still not done...)

When you disassemble sweaters for yarn harvesting, you generally start at the top. First step: remove the turtleneck. Once I had the turtleneck sitting on my lap I realized I had a very good beginning of a hat.

So this Christmas I took the three "necks" with me when I went to visit family as a simple take-along projects.

Here you have the three stages:
The purple (left) is straight off the sweater. The red (center) is in the process of being knit and the blue (right) is done.
Straight off of the sweater, you have to pull on the yarn pieces until you have it raveled to the same row all the way around. (It's pretty much impossible to cut it along one row.) Then put the free stitches onto needles of an appropriate size. Then it's time to count the stitches and figure out how you're going to do the decreases.

The "default" decrease ratio is to do them 8 times on every other round. But if your stitch number doesn't divide by 8 and you have a rib pattern you want to keep intact, you may have to make something else up.

For the blue one, I did increases 10 times in a round, beginning every other row and then switching to every row because the hat needed to end more quickly.
It was done in a basic spiral pattern.

For the red, the stitch count worked better for six decreases in a round. Instead of a spiral, I did a pattern like three upside down Vs which meet at the top.
Since six stitches in a round would make the decrease section way too long, I threw in decreases in the purl sections at various points. It doesn't disturb the rib pattern at all.

The purple hat is still waiting. (It needed smaller needles than I had handy at the time.) It has a lot more stitches and I don't think the total divides evenly by eight either.

Meanwhile, I can introduce you to Suzette who is capably modeling the blue and red hats:
Yes, Suzette has a divet in her nose. Don't mention it--she's a little sensitive.
(:whisper: nose job gone bad)
Suzette was a gift from my sister who heard me saying I needed a model for my hats. It's very hard to take a picture of a hat on your own head.

Being made from turtlenecks does make the hats a little on the small size. But that's ok because hats always fit someone! When I have the third done, I'll be sending them on to the Ravelry group Caps for a Cure for people with cancer who need a little head covering. The cotton will be great--non-irritating, washable, soft, and good for indoor wear. The only drawback is that the turtlenecks have a seam in them which could be a problem. I think that is a very minor problem, however.

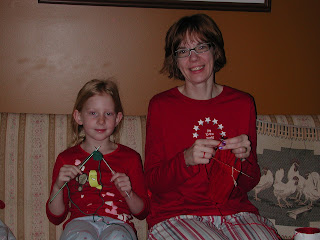
I can report that the blue one went very quickly and I finished it in one evening even while chattering away with various sisters and my mom. The red one took just a little longer as I was more distracted. I did have a chance one morning to sit and knit with my niece. I just found out that she started knitting.
I taught her older brother some time ago, but every time I come over he's still working on the same pair of orange slippers. This one has already finished two Barbie scarves. (Barbie has to be the inspiration for a lot of new knitters and sewers. It's how I started designing.)

All for now!
-Clickety Clack

May I suggest?

I Say! or at least I did once...