Showing posts with label quilt day. Show all posts

Sunday, August 8, 2010

August Quilt Day: Let There be Colour!

I worked very hard on Saturday to clear up everything I could possibly hope to accomplish this weekend. And I got it done. So when Troy came home Saturday I said I was done for the weekend and that nothing more should be expected of me all weekend. I was going to quilt.

So after church, lunch, etc, I was at it by 3:00. I cut out fabric for about two hours. That is very tiring work!! I was standing the whole time for one thing.

The yellow was easy. I just cut crosswise strips of 7.5 inches and then cross cut them. The red was more trouble. But I did have my brand new tool: a 7.5 inch cutting square. I discovered that I can cut in any direction as I hold the square in place over a circle.
The square came with some non-slip pads on the back and they worked wonderfully. I have trouble with my regular cutting ruler slipping as I cut along it, but I didn't have trouble with a single cut with this one. Love it.

Now once I had enough squares cut out, I thought I would try the whole "design wall" thing. I have laid quilts out on the floor, but you don't get a very good perspective, and it kind of gets in the way of the rest of your life.

So I found my flannel sheet and pinned it to a curtain (figuring that was the easiest way to hang it). I knew, intellectually, that cotton sticks to flannel and it was the thing to use for a design board. But to see it in action was like a miracle. Even my old worn sheet: just get the cotton sort of close, let go, and it sticks!!
I'm telling you: a miracle!! And awfully handy.

So I put up all the yellow squares because they didn't need any special arranging:
And then put the red ones up in between. I tried a couple arrangements of the red circles. I rejected Barn Raising which is probably my favourite (co-centric rings around the center) because it didn't work with the number of squares I had of each design. (There are three different circle patterns.)
So I worked the numbers and settled on a Fields and Furrows layout (diagonal lines). I'm pretty happy with it, but I have it hanging up right now and am living with it before I start sewing.

But I'm pretty sure, so after this blogging and popcorn break, I may start sewing. I'm really anxious to do some actual sewing.

A look at my "studio" in case you were curious:
It's my dining room. All cleared of stuff. (Honestly. All that crap piled up on the right is technically in the pantry. Yes, that's my story and I'm sticking to it.)

To top off a great quilting day, I now have football on the TV (my new 42" TV!). Even if it is "fake" game, it's good to have it back. I watched the Replacements this afternoon to get myself ready. There's nothing like a movie you've seen a hundred times to go with your quilting.

Gotta go, it's time to sew!!

Monday, June 14, 2010

June Quilt Day: Not Really Quilting

The second Sunday of June was coming on and I was thinking of what to do for my quilt day. I toyed with getting very ambitious and working on my crossed canoes quilt. But I couldn't do it. One, I couldn't quite summon up the energy it would take to gather materials, clear a space, and prepare the quilt for quilting. Not yet.

The other thing was that I still have these tablecloths for church hanging over my head (still not done from the Spring to Finish list) and I couldn't feel good about any other sewing until I got them finished and outta here! So I worked on the current one and got it finished. Three done, one to go!

I dropped it off at church this evening, and went ahead and took some pics so you could see what I've been talking about.

The first ones done were the two for the rectangle tables. I had a generous friend help with that and we worked at the church for an afternoon. We almost got them done and just had to do a little more sewing at home.
You can see that it fits rather well, hangs low and sports some lovely box pleats. I planned the design and cut all the pieces as my friend--we'll call her "Amy"--started sewing them together. The farther we got, the more confused she got. But she just sewed one seam at a time, and it all worked out.

Later that day, however, Amy delighted in asking all her family how many pieces of fabric it takes to make a tablecloth. They all answered, "One. Throw it over the table." And she would answer, "No! I know someone who used thirteen!" like this was a punchline to a great joke! Well, come on, is that really fair to me?

One piece of cloth would cover the table, but you would constantly be futzing with it to get it even and to keep it in place. If you want a nice table covering for presentation, you need something more than a cloth thrown over the table. Or, at least, that is my opinion.

So I worked this pattern out. It has fancy flowers and swirls on top to make it beautiful:

It has a subtle stripe on the sides to keep it from being too fru-fru:

And box pleats that not only make it more interesting, but make it easier to throw over the table, too:
The flower fabric inside the box pleat is just a little mmm mmm.

The rectangle tablecloths turned out great; they fit the tables well, and just need a good pressing.

The round tablecloth I finished sports four box pleats:

It does not fit quite as well. The top is just a touch small, and that is going to annoy me. (But not enough to redo it, I'm afraid.) I will be sure to make the second one a little larger.

The requirements for these table coverings were that they had to be formal enough for art and music receptions, neutral in colour, and easy to wash/care for. (I thought the poly content would make them need less ironing, but apparently I was wrong on that.) Besides the wrinkling thing, I hope that they fulfill the requirements.

One more to go...


PS: David, the round one is folded on top of the other two, in case you need it. You're welcome...

Saturday, May 8, 2010

May Quilt Day: Fair Block

I got an early start on my May Quilt Day, switching it on Saturday this month.

With the "Spring to Finish" list breathing down my neck, it was pretty obvious that I would be working on my county fair block.

First thing to do was to retrace the design onto paper foundation. I mentioned last time that I needed to buy some specialty paper for this because regular bond does not work well. Fortunately, before I went out and bought some, I found a pack of foundation papers as I was looking for something else. Apparently I had already bought some for some other project--good for me!

I mixed the designs of the two previous blocks, choosing the taller "windows" of the first design and the spikes with different heights from the second.

I was worried about having enough fabric as the main colour was just a 14" square and the accent fabrics were 10" squares. Taking the time to trace each piece directly onto the fabric (with white chalk or blue water-soluble pen), I ensured there would be enough for all the pieces. I had enough (thankfully) but not enough to make a mistake...no pressure!

So once I had them traced, I went ahead and cut them out. Laying them out in the order they would be used, I was all set:
I won't go over the paper piecing process as I think I've covered that in enough detail already. I will say that I went ahead and bought some new thread: thinner cotton thread just for piecing.
Even a average weight thread can make your seams too thick which may cause them to throw off your block measurements, never mind being "unsightly." I was happy with how it worked. (You'll also noticed it's not the colour of any of the fabrics: a good neutral is all you need for any of your piecing.)

There were a few hangups and rip-outs along the way, but I got the block together. Then it was time for a soak to make sure to remove all the water-soluble ink. I laid it out to dry, but then got too impatient. So I did a load of laundry so I could throw the block in the dryer with it, because I couldn't justify running the dryer just for this block!
(Well, that's one way to motivate myself for housework!)

After drying and a good ironing, cropping the edges to a clean 12.5" size gave me this:
I'm pretty happy with it. Whoever picked out the fabrics did a nice job.

You can see I carefully lined up the stripes on the black fabric in the windows:
Reflections? Glare? Miniblinds? Take your pick.

The only thing I'm worried about is this one edge:
The part that's circled is not quite the full width. I don't know how this could happen with two practice pieces under my belt, but it happens. (I mean, obviously, I was the problem, but I don't know on which step the error occurred.)

It's not off by much but it might be enough to cost me big. If it were in a quilt of my own, I'd go along merrily and hardly notice it. But if the judge is a stickler, I may be disqualified just for that...I guess we'll see in August!

Meanwhile, I am happy to have a finished block that I think looks good. And one more thing off the list!!

Wednesday, April 14, 2010

April Quilt "Day"

It was a close thing, but I did manage to fit in some quilting time on Sunday for my personal monthly quilt day. (Second Sunday of the month.) I had to help my honey put up some siding all afternoon--it was a lovely day so it's not like I really begrudged all the time outside. But it was about 7:00pm before I could get to some quilting!

I knew it would not be the month to do something big, new, or complicated. I didn't feel quite ready to make the final square for the country fair raffle quilt. So I thought I'd pull out this quilt:
I have had this quilt top since about 2004, I'd say. My sister got it from her mother-in-law as she was helping her clean out the farmhouse they had lived in all her married life. She had kept a lot of stuff, including three quilt tops she bought off some ladies at the side of the road in Kentucky during a road trip in the 60s. (This was apparently pretty common then.)

Yes, she had these quilt tops for over 40 years and nothing had been done with them. (Does that make you feel better about your UFOs?) One was a very bright orange. To be honest, you'd have to call it hideous, but in that wow-that's-so-ugly-I-like-it way. My sister claimed that one for the cottage she hopes she might have some day.

I don't even remember the second quilt, but the other one was this hexagon flower quilt. My sister was scared of the uneven edges--it would be a hard one to bind!--so she gave it to me.

Well, what I first did with it was to make some blocks to edge the quilt. They were cut from some sheets I bought and cotton fabric I had lying around. I went with blue and white because of the blue and white polka dot fabric used for the flower centers and the triangles between the hexagons. (The only consistent parts of the whole quilt!)

I then layered it with batting and a white sheet and then used another sheet to make a "pocket" to use it as a duvet cover. What about quilting the layers together, you ask? Well, I opted for tacking it together with buttons.
I tried to use just flower buttons. I don't think I got a more perfect match than this faded pink button on this pink paisley flower. I was really happy with that combo.

But as time went on, I realized that the buttons weren't nearly enough to hold the batting in place. And this very many layered cover was way too warm with a duvet inside. So last year I took it all apart and decided I was going to attempt to quilt this and quilt it old school--by hand!

It's been slow going.

But I'm ok with that.

To give you the stats: it takes two hours to quilt a flower. There are 64 flowers in the quilt. I've currently finished three. Yup, things are looking pretty grim for this sweet little quilt. But I figure it waited 40 years to even see the light of day again, so it's probably learned to be a patient sweet little quilt.

My hand quilting skills are very beginner-ish and by that I mean pretty bad. This is my first flower:
Big uneven stitches and the lines wander from 1/8" to 3/8" from the seams. (I'm aiming for 1/4" in case that's not clear.)

This is my third flower:
Even with the very infrequent repetition, I think my stitches are improving. Not by leaps and bounds, but still...

There are many reasons why this quilt will never be a "show-quality" (or probably even county fair quality) quilt. Besides my amateur stitching, you'll notice in all the pictures that the points were just a very rough guideline of where the seams should be. Seams are uneven, yadda, yadda, yadda. But it's still so charming.

Other problems I will deal with when I get there. For instance, ripped fabrics:
It's just too thin to take the strain. (One of the reasons you shouldn't wait to quilt a top. The quilting really helps to stabilize and support the top fabric.) The really sad part is that this is a really charming fabric. I will repair where I can, but I suspect the fabric in this particular block will have to be replaced. (Right now I'm thinking I'll basically applique a new flower fabric over the damaged fabric.) Hopefully I'll find something I like just as much.

I presume the use of actual scraps determined the combination in this quilt:
From sweet pinks to bright bright yellows to, what's that? yes, camo! And you can never have enough kerchief fabric in a quilt, right? You see why this quilt is so beguiling?

I can't promise it'll be done soon, but when I work on it, I enjoy it. What more can you ask, really?

Monday, March 15, 2010

March's Quilt Day

Have you thought I forgot about my resolution to have a monthly quilt day? I did miss in February because it conflicted with the Olympics. But I made sure to get right back at it this month.

I debated what to do, and decided to work on the square for the raffle quilt at the County Fair. I [naively] thought it would be a nice project that would yield a finished project in one day.

I threw around some ideas for the block on the theme of "Spirit of America" in this post, and liked the suggestions I got. While fooling around with some ideas, I kept coming back to the same one.

The first thing I did today was draw it out. It's a foundation paper-pieced block so I had to draw the foundation. I thought that part would be a lot harder than it was. I didn't have a compass for the curves, but a pencil on a string worked quite well.
I was pretty pleased with the results, but considering it was a new design it occurred to me that I should probably play it safe and try it out with "scrap" fabric before I used my limited required county fair fabrics.

So I found some tissue paper, ironed it straight, and traced the design.
I won't get into details on paper piecing again (look here for previous instructions), but at the end of a couple hours I had the following block:
Not bad, eh? And I must ask, does it remind you of anything? I'm kind of hoping it will. Leave a comment and let's see if you can recognize it.

It seems amazing to me that I actually got a finished block that I like from a rough sketch like this I made while working the ideas out:
You know, "I can't draw." But maybe I would have been good at drafting...

Anyway, now that I've done a practice square and have learned a few things (and like a good girl took some notes to tuck away with the materials), I am ready to do the "real" thing with the required fabrics.
When I looked at them again today, I realized just how small those pieces are. (14" square for the background fabric and 10" square for the rest.) With the way I want to use the colours, I think I'll have enough of all of them except maybe the background fabric.

I'm going to have to make paper templates of all the pieces I need and lay them out on the fabric to make sure there's enough. If there's not, it's back to the drawing board!

Sunday, January 10, 2010

Sunday Quilting: January

Although I certainly missed the socializing I would have gotten at Red Purl today if I had gone to the new afghan knit-along, I got a good bit done today on my first solo quilt work day here at home. I got myself set up in the living room with a fire in the woodstove on one side and football on the TV on the other. (And I certainly didn't get either of those at Red Purl!)

I decided to start the year off with my crossed canoes mini-quilt. I had a suspicion that I could get it done or nearly done with a good session. We haven't seen this quilt since July and when we left it, I had finished a good part of the quilting but didn't know what to do for the rest.

Back in October, I took it back out to try and figure it out.

I got out the foamboard, taped together enough paper to fit under the quilt, and then laid down the quilt:

I stuck all the major intersections through with pins to transfer the quilt design to the paper:

I then connected the dots.
(It is funny how much of what you learned in elementary school you do use again later in life.)

I then played around with some curves and a pencil. (And used a lot of an eraser too.)
Until I settled on something I thought might work:
I then transferred it all to the quilt itself, using a water soluble blue marker on the yellow and white chalk on the blue. And then pinned the pattern and quilt onto the foamboard and lived with it for a while:
Yes, that means it was literally sitting on a table in my living room since October. But the more I looked at it, the more I thought it would work. Maybe not the perfect pattern, or the best, but definitely one of possibly many successful possibilities. (I get kind of stuck on trying to find the "right" design, when really there's not really one right way to do it. Pick one and move on!)

So today, I unpinned the quilt and started sewing. First the blue central design:
Then the yellow:
And that meant everything was quilted--Wow!

Next step was to baste the yellow piping that I made in July around the edges:
I did not miter the piping at the corners, but just crossed them over each other. Every strip goes under at one end and over at the other.

Once the strips were sewn on, I could finally cut the outside edges to size. Such a relief to finally neaten them up!

I used the tool that came with my Piping Hot Binding kit. The two grooves fit over the piping to keep everything lined up, and are spaced a half inch and a quarter inch from the edge. You can chose which of those two you want as a seam allowance.

Since this is a small quilt, I chose the quarter inch side, and cut all four sides.
I'm telling you, there's nothing like getting the edges cut off to make you feel like you are finally getting close to the end.

Before adding the final edging (binding), I basted on the two corner hangers. They're just four inch squares folded in half diagonally.
You put them on the back of the quilt at the upper two corners. When the quilt is done, you can slip a small dowel in the pockets and use it to hang the quilt. Pretty slick, eh? This is the first time I've tried it, so I'll let you know how it works.

The one thing I didn't get to was sewing the binding down to the back of the quilt (something I do by hand).
After that is done, the quilt will be finished...oh, except for the blocking. What, blocking fabric? Yes, this is something I've learned recently: blocking's not just for wool anymore. I'll give more details when I get to it.

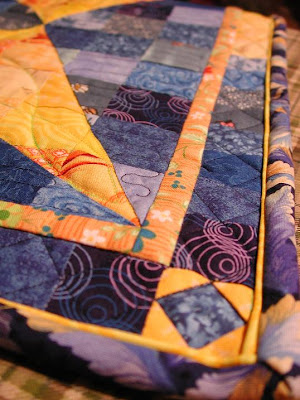
And with all that in front of me, I'll leave you with a little peak of what the finished quilt may look like:

Not bad for my first quilt day of 2010!

Friday, January 1, 2010

What to do in 2010?

I'm not one for new year's resolutions. When I decide to change I don't need to wait for the new year, and a new year doesn't seem to be much motivation for me to change.

But I did think it might be good to have some stated goals for 2010 just to provide a little structure to a few areas of my crafty life. I think my 2009 year review showed that I have no trouble getting knitted things done (!), but I would like to work on a few other things.

One, I have a hard time pulling out the quilting even though I do enjoy it and have a few projects I'd like to finish up.

The big project would be to start (dare I hope--finish?) the quilting on my Hawaiian Star. I also have a few smaller quilting projects to finish if I need a change.

One way I hope to do more quilting is to put aside one Sunday afternoon a month. I've decided not to do this year's Red Purl afghan KAL, so I figure all those Sundays that I went to Red Purl over the past year, I could now use for quilting at home.

Second, I would really love to make this trench coat
out of red plarn. I have been saving up the red bags that my family has been faithfully collecting for me. The jacket is crocheted (not quite as enjoyable as knitting for me) but I hope that steady work will get it done over the year even if I don't work on it quite as obsessively as I do my knitting.

I realize plarn may not make the most comfortable garment, but I just can't resist the idea of a rain jacket made out of plastic bags. And doesn't a red jacket (maybe with white trim) just sound great!? I hope it works out...

The last big project I am considering is the Whistler sweater from Dale of Norway:
Considering the Winter Olympic games are at Whistler in February of this year, it would be perfect to do it then. But I'm not sure I'll be able to rally the supplies and clear my docket in time to start it then. I'm also considering doing it for NaKniSweMo in November. When I figure it out, you can be sure you'll be the first to know!

Of course, I will be working on many other projects throughout the year (including finishing up the woven cables sweater for Troy that is still sitting in time out), but I think these are the ones that I will need to make deliberate efforts to get done. And even to get them started--sometimes that's the hardest part.

Happy New Year, all!

May I suggest?

I Say! or at least I did once...