Showing posts with label embellishments. Show all posts

Saturday, April 14, 2018

Pink Roses

I tried something new and it worked out. You could say everything came up roses....

You see, I had this "quilt" from the long arm class I took last year. They load up some white fabric for the front so you can really see what you're doing and use whatever they have lying around for the back.


Although we tried out a lot of different things and most of the resulting "quilt" looked like messy doodling, the part where I tried a pantograph was fine. It was a relatively wide spot that had roses stitched on it. Except it was all white and pretty uninspiring.
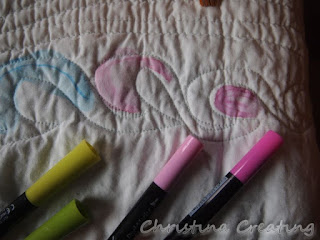
So I thought, Wouldn't it be nice if I could paint the roses and make them pretty? But I'm not confident with actual paint, so I researched fabric markers. Some of them can be made to look a lot like paint. (Watercolours, in any case.)

I purchased some Fabrico markers so I would have them when I was ready to tackle this new thing. I'm not sure if I was ready, but at the end of March, someone in the UFO club on Ravelry more or less dared me to finish an additional project. (She was promising elephant fabric. She knows my weakness!)

Since this project was the closest of my UFOs to being finished, I gave it a go.

First some practice on the unusable part of the quilt:
Don't pre-spray the fabric with water - that is too wet.
I had the best result when I pre-wet the fabric with a small paintbrush,
and then added a little more water with the paintbrush after I had applied the marker. The colour seemed to run toward the stitches so it was hard to get it to flow toward the middle of the petal or leaf.

I then took the additional step of washing the quilt after I was done practising. This would both test the colourfastness of the markers (passed with flying colours) and remove any fabric treatments or residues that would prevent the ink from bonding properly.

And then I spent an hour or two "painting" roses and leaves. All in all, I was happy with the end result:
I had the perfect pink and white fabric for the binding. I remember buying it because I loved the tone of the pink so much. I have used bits of it for other projects, and I had almost enough left to do this binding.
For the last couple inches, I put in a piece of pink butterfly fabric. It was too dark to use around the whole quilt, but it works just fine for a couple inches.

The backing was a small print of blue flowers. I think it works just fine with the pink roses.
I used three different shades each of pink and green. The leaves were mostly the same, but I made sure to vary the roses. I could not only use different markers, I could also add more or less ink to change the intensity.
At 21"x30", the quilted ended up a little smaller than I would like for a baby quilt. I finished it right around Easter and decided it worked just fine as a table topper! :)

Monday, March 10, 2014

Little Sister's Dress

I finished another project!
Isn't this the cutest little dress ever!!
It's knit top-down and starts with some alternating bands of stocking stitch and reverse stocking stitch.
The simple stocking stitch skirt was just begging for a little embellishing.
I free-handed a flower and stem on there.
I tried to do a chain stitch with a crochet hook, but it was nearly impossible. Especially since I was using raveled yarn and it was very splitty. After a few tries, it finally occurred to me that I didn't have to do it with a crochet hook. I found my blunt needle and did an embroidered chain stitch. This was definitely one case where a twisted yarn would have been much better. Not just for ease of working with it, but it would have looked better too. Now I know.

When I crocheted around the top opening, I added a little loop for a button and the last thing I did was sew on a little button:
When I sewed it on, I anchored it with a button on the back. I chose a nice smooth one so it wouldn't be scratchy or pokey. It serves as a cushion for the shaft from the top button so it won't poke either.
I followed the directions for the 6 month size but with this yarn and gauge, it came out closer to the 18 month size. But the versatility of this design means it can be worn as a dress as soon as it fits, then worn as a tunic and then a shirt as baby grows taller. As long as the neck fits, it should be good.

One more look? Sure...
Project Stats
Started
: 15 Feb '14
Finished: 3 Mar '14
Pattern: Little sister's dress (Kjole til lillesøster) by Tora Frøseth Design
Materials: 73 grams cotton (~DK weight) from a Jeanne Pierre sweater ($5.00) and a little bit of mustard-coloured raveled cotton


Wednesday, April 21, 2010

Field Trip: Chicago

I was invited along to Chicago today by a friend, and was happy to be off. It was a beautiful day for driving, and--lucky me--she was doing all the driving!

The primary destination was Andersonville in Chicago, a neighbourhood which was historically populated by Swedish immigrants.

First stop was a stop in at Knitting Workshop. She hadn't been there since they moved and was curious. I had visited the shop on my last trip to Chicago (last May) and found it much the same this time as before. We did not stay long and didn't buy anything.

But, since Soutache (the embellishment store) was right down the street, I pulled her over there for a look-see. That store was also much the same as before--delightful. I don't know if it was the same woman waiting on us, but if possible she was even more cheerful than last time.

No more purse handles for me to look at, but so many lovely trims. Ribbons, buttons, feathers, satin, bows, lace, and so wonderfully laid out too. I found something I could pretend I "needed":
Some ribbon and puffed applique pieces for a purse that's knitted but still needs to be sewn together. I'm hoping to get to that in the next month or so...only thing left is to nail down the lining fabric and then put it all together.

And this time I was not able to resist some feathers:
I haven't worn them; I almost can't imagine wearing them, but they are so dang pretty! This is just a little feather medallion which needs a little pin on the back and a bead or two in the center. I like the thought of it on a lapel of a coat. I'll have to be careful, however, because the feathers really can't get much wear. (Watch out for seatbelts, for instance.)

From there we made it to the Swedish American Museum. (After one quick stop at Nuts on Clark for some very good caramel popcorn!) We saw an exhibit of paintings by Anders Hultman. This postcard shows the one anomalous painting...the rest were of his impressions of Sweden.
What this painting does have in common with the rest is a very bright and beautiful colour pallet and a primitive (and self taught) style of painting.

The exhibits in the upper floor of the museum told the story of Swedish immigration to the United States. I spotted only one or two hand knits:
Did the gloves survive because they were too well liked to use, or because they weren't liked at all??

For those of you with children to entertain, the third floor houses the Children's Museum. It looked like the kids were having a lot of fun dressing up in period costumes (to fit over their own clothing), working the paddles on the Viking ship, and working together in the garden gathering the produce. That was the best little activity area--they literally had a garden made of fabric set up. You could "pick" the cucumbers, corn, squash, etc, gather them in baskets, and bring them into the log cabin. A few kids were just having a ball together.

After the museum and some food at Taste of Lebenon (on Foster just off Clark--very good!) we wandered into Andersonville Galleria, a collection of vendors in art and indy products. One warning, you could spend a lot of time (and money) in this place! There was a lot of variety, but I found most of the products well-done, fairly priced and just plain nice to look at. I can't wait to have walls I can decorate with art.

One [little] thing I did let myself buy was this coaster set:
I spent a lot of time looking at all the elephant products (notebooks in many sizes, stationery) by Koru Street before I noticed all the paper is made from elephant poo! Well, how could I resist that?! Ha ha. But really I do have a thing for elephants (but not its poo, per se), so I treated myself. I will now look forward to when I have furniture that actually needs protecting...

We did try to make one more stop at Knit 1, but they are closed for renovations and restocking until May 1. Next time, I guess.

And did I do any knitting while not having to do any of the driving? Well, yes I did. I got some nice little swatches done up for a sale coming up at Red Purl (more info at a later date). You can see them to the left.

I finished the heel of my hat heel sock so that I was ready for the second class this Friday.

And I worked further on my purple mohair T. I finished the front and got the sleeves started yesterday. I'm doing them two-at-a-time on straight needles. On the way home today, I got the initial increases done and have only about half an inch to go until I start the cap decreases and shaping. (They're short sleeves--I'm not really that fast!)

All in all, a truly lovely day! Things done. Things seen. Things to inspire more things.

And all in good company.

Sunday, April 4, 2010

Happy Easter!

I've been having some fun preparing for Easter. Another little break when I couldn't concentrate on the Whistler sweater.

I also had some fun with the photo shoot. Troy had conveniently just brought me a bouquet of pink tulips when I was ready to take the pictures.

I bought the pattern for these eggs last year already knowing I would have leftovers from my 2009 afghan to use. Yes, I probably could have figured out my own pattern for the egg shape, but the pattern was right there and it's so easy to just follow directions! Plus it was nice to have something to look at to stimulate some embellishment ideas.

Although the project was pretty quick, it did not happen all at once. It was a few weeks ago that I knit them up over a couple days, in minutes stolen here or there, and at the end of the day when I couldn't concentrate on anything more complicated.Project Stats
Started: 22 Mar 10
Finished: 27 Mar 10
Pattern: Woolly Eggs by Marie Mayhew ($6)
Materials: Malabrigo leftovers from my 2009 RP afghan; buttons on hand


Then came the felting. While I was at it, I threw in a few sweaters I have sitting around waiting for the right time. I probably could have felted the eggs a little more but they're ok. (It's hard to tell how felted it is when it's sopping wet.)

A few days later, I finally got to the stuffing and embellishing. The most fun, I have to say, but also the most fiddly.
From top left, we have a striped egg--but they're not just any stripes. I used a helix striping technique I'd recently read about. You can see in the detail pic to the right that the colours literally spiral. There's no jog from doing one colour followed by another. The colours are all worked at the same time, stacked on top of each other like interlocked spirals. This egg was fun little project to practice the technique.

In the middle top, I knit stripes and then used buttons for flower blossoms. The stems and leaves are needle felted. (More on that in a minute.)

Top right is a small plain robin blue egg. So simple, and yet it might be my favourite!

Bottom left has a knit stripe and borders done with needle felting.

Bottom middle is a plain egg in hollyhock dressed up with swirls and dots of needle felting. (Also in the running for my favourite!)

And bottom right is a speckled egg, done by knitting with two colours held together--the taupe Malabrigo and a bit of the thin green wool rescued from this vest. Again, very simple, but a great effect nonetheless.

And then there is this egg:
I abandoned the pattern and tried knitting an egg in the other direction to make vertical stripes easier. I used short rows for the shaping, and it worked pretty well...except I cast on too many to start. So it's more like a torpedo egg. And then I embroidered it with the feather stitch, carefully placing each colour opposite its knitted section.

Oh yeah...I did one more too. I could call it my measles egg. I knit it in orange and then duplicate stitched some red dots on it.
They didn't stand out very well after felting, so I thought I'd outline them. I pulled out my new toy, a pen style needle felter. This model has three needles for fine work. Each needle is barbed so that it grabs material on the way down and pushes it through lower layers. You set the wool where you want it and just start punching through it. (Keep fingers at a safe distance!)
In the above pic, you can see one dot done on the left, and I'm working on another. The outline didn't end up helping a lot with defining the polka dots, but it was worth a try. It did, at least, add a little texture to the egg.
I had been curious about needle felting for a while now. I wasn't sure if it would be like other embroidery and embellishments for me: ok, but not especially enjoyable. But I have to say that I really liked it. It certainly is easy and fast, and you have a good amount of control. I'll be pulling that needle felting pen out more often when I want to dress something up!

And now I'll leave you with a picture containing just about every Easter cliche I could think of!
As a side note, I'm not normally a stuffed toy person, but I am oddly attached to these two bunnies. They were gifts from two different people the same year and are good representations of our bunnies, (the late) Chocolate and (the still going) Red. (And when you squeeze their front paws, they cluck like chickens!)

Hope you all have a happy Easter!


PS: Last night I finished the second sleeve on my Whistler! Woo hoo!

Sunday, February 7, 2010

SB Sunday

Yes, today's the day--Super Bowl Sunday. My Colts have their chance at a second title since I've been following them.

But it's "SB" Sunday for another reason...let's see if I can explain the inside joke.

A group of friends were together one evening when one of us exclaimed, "Why M---, you have a Sparkly Bum!" And immediately M--- (a lady of a certain age) twirled around with her hands covering the "offensive" glitter and sparkle, completely embarrassed.

Well, we couldn't let that go, so we lovingly teased her the rest of the evening. (We even found out that earlier in the day someone had told M--- that she had a "Shiny Heinie.") M--- took it all in with good humour, and in fact became rather defiant as she bought another pair of "sparkly bum" jeans the next day!

Of course, we then planned the next stage. M--- is hosting today's Super Bowl get together and we have made plans to all come with sparkly bums! I haven't seen what any one else has planned, but I worked on mine yesterday.

I bought some heat adhesive crystals and a heat tool (the "Creative Jewel Tool") and planned my own sparkly bum...in support of my Colts, of course!

First, planning:
I traced the pocket onto some scrap paper; drew out a horseshoe and tried to fill it with crystals. After adjusting the shape several times, I had a design that worked and used every single clear crystal I had. (No pressure now!)

Next I transferred the horseshoe to the actual jeans, one by one. It's still a "dry fit" at this point; no adhesive had been activated yet.

Once I had the design, I started to stick them down. The heat tool worked on one crystal at a time and took about 20 seconds. There are about 120 crystals in the design, so it took a while. It did not go any quicker when the jeans (and crystals) fell to the floor after I had only about 10 glued down. :big sigh:
The only good thing to come from it was that after I had picked up all the crystals and laid out the horseshoe again, I had several clear crystals left over! (At least now I had a spare if I needed.)

I had trouble with some of the crystals: they wouldn't stay stuck. I finally fixed the last few with Elmer's glue. (It may not survive the wash, but hopefully it will last through tomorrow.)

I hope M--- appreciates the joke. Isn't it funny how we were teasing her, but now we just want to be like her!?

Go Colts!

ETA: Well, never mind the Colts til next year, but here are more Sparkly Bums that showed up for the party:

May I suggest?

I Say! or at least I did once...