Tuesday, February 28, 2017

Road Trip to Quiltville, USA

I was in Missouri a couple weeks ago visiting my in-laws. We happened to be only about an hour from the Missouri Star Quilt Company. Why it took me this long to learn that, I have no idea!

So we picked a day and my two mothers-in-law and I headed to Hamilton, Missouri, also known as Quiltville USA.

Why the fuss? Why all the excitement? Well MSQC has become quite a thing in the quilting world. The owner, Jenny, puts out great videos on youtube every week and they have made themselves known for selling precut packages (especially online).

It all started when Jenny's kids were worried she wouldn't have anything to do when they all left the house. So they bought her a longarm quilting machine, you know, to keep her busy. They had no room for it in their house so they bought an empty building in the town to house it. (I believe it was the old library.) The building cost less than the quilting machine did.

From professional longarm quilting, she moved into selling fabrics and long story short, a lot of the family is involved in running this big business that now owns about eight store fronts in town. (That's about half of downtown Hamilton.) The company also has a conference center where they host classes and overnight retreats.

And that has spawned a whole local economy centered on quilters. There are B&Bs for groups that plan quilting retreats there so they can be close for shopping. All of them advertise having a large room where you can quilt while you stay there.

The company also has packages for buses full of quilters that come from all over. Anyway, all that is to say it has become a destination spot. (Hamilton is also the hometown of JC Penny, but that's not quite as big a draw.)

We had a lovely time perusing all the shops. They have them organized by type of fabric (like moderns, juvenile, licensed prints, batiks, reproductions, etc.).
Here we are in the main store.
I went ahead and bought anything I really liked. :)

I found a charm pack (5" squares) in soft red, cream and blue (left side of picture):
and then found the three pieces of yardage (on the right)  that could go with them. What will this be? I have no project in mind at this time but sometimes the fabric comes before the pattern.

Here are some more precut packages I took home:
Two shibori packs (left), a mini charm (2.5" squares) of light neutrals, a layer cake (10" squares, on right) of various neutrals with text, numbers, music or map motifs, and a charm back (bottom middle) of more blue and white fabric which have the look of Delft blue pottery.

I think the shibori caught my eye because I had tried to sign up for an indigo dyeing class at Squam. Before I found out that I didn't get in, I already had thoughts of making a quilt from the fabric I would dye there. I guess the quilt idea stuck in my head and I decided I didn't have to actually make the fabric myself. :)

I found a few batiks that I just love:
I believe I got a half yard of the three on the right since I don't have a plan for them. The blue squares is my favorite batik ever right now. The blue on the left was purchased to be binding for my Nocturne Star quilt.

Here are a few random half yard or fat quarter pieces I picked up:
Obviously they weren't purchased as a set to go together but I like them each for different reasons.

I was keeping an eye out to see if there was a fabric that I could use with some of my leftover nine patch blocks to make a baby quilt for a coworker who is expecting. I saw a piece of this navy airplane fabric in a fat quarter bin:
I was thinking two fat quarters would do the job, but I could only find one! I went to the register to ask if they had it in yardage and they didn't...in that store. A bunch of clicking on their keyboards, and then they told me just what store I could find it in. I borrowed the fat quarter to show at the next store and found it no problem. And of course, found other color ways and other fabrics in the line! Oh my!

I was able to restrict myself to the two colors you see above. I ended up getting a yard of each and thought I would use the light one for the back of the quilt.

It wasn't until I was cutting up this fabric (yes, I have used it already!) that I noticed the cute way they have done the color code on the selvage:
When printing fabrics, a dot of each color used is put on the selvage. (They do it for some part of the printing process, but it's also very handy if you're trying to match a color in the fabric.) But this fabric used different airplanes silhouettes to map out the colors instead of dots. Isn't that too cute!!

Finally, I bought a couple bags of scraps and cut offs:
I looked through all the bags (without opening them) and found the ones with the most fabric I like. I don't know what yardage I got because they just put a minimum weight in the bag, but it looks like quite a bit for my money. And you certainly get a wider variety.

It was a fun day. Well, we were pretty much done by lunchtime, but you know what I mean. Not something I need to do every year, but every other year--I could see that!
Downtown Hamilton, Missouri

Friday, February 24, 2017

Farm Girl Vintage Quilt - Putting it all Together

In all my enthusiasm for my nine patch quilt, my Farm Girl Vintage blocks have been sitting in the same box that they came home in after Christmas.

Since I'm hoping to have it done or nearly done by Easter I thought it was time to get to the next step. On Sunday I got them out of the box and organized them. (Basically sorting them by top row, left side, right side, etc.)

On Monday at 10:50 pm I decided I had done all the work I was going to do that night and had the thought that I could sew for 10 minutes before bedtime. Since my sewing machine has been living on my coffee table (where I've been sewing), there was time wasted with set up.

I pulled out the blocks and sewed the first row together. That's as far as I got, but it was something. (And no, I didn't finish in by 11:00. When you start sewing for 10 minutes, it's most likely going to turn into 30.)

Thursday was another evening with
very limited sewing time but I
did manage to get two sets of rows
pinned and ready for sewing when I
had another "quick minute" to sew.
Over the next couple days, I got all the blocks sewn into rows. And then slowly but steadily rows were joined with other rows.

I decided to press the seams open because I couldn't decide how to deal with the excessive bulk where the diagonal "cornerstones" were inserted. I thought it would also make the separate sashing pieces look more convincing as one piece. It's pretty subtle, but I think it makes a difference.

And I think because I came to quilting after garment sewing, I still am used to an open seam. Even though I get why pressing to one side works so well for quilting, deep down I still am bothered by the extra bulk!

Tonight, being Friday night, I gave myself extra sewing time and got all of the rows together and the whole top pressed.
The top right now is about 66" x 75". Adding one more border should make it a generous double bed size, and plenty big to be useful for a queen size.

I had thoughts for a pieced transition from the border to the center of the quilt and now is the time to decide if it's worth it/the quilt needs it/will it work?

I'll let you know....

Saturday, February 18, 2017

...and a Coaster

This is really a postscript to my last post. I forgot to include a cute little coaster that I made with a "slab" of red fabrics. This was my warm up project before I made the mug rugs.

I used a leftover piece of batting that was cut off of my orange and grey zig zag quilt. And for the backing, I used the fabric from that quilt which was still attached to the batting.

The size was limited by the size of the batting and backing that I had. It's a little smaller than I would have made it otherwise but I'm ok with that.

I added some straight line quilting. The lines are probably even close enough together to be considered match stick quilting.

I changed the direction of the lines one time to match an angle of a piece on the front.

The coaster has been put to use at work. I'm glad to finally replace the coaster I inherited from the last person--it had a picture of a man in a kilt doing a reverse Marilyn. And no, you didn't have to wonder if he was wearing anything under his kilt as his bare backside was showing! I have been using the coaster upside down for years, but I'm much happier using this new one. :)

Wednesday, February 15, 2017

Turning Spare Parts into Mug Rugs

Before I put away the scraps from making all the blocks for the Farm Girl Vintage quilt, I used the many leftover little pieces to do some fun improv piecing.

I made some "slabs" or crazy log cabin blocks in single colors. I also pieced a bunch of the triangles that were cut off from making half square triangles into new half square triangles. And I pieced some improv flying geese blocks and used them as roofs (rooves?) on improv house blocks.

Then I put them in the bag with the scraps without doing anything with them. But I knew they were there, ready for when they were needed.

Well, last week I decided to try putting some of them together into mug rugs. (An object between a coaster and a placemat.) I pulled out some of the "house" blocks and found three I could use to make a minimal street scene.
I pieced blue scraps together to make enough sky above the houses so that the three pieces were all about the same height. I didn't want the middle house and the one on the right to be the same height, so I added a strip of pink to the bottom of the one. Maybe it's a stoop. Maybe it's a porch. Maybe the paint is just faded there. You can make up your own story. 😊
Final measurements: 6" x 8.5"
I didn't think the portions were quite right so I added a bit of green on the left side. we can pretend it's a tree or bush or whatever you want.

I quilted the sky in blue thread in gentle waves--the wind isn't blowing too hard. I quilted the houses in lines to echo the outside shape of the house, with lines in a perpendicular direction on the red door. I used a light colour with slight variegation. The "tree", I did with green thread.

I used a solid batik for the back:
I didn't want to bind them, so I finished the edge with a satin stitch. I actually went around the edge four times, if you can believe it. First I did a straight stitch to keep all the layers together and in place. Then I went around with a narrow zig zag (a width of 2, I think) and a length of about 3 so it wasn't really close yet. This stitch goes over the edge and starts to put things in place.

Then I went around with a satin stitch (shortest length--1) at a width of 3. This fills in the space and stitches over the previous stitching because it extends further to the left and right. Finally I do a final round of satin stitch at a width of 4. It's not thick enough to really cover the edge if you only go around once, but it lies better if you widen the stitch each time. At least that is my experience.

It's still not perfect, or even particularly satisfying, but it works.

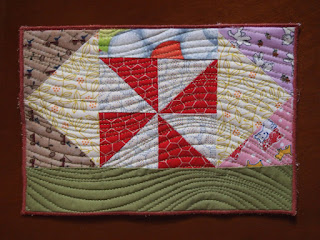
For the second mug rug, I took four matching half square triangle pieces and made a pinwheel for the centre. I had larger half square triangles that I matched in pairs and sewed into flying geese units and added them to both sides.

But the pinwheel wasn't really big enough. Instead of cutting down the flying geese units, I added a strip to the pinwheel. Then to make the final proportions better, I added a strip of green to the entire length.

You can see I quilted it in all over waves. I added more movement (and avoided it looking too mechanical) by making the dips and peaks closer together and further apart in different areas.

While I was making it, I thought the green strip went on the top, but when Troy looked at it, he immediately set it with the green on the bottom.
Final measurement: 6.75" x 9.25"
Fortunately, there doesn't have to be one answer--it'll work just as well however you like it.

I backed this one with a piece of cheery cotton:
After it was quilted, I turned it over to see the back and got a surprise. Can you see the dark spot in the top right? Now that I've drawn your attention to it, you probably can. Apparently there was a scrap of fabric that stuck to the backing piece that I didn't notice. By the time I did, it was too far quilted in there to make it worth trying to get out!

This could open up a whole new way to add design layers to a piece when you're using lighter fabrics. (That's me making a mistake into a "feature".)

PS Did you recognized the thread I used for the satin stitch edging? Ya, it's from the cone I bought when I quilted my nine patch quilt. You will likely see it on a lot of projects!! 😉

Friday, February 10, 2017

You can have Boston and New York; I'll take a quilting marathon any day.

I had my quilt top and backing ready. I had my lesson on the long arm machine. I was ready (and eager) to get this quilt going. I'll be gone next week so I was also anxious to get it done before then. I didn't want that much time to pass between my lesson and applying the lesson. And of course, I was just excited to get quilting and didn't want to wait. :)

So Monday (almost two weeks ago now), I decided with two weeks before I went on vacation, I could afford the time to take a day off (and use up some of my comp hours that are burning a hole in my pocket). I called the quilt shop to see if any days were better than others to rent time or if some days were definitely out before I proposed a particular day to take off to my boss. I was very concerned that I may not get the whole thing done in one day, so I also asked what day could I get the maximum time in.

It turned out that Friday was out because they had a class, but some of them usually worked late one day and, even though the shop wasn't official open, I could continue quilting while they were there. That day turned out to be Tuesday. As in "tomorrow" when I was talking to them.

So long story short, I politely let my boss know that there was an opportunity at the quilt store I had to take advantage of the next day and I would be out. He took it gracefully. (He knows as well as I do how many hours he owes me, so what can he say?)

Tuesday dawns. I pack up the quilt top and backing into a suitcase and head to the store. I get there around 9:30. They gave me a lot of help setting up the quilt on the machine, basically walking me through all the steps again. I chose wool batting. (They sell it there--how convenient! Even better is that they pass on the wholesale price.)

Here it is loaded onto the machine. This is  after I've quilted quite a bit of it, but you get the idea of how it goes on.

The highest bar, in the back, is called the take up roller because it takes up the quilt after you are done quilting each section. The arm of the sewing machine runs over this one.

The lowest bar, at the front of the frame, is the quilt top roller. As you can see, it holds the part of the quilt top that you haven't quilted yet. You can use it to keep the right tension on the quilt top, although apparently some people quilt with the top not in tension at all. In that case, you can let it hang down, or roll it up to keep it out of the way, but not pull it tight.

Just above the quilt top roller is the payout roller. (The one with the red stick on it.) It's also called the belly bar because that's the one your belly is always hitting as you lean over. :) This is the roller that holds the section of quilt backing that hasn't been quilted yet. It also maintains the tension of that layer.

And in between these two layers lies the batting. It isn't held in tension at all and you can see that it is just hanging down. When you're just starting, there's a lot more batting which piles up on the floor and gets in the way. If you look closely, you can see some purple fabric hanging behind it. They call it a hammock and it is tied to both sides of the frame. You stuff the batting in there to keep it out of the way until you need it. Low tech, but effective.

Once we had it on the frame, we chose a thread colour. I knew I wanted red (what else?) but didn't want a bright take-control red. We ended up going with a dusty rose colour and it worked really well. It was not one of the colours that I could just buy what I needed (they charge by the size of the quilt--they don't actually measure what you use) so I ended up buying a whole cone. So now I have a lot of dusty rose thread to use.
I was pretty focused during the day so I didn't take a lot of progress pictures. I knew I would have to keep it moving to get it done. I did have some issues with the thread breaking which slowed me down. I was advised to quilt only from left to right and that stopped the breakage. But it meant that at the end of each pass across the quilt, I had to cut the thread and restart on the other side. On the plus side, your muscle memory is not the same moving in both directions so I think I got better a little faster because I was always going the same direction.

I love how much texture is added as soon as you do some quilting. I think you can see how the closer squares in this picture are flat, but the ones further back look like little hills.
It just brings the quilt alive. It's an exciting process. (Keeping in mind the context. It's also the tedious repetition of a thousand curved lines. :)

After the first couple times you've filled the area with quilting and rolled the quilt on the take up bar, you can see the design on the back of the quilt. This is from the front of the frame:
 Below, you can see a little more of the design from the back of the frame:
 Here is a quick peek under the quilt:
This was taken from the back of the frame. This is the part of the quilt that is lying flat ready to be quilted. (You can see the belly bar in the back (bottom of the picture).)

Then, 10 hours after I arrived, I had a quilt completely quilted:
This is Doug who stayed late. They told me he was working late anyway, but I didn't see him do much more than a couple phone calls, so I think he was essentially staying so I could finish. They were very gracious! But I think he was also glad that he got to see the whole quilt because he came in after I had it rolled up on the frame and he told me part way through the day that he couldn't wait to see how the colours moved across the whole quilt.

I thought ahead enough to pack a lunch and snacks. I knew they had water in a fridge there that I could purchase. I tried to take a break every two hours but honestly spent most of the time quilting. I was very determined to get it done. (I did do some yoga cat/cow in the bathroom at some point. That helped my back a lot!)

For most of the day, it was very uncertain that I would get it done, but after about half way things started clicking. I had many fewer thread breakages and just had to deal with the bobbin running out. (I went through 7 or 8 bobbins in the project.) I also got into a groove with the quilting and got faster. I think the first half took me until about 4:30 and I did the second half in the next three hours. (My best guess.)

As for the quilting, I certainly wouldn't be happy if someone charged me and I ended up with these results, but since I did it myself and it's my first one, I was certainly happy enough. Right from the beginning, it was obvious that the quilting wouldn't be "perfect". And apparently it didn't bother me because I caught myself almost laughing every time I did a wild curve or really missed the mark. (Like "ha ha...that was a good one!") And when you step back, you still get the idea of the pattern.

I'm looking forward to getting some of my other tops ready to quilt. I think they'll need a little more custom quilting than this one did and I'm going to make sure I have two days in a row available so I won't have to drive myself quite so hard!

As for this quilt, I need to find a place where I can trim the edges (it's a little overwhelming how big this thing really is) and then can apply the binding. I've got some crazy plans for that too...something I've never seen done before. (Oooh...the suspense!)

____________________
Bonus footage: Here is a short video of their bobbin winder, a truly slick little machine.
Once you get it started, it runs by itself and stops when the bobbin's full. You load the next bobbin, flip the arm down and it does it all again. If I'm not careful, it's going to make me think filling a bobbin on my sewing machine is quite dowdy!

Monday, February 6, 2017

Putting it Together, Front and Back

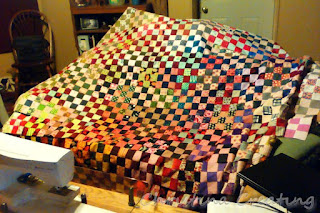
<= This is how I spent a lot of January: watching football playoffs and sewing all my nine patches together. (Two of my favourite things, so yay!)

First I sewed all the seams in one direction (without cutting the thread between pieces) and I could throw the top over the couch and it (almost) looked like it was done.
But of course, it wasn't done yet. Only about half.

So I doggedly worked on the seams in the other direction. As I did so, I had to decide which way to sew the opposing seam allowances. Notice (below) the longer horizontal seam just in front of the needle:
Does it go forward or back?

You have to look at the seam on the opposite side of the square--if it goes forward, then the one you're sewing goes back, as seen below.
You could also say that they are both going away from the middle of the square. If, on the other hand, the other seam goes back, then you sew this one forward (and they both go toward the center of the square). Got it?

What also helps, is that the direction is always going to alternate from one square to the next, so I could get into a rhythm if I wasn't interrupted by replays.

Once I had the whole top together, I was left with long horizontal and vertical seams that needed to be pressed:
But I couldn't press them until I picked all the seams inside the seam allowance to allow me to furl every single last one of them. That got me a whole quilt that looked like this:
It really is a shame all of that great care has to be hidden on the inside of the quilt, but that's how it is.

After I sewed around the outside to stabilize it and pressed it, I threw it over my couch and I had a finished top:
Yell a cheer (woo hoo!), take a breathe (in...out) and then on to the next step: piecing a back.

I checked my numbers a few times, but the back of the quilt really was going to take over 9 yards of fabric. I still can't really wrap my mind around that. I certainly didn't have nine yards of one fabric to use and I was not interested in buying a piece for it. So I looked through my box of red fabrics and started on a plan.

The plan started with some leftover nine patch blocks that weren't used in the top. Instead of doing solid nine patches, I alternated them with squares of one fabric.

After sewing all the seams, I was left with some pressing decisions. On the first seams (vertical in the picture below), I chose to iron toward the solid piece of fabric. Makes sense because I don't want to press a seam back on itself if I don't have to.
But now if I try to do the same thing on the horizontal seams, it leads to trouble at the intersections. In order to furl the seam allowances, they have to all go in the same direction (clockwise or countercw) and that's not going to happen if I press toward the solid square.

So it was time to choose my poison: press seams back on themselves on all the nine patches in order to furl the intersections OR press seams back on themselves on half the nine patches by pressing the seam in one direction. Both would lead to some bulky spots. This was on the back of a quilt where there were already a lot of seams on the front. If they all lined up in an unfortunately way, it could lead to problems when sewing through all the layers.

So I choose a third bottle of poison: I cut the seam allowances and pressed them all away from the nine patches. There were still some bulky spots, but not as many. So I snipped on one side of the intersection:
and then pressed:
A compromise I was  happy enough with.

You can see the checker board section in the centre of my pieced backing:
which is essentially a giant nine patch!

I was going to cut the four dark corners from the same fabric because I had plenty of it. I had enough of it that I used it for the plain squares alternating with the nine patches in the middle. (Cue the ominous music...) Yes, after I had pieced the middle section, I cut out the large pieces for the other sections and did not have enough to do all four corners. Apparently I used just enough for the centre section that I was short, by about 3". :( If only I had really measured because then I could have used a different fabric in the middle and the four corners would have matched.

So enter another compromise, I mean solution. I didn't have enough of any one red to cut out the third and fourth corner pieces. So I cut smaller squares of a bunch of fabrics and made nine patches of similar reds to use on the last two corners. Are my nine patches in nine patches in nine patches getting fractal yet?

In the end, I did manage to put together a back for this quilt. It was sized about 6" bigger on all sides which is what I needed. And I met my very firm goal of not buying more fabric for the back.

Saturday, February 4, 2017

Long Arm Practice

This is putting the horse ahead of the cart because I have a lot to tell you about my marathon session at the long arm shop last Tuesday, but before I get to that, let me tell you what I did today.

When there on Tuesday, they mentioned that they were having an event today to work on Quilts of Valor. (If you're not familiar with the project, check it out here.) They invited me back and I said I'd think about it.

The idea is that some people make tops for Quilts of Valor and then many of them get turned over to long armers or, in this case, a long arm shop to be quilted. Besides events like this, the store gets many of them done at shows when they want to have the computer-controlled machine going. (A quiet machine gets no attention. A machine quilting all by itself? That gets a lot of attention!) The quilts get quilted and the shop doesn't have to waste a lot of fabric for the demonstrations.

I got enough done during the week that I decided I could go to the store for a few hours to participate. When I got there, they let me chose a quilt top and helped me get set up on the machine. Having been there working on a machine just a few days ago, it was all very familiar and doing it again so soon really to reinforce what I had learned.

The woman helping me set up recognized the name of the maker of the quilt top and told me that this woman has Alzheimers and this is the only pattern she does any more. It's touching that even though her abilities are likely very diminished from what they once were, she is still able to contribute such beautiful work.
 (I recognized the green fabric on the top because it's one of the ones I used in my Mt Robson quilt!)

Unlike Tuesday, I chose to quilt with a pantograph which produces an all-over design. I looked through the available selection and chose this triple scallop:
In this case, I followed the solid line. You can see there's also a dotted wave, but I think that was just a second option on the same pattern--not something that was supposed to be combined. (The dotted scallops on the top and bottom are there as registration marks only.)
With a pantograph, you sew from behind the machine, making the red laser dot follow the line on the pattern. You aren't watching the quilt at all! In the photo above, I would be standing behind the thread (you can just make out one of the black handles just behind the thread cone--that's where my left hand would be) and the machine is stitching on the quilt between the curvy handles you can see near the top of the picture.

We chose a gold thread with a greenish tinge and it went very well with the fabrics. It likely will be hard to see because it blends so well, but you might be able to make out the stitching in this pic:
I was largely self-sufficient while I worked. They checked in every now and then, but the machine worked well and I was remembering what I learned in the class. :)

I didn't realize (or remember) that they provided food for lunch so we all stopped for a break at the same time. I think there were three people sewing (including me), one person there to facilitate and help those who needed it, and about three employees.

As I got to the bottom of the quilt, I took a measurement of how much was left and how wide one pass of the pattern was. I had about an inch more than two repeats of the pattern so I spread them out an extra 1/2 inch each so there wouldn't be a big gap at the bottom or a "half repeat".

I also checked the angle of the last pass because although the pantograph pattern was set up to be straight as compared to the top edge, that didn't mean it would match the bottom! (Pesky changeable fabric!) I had to adjust one end about a 1/2 inch so the last repeat would look straight as compared to the edge of the quilt.

If I had thought of it sooner, I would have split that difference over the last two rows as well. But in this case, the stitching draws so little attention to itself on the star pattern that I didn't think it would be noticeable at all that the last row of stitching angles away from the second last row. But since the quilt top and bottom had a few inches of solid colour border, I knew the stitching would be very obvious there.

No one noticed what I had done and the quilt was folded up as soon as it was off of the machine to go to the next group who will add the binding and attach the label. The person who gets the quilt likely will never notice. But what they will not think is that someone didn't care while they made the quilt because the stitching is crooked or because there's a silly looking "half repeat" on the one end. That made it worth it to me.

They took a picture at the shop when I finished. The quilt was about 70" on each side and I finished in about four hours. (In my mind, I had "best-case scenarioed" my schedule and had myself leaving the shop at 2. It turned out to be 2:15 so not too bad.)

Pantographs certainly are a lot faster and I can see why people who long arm for money like using them so much.

But usually I would prefer to sew where I can see the needle moving across the fabric. It's not as interesting as you might think to make a red dot follow a line! That's not to say I didn't enjoy it because it's still a fun process and the results are good. But I would enjoy more of the process "quilting from the front."

This was a perfect opportunity for me to get more experience on a long arm. And I'm not thinking "Hey, great time to practise...on someone else's quilt that I don't care about." But there are only so many tops I can make myself. If I can work on a project like this, it's really a win-win!


May I suggest?

I Say! or at least I did once...