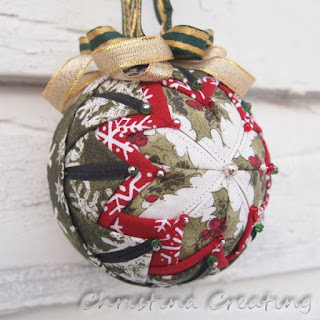
I don't remember how or where, but two years ago I saw the work of "The Ornament Girl" and signed up for her free tutorial. The ornaments are all made by folding fabric and pinning it to a foam ball.
Then I got emails every week with new examples of the same design or new designs. (She has an ornament of the month club so there are always new ones.) I deleted the ones I didn't like and collected the ones that I did like.
This year was finally the year when I was going to put the tutorial to good use.
Over Thanksgiving weekend, I spent some time at my sister's. We always talk about doing "craft days" together and that's what I decided to make it. I gathered and brought all the supplies to make some ornaments. (At first the only fabric I packed was a strip set of Christmas fabric that I got as a gift but by the time I left I had three gallon bags full of red, green, and blue Christmas or winter fabric!)
I didn't take any progress pics, so the rest of this post consists of pictures of finished ornaments. The first ornament strictly follows the instructions of the tutorial.
The tutorial even shows how to do the ribbon on the top, which is good because I am not great at those fussy embellishments. I used a bunch of leftover ribbon so none of them match!
This is the same eight-pointed star design with different fabrics:
Then I decided to try one of the other designs that I had collected:
I didn't have a tutorial for it and tried to figure out how to adapt the other technique on my own. I don't think I did it the same way, but the final effect is pretty much the same.
Another eight-pointed star:
Later, I added the beads to the ornaments.
Where I put beads was influenced by the pictures from the Ornament Girl and also determined by what colours of beads I had! The beads are applied with a pin through them so that is why they all have a silver "head".
I think I got three done at my sister's in an afternoon and the next morning. They took a lot more time than I anticipated!! (Picking and cutting the fabric takes quite a bit of the time.)
When I got home, I kept the supplies out and made a few more over the next week or so. I made a few where the center was a scene cut from a fabric.
(These "double pictures" show the two sides of the same ornament.)
Look at those sweet bunnies!!
And I had to make a pink one for my sister who does her tree up in pink. (When she does a tree; this year she didn't have one.)
Then I tried a little fussy cutting. Lucy Boston having her influence on me!
Here, the center pieces are fussy cut and folded to line up.
The center and outer pieces in this one
are fussy cut as well. The center lines up holly leaves on the fold and dotted lines where fabric pieces meet. The outer pieces are folded so a solid green line forms at the fold.
Here's a top view of the ribbon.
Some got single bows; some double. It just depended what I had to match and what I felt like the ornament needed.
And the final ornament was made with a collection of black and white holiday fabric I had.
I really liked this one!
There was one more ornament I made with a spiral design but I gave it away without getting a picture!! It was my attempt at this style:
 |
| Picture by the Ornament Girl |
A few other people got ornaments, but here's a picture with my sisters after I gave them theirs:
This was a really fun project and the results came out better than I expected. (It's hard to cover the raw edges of the fabric and to "finish" it when there's no place to hide the ends.) I don't naturally trust things that aren't fastened together somehow (pins pushed into foam can be pulled out!), but it seemed to work well.
It's a fun way to use up some small amounts of fabric and adding beads or other embellishments (sequins, charms, rhinestones, etc.) can make them sparkle in the tree lights.


No comments:
Post a Comment
Comments are moderated so you will not see yours post right away. Thank you for leaving a comment; I enjoy reading each one!