Sunday, February 28, 2016

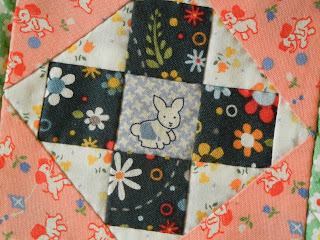
Block 10: Milking Day

I called my sister on Thursday for her birthday and she showed me her next block, the Milking Day block. I hadn't even started mine, so I took that as a kick in the pants!

Friday evening, I pulled out the pieces I had ready in a baggie and got started. The center of the block is a basic nine-patch. I don't know if I had a layout in mind when I chose these fabrics, but this is how I placed the fabrics as I sewed them:
Once again, I stopped and started stitching a 1/4" from the edge and was able to fold the seam intersections down flat. I've also learned this has a name: it's called furling the seams.
While sewing these blocks I have debated whether I should be marking all of the seams. I resist because of the extra time it takes and because I think I'll get better at making even 1/4" seams faster without the crutch. But when I got to some of the longer seams towards the end of this block, I went ahead and marked them with a water-soluble ink marker. I think this will be a good compromise for me for now.
Here is the back of the block after it has all been put together:
And here is the front after starching, pressing and a little trim:
I didn't plan it, but I like how the two top pieces of the milk can came together so the white dots roughly stayed in pattern. Have I shown my three little pigs fabric yet? In the lower right corner, you can see the wolf trying to blow their house in.

And here is the virtual mocked-up layout of all the blocks done so far:
_____________________________
Here is Kim's block:
I like her grey fabric for the can lid and handles, and I see we used the same fabric in one of our nine-patch squares! :)

Friday, February 26, 2016

Rekindling the Spark

I finally finished these socks for Wool-Aid.
They were a slog. Two strands of nearly-worsted weight on small needles. They'll wear like iron but they were uncomfortable to knit. They were the only thing I had on the  needles and I got into a rut where I felt like I had to finish them first. I also did them two-at-a-time so I was wrestling with two socks on a long circular needle and four balls of wool. It was UGH all the time.
When I chose to use these two wools (both ravelled from sweaters) I thought one was a wool blend with nylon and other fibers which would add strength. By the time I got close to the end, I realized I mixed up some labels and they were both 100% wool. So they'll still be warm, but may wear out sooner, and they were not what I had intended. It was discouraging.

But I pushed on and finally got to the cuff, which I finished with Jeny's Surprisingly Stretchy Bind Off.
They are 9.5" long and I couldn't be happier to be done with something. I hope they keep someone's feet very warm and to whoever you are, I'm sorry if they are filled with bad karma. It wasn't personal.

After a one- or two-day "finger cleansing" period, shall we say, I was energized to pick out what was next. A look at the stash led me to this wool/mohair mix. I previously used it for a couple pair of smaller socks, but this time I cast on a hat.
I am worn out of knitting worsted-weight socks and I think a hat is just the thing. I haven't worked on it much because it is my "take-along" knitting and I guess I haven't been out much.

I started something else to enjoy knitting at home:
Glorious fine-gauge socks! Working on these makes my fingers sing again. I've been enjoying it so much, my first sock is half done already. I'm making another pair of Stripe Tease like I made for my mom.

The sock is worked in narrow strips so it's quick to make progress (if you just look at length of your strip, not the entire project). Last time I did three strips at a time working from both ends of a ball (plus a second ball) in intarsia. I considered it again this time because, in a way, it's a more elegant way to work it and avoids a lot of picking up stitches. But I just couldn't do it. Too much to keep track of. Too complicated. I just wanted simple. So I am working my little strips and loving it.

This is yarn I got on my trip to the Netherlands with my mom (as was the yarn I knit my mom's socks with). Mom's yarn was brighter with more reds and made me think of the narrow strips of colour in the tulip fields.

Since this yarn is more blues and purples, I think of fields of hyacinths instead. The socks won't smell quite as pretty, but they'll be just as lovely! :)

Sunday, February 21, 2016

Block 9: Gingham Block

This is a simple block that I assumed would take a lot of work because there are a lot of tiny pieces. It turned out not to be too bad! I worked on it while my sister was visiting. I wasn't sure if I was going to hand sew it, but not surprisingly, I did. It's just so easy to pick up the hand sewing and do it while we're talking, etc.

I remembered to take some in-progress pictures this time, so I can show you how I put this simple block together. I sewed across the rows without cutting my thread (although I did anchor the thread at the beginning and end of each block).

Below you can see that several seams are sewn and I am working on adding another row across the top. I'm half way through sewing on the fourth block and still have to add the pink block and the plaid block to the last two columns.
Here all the horizontal seams are sewn. Since I didn't cut my thread between blocks, they are held in place--sort of basted together.
It makes it very easy to sew the remaining seams. There's no mixing up the blocks or confusing how the rows go together. Here the block is turned 90 degrees so the vertical seams were the ones done first, and I have two of the cross seams done.
I think you can see how it is coming together.

Here is the completed block:
The fabrics are extremely thin and I think I will back this block with a piece of white material to give it some extra support.

Here is the back:
I made sure to start and stop each seam in the first step 1/4" from the edge. This meant that I could flip the direction of the seams at every junction and open up the intersection so that they lie flat. Here's a close up:
I've shown this before and I'm becoming quite enamoured of this step. (That's probably becoming obvious to you!)

Here are the blocks in a sample virtual layout:
______________________
Kim's block is a stunner this week. :)
I will take credit for getting her to use the orange/brown/green bubble fabric in this block. I was imagining the fabric put together with solids, but Kim took it up a notch by using it with two other polka dots. I really love it.

Sunday, February 14, 2016

Block 8: Simple Star

Oh, are those frollicking elephant puppies on a yellow
background? Yes, yes they are.
There are several star blocks in this quilt. I think there is one named for each season and then this one, simply called "Simple Star". It is about the most basic star pattern so the name is apt.

I hosted a debate on my Facebook page once on whether if something was "deceptively simple" that meant it was easy but looked hard or hard but looked easy. I'm not sure we ever settled it so I can't tell you if this block was deceptively simple or deceptively hard, but I basically did it twice since I had to redo so many steps.

First thing I did after pulling out all the fabric, was cut apart the wrong piece for the star points. The star points start as a larger square and the first thing you do is mark some lines and then cut it into quarters. Well, I confused my fabrics and cut up the wrong square. I noticed this on the next step when it didn't match up with what I was supposed to sew it to.

I guess that's what happens when you cut your fabric ahead of time and then don't mark what the pieces are going to be used for.

Then a lot of the pieces that make up the border (with the star points again) didn't come out to the right size so I resewed some seams to adjust that. This was pretty easily done since I could resew the seam with the old stitching in place and then pull out the first seam afterward. (Can I say again how easy it is to rip out hand sewing compared to machine sewing! It's also less damaging to your fabrics.)

But then all the pieces were the right size, I cut out a new blue square for the center and everything went together beautifully. I like the soft look of the square and that the blue ears of the elephants match so well with the blue fabric in the center. (Did you notice what that fabric is? Little red riding hood. There are little wolves concealed in the print.)

And here is the mock (or virtual) layout with all the blocks so far:

_______________________________
Here is my sister Kim's block:
Aren't those pretty colors!?

Monday, February 8, 2016

Block 7: Feed and Seed Block

Ok, is that not the cutest bunny in the middle ever!!
And you can see my frolicking elephant "puppies".
I'm not sure how the block name relates to the design, but that's ok. This was an intricate piece of work.

I stitched it by hand again. I had to work around one spot where the designer had you stitch some pieces together and then cut it apart, but with a little finagling I got it done.

The block ended up "mostly" 6 inches. It is not really square and is a bit slanted. I'm thinking of ways to fix this with the sashing because I really don't think these blocks are going to just sew together nicely. Too much variance. But I have a plan cooking on the back burner.
I love that the pink and greens are the same value or tone and blend together a lot. And then the dark blue adds a little punch. I feel like the block would have been more cohesive if I used orange instead of pink because of the orange tone in the background, but I really didn't want it to be too matchy. So pink it was. (And I was dying to use some of that elephant fabric. Did I tell you I bought it in three colours?!)

Here is the mock layout with the additional block:


_________________________________
Here is Kim's block:
I think hers has a little more punch to it all around. Very dramatic.

Sunday, February 7, 2016

New Project

Pretty much the only thing I've been working on lately has been the Farm Girl Vintage quilt. (You may have noticed from my blog posts. :)

But today I opened up this rug hook kit that I purchased in Missouri, found the hook I had and got started.
It's not a lot done, but it's started. And sometimes that is the biggest hurdle.

And now I have a game to watch!

Tuesday, February 2, 2016

Block 6: Cool Threads

Looks like I did another pinwheel block, doesn't it? But no.
So the title of this post may make it sound like I made some new clothing (cool clothing, at that), but no. That is the title of this week's block--"Cool Threads Block." I would call it a spool block, but the designer has taken the liberty of renaming a few of the blocks.

This one is similar to last week's pinwheel in that it is made up of four identical block done in different colours.

Only after I put the two blocks side by side did I realize that I used the same dark blue and green and have put them opposite each other in both blocks.
I'm sure over the entire quilt, this will not be noticeable or distracting. I did like that I got to use my yellow "button and bows" fabric on this one since buttons, bows and thread go together like peanut butter, jelly and bread.

This is another one I hand stitched. I am surprised how much I am enjoying hand sewing the blocks. I think the most pleasurable part is that it becomes so portable and can be done on my lap while sitting on the couch. Right now I don't seem to be able to clear off even the smallest table space to work on.
You can see that I pressed some of the seams open instead of toward one side. The designer suggests doing that on all the seams in the small blocks. I haven't been doing it where the seams logically lock together, but in this case pressing to one side was no better than pressing it to the other (both sides had seams) and they were being sewn onto a piece with no seams. May as well spread out the bulk instead of clumping it up.

And here are the first six blocks in a mock layout:
___________________________
Here is Kim's block. Notice all the striped fabrics cleverly used for the "thread."

May I suggest?

I Say! or at least I did once...