The steps are basic, but the result is cute and useful.
Step 1. Cut fabric for outside and lining.
For a bag that's 10"(height)x13"(width), I cut the two pieces 10.5"x13.5" for the outside and two pieces 12.75"x13.5" for the lining.
If you have a large enough piece and your fabric doesn't have a directional print, you can use one piece for the outside 20.5"x13.5" and one piece for the lining 25"x13.5".
 |
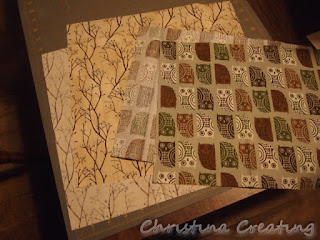
| The owls will be on the outside and the trees will be the lining. |
Put right sides of outside fabric pieces together and sew a 1/4" seam on both sides and along the bottom. Do the same with the lining pieces. (If you used one piece of fabric, you don't need to sew the bottom seam -- just fold the fabric in half and sew the side seams.)
3. Press seams open.
I find it easier to turn seams inside right when I iron the seam allowances open first.
4. Box corners.
On the two bottom corners of both the outside and lining, fold the side seam to lie on top of the bottom seam (or the bottom fold if you used one piece of fabric). Sew a line perpendicular to the seam from fold to fold.
To make it even, I line up a line on the ruler with the seam and make sure it is an even distance to each fold. In this case, the 2.5" line is on the seam and the 1" and 4" lines are at the fold. It is 1.5" from 2.5" to both 1" and 4", so it is even.
Draw a line along the edge of the ruler and sew.
If you want a bigger boxed bottom, you sew the seam further from the corner. For instance, you could line up the .5" and 4.5" lines with the folds.
5. Trim seam allowance.
Cut the seam allowance of the boxed corners to 1/4" and sew over the raw edges to keep them from raveling. Instead of a zig zag or a regular blanket stitch, I used a blanket stitch where the "arms" are made of multiple stitches. It doesn't pull in the edge as much as a simple blanket stitch.
6. Insert lining.
Insert the lining into the outside fabric, wrong sides together. Match side seams, bottom seam and the boxed corners. You can see the lining is taller than the outside fabric.
7. Finish edge of the lining.
Fold over the raw edge of the lining fabric evenly around. 1/4" - 3/8" is good.
8. Cut and cover tape measure.
Didn't see this one coming, did you!? For the top closure, I used pieces of an old metal measuring tape.
Cut two pieces at 13". (You can use regular scissors - just don't use your best pair! :) Round the corners and be careful, because they're sharp! Then cover the end with electrical or duct tape. This will help prevent the tape from wearing through the fabric.
Want to hear a funny? When I first went to cut the tape, I was wondering whether it would be easier to measure the length on the cutting mat or with a ruler. Duh! The measurements are printed right on the tape!
9. Insert snaps.
Fold the excess lining length over a piece of the measuring tape -- one on each side. Insert with the concave (inny) curve facing the inside of the bag. To make it easy, this is the side with the numbers printed on it.
10. Pin and sew.
Pin the lining to the outer fabric. To make sure it was even all the way around, I used my hem measure. You can also use a ruler or measuring tape, or just make a mark on a stiff piece of paper and use that.
Sew along the folded edge of the lining. This is obvious, but make sure not to sew on the measuring tape! I put the needle in the right position so the foot could ride further away from the measuring tape.
I also sewed along the top edge to finish it off. This isn't strictly necessary for the bag's function but I thought it would make a nicer casing for the measuring tapes.
11. Enjoy!
The top pops open and snaps shut. It's tight enough to hold things inside but you can pull the yarn through it as you're knitting.


No comments:
Post a Comment
Comments are moderated so you will not see yours post right away. Thank you for leaving a comment; I enjoy reading each one!