Showing posts with label quilt adoption. Show all posts

Tuesday, August 18, 2020

Scrappy Trip Around the World Begins

Remember the Quilty Adoption Event in April? I wrote about the first item I adopted -- a quilt top that I disassembled and sewed the blocks in a new layout -- and in that post, I mention a second item, but haven't written about it since.

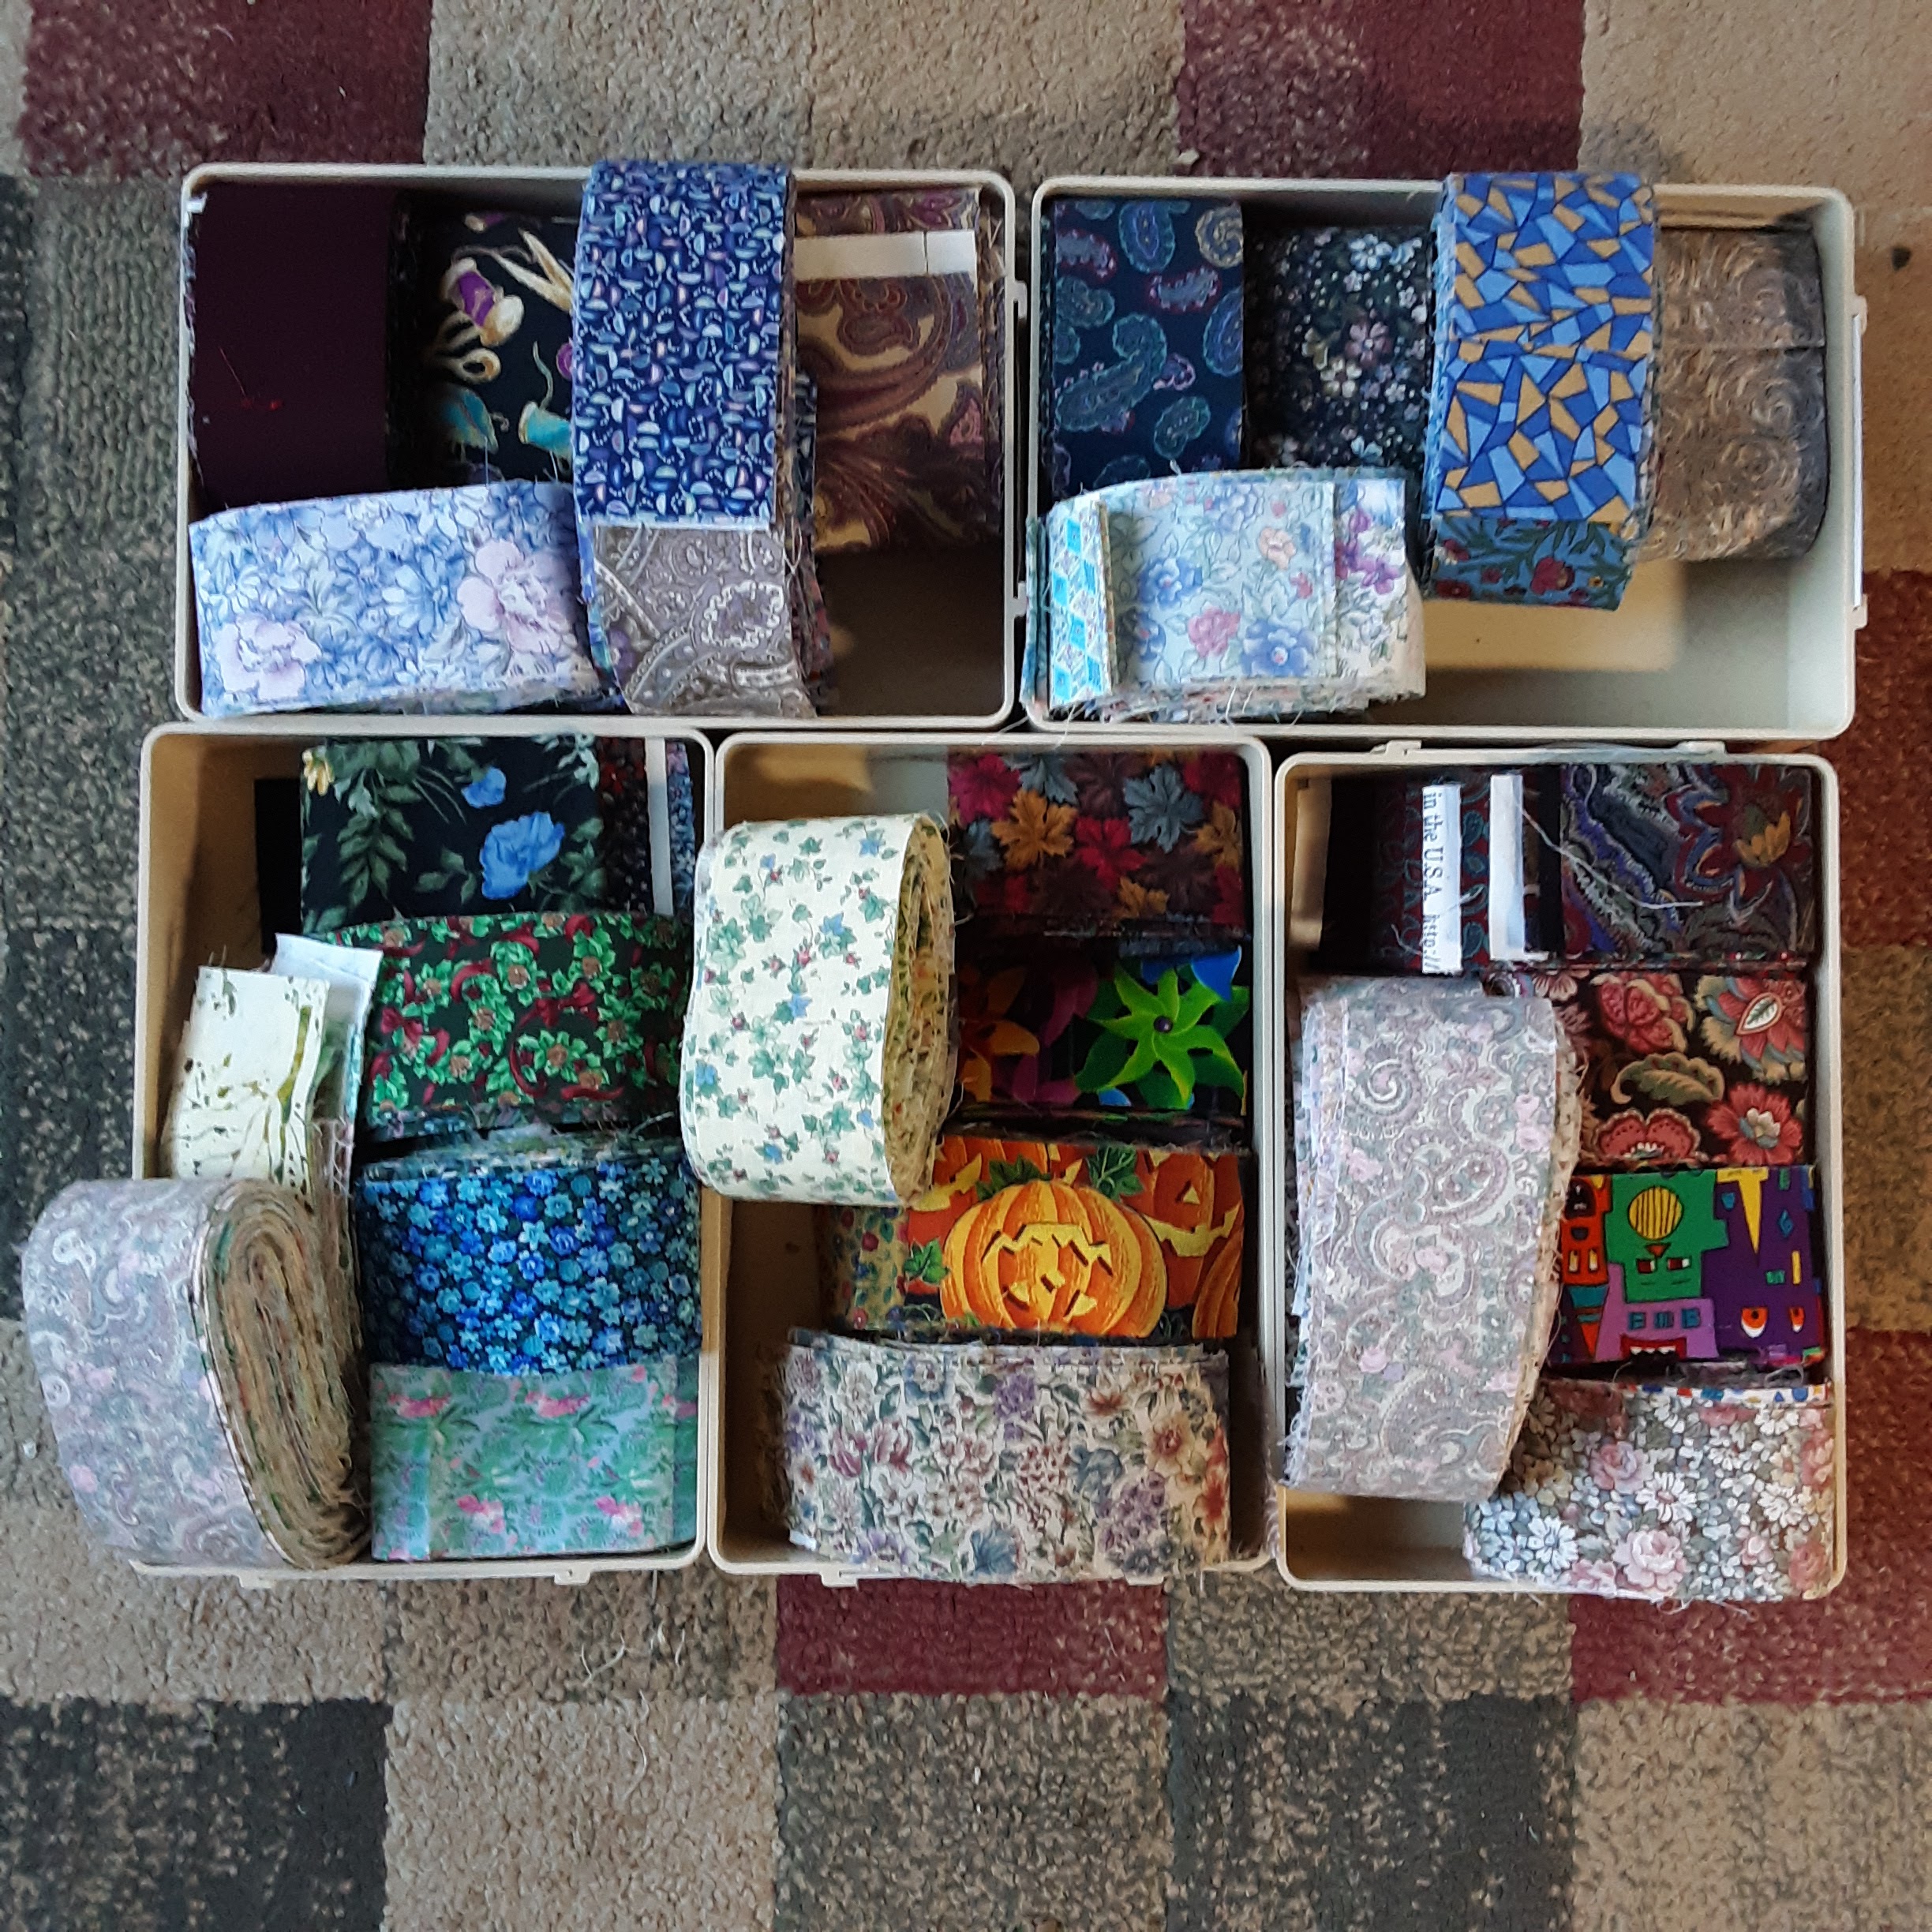
If you follow me on Ingstagram, you will recognize these strips that I adopted:
It was a big box of single 2" strips, loosely sorted from light to dark and a bunch of strip sets already sewn together. There's a project the sewn sets were intended for and I'm still deciding if I will go ahead and make it, or use these strips for something else.

Meanwhile, I took the single strips and sorted them in groups from light to dark.
I then sorted those groupings into five gradations I called light, light2, medium, medium2, and dark because I needed five different groups to make a trip-around-the-world (TATW) block.
I have become enamored with the scrappy TATW blocks popularized by Bonnie Hunter. (Link to her tutorial.) These blocks I'm making have a similar effect but with a little more order to them because of how the lights and darks are placed.

For the first set of blocks (above) I created sets by pulling similar colours from each of the five categories. That was enough to show me that I was going to have to do a little more pre-sorting if the sewing was going to be any fun.

So I took the five gradations, and sorted each one into different colour families.
Some of the strips are in more than one colour group, and sometimes it's a stretch when a fabric is multicoloured but I had to put it somewhere. Above, clockwise from top left, is, purple, blue, red, yellow, and green.

This was the first layout I tried on the design wall, just to have a proof of concept.
The project sat for a while then and while it was sitting, I thought I would try to make strip sets ahead of time so the sewing would be even easier. It was just too hard to see if the fabrics contrasted enough when I grabbed strips while I was sewing.

So, recently, I sat down and pulled out one colour group at a time and made some sets. For the first colour group, I did it just by eye, but then realized I should be putting my camera to use.

In this photo, the strips in colour are a bit of a jumbled mess, but when I convert them to black and white, I think the contrast is just what I need. (In this case, M-M2-D-M2-M, as in medium, medium2, dark, medium2, medium.)
In this next set, I think it looks good in colour, but the black and white shows that the first two fabrics are pretty close in value. (I think I used this set anyway because my choices are limited.) This strip set is L-L2-M-M2-D.
In the next photo, I'm going for another L-L2-M-M2-D, and I think the fourth fabric looks darker than the third in colour. But in black and white, I think they are too similar to use.
The next picture is an example of M2-D-M2-M-L.
In the fourth position, there are actually two fabrics (buttons and a floral). I was trying to see which was better. Even though I think they are the same value, I think I went with the buttons because there was a little better contrast. The floral seemed to mush in with the other florals. And I think it's clear that even though the two reds in the first and third position look different in colour, in black and white, they are the same value.

The fabric strips are all different lengths and it didn't take long to realize that I needed to pay attention to how many inches of each combination I was going to get. For each inch of one strip set, I needed 2 inches of the other two strip sets for each block. I didn't worry about getting it exact but I couldn't be way off either. I sorted a lot of fabric and ended up with sets ready to sew.
Another day I tackled sewing some of the strip sets (below). I had tried to match strips of similar length, and just cut them to match the shortest length for easy sewing.
Once they were sewn I figured out how to iron the seams the right way, and cut each set into 2" pieces.
I stacked up the pieces to make blocks (seen at the top of the picture above), and then sewed those strips together.

And here we have my first set of blocks sewn from this process:
I have since sewn sets from two other colour families, and here they are on the design wall:
I don't know if this will be the final layout, but it's a fun way to put them on the wall for now.

______________________
Linking up with Oh Scrap! hosted at Quilting is more fun than Housework.

Sunday, May 31, 2020

It Happened Again

You will remember that I recently rehabbed a vintage quilt by sewing the blocks into an entirely new setting. Well.

Not long after, I received a message on Ravelry from someone who happened to see my post (she was visiting the quilting group) and linked me to a post where someone was offering two old tops. Sure enough, someone was offering two tops that were found in an attic they were cleaning out. (First time in 85 years, apparently!) The first they thought was from the 30s and the second from the 70s.

We ended up connecting and he agreed to send me the tops. I had half a thought that I might get into trouble if old quilts keep finding me! (But I quickly quashed it.)

Then the owners wrote me and said that someone in the family wanted the checkerboard top for a baby quilt; he was very sorry. But I didn't mind because I was only taking the second one because I liked the first one! So, perfect all around.

A couple weeks after that, my package arrived!
What did I have?
Twenty-five blocks sewn in a 5x5 grid; 4 blocks sewn in a row; and 4 single blocks. I can't imagine what layout they were thinking of with that number of blocks, or maybe they were planning to make a few more.

Some of the blue pieces have evidence of stitching and I'm wondering if it's from the same reinforcing stitching that I saw in the last set of blocks. But in this case, they took the time to remove the reinforcing strip. The blocks looked to be in good shape. It was all hand sewn.

First order of business was to separate the blocks. I knew I couldn't use them in the existing arrangement.
And here they are!
I gave them a good soak and light swishing and then an extra long soak because I forgot about them overnight. A quick spin in the washer and they were ready to hang to dry.
The water came out very brown which was icky. But I wonder if it was some of the brown dye bleeding. A few of the blue stars have brown spots and I don't know if they were already there or if it was transfer from the dye.

Once washed, they all needed a good pressing. Each block went from this:
to this:
Back
Front
So satisfying!!

Although the blocks are not a uniform size and some of the seam allowances are a lot smaller than a 1/4 inch, the only one that could pose a big problem is this one:
Can you see how "not flat" that is?!! I don't think I'm going to re-sew it. I can just push it down and flatten it which makes the blue fabric pleat over itself but doesn't affect the outside shape. Or I can choose a layout that doesn't need that block.

This morning I laid out the blocks for the first time. I'm thinking of setting them on-point with alternating blocks.
There are a lot of ways you can fill in the blank squares. Solid fabric squares is one option, or quarter square triangles (hour glass blocks) can be a striking arrangement too.

I trimmed the last set of blocks so that they were all the same size. I think I may add sashing to these blocks so I can cut them the same size without cutting off parts of the stars.
I was thinking these small blocks (only about 7") wouldn't be enough for a big quilt, but setting on point and alternating with other blocks makes them almost fill this double bed. Add a few borders that hang over the side and I'd have a bed quilt!

That would also mean making a couple more blocks because there aren't quite enough for this 5x7 arrangement. I used to have a blue that I think would have match pretty well, but I'm not sure I have it any more. Matching the brown would be a lot harder.

But on the other hand, they don't have to blend in completely. Having different blocks would just highlight the fact that this is a "mother/daughter" quilt--that's what they call it when one person makes the blocks or starts a quilt and another (from a younger generation) finishes it. An endearing name, isn't it?

Linking up with Quilting Patchwork and Applique

Sunday, April 5, 2020

Vintage Quilt Remake

Quilting is more fun than Housework
Once or twice a year, Cynthia at Quilting is More Fun than Housework hosts a quilt adoption event. Click here if you would like to read more details about this spring's event and you can see all of the adoptions that were linked. The basic idea is that you can offer any unfinished project, set of supplies, or anything quilting related to any takers for free. You can decide if it goes to the first taker or if you'll have a random draw or if you'll make a decision based on some other criteria.

I love looking through all of these items and unfinished projects each time. I mean, it's basically second hand shopping for quilters! I work to be very cautious about how much I ask for. One of the main points of this event is to get these project finished/items used--it's not just to have these items sitting on someone else's shelf!

Having more time these days and experiencing a resurgence in my sew-jo led to me asking/offering on two items. The first was an old quilt top:
You can read the original offering and story here at Life's Little Adventures (item #4). I can't say exactly what drew me to it, but I liked the blocks, the basic colour scheme, and of course that it was old. My original thought was to "rescue" the blocks from that "horrible" fabric that was sewn between them.

When I got the quilt top, I realized the strips between the blocks were not a big collection of random ugly fabrics but was mostly just two ugly fabrics:
and the more I saw them, the more I liked them!!

I was still resolved to disassemble the quilt. The blocks themselves were sewn by hand:
with skillful stitches, at least by my estimation. They did not handle the seam intersections in the best manner so I wonder if they were a garment sewer by training and new to quilting. Or maybe she just didn't worry about which way to sew down seam allowances.

The blocks were sewn together and the strips sewn on by machine. By my limited knowledge, the fabrics in the strips were much newer (a decade or two?). Those two things make me think that it was a later sewer who did this part--the block maker's daughter or granddaughter perhaps. I also don't think they were as experienced as sewers.

For one thing, the machine stitches were far too small. My guess is someone didn't know what a conventional stitch length was so they went for what they thought was as strong as possible.
In fact, the close tiny stitches actually put the fabric more at risk as the many needle punches can weaken the fabric, and also put it at risk of tearing since the seam is stronger than the fabric.

Or maybe they just had no idea you could even change that setting and used the machine with whatever settings the machine was already set to.

Also, uneven seam allowances
show a sewer who didn't know how to control the fabric as they sewed or that it would affect how flat and straight the final product would turn out.

I proceeded with trying to take out all of those tight tiny impossible stitches. The first go was with a regular seam ripper, which worked but was pretty tedious. Someone on Instagram suggested a tool that was basically small electric hair clippers. The method was to pull apart the two fabric pieces and snip the thread with the clippers. The tension on the fabric would then pull out the next few stitches, you'd snip again and just zip your way up the seam.

So I tried it with our hair clippers with mediocre success. Our clippers were not quite as sharp perhaps. (Although don't say that to my husband who takes great pride in keeping everything very sharp around here!) But the main issue was that the stitches were so small, there was no "pulling out the next few stitches" with the tension on the fabric because the stitches were too close together.

Then I switched to using a razor blade instead. I'd put tension on the fabric, pulling the two pieces apart, press the blade against the stitches to cut them, and go down the seam that way. It was quicker than the seam ripper, although at higher risk of cutting the fabric instead of the stitches.

I only had one damaged part:
although I can't remember if that was done with the clipper or the blade. Probably the clippers.

But finally I had all of the blocks separated from the strips of fabric and from each other.

I have never worked with fabric this old. I was mystified by the strips of twill tape that were sewn into the fabric in random places, completely unnecessary to the piecing of the blocks:
Google searching has failed me. I came to the conclusion that this was reinforcement sewn in from when these were used as seed, sugar, or flour sacks. I think some of the fabrics go back to 1930s or 1940s sackcloth. Some of them are a very odd texture, like they've been coated. I assume this was to treat the fabric so it would not allow flour or sugar to leak through.

The other interesting thing was how precious this fabric was (fabric in general, I'm sure). If the piece was a tiny bit small, they would sew a piece on, no matter how close to the seam. Check out this small square:
 Can you see all the seams?
Holy cow!! Just to get a little 3" square--a piece many quilters now would consider waste. (Of course, not if it's the last little bit of a fabric you need to complete a pattern!)

Sometimes they matched the pattern
 other times they didn't bother:
Or more likely not that they didn't bother, but because it wasn't possible with the fabric they had available.

A lot of the blocks are dirty and faded:
but what can you expect? Some of them may be nearing 100 years old! (I can't decide if this fabric was originally blue or red. Or maybe they really did throw in one random purple block.)

I did wash the fabric and blocks once it was disassembled. The water came out pretty grungy so that certainly affirmed the decision. No damage was done as far as I could tell, so I was grateful for that.

Once I had the blocks apart, what now?

I tried a layout of just the blocks:
But I didn't like that. Too cluttered. But it did help determine where I wanted the blocks and demonstrated that I could use all 25 blocks in an "on point" setting. If I added some sashing between the blocks I thought I could have something!

But before I could do any sewing, I had to get the blocks to the same size. I measured each one and got measurements from 10.5" to 11.5"...that's a big range!

Not much choice but to cut them all down to 10.5". The blocks were uneven and did not lay flat. I tried to centre the centre square as best I could and just laid the square ruler on top to make it as flat as possible while I cut.

You might be asking how I could just cut the edges of the blocks off since they were hand sewn. Wouldn't the stitching come out? I asked myself the same thing. At first I thought I would just mark the new boundary of the block and try to match it with the sashing.

But then I thought I could cut the edge everywhere but the seam, like this:
So I have the edge I can match to the sashing, but haven't cut through the seams. Pretty clever, right? They remind me of the little notches that you leave when you're cutting out fabric for sewing patterns.

With that done and some careful sewing*, I got the sashing onto two sides of each block.

(*Remember that when you have to sew two pieces together that aren't quite the same length, always sew with a "baggy bottom". I.e. put the longer piece on the bottom where the feed dogs will ease it into the seam.)

And here is the top with the edge triangles and the rest of the sashing:
I really had to get creative to cut all the edge triangles from the fabric that was originally sewn between the blocks.

Then I realized that I read the chart I was using incorrectly and the corner triangles are too small. That elicited a big sigh from me, I can tell you. But since I first realized, I've been mulling it around and I think I have a solution I like.

In one place I saw this block called Puss in the Corner, but since then I haven't been able to confirm it. When I search for Puss in the Corner blocks, they are shown with half-square triangle pieces. If you have a name you use for this block, please leave it in the comments below. I'd like to know how to refer to it. Thanks!

May I suggest?

I Say! or at least I did once...