Saturday, September 24, 2011

Current Projects

With my current lack of large chunks of time for knitting and even smaller chunks of time that my brain can focus (seriously, I come home from work and just stare into space occasionally thinking "I should knit" but not able to pick up the needles and do it), I have been working on small projects.

A few weeks ago I was finishing a number of projects (the red stole, Green Leaf beret and Mini Mochi Circle Socks) and debating what to do next. It occurred to me that I could make the decision easier by just working on some gifts for Christmas this year. I had a couple ideas already so it was a matter of casting on and getting going.

First was a "spooky" hat for my boss at the haunted house. (Yes, I work for a haunted house--specifically, the Niles Haunted House Scream Park. I went there last night, incidentally, and had a great time with the rest of the office staff! Oh, alright, while I'm on the subject I may as well show you the pic we got at the photo op:
The one on the torture table is my boss in case that's not obvious. I'm the one tightening the chains.)

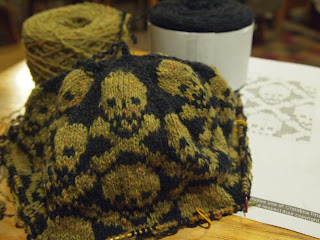
Anyway, back to the knitting. I had seen several skeleton or skull design hats and thought I would make him one. I settled on the Skully pattern from Knitpicks and cast on with some raveled wool I had. Green from an American Eagle vest and more of the black I just used on the Circle socks.

The first attempt I did with the yarn doubled and it wasn't right at all. When I finally accepted that, I ripped it out and restarted with a single strand of each. That was much better and I've been making pretty steady progress. I thing I'm about half way down the length:

One thing that is slowing it down is that my needles are just a little too short.
This makes it a pain to work because I'm always having to watch the stitches to make sure they don't fall off the end or picking them up when they do. I don't have a circular needle in this small a size or I would have switched over already.

It should get a little better when I do the ribbing. And even if it doesn't, I'll get through it.

The second project is the gloves I mentioned in a recent post. They are just a simple stockingnette stitch and haven't given me any trouble at all.

I have not let myself work on them at home because I knew they would get done too quickly and leave me with no "travel" knitting. So it's been my Skully hat at home and these gloves in the few minutes I find to knit when out of the house.

I did get in a couple hours of knitting on them during small group on Monday so that helped a lot.

This week I finished the second glove and turned my attention to the cuff. I decided there wasn't enough wool left to do the cuffs. So I enacted my Plan B and added a second colour.

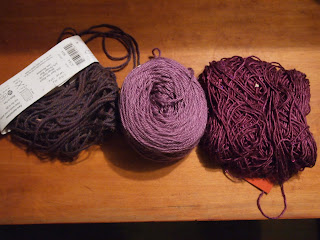
I had a couple choices on hand:
I debated between the light purple alpaca/silk in the middle and the darker sequined silk on the right. (The main colour is on the left.) I ended up going with the sequined silk even though sequins aren't really the style of the recipient. I thought I could get away with it because it's going to be very subtle once it's mixed with the main colour.

I picked up the stitches from the provisional cast on and started knitting in the other direction. I used the stitch pattern from the Honey Cowl I made last year and it worked out very nicely! I tried the contrast colour on the slip stitch rows first but it looked much better with the slip stitches done in the main colour and the contrast on the plain rows.

Once I had that figured out, I motored on the first cuff. I made it fairly narrow and was done in no time. The second cuff is about half done now too. No pictures? Nope. At this point you'll just have to wait until I'm done. But trust me, they're looking good!

Tuesday, September 20, 2011

Walking on Sunshine

My "Mini Mochi Circle" socks are finished. They feel fabulous and were a lot of fun to knit.

I got a little carried away with the length. I just kept knitting and knitting on them as they were a great "take along" project and I guess I was going places. I was also thinking that I was going to knit til I ran out of yarn. After all, that's part of why I knit from the toe up so that I can use up all the yarn.

But at some point I realized that just because I could doesn't mean I had to and that knitting toe up can also just prevent you from running out of yarn before you're finished. You don't have to use up all the yarn. So I tried the sock on one more time and then finished it off. (And then finished the second one to match.)

I used a folded over hem to finish. The "fold line" was made with a row of yarn overs which gives a nice picot edge. I took the time to Kitchener the live stitches to the purl bumps on the back. It turned out fantastic. Sturdy, stretchy and comfortable.

At its most basic level, the pattern on the leg of the sock is alternating knit and purl rows. This makes it want to stack up on itself (picture the slouch socks from the 80s). I hope it won't be too bad when I'm wearing them. The good thing, I made the socks long enough that even if they do sag and slouch, I think they'll still protect enough of my leg from cold drafts.

The raveled black wool worked out perfectly for this project. It sets a nice backdrop for the colourful circles. I think they look like stain glass windows.

For those of you who like the details, I used my current favourite short row toe and heel for the socks, disregarding whatever the pattern told me to do. (I didn't even read it, so I don't even know what I was "supposed" to do.)

I thought the short row heel was especially called for to keep the colour changes as continuous as possible.

I think that's all I've got to say. The weather's gotten quite a bit cooler the last week, but not quite cool enough to wear these yet. Can't wait!

Project Stats
Started
: 27 Jul '11
Finished: 01 Sep '11
Pattern: Circle Socks by Anne Campbell (free)
Materials: Mini Mochi, 2 skeins in 108 Neptune's Rainbow ($18.40) and 21 g of lambs wool raveled from a sweater

Saturday, September 17, 2011

Assemble-a-Light

Walking through DIY stores is dangerous. I see lots of things I think I can use to make stuff. (Yes, I know that's the point, really.) I should add that I'm a sucker for a mix and match kit type product. All this is to say that I've walked through Lowe's several times and seen how cheap their pendant lights shades are. Less than $20. And how nice the styles are.

The light shades are for some "pick your own parts" kits. These kits, however, were for wired lights and I don't have quite that much ambition. But I have seen light shades converted to nice hanging lamps by what is essentially a bulb at the end of an extension cord.

So I started gathering parts in my cart:

1. An extension cord:

I chose black because the red, yellow and blue options looked a little too "neon bright construction" to me. You may pick what you like.

15 feet was as long as they had in their selection. It's barely enough so definitely don't go shorter.

Also, it has to be one of the cords with a single outlet at the terminus. It can't have three outlets with one on one side and two on the other.

2. A socket adapter:

You plug this into the end of your extension cord and suddenly you can screw in a lightbulb. Isn't that crazy convenient?!

3. Shade of your choice:

Although the lovely red shades were enticing, I liked this neutrally coloured but detailed pattern.

You want to make sure that it's long enough to hide a bulb and the adapter and the end of the extension cord. Unless you like bulbs hanging out the bottom...

This set up will definitely seat the bulb lower than what the shades are designed for so you won't be able to use some of the shorter styles.

4. Lightbulb

Around here nothing but flourescents will do. I made sure to get a bulb that was shorter than most to make sure it fit in the shade.

I tried the 60-watt equivalent first but it was way too bright. The 40 is much better.

I'll also add that the Sylvania's I first bought gave me some trouble. The first one shattered with the first bump and the second one burned out after less than 30 minutes. I took them back and bought an off-brand. It's worked great.

Ok, so I'm sure you can guess how to assemble most of these parts. The only thing that will give you trouble is getting the cord through the hole in the top of the shade. It's too big to fit. I had suspected that would be the case but held onto a hope until I tried it.

Resigning myself to the inevitable, I cut the cord a few inches above where it plugs in and started separating and stripping the three wires inside. Just as I was about to make a "cheater" connection--after threading one end of the cord through the shade--Troy came home and insisted I do it right.

He generously offered to solder two of the wires but only on the condition that I solder the third. I had done soldering when I had my optical training so it's not like I hadn't done it before, but it's still not a task I am very comfortable with. But to have a more elegant join and take advantage of the help he was offering, I did it. (Perfect "action" shot for my knitting blog, but I forgot to take any pictures. Sorry, you will have to to imagine.) We got the join done and taped and it blends in well (and works!).

The only thing I didn't consider and should have was an inline power switch. As it is, I have to lean over the back of the couch to plug it in and unplug it. Not so bad, but not so convenient either.

I got it put together and hung from a hook over one end of the couch. I love it and can't sit there without having it on.

At some point I expect to do this with a knitted shade--some heavily starched sphere or semi-sphere. It's still percolating...

Sunday, September 11, 2011

New Splice Method for a New Project

I have a beautiful yarn. It's half alpaca, half wool. It feels lovely. Not buttery soft, but sturdy and soft with a nice bounce to the spin.

It's also a beautiful "prune" colour with heathery flecks of every other colour. Subtle but delightful.

I used it for a cowl described here, but I still had some left over, so I thought I would make something else. It had to be small because I don't have a lot left and because I don't currently have the wherewithal to handle something big.

Oh, I should mention the one thing that's wrong with the yarn that I have left is that moths or some other bug got at it. The balls used for the cowl were ok, but this one has quite a number of breaks in it. Or sometimes it is not a complete break, but you have to treat it as one.

Like this spot:
Can you see that the middle section has only one of the three plies left? Not so good. What is good is that I recently read a post in Ravlery that described another way of splicing yarn that doesn't leave a bulky section or ends to work in later. It works best on wool or wool blends that will felt.

First I cut the yarn at the weak spot and raveled the plies back about 1.5 inches.
I raveled the top piece into its three parts and the bottom piece into two parts (one ply/two plies).

Then I cut one of the plies off the top one and cut the single ply off the bottom one:
You now have three pieces that you can braid.

Pin the top to anchor it:
and then start to braid.

I ended up doing almost two inches, but I think one inch would probably do.
Once it's braided, cut off the ends close to the top/bottom of the braided section. Then wet your fingers and rub the cut ends in--you just need to twirl the strand between your wet fingertips and the ends will felt down.

Can you see the braided section in the middle?

Here it is from a little further away:
and you can barely tell. The join is very strong and keeps the strand consistent. Even though it's actually four plies instead of three, the braid is tighter than the spin and it evens out.

The only bad part of this join? It takes quite a bit more time. I'll be saving it for when I really care!

And what am I making?
I started a pair of gloves. They fit...well, like a glove, and I just love the way they feel. (In case you're worried about the part at the wrist, I started with a provisional cast on so I will pick up those stitches later and knit the cuff down from the glove. Once again, I am worried about having enough yarn. Story of my life, but I have a plan B so I'm not concerned.)

All for now...go forth and splice!

Friday, September 9, 2011

Love it or Leaf it

A finished project...and pictures to boot!

Pulling myself together is a little tough these days, but it should get easier now that I have a matching set to wear. Ok, I do have to wait for some cooler weather, but I am ready!

With all the knitting I got done at the game last week, the hat was ready to be Kitchenered together. I sat down to do that on Monday and then got the hat blocking on a large dinner plate.
It struck me that it sat a little looser than I imagined it would on the plate. Although I measured (roughly) and thought I was (pretty) close to what the pattern called for, I think my hat came out a little long. Not so long that I'm going to undo it though!

I think the "cap" that I knit top down came out nicely:
As I said, I like a little Icord tab on a beret/tam. (Btw, you can still have an Icord if you're knitting up from the brim but I just think they're such an elegant way to start--perfect for knitting top down.)

I've experimented in front of a mirror with several ways of wearing such a slouchy hat--to the side, to the back, pulled down low--and I'm not sure it's the best suited hat for me, but I'm not worried about it.
I still like it and I really like that it makes a set with my gloves.

One more detail...I started the brim with a tubular (or Turkish) cast on around a scrap piece of yarn. When I was ready to pull it out, I tied a stretchy cord that I have for beading to the end and pulled it though. As the scrap yarn came out, the elastic cord was pulled through.
If you look closely, you can see the "clear" stretchy band showing.

Project Stats
Started
: 25 Aug '11
Finished: 5 Sep '11
Pattern: (Love It,) Leaf It Beret by Melissa LaBarre ($2.99)
Materials: James C Brett Pure Merino in PM16 Green, 1.5 skeins (gift)
When the hat was finished and I had a good sense of the size it needed to be, I tied the two ends together and now have a nice firm but stretchy edge to my ribbing. The tubular cast on makes the perfect casing. The elastic really makes a difference with how well the hat stays on.

Love it or leaf it? I'll take both, please.
And that's the end of a very long saga. I started a hat to match these gloves last January, got stuck when I ran out of yarn, considered redoing the pattern until I saw this new one. Had another adventure with this pattern as I ended up ripping out the first go and casting on 20 fewer stitches. But then smooth sailing. Phew! Let's hope for a "happily ever after ending" now.

Sunday, September 4, 2011

It's Best to be Prepared

Well, thank goodness I got that hat all set to go, sorted out and up to a point where it was straight stocking stitch. I took it to the ND game yesterday. (I didn't think I'd be knitting during the game, but I thought maybe at half time or who knows.) "Who knows?" indeed. Half time turned out to be a 2 hour weather delay. They evacuated everyone out of their seats and we spent most of the time sitting on the floor on one of the ramps.

That's ok--I had my knitting to keep me occupied. I got so much done, I am working on the Kitchener this afternoon and hope to be finished soon. wOOt wOOt!

Saturday, September 3, 2011

Leaf Beret: Plan B

Remember the green leaf beret I talked about here? I was heavily modifying a pattern to make a beret to match my Green Thumb gloves.
I ran out of yarn and wanted to rework the pattern. I ended the post with "until I have the energy for that, the hat can stay on the plate."

Well, it stayed on the plate for a while. Then it was stored with my wool stash for a while. I wanted to work on it for Project Spectrum's green month in June but that didn't happen either.

Then I got a notice from Vogue Knitting that they were having a pattern sale and one of the ones that was shown was this hat:
I immediately recognized the true match to my Green Thumb gloves. This was it! So I checked that the pattern would work with the yarn I was using, both for weight of yarn and how much I had left and decided it should work. By the next day, the pattern was purchased, downloaded, and the old hat was frogged away. (I put the end on my yarn winder and it was gone like buttah.)

The hat itself got off to a bit of a rough start. I cast on the 120 stitches the pattern recommended--and did a very fine looking Turkish cast on, I might add--but it was way too big. I know it's supposed to be a bit of a slouchy hat, but it has to actually stay on my head. So I ripped it out again and restarted with 100 stitches. That is feeling much better.

Once I had the ribbing and chart done,
I started to get a little worried about having enough yarn. (The pattern called for two skeins; I had 1.75. Plus when you're substituting yarn, you just never know.) I did not want to work on this and then run out with a few rows to go on the decreases. When you're working bottom up, it's not like you can decide to make it a little shorter and just leave a hole at the top of the hat!

So I took the other end of the yarn and a set of dpns in the same size as the circs and started the hat again from the top. I did all the increases until the number of stitches matched the number on the main body of the hat. Now I know I will not run out before my hat has a top to it. In fact, here it is,
ready and waiting. It doesn't hurt that I also like the look of a top down hat better. I find the Icord tab is an elegant way to start.

I also was pleased with the amount of yarn I have still to work with. I should be able to make the hat good and slouchy (one of my original goals). The pattern says I have two more inches to go on the body. I think I'll get it in, but if not I can just work until I have only enough yarn to Kitchener the two parts together.
I know, that's a lot of Kitchener. But I don't mind.

May I suggest?

I Say! or at least I did once...