
And that is what I did. Apparently I used too much heat when I applied to first side, however, and the muslin didn't stick very well anyway!! Oh well, I left it there just in case. What didn't stick down was caught in the seam so I think that is taken care of.
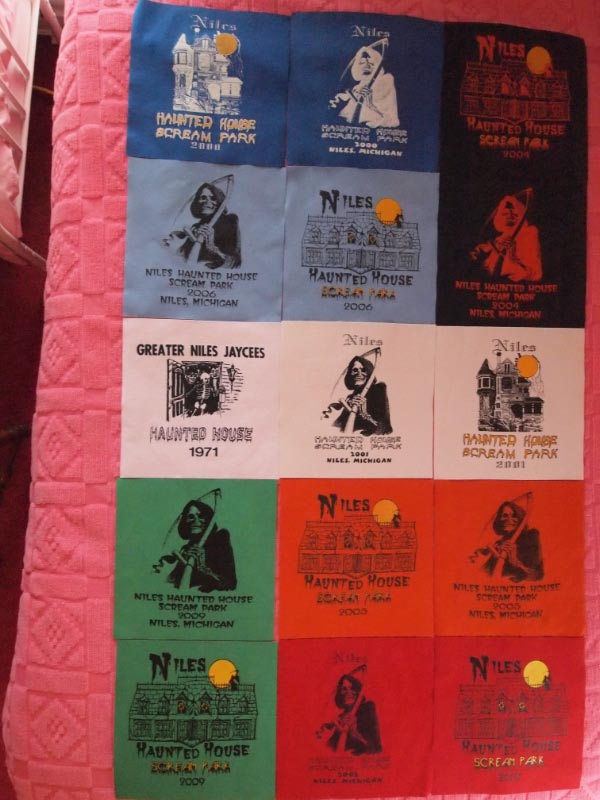
Once the pieces were prepared, I could piece them together. That didn't take too long since the squares are so large and there were only three columns by five rows to do. The only snag I ran into was that I had to move the quilt from one spare room to the other and got some of the squares mixed up. See if you can tell in the final pictures. I decided it wasn't worth picking out and it only bothers me a little. :)
Once the top was sewn, I layered it with the flannel "batting" and then the flannel backing. I went with flannel on the inside for two reasons: with the large squares and not wanting to sew in the middle of them, it was too large an area not to tack down a batting; and I didn't want a super warm blanket.
I decided to tie the quilt instead of sew it, again for two reasons: sewing knit fabrics down can be tricky to do right, yielding bad results; and I thought ties suited the character of the top better.
I went with a pinkish yarn to match the back:
 It's leftovers from a pair of socks I made for my sister.
Then I marked the seam of every side of each square so that I would tack it down three times, plus each corner. I marked and sewed from the front, but you can see on the back that I didn't cut between each stitch, but ran the yarn from one spot to the next:
 Here's a close up:
 This was a tip I read once but had not had a chance to try. It did go faster as you didn't have to cut the yarn between each spot and it made it easier to start each stitch. (You didn't have to fuss with not pulling the yarn all the way through.) And it also saved on the amount of yarn you used because there was not a lot of extra between each stitch.
Here's a view of the front:
Once they were sewn, I could cut the yarn between:
 And then knot. I had read that a good way to keep the knots from loosening was to double wrap the first step of a square knot. I tried this and the knots were coming out before I moved to the next row! Very maddening. It's a good thing my sister (another one) was visiting because she said you had to double wrap the second step for it to hold. She was right. I ended up double wrapping both steps, but the knots stayed in much better at least.
I also think that using a (non-superwash) wool will help because as the blanket is washed the strands will felt on themselves and it will soon be impossible to untie them. And hopefully, being sock yarn, the wool will stand up to the use.
Once that was done, it was time for a binding.
 I used commercial binding because I wasn't quite up to making my own. It works great but feels awful (to me) because of the high polyester content. It was a nice nondescript edging, in any case, and that is what I wanted.
Then I was done!
Oh no, then there was the label. I think labels are important on quilts. Especially gift quilts as you can mark an occasion on the label and give wash instructions, but I really hate to make them. It's like thinking your home after a long bike ride and then realizing you have one more big hill to climb. Ugh.
But I did it. I took a piece of the white tshirt fabric and laid it out on the table. (I taped the edges to keep it taught, but this is a knit fabric with no stabilizer--it didn't help.) I wrote out what I wanted to say line by line on a piece of paper with the pen I was going to use. Then I slipped the paper under the fabric so I could use it as a guide as I wrote on the fabric.
 As I finish each line, I can move the paper to center properly the next line, and then trace again.
 It works pretty well.
(But recently I was told an even better trick for labels. Someone who shares my aversion to making labels says if there's not too much information, she has her sewing machine "type" it onto the binding before she sews it on. Then she puts the binding on the quilt so the letters are on the back. My machine will sew letters too, so I think I'll be trying that on the next one!)
Then I was done.
 And I gave it to my (former) coworker at her graduation party, not wanting to wait for her "retirement" lunch.
 She really likes it.
(My boss was at the party and was more than a little jealous of the quilt. The next Monday at work, he said I ruined it for him because he had wanted to give her the best present. Knowing what he gave her was a framed picture of the two of them (a picture I had ordered and another coworker had framed), I grinned and said, "If you want to play with the big boys, you'd better learn to keep up.")
And then a week later I asked for the quilt back so I could show it at the fair. Yes, fair preparations have begun again...
I decided to tie the quilt instead of sew it, again for two reasons: sewing knit fabrics down can be tricky to do right, yielding bad results; and I thought ties suited the character of the top better.
I went with a pinkish yarn to match the back:

Then I marked the seam of every side of each square so that I would tack it down three times, plus each corner. I marked and sewed from the front, but you can see on the back that I didn't cut between each stitch, but ran the yarn from one spot to the next:


Here's a view of the front:
 |
| I put Xs at the corners, and two side-by-side straight stitches on the sides. |

I also think that using a (non-superwash) wool will help because as the blanket is washed the strands will felt on themselves and it will soon be impossible to untie them. And hopefully, being sock yarn, the wool will stand up to the use.
Once that was done, it was time for a binding.

Then I was done!
Oh no, then there was the label. I think labels are important on quilts. Especially gift quilts as you can mark an occasion on the label and give wash instructions, but I really hate to make them. It's like thinking your home after a long bike ride and then realizing you have one more big hill to climb. Ugh.
But I did it. I took a piece of the white tshirt fabric and laid it out on the table. (I taped the edges to keep it taught, but this is a knit fabric with no stabilizer--it didn't help.) I wrote out what I wanted to say line by line on a piece of paper with the pen I was going to use. Then I slipped the paper under the fabric so I could use it as a guide as I wrote on the fabric.


(But recently I was told an even better trick for labels. Someone who shares my aversion to making labels says if there's not too much information, she has her sewing machine "type" it onto the binding before she sews it on. Then she puts the binding on the quilt so the letters are on the back. My machine will sew letters too, so I think I'll be trying that on the next one!)
Then I was done.


(My boss was at the party and was more than a little jealous of the quilt. The next Monday at work, he said I ruined it for him because he had wanted to give her the best present. Knowing what he gave her was a framed picture of the two of them (a picture I had ordered and another coworker had framed), I grinned and said, "If you want to play with the big boys, you'd better learn to keep up.")
And then a week later I asked for the quilt back so I could show it at the fair. Yes, fair preparations have begun again...


