Showing posts with label batik. Show all posts

Tuesday, March 2, 2021

Art from Photographs

I noticed a theme recently of art created from photographs so I thought I'd share some of it.

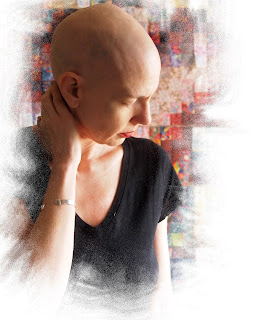
I took some self-portraits while I was bald; this being one of them:
I found a YouTube channel, davrodigital, of tutorials about photo effects made in Photoshop Elements. I've tried to follow a few of them, with mixed results. Here's a framing effect:
I like this frame a little more:
The picture wasn't perfectly suited to frames because there wasn't enough margin at the top (above my head).

Then I tried a "sketch" effect:
Even following each step, it doesn't come out with the same results as the tutorial, so I'm guessing what kind of photograph you start with makes a big difference. (Like does it have a lot of contrast, or a lot of lines, or whatever.) Or maybe he's not sharing all the secrets to finding the right settings.

Here's a picture I took when I was in Toronto.
Not that great at all.

But it worked pretty well for the "tiny planet" effect:
Fun, right?

This was another portrait I took in the same session:
And look what my friend drew and gave to me to celebrate being done with treatments:
Isn't it fantastic?
I was really touched by the gift.

Finally, my sister commissioned our cousin, artist Karen Rhebregen, to make a portrait of our grandparents in batik.
She created the composition from a couple pictures my sister sent her.
It's wonderful! It was a gift for my mother and proudly hangs in her home.

Sunday, June 24, 2018

Star Light, Diamond Bright Quilt

Last time you saw this quilt (here on this blog) was in January when I finished the top.
I had been following a longarm quilter on Instagram and was impressed with his work. (You can check him out at @quiltingbydavid.) He lives and works in St. Joseph, Missouri, and it turns out we were going to Missouri in February.

It was about a two-hour detour, but I thought it was worth it to drop off my quilt instead of mailing it. We got to meet David and take a tour of his workspace at his home. He had just gotten a second longarm machine in November and was able to keep both of them busy.

I had already picked a pattern from his website (quiltingbydavid.com) and before the day was done, he had texted that it was done and asking if he should wait to mail it so that it wouldn't get to our house before we did! And his prices can't be beat either. :)

It was really fun to see my quilt come up in his IG feed.

The only mishap was that I didn't realize he would trim the quilt. He did and that meant I couldn't do the extra wide binding that I was planning to do. He didn't do anything wrong and I'm sure most people are thrilled to have it done for them, but it was a lesson for me to explicitly mention it next time I have plans for any special handling of the edge.

I chose an all-over interlocking diamond pattern. David did a great job of lining up the stitched diamonds with the diamond pattern of the fabric. They're not the same angle, but he lined them up along the whole length and width of the quilt. I had noticed in his IG feed that there were never issues of patterns wandering off on a funny angle or not being lined up with the quilt pieces, and that's why I trusted him to do this quilt for me.
I let him choose the thread colour because I couldn't decide on one and thought, given all of his experience, he would know what would work (and what he had in stock). I did know I wanted a solid and not a variegated. He went with a nice lilac which I think worked great.

This was the first time I "quilted by check" (as opposed to "by hand" or "by machine") and I would definitely send more quilts to David if I want an all-over design.

When I found this purple batik with orange circles, I thought it would be perfect for this quilt. The plan was to make it quite a bit wider so that it wouldn't get so lost in the busy-ness of the quilt and could actually frame the diamonds. But it looks fine and certainly is perfectly functional.

For the back, I pieced together some fabric I had on hand. The larger pieces were used for diamonds on the front. And then I added a vertical strip of diamonds that were leftover from the front.
I added a new blue batik fabric on the sides to fill in around the diamond points.

Here is the finished quilt:
The final size is about 62" x 84", a good sized single (twin) with a little extra length.

The final step was to make a label. I ironed some freezer paper to the back of a white cotton and wrote on it with fabric markers. (The freezer paper stabilizes the fabric so you can write on it. You peel it off once it's done.)
Of course I did it in the shape of a diamond and bordered it like the rest of the blocks.

I was able to deliver the quilt in May when I was home for a wedding. It didn't work out to give the quilt directly to the recipient though, so I left it with her parents. Long story short, they had to wait a couple days to give it to her, but finally her mother couldn't wait any longer. (They guessed what was in the box, but hadn't seen it yet.)

So even though she came home from school tired out from field day and looking for a shower, her mother said she had to do it right then. :)
I'd say she appears pleased. :)

Saturday, January 13, 2018

Bright Diamonds Quilt Top Assembled

When you last saw this quilt (in 2015), it was scattered over the floor after it fell off my flannel sheet design board. I thought the cotton just didn't stick to the flannel, but I later realized the window was open and the breeze would get behind the flannel and flick it against the wall, effectively tossing off all of the blocks.
I got busy with work or whatever and put these blocks in a box and didn't take them out again until last week.

It being winter (and freakishly cold), I didn't think an open window would be a problem if I used the design wall. I laid out the blocks again, moved them around a little bit and ended with this:
The diamonds have to be sewn together in diagonal rows. It's not any harder really, but it does take a little more thought to make sure you don't mix things up. I took the blocks off the wall from top to bottom in the rows from upper right to lower left. I pinned a number on them to indicate which row they were and then managed to sew them together. (I only put one row on upside down and caught it soon enough that I didn't do any more seam ripping than necessary.)

I put the completed top back on the wall and decided it was too narrow. I'm aiming for a single (I think that's the same as a "twin") and it was less than 60" wide. I decided to add half blocks to fill in the spaces on the right and left sides. This meant putting together more blocks.

I pulled out the fabrics and put together five more diamonds. I cut them in half to use one half on each side and cut two of the halves in half again for the four corners.
The quilt police would say that you can never make a block and cut in half to use like this because it doesn't allow for a 1/4" seam allowance. So you're supposed to make a partial block just a little bigger than a half block. With this pattern, I just don't have to be that fussy. The points of the main diamonds (the inner ones of each block) won't be cut off and no one will care that the border is cut off 1/4". Now that I've proven to the quilt police I know what they know, we can move on.

On the first side, I tried to "insert" the half diamonds with Y seams and without taking out any of the existing seams. I got it done, but it's not very pretty. On the other side, I did the extra step of undoing a couple inches of the existing seam before adding the new half block. It did take a little more time but it was less fiddly.

I thought about ironing all the seams between the blocks open so that they would be nice and flat and no block would be more dominant than another, but I ended up pressing to one side and furling the seams.
You can see the intersection circled in white. Sorry to keep showing it, but I still love the effect of this method! And since each block ends up with two seams pressed in and two pressed out, none of them dominate.

While I was inserting the blocks, I discovered that one of my border strips had a little cut in it. The fabric was cut just about to the seam.
This is probably an "overcut" from cutting a previous piece that I missed when cutting this strip. I decided to mend it instead of replace it, and just stitched it to the other piece of fabric in the seam allowance. Now there won't be any pressure on the cut and it shouldn't tear any further. The seam allowance will be slightly thicker but it won't be noticeable.

Once the top was together, I trimmed the points from the edges and sewed a line of stay stitching around the outside.
This helps prevent the quilt from stretching at the edges, helps to lock any seams that weren't backstitched to prevent them from popping open, and keeps seam allowances in place as you layer the quilt.

And then I could call the quilt top done:
I think I know how I would quilt this and (unfortunately) it isn't really suited to using a longarm machine, so that means quilting it on my home machine. But I am also considering having it done by a professional longarmer with a computerized machine. I have an idea how I would like that done as well so I'm going to get a quote.

So how long does it take to make a quilt? I bought the fabric over a couple days in 2014. I cut and made the blocks in a week in 2015. And I pieced the quilt in a week in 2018. So that's four years for a quilt top, right? :)

While I was adding the half blocks on the sides, I stitched some scraps together in between each seam. (This saves you from pulling out a few inches of thread at the end of every seam and saves you from cutting those ends at the beginning of each seam.)
I ended up with a 10" block and some units that can be used in a future block or other project. Slab blocks like this are so much fun. Sticking with one colour at a time makes them surprisingly versatile, but I have no particular plans for this one.

Saturday, August 22, 2015

Star Light, Diamonds Bright

My quilting mojo has been in overdrive lately. I'm not sure which came first--the mojo or finishing my orange and grey zig zag quilt in such a short time frame, but I'm sure they're related.

Since then, I have also sorted through and organized all my fabrics. I donated a full (tall kitchen-sized) garbage bag of fabrics I would be happy not to see again. (Perfectly fine, but I am "done" with them.) A lot of them were garment fabrics which I am just not sewing these days (or years).

I now have the fabrics sorted in boxes. (I use paper boxes from work. They're free, have lids, and come in a uniform size.) One for just my reds. One day I'll do a scrappy red quilt. One for upholstery-type fabrics. One for quilting cottons and one for scraps. I just roughly sorted them in "fat quarter" sized or smaller sized. The smaller pieces I put into ziplock bags to keep them from falling all over. One day (maybe soon) I'll do a quilt from the scraps too.

Anyway, I didn't have as much as I thought I might and it felt great to sort through it, organize it (a lot of new acquisitions had been loose on the shelves waiting for a box to go into) and put it away.

But part of the same movement was to consider some projects I had in the planning stages. You may recall that a couple years ago I went crazy buying bright bright batiks and other fabrics when I visited my mother-in-law. I had a a project in mind from the start, based on this great quilt from Wanda at Exuberant Color. It's a Kaffe Fassett pattern from his book Simple Shapes: Spectacular Quilts.

Bolstered by my success in finishing the zig zag quilt, and maybe reacting to my long work hours, I pulled out the fabrics and got started.

First I sorted them into eight "darks" and eight "lights":
There are a couple that could fit into either category depending on what you paired it with, but I put them in one pile or the other anyway. I was emboldened to break some quilting rules by Kaffe's comment in his book, "Although the border strips on this quilt are either lighter or darker than the diamonds inside them, the contrast of lightness and darkness is not very great. Likewise, there are alternate rows of lighter diamonds and darker diamonds, but the feel of richness is achieved by keeping the tones fairly close together."

I have more contrast in my fabrics than he did, but I was buoyed by a general feeling of "it's all good". Likewise, Kaffe's quilt does not use the same fabrics for the diamonds and diamond borders, but I didn't have enough variety to follow suit. So I cut diamonds from each of the fabrics and then cut strips for the borders from the same fabrics.

It looked like one selvage-to-selvage strips was meant to border one diamond, but it wasn't explicitly stated so I did one trial block:
I got the block bordered and had a couple inches left over. That let me know that I had enough. I didn't have to "squeeze" out as much as I could from the strip, but there wasn't a lot of room for error.

I assembled all the dark diamond/light border blocks first. I did them all by "chain piecing" one block after another.
First I put the first border side on all of them. Ironed and trimmed. Then proceeded to the next side, and so on.
It was the perfect sort of sewing for the end of the day when my brain was pretty fried. In no time, I had all the dark diamonds done and then the light diamonds not long after.

This morning I hung a flannel sheet on the new drywall in our bedroom and started placing blocks.
Here is a close up of some of the fabric combinations.
And here is a full view. I have not spent any time rearranging. I like it, but it doesn't knock my socks off. Maybe I have too much contrast? I don't know, but on the other hand it is exactly what I had wanted from the beginning and I do like it.
I changed one photo to black and white so I could judge contrast better.
I'm not sure if I'll move blocks around to spread out the "dark" spots. One thing I notice is a lot of "grey" areas and I'm happy about that. I think it means I got enough of the tones fairly close together, following Kaffe's original design.

The flannel wasn't super sticky, so I'm a little concerned that there will be a lot of pieces on the floor when I go back upstairs, but I haven't invested a lot of time in the arrangement so I think I can handle it.

This will be another exercise in diagonal rows when I piece the blocks together. I managed the zig zag quilt by laying it out on the bed at regular intervals. I'm sure I'll have to do the same with this one.

____________________________
ETA: What greeted me when I walked up the stairs an hour later:

Two good things to remember: I took a picture, and I wasn't overly invested in what was there. But I am sad that my design wall solution isn't going to be an actual "solution".

May I suggest?

I Say! or at least I did once...