Showing posts with label slipper. Show all posts

Saturday, January 19, 2013

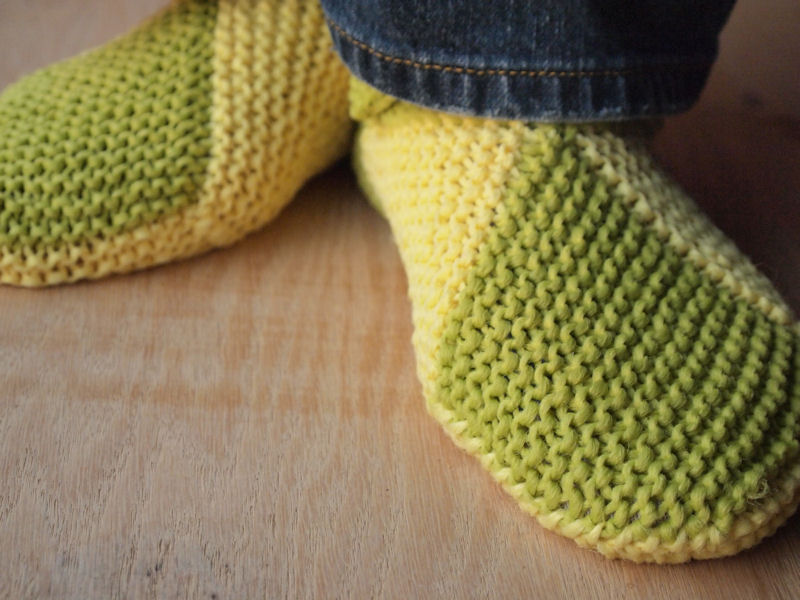
Citrus Slippers

They are finished!
New slippers for my feet.
I find the lemon and lime colours of Phentex very cheery.
Yes, I write about new slippers relatively often. Unfortunately they are a "consumable" knit. I wear them often and wear them out!
The design is one that my grandmother use to do from memory. I found a Finish pattern and managed to figure it out and write up an English version.
Last time I needed slippers, my sister kindly made a pair from the same pattern. But this time I thought I should take care of my own feet!

Project Stats
Started
: 6 Jan '13
Finished: 19 Jan '13
Pattern: 8 square sock by Käspaikka
Materials: Phentex Slipper and Craft yarn (yellow and grass) $5.38

Monday, January 7, 2013

Progress Report (Day 2)

After writing my last progress report, I worked on the bulky cable vest. I figured out the length issue and ended up taking out a few rows of the front, but not much. I joined the back and front at the shoulder seam with a three needle bind off.

Once they were joined, I continued knitting the two side cables, attaching them to the stitches I left live on the back neck edge. At the end of each row I knit or purled the last stitch together with the stitch from the back. It got pretty awkward at the center back, but still manageable.

Once all the stitches were picked up, I grafted the two ends of the cable trim together. It happened to fall on a cable row so I exchanged the position of the stitches on the needle and then grafted as normal.
It's too bad it looks a little clunky where the cable twist changes direction at the center back, but there's not much you can do about that if you want the twists to be a mirror image on the front.

Once that was done, I picked up stitches around the armhole, but didn't start to knit them.
I paused here because I want to try it on and see how it's going. And that also pretty much finished my night. Football was done and it was time for some sleep. (BTW, it looks like I will have plenty of yarn for this. You don't need to stay up at night worrying about it any longer. Not that I was...)

The next day in the car, I started with the lace coat. I started chart 2 and got the first repeat done (24 rows):
You can see the left side is "longer" than the right side.
It will form the ruffle at the hem.
Only nine more repeats to go!

Right now it's a lot of work because I am consulting the chart on almost every stitch. But after the first repeat of the chart, I'm starting to recognize some patterns. It's sort of like starting to write. At first someone tells you to make a line from top to bottom and then to draw a circle beside it but just touching the line. You follow the instructions piece by piece, and when you're done you look at what you made and recognize a "b." But with a little repetition, you start to recognize that the "b" falls into a whole family of letters with circles and lines, like "a," "d," "p," and even "g" if you just add a hook at the bottom. That's about where I am with this pattern, just recognizing the patterns between the different parts.

Once the pattern is learned, it's easier to knit without constantly looking at the chart. You can "read" your knitting and know what comes next. You can see that you're working on the leaf, and what part of it you're on. Do you need to make it bigger or smaller at that point?, etc.

I'm not sure I'll get to the point where I will be able to knit this lace pattern without the chart, but I can already tell that it's getting easier. For now, it will not be something to work on during football games, I can tell you that!

About the time I finished the chart, it was getting dark enough to make chart reading more difficult, so I pulled out the sock I had packed. In the hotel the night before, I had tried it on and decided it was long enough to start the cuff. I cut the black/white yarn, joined the red, and knit one row (so there wouldn't be any colour blips) to set it up for the next day.
In the car I started a 1x1 rib and got this much done before my hands were tired from the small needle work and it was getting dark enough to make it hard to see the stitches.
Do you think I made it long enough?? Ha ha. It really shortens a lot when I put it on because it has to stretch around my calves. I'll do a good 3" of cuff, I think, and they will be just right for knee socks. (That's 3" when I'm wearing them. That might be as much as 5" unstretched.)

Then I still did not stop knitting because I don't need to see much to work on the bias scarf, so I did a few sections of that. Then it was truly dark and my hands/body were tired enough to want to stop. Troy drove the whole way again, so I had plenty of time to knit, knit, knit!

Once home, unpacked, and settled in for some Downton Abbey, I picked up a new project. While in Guelph, we stopped at Len's Mill, a general merchandise store that carries tonnes of yarn and fabric. I walked through the aisles and couldn't believe the sheer quantity of yarn that they carried! A lot of it was acrylic so fortunately I could just skim those aisles.

I did pick up a couple balls of crochet cotton, and then I saw the Phentex. What a blast from the past. I've never seen it in the States, but it's a completely horrible fake yarn that feels a lot like plastic twine. But it is what we all used for slippers growing up. And many still do. Well, my own slippers have been taken down by the latest round of home improvement, so I picked up a couple of bright cheery colours and started on a replacement pair:

Friday, December 23, 2011

Christmas Slippers

Still need a Christmas gift? Well, if you have a little car trip ahead of you (where someone else is driving) you may still have time to finish these slippers:
I finished the second one in less than a day, and I don't mean a day where all I did was knit. My best guess would be less than three hours. The socks have a lot going for them as far as speed is concerned: they're worsted weight and short with a fairly simple construction.
I didn't even bother to convert them to toe-up; I just followed the directions. The pattern is a little dense (written in more of a paragraph form than line-by-line), but if you have any experience with socks you shouldn't have any problems.
I made these slippers as a gift and they are a little big on me. I hope the recipient likes them! (I know she likes wearing slippers so it's not a big risk!)

Project Stats
Started
: 8 Dec '11
Finished: 18 Dec '11
Pattern: DROPS 125-15 by DROPS Design (free)
Materials: leftovers of Red Heart Super Saver (66 g)

Tuesday, May 3, 2011

AIDS Walk Report

Sunday turned into the one shining specimen of a beautiful day in an otherwise crappy week. It was a great day for a Walk.

There was a good crowd and they were all in the mood to have fun. After registering and eating a lunch, I pulled out my knitting and continued working on my second slipper.

The knitting drew some attention, but the best interaction was with a fellow Raveler. Instead of opening with, "Hey my grandmother used to crochet!" she opened with, "Hey, are you on Ravelry?" For both of us, it was the first chance meet up with another Raveler. (And when we got home we immediately friended each other.)

I continued the slipper as we began the Walk and very near the end, I finished it:
Yeah!!

And who won the slippers?? A random number generator selected Mic and Martha who have been generous long time supporters of my walk. I hope they will enjoy them!

Until next year, then!

Project Details:
Pattern: Slippers Triangle Sock (vintage, free)
Materials: Red Heart Super Saver in Cherry Red (0319) (86 g)
Start Date: Apr 19 '11
Finish Date: May 1 '11

Thursday, April 21, 2011

The Walk

That's what they're calling it now: Help fight AIDS by joining "The Walk." When I started doing this (back in 1995 in Halifax, NS), it was called the AIDS Walk. It's also been called the "Stop AIDS Walk." That one's my favourite.

But whatever you call it, that time of year has rolled around again. I am walking in the Michigan area AIDS Walk "The Walk" to raise money for AIDS Ministries/AIDS Assist of Northern Indiana. They focus on prevention but also help with referrals (housing and medicine mostly) and support for people affected with HIV and AIDS.

Knitting on the Walk, 2010
Last year for the first time, I made a prize for a randomly drawn person from my sponsors list. I debated and debated this year about whether I could add one more project right now. And then I said, "Bring it on!" So I brought it!

I decided to knit a pair of slippers. They will be given to one of my sponsors. If you would like to be on the list, please send me an email (it's near the top right of this page). I figured something for your feet for giving to a walk would be appropriate.

I looked and looked for a pattern. Something [more or less] unisex; something simple (so I could knit it on the Walk itself--that's my favourite part of all this!); something fast. (I did say, "Bring it." but don't bring too much!)

I settled for a pattern called Slippers Triangle Socks (which I have to say is not a very well thought out name). Triangle Square Slippers would be more apt. Essentially you knit a bias square and then fold it in half to make a triangle and do some sewing. Presto - origami - chango you have a slipper.

Today I was at a seminar all day and managed to knit one. (Really it was one and a half because it came out too large the first time and I had to rip out half of it at lunch. That really confused my tablemates who 1. couldn't figure out what I was making in the first place and 2. really couldn't figure out why part of it seemed missing after lunch!) P.S. I'm really glad my boss who paid for the seminar "doesn't believe in the internet" and thus will never read this. (Seriously, I listened very well, took notes and even participated--so there!)

I have to say the slipper looks a little...odd. Like many things made with bias fabric, it needs to be worn to really be appreciated. On the plus side, it feels good on, will be really warm, and the bias will stretch to accommodate a wide variety of sizes.

In the interest of full disclosure I should also admit that I am making them out of acrylic. I don't know who will be getting these slippers and I would rather give acrylic to someone who appreciates wool than give wool to someone who would treat it like acrylic. So wash, wear, repeat to your heart's content!!

Don't forget, the Walk is Sunday, May 1. Email me if you'd like to sponsor me. I love sponsors!!

Friday, December 3, 2010

Yup, Slippers Make my Feet Happy

 I've said it before, and I'll say it again: Slippers make my feet happy.
I put out a call on Facebook a while ago for slippers. (A shameless plea; it really was.) I really need them. My floors are rough on socks and the temperature is too too cold for unprotected feet. And I just couldn't find time to knit myself a pair. So I put out the call.

And my wonderful "little" sister came through for me.
Aren't they darling? I didn't think too much about what colour they might be, or what pattern they might be, but when they came, they were perfect. You know, I've knit more than a dozen of these slippers and taught a class on them, but I've never actually had a pair of my own!!!

Thank you, Patricia!

Wednesday, December 16, 2009

Overcommitted Much?

To be clear, the spoiler alert is specifically for my sisters and children of my sisters. And again, if you don't mind knowing ahead of time and can carry that knowledge guilt-free then I'm not going to get my panties in a knot over whether you know.

Christmas is almost here, after all!

To start at the beginning, I have to say that my grandmother (whom we all called "Oma"--that's Dutch) knit a lot and one of the patterns she was known for was a particular slipper pattern. It wasn't the only one she did, but she did it often and not many other people did.

The slipper was different in that it was knit flat as a series of different coloured squares and then "magically" seamed together to make a sort of harlequin or elvish slipper. You could make it from just two colours or use a different colour for each square. (A good way for my thrifty grandmother to use up all those scraps!)

The problem with the pattern is that no one in my immediate family thought to learn how to do it from Oma before she passed on. I heard that a cousin had the directions, but they said they had put it in a time capsule and it wouldn't be opened for at least a decade!

So I searched Ravelry with no results. I let it go for a while. Then searched again. This time I found the exact thing I was looking for...but the pattern was in Finnish! I applied an online translator which helped a little, but it really didn't know how to deal with the knitting terms. But the key was that the pattern had a chart which mapped out the seaming. Perfect, that's all I really needed!

I wrote up my own version of the pattern with some modifications on how it was knit up (especially to get rid of some of the ends which need to be worked in--yuck!) and used it for the class I taught at Red Purl over the fall.

But I also had another project going on which was mentioned in the blog as my "Christmas Surprise." I had the idea to knit a pair of slippers for every member of my family. I started back in May...surely I would have time!

Surely not, actually. I worked on the slippers pretty diligently in between other projects. They were ideal travel projects because they were small and I had the pattern memorized. But knitting up 21 slippers (yes, 21!) still takes a lot of time.

And a lot of wool, I realized. (I kind of dove into the project without considering all the little details like how much wool it would take and what the cost would be.) I had decided to use Lorna's Laces Shepherd because it's washable and feels great. I got the first few skeins cheap at the Lorna's Laces tour I took and some on sale at Red Purl. But when I considered the fact that an adult pair of slippers pretty much used up two full skeins, I realized I was beat. (We pick names in our family with a supposed limit of $20; if you get gifts for anyone else, they're expected to be less than that.)

But by that time, I had quite a number of them done:
So instead of going crazy trying to finish what I started, I changed the plan. I would knit just for the younger children in my family. That would only be six pairs of slippers, and a lot of them were already done.

Or so I thought. When I had a chance to measure my one niece's foot and then finally broke down and asked their moms what size shoe they all wore, I realized all my sizes were running small. I would have to knit a couple more pair, and they would have to be the larger ones. A pair of baby slippers I could do in an evening if I really kept at it, but it would take a lot more time for the older ones. And I've got other things to make!

Then a new lifeline appeared: my one sister's family was not going home to Mom's--her kids wouldn't be there for gift giving. And those were the bigger ones. Guess what...we're back on track. So although I started with grand plans, the end result was much more modest:
I have packaged up and am almost ready to mail four pair of kid's slippers and one adult pair for my mom.

I have found homes for almost all of the slippers I had made, mostly gifting them to the other side of the family and friends. The smallest pair were perfect to send to my great-nephew who was conveniently born just as I was realizing my sizing wasn't going to work out.

I also rewrote the pattern and printed up an "official" version which I will give to all my sisters. Then they can knit their own "Oma slippers" whenever they want.

Sunday, August 30, 2009

Time for Class

The time is right for another class at Red Purl!

I am teaching a slipper class on Thursday Sep 10 and 24, 6 - 7:30 pm.

The slippers are knit flat in garter stitch (no purling) and then shaped by a final seam.

By changing the number of stitches you use, you can use the same pattern to make any size!

An easy project to take with you anywhere (or to knit at home while watching all the fall premieres of your favourite shows), slippers make a great gift.

If interested, stop in at Red Purl or check out the website.
PS Rumour has it that the class is about half full...make sure to reserve your spot.

Sunday, December 21, 2008

Travelling Slippers Done!

I've been working on them steadily for the last few days and they are finally done!

I had to make a point of working on them at home after the easy "take-along" knitting was done. I got the edging around the opening done and then knit the strap. This is where it was getting dicey about whether I had enough yarn left. To give myself a heads up, I marked the half-way point of what I did have left with a knot and then rolled the yarn back into a ball. This way if I got to the knot before I had finished the edging and strap for one slipper, I would know I didn't have enough for the other. But it all worked out fine and I had enough with just a little left over.

The first strap, however, didn't turn out very well but I learned enough to know what to do the next time. The main problem was the kniton cast on which looked terrible. Switching to the cable cast on fixed that and then I did a little shaping around the buttonhole so it would have a rounded end instead of being so square and blocky. So I ripped the strap out and then went to sleep (it was very late) with thoughts of being able to lick it next time I got to it.

Well, the next time I got to it was at the airport waiting for someone to arrive. I got there very early and then his flight was 45 minutes late so I had time to make two straps and do the edging on the second slipper. [An airport turns out to be a very good place to knit without being bothered or interupted, and I had nothing else to do!] Today I sat down and stitched the second one up while watching football--my team wasn't playing so I didn't really have to watch closely--and found some buttons, and voila, done!

What was also pushing this along was the fact that I'm going "home" for Christmas this week and I wanted to be able to show my mom the finished project. She was interested and liked them very much when she visited in November so I like to reward that with a finished object to look at! (Let's be honest, not just to look at, but also to admire!) Plus her house will be much cleaner than mine so I can wear the slippers without fearing too much about how dirty they're going to get. (My half-constructed, half-destructed house is definitely not the place to wear them.)

It feels so good to get projects finished! My Ravelry record says I started them on Oct 24 so they took just about 2 months in all, with other projects in between, of course.

I now have four pairs of slippers that I can think of off the top of my head. I don't think that's too many...is it?
-christina


ETA: 2nd place ribbon at the 2009 County Fair (misc knited item)

Saturday, November 29, 2008

Slippers Make My Feet Happy

So the other day I was in Red Purl snooping around for some yarn when I noticed a basket on the floor with some small hanks of chunky rough-spun wool in green, orange, and brown. And believe it or not, the colours together were very appealing. Then I noticed it was spun by a local woman I have met through Ravelry and who in fact was right there in the shop teaching a class to half a dozen women. I loved it.

So I fingered the wool desirously, and even perhaps covetously, thinking of what I could do with it. I wasn't sure, but I thought three skeins would be just about right. I went ahead and bought the three skeins with a nod to Kallie who spun it. She didn't ask me then, since she was in the middle of a class, but she wanted to know what I was going to make with it. (Wouldn't you want to know what your wool became?) Of course, I didn't have an answer then, but I did within a couple days: slippers!

So here is the pattern for some very easy slippers. I was taught this basic pattern in sewing (& etc) class in grade school and it is the "go-to" slipper pattern in my family. These instructions are appropriate for bulky or chunky yarns.

Yarn: bulky wool or your favourite material. I bought 3 skeins of about 40 grams each and got into the third, but not by much.

Needle Size: 6.5 mm / US 10.5

Stitches used (abbreviations): knit (K), purl (P), knit two stitches together as one (K2tog)

Instructions:
Cast on 24 stitches [I used the knit cast-on, but any method would be acceptable in this case]

Knit 26 rows [or as many rows as you need to go about half the length of your foot]

Start ribbing with next row as follows:
K2, *P1, K1, repeat from * across row
Next row: *P1, K1, repeat from * to last two stitches, P2
Repeat these 2 rows 7 times (16 rows total ribbing) [or as many rows as you need to get to about an inch before the end of your toes]

Next row: K2, K2tog, *P1, K1, K2tog, repeat from * across row (18 sts)
Next row: *P2, K1, repeat from * across row
Next row: *K2tog, K1, repeat from * across row (12 sts)
Next row: Purl
Next row: K2tog across row (6 sts)
(Do not cast off)

Break end of yarn, leaving a 12-14" tail. Weave end through last 6 stitches and draw tight. Then use the end to sew sides together. Sew only along the ribbing.

Fold the slipper in half lengthwise and sew the cast-on edge to itself. This will form the heel. Work in any other ends.

And voila! Slippers!
Other notes on the pattern: you will notice that if you seam along the ribbing by taking up each selvage stitch into the seam, the ribbing pattern will be uninterrupted by the seam. Another way to tackle this is to switch to double pointed needles (or your favourite circular needle technique) and start knitting in the round when the ribbing starts. In that case you would eliminate the first and last stitch of each row and adjust the decrease rows accordingly.

Also, I slip the first stitch on each row. I find this makes a neater edge, especially if you consistently slip it as if you're doing the stocking stitch. (In garter stitch this means you either need to always slip the first stitch knitwise and purl the last stitch OR slip the first stitch purlwise and knit the last stitch. Phew--is that confusing yet?! It's always easier to do than describe!) Slipping the stitch also makes finding that selvage stitch for seaming easier too. And I'm all for anything making seaming easier: not my favourite thing to do.

Also, you can imagine how easily this pattern could be adapted for your favourite lighter weight yarn. I wouldn't go much lighter than worsted weight though. For most of those yarns you'd want to cast on 30 stitches and go as many rows as you need to reach the distance specified in the internal pattern notes.

I hope your feet are happy in their own slippers right now. If not, try out this pattern and it won't be long until they are!
-christina

PS Make sure to leave a comment if you've tried it out: let me know how it goes!

Monday, November 24, 2008

What's on my Needles

Like a good girl, I spent some time getting things organized the other night so I again have a few projects to take with me to knit at lunch breaks, meetings, and waiting for tellers at the bank drive throughs.

First, my travelling slippers. I finished the sole and top of one slipper and sewed the parts together just to make sure my alterations worked before I committed all the work of the second slipper. I then I weighed the assembled slipper and the left over yarn just to make sure I had enough yarn to do the second one. I do! (yeah!)
I still have to knit around the top of the slipper, but I'll wait until the second one is done to again make sure I have enough wool. If not, I'll do that in another colour. (This was the last skein of this colour at the LYS.)

Next is the Hat Fit for a Boyfriend that I am actually making for my BIL (hoping he isn't reading this of course!). I made it out of dreamy Malabrigo (worsted weight). I'll try not to wax on for hours but the stuff really is dreamy; soft; squishy (in a good way); warm; lovely...well you get the idea. It is 100% wool, but those of you who think wool is "itchy" have no idea. It is gorgeous to the touch.
The pattern is also simple and genius. Although this pic does not show it off, the decreases are done in the best possible way. Each column of knitting drops out in orderly fashion, exactly when it is supposed to. If you follow the link to the pattern, you'll see what I mean [third pic].

I did not calculate how much yarn I need correctly and bought two skeins when I only need one (less than one) to complete the hat--even in the longer length. So even though you see a picture of a completed hat, I DO have this on my needles because my hubby wants one now too. And I am only too happy to have an excuse to work with this wool some more. It just glides over the fingers so silkily...oh oh...here I go again...

And yes again: because the next project is something for me in the dreamy Malabrigo. I found a good shade of red (which does not photography true) for a scarf to perk up my utterly boring new dark grey winter coat.
The pattern is another brilliant piece of work. It is knit from the bottom up on both sides (in two pieces) and then joined at the back center with a seam. I will use the Kitchener Stitch so that it will in effect be seamless; you will only be able to notice where the pattern "flips." (Now I'm really setting the bar for myself, aren't I?!)

I'm planning to make the scarf shorter than the pattern calls for and am just going to make is as long as one skein will get me. I got a little carried away with the first half and knit it past half way through the ball. (Again, I just weighed the two parts to decide whether I was past half.) So I started the second half with the other end of the ball and I'll see how far I get. Worst case, I undo some part of the first half OR my two halves are not quite the same length. (I'm mean, really, it's not only worn at the back of my neck, it'll probably be under my coat!)

All for now,
christina

May I suggest?

I Say! or at least I did once...