Showing posts with label Bulky Cashmere Cable Vest. Show all posts

Friday, March 22, 2013

Big Bulky Cable Vest

Ready for a parade of finished projects? The combination of a deadline of leaving on a trip and the time during the trip to work on knitting has led to a great number of things being finished and/or photographed.

Of course, I also figured everything looks better with mountains in the background. (Or if it doesn't look good, you don't notice because Look! There's a mountain!)

Last time I wrote about the Cable Vest, I had finished the neck bands and was working on the armhole trim. Or I had picked up the stitches, but hadn't knit them. It took me a while to pick it up again--I'm not sure why. But with this trip looming, something got me going and I knit both sides pronto. I did three rows on each side, so that didn't take long. Turns out that's a good thing because I'll be redoing them, but I'll talk about that in a minute.

Project Stats
Started
: 25 Dec '12
Finished: 8 Mar '13
Pattern: Ruffle Trim Vest by Shiri Mor
Materials: 574 grams raveled bulky cashmere (~$5-$7)
After that, I had to deal with the bottom hem. I had done a provisional cast on so I had a bunch of live stitches to deal with. I wasn't sure what I was going to do when I started, but when it was time to work on it, I had decided to do a cable around the bottom, much like the neck trim.

I put all the stitches onto a cable needle and started at the bottom of the front center cable. I took half of the stitches and added a couple more so that I had six stitches--enough for a four-stitch cable with a purl stitch on both sides.
I then knit along the bottom, twisting the cable every six rows (like the neck) and working the one purl stitch together with a stitch of the bottom hem.
I think it turned out pretty well.

I threw the vest into my suitcase and worked all the ends in at some point on the trip. Probably the first night in the hotel, actually, because then I blocked it! Soaked it in the little sink and laid it out, first on the floor and then on a luggage rack.
At some point I thought maybe this was going to be a bad idea because it took all of the two days we were there for this to dry! At some point I thought it was never going to be dry, but finally it was.

And I could put it on, and pose with some mountains in the background.
I like the way the bottom cables come out of the center braid. (If you don't look too close, and really, who's going to be?)

And here is the back with its swirly twirly cable design:
I'm not too happy with the holes where the cables begin (bottom of the looping circles--see the very bottom of the design and the loops on the right and left sides). This was the first time that I had done this technique and apparently didn't do it very well. There's a "make 5" at that point, and that's a lot of stitches to get out of one stitch. I may be able to sew it up with a separate strand of yarn to get rid of the hole. I haven't tried it yet.

Also, I will be doing the armholes again, when I get to it:
I don't like the way it uncurls, especially on the back. It's supposed to roll to the front side (taking advantage of stocking stitch's tendency to curl to make it match the reverse stocking stitch on the main panels). But there aren't enough stitches around the hole and that is making it pull. I'm going to have to rip them back and add more stitches so it has lots of room to curl.

And that last thing is the colour. Since the beginning, I have not been too crazy about it. Pale blue is one thing, but this is just too washed out. I have determined I am going to dye it, at some point. (I'll wear it a few times first so that if the dyeing is a total disaster, I will have at least had that!) Although my calculations at the beginning made it look like I may be short on yarn, I actually only used half of what I had!

I will experiment with some KoolAid dyeing on the extra yarn, and hopefully have good enough results that I will dye the whole garment. KoolAid has a reputation for being splotchy and being "taken up" unevenly, but I am just going to have to risk it. Nothing ventured, nothing gained and all that.

Monday, January 7, 2013

Progress Report (Day 2)

After writing my last progress report, I worked on the bulky cable vest. I figured out the length issue and ended up taking out a few rows of the front, but not much. I joined the back and front at the shoulder seam with a three needle bind off.

Once they were joined, I continued knitting the two side cables, attaching them to the stitches I left live on the back neck edge. At the end of each row I knit or purled the last stitch together with the stitch from the back. It got pretty awkward at the center back, but still manageable.

Once all the stitches were picked up, I grafted the two ends of the cable trim together. It happened to fall on a cable row so I exchanged the position of the stitches on the needle and then grafted as normal.
It's too bad it looks a little clunky where the cable twist changes direction at the center back, but there's not much you can do about that if you want the twists to be a mirror image on the front.

Once that was done, I picked up stitches around the armhole, but didn't start to knit them.
I paused here because I want to try it on and see how it's going. And that also pretty much finished my night. Football was done and it was time for some sleep. (BTW, it looks like I will have plenty of yarn for this. You don't need to stay up at night worrying about it any longer. Not that I was...)

The next day in the car, I started with the lace coat. I started chart 2 and got the first repeat done (24 rows):
You can see the left side is "longer" than the right side.
It will form the ruffle at the hem.
Only nine more repeats to go!

Right now it's a lot of work because I am consulting the chart on almost every stitch. But after the first repeat of the chart, I'm starting to recognize some patterns. It's sort of like starting to write. At first someone tells you to make a line from top to bottom and then to draw a circle beside it but just touching the line. You follow the instructions piece by piece, and when you're done you look at what you made and recognize a "b." But with a little repetition, you start to recognize that the "b" falls into a whole family of letters with circles and lines, like "a," "d," "p," and even "g" if you just add a hook at the bottom. That's about where I am with this pattern, just recognizing the patterns between the different parts.

Once the pattern is learned, it's easier to knit without constantly looking at the chart. You can "read" your knitting and know what comes next. You can see that you're working on the leaf, and what part of it you're on. Do you need to make it bigger or smaller at that point?, etc.

I'm not sure I'll get to the point where I will be able to knit this lace pattern without the chart, but I can already tell that it's getting easier. For now, it will not be something to work on during football games, I can tell you that!

About the time I finished the chart, it was getting dark enough to make chart reading more difficult, so I pulled out the sock I had packed. In the hotel the night before, I had tried it on and decided it was long enough to start the cuff. I cut the black/white yarn, joined the red, and knit one row (so there wouldn't be any colour blips) to set it up for the next day.
In the car I started a 1x1 rib and got this much done before my hands were tired from the small needle work and it was getting dark enough to make it hard to see the stitches.
Do you think I made it long enough?? Ha ha. It really shortens a lot when I put it on because it has to stretch around my calves. I'll do a good 3" of cuff, I think, and they will be just right for knee socks. (That's 3" when I'm wearing them. That might be as much as 5" unstretched.)

Then I still did not stop knitting because I don't need to see much to work on the bias scarf, so I did a few sections of that. Then it was truly dark and my hands/body were tired enough to want to stop. Troy drove the whole way again, so I had plenty of time to knit, knit, knit!

Once home, unpacked, and settled in for some Downton Abbey, I picked up a new project. While in Guelph, we stopped at Len's Mill, a general merchandise store that carries tonnes of yarn and fabric. I walked through the aisles and couldn't believe the sheer quantity of yarn that they carried! A lot of it was acrylic so fortunately I could just skim those aisles.

I did pick up a couple balls of crochet cotton, and then I saw the Phentex. What a blast from the past. I've never seen it in the States, but it's a completely horrible fake yarn that feels a lot like plastic twine. But it is what we all used for slippers growing up. And many still do. Well, my own slippers have been taken down by the latest round of home improvement, so I picked up a couple of bright cheery colours and started on a replacement pair:

Saturday, January 5, 2013

Progress Report (Day 1)

Ok, so I had a day of traveling in the car--just what did I get done of my ambitious packing?

1. I finished the front of the bulky cashmere vest:
I knit both the left and right sides at the same time (with two different balls). But when I was supposed to have 15 stitches on each side, I had 15 on one and 17 on the other. I worked out that I hadn't bound off two stitches at the armhole--right back where I started the day!!

So I ripped back the one side and did it right. Fortunately it was only about 20 minutes of extra knitting. It's a little ironic that part of why I do both halves at once is so that I can do the shaping at the same time and get it to match...

I didn't like how the cables that run along the neckline looked in the pattern so I changed them somewhat.

Instead of crossing every 4th row, I did it every 6th row. I like it better than the pattern, but I think it may have even worked to do it every 8th row. I don't want it to look much more twisted than the main braid cable. The two side cables will continue around the back and form the back neckline. It's a neat design feature.

I got to the point where I couldn't be sure whether the front was the same height as the back. It was impossible to measure accurately while in the car. I think I may have knit the front too long so I'll have to figure that out tonight so I can continue tomorrow when I'm back in the car.

2. Once I decided to put that away, I pulled out the lace coat. I decided to start with a provisional cast on over a long end:
Once I'm done this section, I'll pull out the tail (picking up the stitches) and cast off with the tail. As stated in a recent post, it's easier to get a neater and correctly-tensioned cast off than cast on. It's not really a lot of extra work either, so totally worth it.

I discovered that I ordered the wrong size needles. The "size" is correct (diameter), but I was looking for a 40" cable needle so that I could use the magic loop method on the smaller sections of the coat (like sleeves). Well, 16" cable needles are apparently 40 cm. So when I saw "40" and ordered them, I got about the shortest needle you can get. And I wanted the longest. The good news is that I can use them for some of the sections (like the hem band, which is the first piece). Of course the bad news is that I will still have to buy the longer needles.

The other good news is that these needles are more comfortable than the interchangeable set that I have. I've never like circular needles, but maybe I just don't have the right set yet.

The knitting itself went pretty well and I completed the first chart (24 rows) before it got too dark to comfortably read the chart:
The yarn doesn't really feel like much in the strand, but it sure is lovely to knit with.

3. Once I put the lace away, I pulled out the no-thinking-needed shawl and did a couple of sections before we arrived.
Well, three out of four projects worked on and I still have the trip home tomorrow (and time tonight while watching some football playoffs). Apparently my packing wasn't so out of line after all!

Friday, January 4, 2013

Ready to Go!

I wasn't particularly excited about a car trip this weekend (although I wanted to go), and then I remembered...car knitting!! So tonight I set out to be prepared.

First, I wound two balls of lace for the lace coat:
Don't tell anyone, but I'm not going to swatch. I'm usually close on gauge and to do an accurate gauge swatch would require so many stitches, I may as well get the coat started. I'm not afraid of ripping back if it becomes necessary.

I wound two balls because part of the pattern needs to be worked double stranded. I decided if there is any colour difference between balls it would be safer to work with two balls than to work from two ends of the same ball and then have a sudden change when I had to start a new ball.

I've printed the corrected charts from the Vogue Knitting website (advantage of not being the first one to knit the pattern), have my new cable needles, and should be set to go.

I also have my vest ready for some new work. I have ripped out and reknit the back. It is looking much better:
Next I'll continue the front. Since it has a single fairly simple cable, I expect it will go pretty quickly and hopefully without incident. Of course, there's always more shaping with the neckline in the front, but nothing that should slow me down.

And for the times when I don't feel up to thinking, charting, or keeping track of where I am in a pattern, I can continue on my bias scarf:
It's coming along nicely. I wondered if the gauge is a little tight, but I think blocking will loosen it up enough. If not, it's alright.

And just in case, I'll throw in these socks too. (You never know.)

Tuesday, January 1, 2013

Symptoms of Startitis

On Christmas day, with a serious case of startitis and not wanting to wait for the yarn for my Squam sweater, I started a bulky vest from Vogue Knitting I had been eyeing for a while. The original was done with Rowan Big Wool which I have used for a couple projects and is nice, but doesn't come in the colours I was thinking of and would have been a little pricey.

So instead, I decided it was time to ravel my ultimate find at Goodwill--a bulky cashmere sweater.
I originally bought it for the wool, but since it fit well enough I wore it for a couple winters. The wool is soft and cushy and warm, but the high collar was a little irritating to my neck. So I knew I couldn't make it into something worn against the skin.

I also was kind of waiting for the perfect something to come along. Because, really, the sweater it was already knit into was pretty good as it was. But at some point on December 22, I decided long enough was long enough and started raveling...
I got about 550 grams of bulky weight cashmere and I have to say this was one of the most uneventful ravels I've ever done. I don't think I lost one inch of the yarn, and that is very rare. I was able to separate the pieces, then undo the ends at the end of the cast off, undo the cast off, and then continue all the way down to the beginning of the cast on. It was incredible.

The next day I started a swatch to try and get the gauge specified in the pattern. The needle size recommended in the pattern didn't quite work. I went up two sizes, then down one and none of them were quite right. (The last option fit the gauge but the look and feel of it was too loose.)

Then I realized that since I was planning to knit the pattern in the round, most of it would be purled and I was swatching by knitting and purling. Although I haven't noticed a big difference in my own knitting, there is often is a difference in the knit tension and purl tension. (Some people exhibit such a wide difference that they use a different size needle for purl stitches than knit stitches. Of course this only works for stocking stitch, but that's a pretty big percentage of knitting.)

So I started a new section of the swatch and only purled. At the end of the row, I would slide the stitches to the other end, leave a long loop at the back and purl the next row.
So I got a stocking stitch pattern (or reverse stocking stitch pattern, depending on the side) by only purling, which is what I was going to have to do on the pattern. And guess what...with the needles suggested by the pattern, I got gauge and the fabric felt right.

While I was knitting the swatch, I debated about the colour. I've always been a bit conflicted about it. Nice pale blue, or horrible off colour? I don't know. Troy saw me knitting the swatch and, without any prompting on my part, said, "You need to dye that a new colour." That settled it--I had to at least consider what I could  do.

The only option I was really considering was dying with Koolaid (yes, that's a real option). People are loving it because Koolaid is readily available, food safe, and needs no additional colour affixer (or whatever it's called). I considered it for quite a while and asked about it on Ravelry, but eventually decided to just knit the vest. I was never going to risk this bulky cashmere, and I didn't want to wait until I had learned on other samples. I had serious doubts that I could dye the whole lot the same and I really didn't want the vest to be made out of a multi-colour or multi-toned yarn. There is the option of dying the entire garment once it's knit, but realistically, that has even less of a chance of success. So I will be wearing icky blue and hoping for the best.

I've noticed lately that my cast offs are a lot better than my cast ons--it's easier to get the tension right for one thing--so I decided to start with a provisional cast on, and to finish the bottom of the garment later.
I used the crochet cast on and knit up from there.
Using a contrasting yarn not only reserves more cashmere for the garment (it's going to be close according to  the yarn requirements listed by the pattern), but also makes it easier to pick the crocheted part out when you're ready to knit those stitches again. I'm kicking around a couple ideas for how to finish the bottom edge.  (I can simply do a cast off row, knit a couple rows of rib and cast off, or apply another type of edging.) A lot will depend on how much yarn I have available.

The pattern is done from the bottom up with the front and back in separate pieces. I decided to do it in the round (hence all the purling). This also helped with the sizing because the medium size was just a touch small. By doing it in the round, four stitches will not get caught up in seams and with a gauge of 10 stitches/4" that will add more than an inch. Just what I needed.

With such bulky yarn, it was quick work to make it up to the armholes. Here's the back:
Here's the front:
The designer incorporated a nice touch that I had just learned about recently. Most cable patterns have you cast on the number of stitches you will need for the pattern and then the cast on edge is all stretched out because the cable itself pulls in where the stitches cross. The designer overcame this by casting on fewer stitches under the cable and then having you increase on the third row. It worked great. I'm glad to see Vogue did not edit this part of the pattern out. Sometimes I think things like this get taken out because people will think the pattern is "too hard" but I was happy to see it. (I might have forgotten to add it in myself--certainly I would have the first time through.)

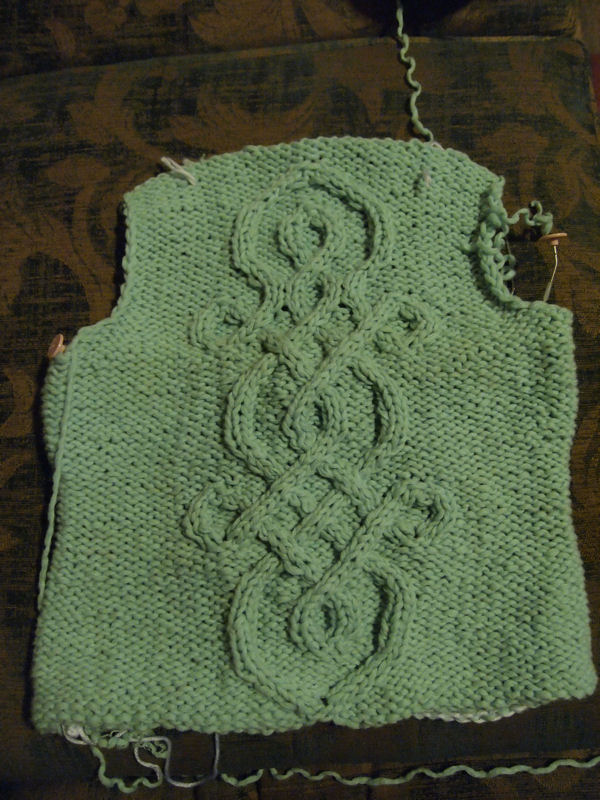
Yesterday I finished the back up to the shoulder shaping. When I laid it all out to admire my work and see how it was going, I found a mistake. Gah!! Can you find it?
When you're ready to give up, you can look at the next picture...


The red arrows indicate the problem. The yellow arrows indicate the same part of the pattern one repeat before. I didn't cross my cables when I should have. And yes, you can say it looks pretty enough, but you lose the illusion of two intertwined ropes. So tonight when I get done writing this, I will have to rip it out, figure out what row I'm on and knit it back up.

It shouldn't take too long...

May I suggest?

I Say! or at least I did once...