Before I put away the scraps from making all the blocks for the
Farm Girl Vintage quilt, I used the many leftover little pieces to do some fun improv piecing.
I made some "slabs" or crazy log cabin blocks in single colors. I also pieced a bunch of the triangles that were cut off from making half square triangles into new half square triangles. And I pieced some improv flying geese blocks and used them as roofs (rooves?) on improv house blocks.
Then I put them in the bag with the scraps without doing anything with them. But I knew they were there, ready for when they were needed.
Well, last week I decided to try putting some of them together into mug rugs. (An object between a coaster and a placemat.) I pulled out some of the "house" blocks and found three I could use to make a minimal street scene.
I pieced blue scraps together to make enough sky above the houses so that the three pieces were all about the same height. I didn't want the middle house and the one on the right to be the same height, so I added a strip of pink to the bottom of the one. Maybe it's a stoop. Maybe it's a porch. Maybe the paint is just faded there. You can make up your own story. 😊
 |
| Final measurements: 6" x 8.5" |
I didn't think the portions were quite right so I added a bit of green on the left side. we can pretend it's a tree or bush or whatever you want.
I quilted the sky in blue thread in gentle waves--the wind isn't blowing too hard. I quilted the houses in lines to echo the outside shape of the house, with lines in a perpendicular direction on the red door. I used a light colour with slight variegation. The "tree", I did with green thread.
I used a solid batik for the back:
I didn't want to bind them, so I finished the edge with a satin stitch. I actually went around the edge four times, if you can believe it. First I did a straight stitch to keep all the layers together and in place. Then I went around with a narrow zig zag (a width of 2, I think) and a length of about 3 so it wasn't really close yet. This stitch goes over the edge and starts to put things in place.
Then I went around with a satin stitch (shortest length--1) at a width of 3. This fills in the space and stitches over the previous stitching because it extends further to the left and right. Finally I do a final round of satin stitch at a width of 4. It's not thick enough to really cover the edge if you only go around once, but it lies better if you widen the stitch each time. At least that is my experience.
It's still not perfect, or even particularly satisfying, but it works.
For the second mug rug, I took four matching half square triangle pieces and made a pinwheel for the centre. I had larger half square triangles that I matched in pairs and sewed into flying geese units and added them to both sides.
But the pinwheel wasn't really big enough. Instead of cutting down the flying geese units, I added a strip to the pinwheel. Then to make the final proportions better, I added a strip of green to the entire length.
You can see I quilted it in all over waves. I added more movement (and avoided it looking too mechanical) by making the dips and peaks closer together and further apart in different areas.
While I was making it, I thought the green strip went on the top, but when Troy looked at it, he immediately set it with the green on the bottom.
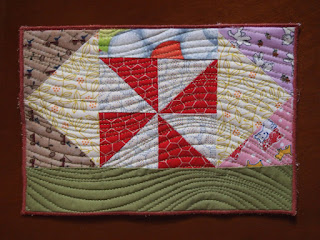 |
| Final measurement: 6.75" x 9.25" |
Fortunately, there doesn't have to be one answer--it'll work just as well however you like it.
I backed this one with a piece of cheery cotton:
After it was quilted, I turned it over to see the back and got a surprise. Can you see the dark spot in the top right? Now that I've drawn your attention to it, you probably can. Apparently there was a scrap of fabric that stuck to the backing piece that I didn't notice. By the time I did, it was too far quilted in there to make it worth trying to get out!
This could open up a whole new way to add design layers to a piece when you're using lighter fabrics. (That's me making a mistake into a "feature".)
PS Did you recognized the thread I used for the satin stitch edging? Ya, it's from the cone I bought when I quilted my nine patch quilt. You will likely see it on a lot of projects!! 😉


