Showing posts with label baby quilt. Show all posts

Friday, November 22, 2019

A Story of Three Fabrics

Apparently it is too much for me to haul out the laptop, edit and load pictures, and then write a post. So I'm trying this on my phone to see if that feels any easier to me. Maybe I will update here more often then.

What I'm showing you today is a little quilt that was born of various fabrics coming together.

First I had the little dotted squares. It was a charm pack (5" squares) I picked up because I thought they would make great cornerstones in sashing, especially if cut into four smaller squares. (Like you can see on the far right of the picture.)

Then my mom went on a trip to Pennsylvania with my quilting sister and "somehow" ended up in a lot of fabric stores. Well, the fabric fumes must have overcome her too because she bought some fabric for me, including a fat quarter bundle of the bright semi-solids. (They're similar to a grunge look.) I noticed right away that they coordinated perfectly with my dots. (There was a green too but it somehow got separated and didn't make it into this picture.)

Then sometime in the last year when I was at my mom's, she had some fabric from an aunt that my sister and I could go through. We took turns choosing but we both knew the elephants were mine! :) And then look how well those colours went with the rest. Kismet!

I vaguely debated for a while with myself about what design to do and eventually settled on something simple that would use some of each type of fabric in each block. The size was mostly determined by the size of the cornerstones (2.5"). By cutting the 5" squares into four, each one would work for one quilt block. I paired the dots with the solids and made 16 blocks.

Then I had fun trying layouts.


And decided on this:
It didn't take long to stitch the top together. I alternated all the seams so I could twirl the intersections.
And once that was done it didn't take long for me to find time to baste it too! I had just the right size of a different elephant fabric for the backing and taped it to my coffee table to keep it straight and taut.
I then layered the batting and then the top on top of it.
After sliding my cutting mat underneath to protect the table, I pinned everything that was on the top of the table.
I then took off the tape, slid the layers one way to pin one edge and then slid it the other way to pin the other edge. Now it's hanging on my project board again, waiting for me to quilt it. (Shouldn't take long, I would imagine!)

Saturday, April 14, 2018

Pink Roses

I tried something new and it worked out. You could say everything came up roses....

You see, I had this "quilt" from the long arm class I took last year. They load up some white fabric for the front so you can really see what you're doing and use whatever they have lying around for the back.


Although we tried out a lot of different things and most of the resulting "quilt" looked like messy doodling, the part where I tried a pantograph was fine. It was a relatively wide spot that had roses stitched on it. Except it was all white and pretty uninspiring.
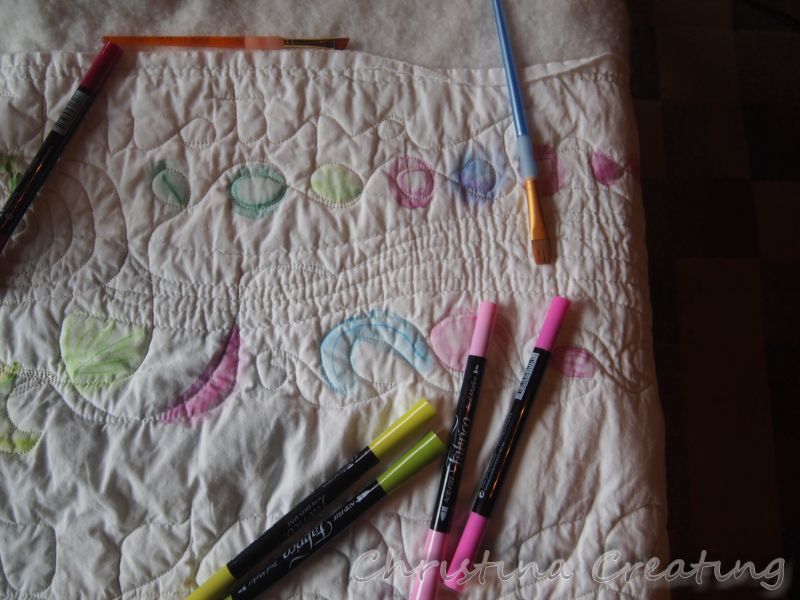
So I thought, Wouldn't it be nice if I could paint the roses and make them pretty? But I'm not confident with actual paint, so I researched fabric markers. Some of them can be made to look a lot like paint. (Watercolours, in any case.)

I purchased some Fabrico markers so I would have them when I was ready to tackle this new thing. I'm not sure if I was ready, but at the end of March, someone in the UFO club on Ravelry more or less dared me to finish an additional project. (She was promising elephant fabric. She knows my weakness!)

Since this project was the closest of my UFOs to being finished, I gave it a go.

First some practice on the unusable part of the quilt:
Don't pre-spray the fabric with water - that is too wet.
I had the best result when I pre-wet the fabric with a small paintbrush,
and then added a little more water with the paintbrush after I had applied the marker. The colour seemed to run toward the stitches so it was hard to get it to flow toward the middle of the petal or leaf.

I then took the additional step of washing the quilt after I was done practising. This would both test the colourfastness of the markers (passed with flying colours) and remove any fabric treatments or residues that would prevent the ink from bonding properly.

And then I spent an hour or two "painting" roses and leaves. All in all, I was happy with the end result:
I had the perfect pink and white fabric for the binding. I remember buying it because I loved the tone of the pink so much. I have used bits of it for other projects, and I had almost enough left to do this binding.
For the last couple inches, I put in a piece of pink butterfly fabric. It was too dark to use around the whole quilt, but it works just fine for a couple inches.

The backing was a small print of blue flowers. I think it works just fine with the pink roses.
I used three different shades each of pink and green. The leaves were mostly the same, but I made sure to vary the roses. I could not only use different markers, I could also add more or less ink to change the intensity.
At 21"x30", the quilted ended up a little smaller than I would like for a baby quilt. I finished it right around Easter and decided it worked just fine as a table topper! :)

Wednesday, March 1, 2017

It's Small and Fast and Sneaks up on You

Nope that's not the start of a juvenile joke I know. But it does describe the quilt I made last weekend.

Ya, one weekend, one quilt. Take that, Eleanor Burns.

It all started with the idea that I could use the leftover nine patch blocks from my big nine patch quilt for a baby quilt. (I have a coworker who is expecting.) I played with the blocks on my coffee table and decided I was on to something. Since I found fabric for the alternating solid squares in Missouri, I was all set.

Saturday turned into a free day for sewing, and sew I did. It turns out I didn't have enough nine patches by about half so I had to make 10 more. That was because I realized I couldn't use just any of the nine patches--for a proper design, I needed to use ones that had five dark squares, not four dark squares.
This creates the strong diagonal lines across the quilt. So I fished out some of the 2.5" squares left over from the big quilt and made sets for 10 more blocks. I also cut into some of the scraps I had just purchased in Missouri, like the reds in these two blocks:
And used some of the mini charms I bought, like these darling puppies:
And, after a time, I had this quilt:
It's about 36" square. That size, partly because I like the 6x6 block arrangement better than a 6x5 or 6x7, but also because that's about all you can get on a one-yard piece of fabric for the backing! As it was, I was very close on a couple of the edges. Fortunately with a smaller quilt, it's easier to make sure things are centered and that you haven't lost part of the backing in the layering process.

For the quilting, I kept it simple by following the grid lines suggested by the nine patches:
I marked the lines on the solid squares with a water soluble marker. I generally avoid stitching in the ditch (which is sewing right in the seam line) because it's not as easy as it is simple, but that's what this quilt needed so that's what I did. (Sometimes quilts are so bossy.)

A lot of times this quilt layout (called "Irish chain") is quilted in diagonal lines along the diagonal lines of the red squares and then a special motif is put in the solid squares. But that is not the type of quilting for me (right now). I wanted to fill the space simply and consistently.

Originally I bought the navy airplane fabric to go on the front but it didn't work at all with the nine patches. Fortunately, the light airplanes worked much better. This left the navy for the back.
It's pretty dark for my taste, but it's cute enough to make up for it. But it definitely meant I was not going to bind in the navy because I wanted at least the contrast of a lighter border.

I decided to try machine stitching the binding. Not something I've had the best of luck with in the past. This time I stitched the binding to the back of the quilt and folded it over to the front. I cut the binding 2.25" wide which made sure it was a little longer in the front and the stitching line would be in the field of the backing fabric. In other words, I wouldn't have to try and line it up with the edge of the binding on the back.
So I folded it to the front so I could sew it on the front and see what I was doing on the "good side." The navy thread blended so well into the backing fabric that I felt any wiggly lines wouldn't be noticeable.

In fact, besides one or two spots in the beginning where I did "jump" onto the binding on the back, the stitching all looked pretty good from the back and front. Maybe I'm getting better at this! And it helps that with the quilting lines I did, this extra row of stitching on the edge blended right in and just looked like another quilting line. I think it looks pretty good from the front too. :)

The baby's not due until mid-May, so I am done with plenty of time for this gift! Oh wait. I still have to make and attach the label. I guess I still have a chance at "last minuting" this gift....

May I suggest?

I Say! or at least I did once...