Remember this project? I wrote about it last November. I did get it done in time for Christmas.
Although I started it for myself, somewhere in the process I decided it really was perfect for the sister whose name I had for gift giving. She loves to decorate her table for a holiday.
I quilted the background in lines that echoed the shape of the stars/flowers about 3/8" apart. The first side I did on the go but the second side, I marked the turning points so that the two sides would match.
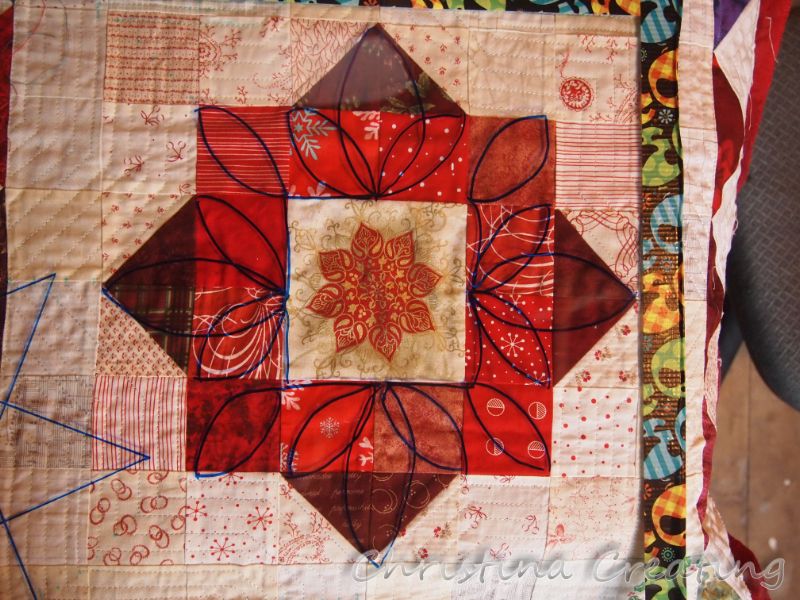
When it got to the stars/flowers, I had a few ideas. I drew out a couple on a pane of glass and took a poll on my IG feed.
A number of people voted and gave their opinions, which were all fun to read, but when this sister chimed in her preference, I was done and went with what she liked. She picked the bottom design. I made a change in the corners after this picture. Instead of another petal/leaf in the corners, I simplified it to a curve that travels to the point and then on to the other side (without crossing itself).
I bound it with a subtle red strip on cream. It could look like candy canes when you got close, but didn't detract from the center design.
Then it was time to wash it to remove the markings. I also knew it would be washed in its future life and I feel like I should do it first in case anything goes wrong.
Well, it did. The red damask I used as backing bled like crazy. It seeped to the front side where there was stitching (you know, like everywhere):
and there were areas of general red splotchiness. The binding seemed especially suseptible.
It wasn't terrible but it gave an overall pinkness to the table topper.
So I did some reading online and got a recommendation from someone I trusted to clean it with blue Dawn dish soap. So I did. And it bled like crazy and continued to do so through several washes. And the red kept depositing on the front. I have since read others who expressly say to never use blue Dawn because it will pull out more colour (and not the colour that was deposited). I think we know who's right.
So I accepted what was and gave the table topper to her anyway. She really likes pink so I sincerely thought she may even prefer it.
It is interesting to see where the red did not stick - you can see a couple of whiter squares in the background area.
I almost like the pink over all of it, except the center of the stars/flowers. I would have liked it if they stayed cream. And that it emphasizes all the seams in the background. It prevents the different fabrics from blending together.
But my sister liked it and she can wash it without fear - it can't get worse!!
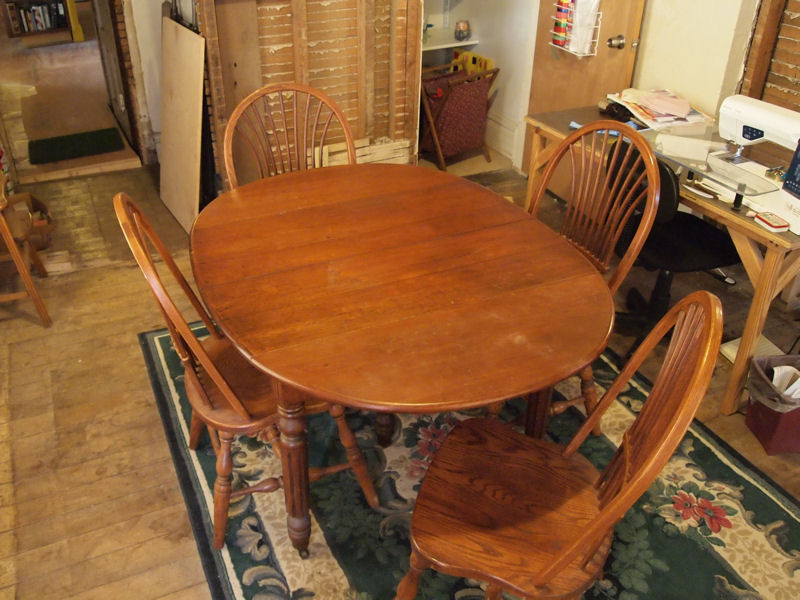
Troy and I have had this dining table since we were married. I found it in a local antique mall and liked its general design, size, and the fact that the rounded ends fold down.
It came with three leaves (not shown in picture at left) and would seat six, but barely.
We lived with it for six years in South Bend, and not until we moved to the current house did something make me wonder just how far this table would expand.
Here's the table at its smallest--small enough to push against
a wall as a side table (which is how it might end up in the
final room layout when we have a permanent table in the
kitchen). I can't get over how versatile it is.
As I recall, I asked Isaac to grab the other side, and we pulled...and pulled...and pulled. The table stretched from one side of our dining room to the other (literally wall to wall). It was 10 feet long!! Well, that got me thinking...
Since we got it, we have known it has needed to be refinished. Whatever they put on the top isn't really hard and reacts badly to hot and/or wet things being put on it. So I had the idea that I could hire someone to refinish the top and build some new leaves so I could have a really big table when I needed (and replace the one really annoying warped leaf).
Time passes...
I still haven't looked into getting someone to do this for me and it occurs to me that I'm not looking for a restoration of the table, I just want a big table. And I figure anytime I'm using it full length, I will have it covered with a table cloth anyway. So I ask Troy if we could make some wide plywood leaves to use instead of trying to get a matching wood. He says, "Of course." So that is what we did.
Troy made two wide leaves with the holes and dowel pins needed to lock them in place. Here we are testing one of them:
We weren't going to be really fussy about the project and thought we could have just used them like that, but decided with just a little more work we could do better.
So, taking over Troy's workbench in the shop, I put on a couple of coats of stain:
and then added two coats of polyurethane. Can I say again for anyone that is listening that stain and varnish do not agree with me? What a chore. Not my thing. But anyway, it's done. (Troy reassured me that wood workers probably have a similar creed as quilters with their "it's not bad if you can't see it from a galloping horse" criteria. Let's hope so.)
Here are the finished leaves in place:
You can see they're a little different than the original wood, but they blend pretty well I think.
Here's the table at its full length:
And here it is fully dressed:
We had 11 for dinner last night and it worked wonderfully.
I had to get new tablecloths for the new length, of course! A few weeks ago, I happened to be at Joann's when the decorator fabric was 1/2 off, and I took advantage. The 54" width is perfect for the width of the table, and I purchased 4 yards of a blue brocade and a shimmery gold cotton. I looked for fabric that had a nice enough looking selvage that I didn't have to hem up the long edges. (Galloping horse criteria, remember?) Then all I had to do was straighten the end and hem it with my favourite blind hem stitch. In the set up above, I just folded the gold tablecloth twice lengthwise and laid it on top of the blue. It makes a lovely runner.
Now I need to make one (or two) for the next size down...
Today is the first day of advent. I'm starting to get into it. (It's not quite the Christmas spirit, but it leads into it.)
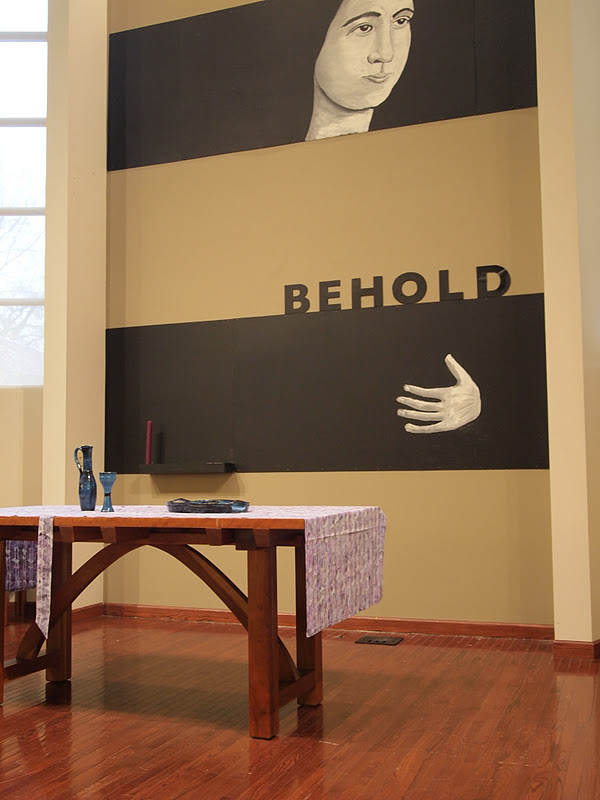
What helped this year is that I was asked (just last Sunday, I will add) to make an advent cloth for our church. The communion table is generally "dressed" with a liturgical cloth suitable for the current season and we didn't really have an advent cloth.
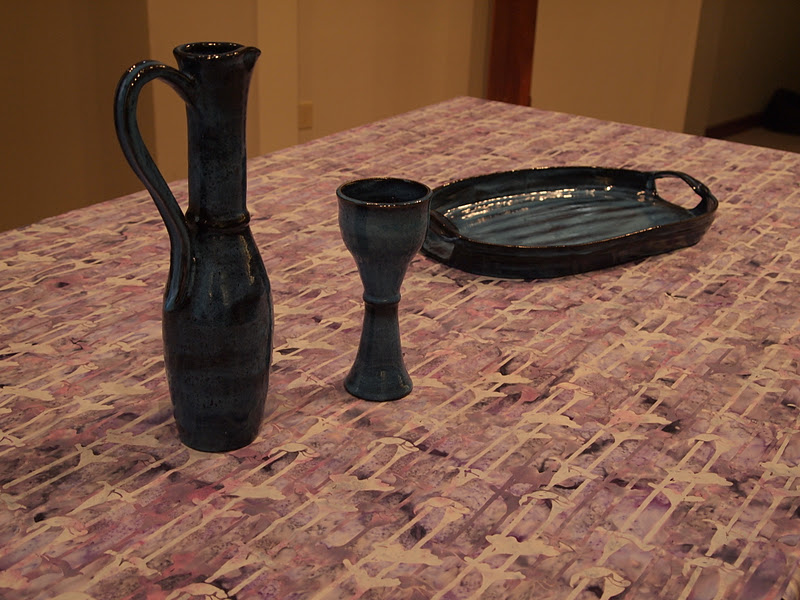
Although purple has been traditional for advent, blue is becoming more accepted as purple is used for lent. It is also widely accepted to use pink for "Mary's Sunday." I think we found a lovely sort of compromise in this batik fabric which contains lavenders and blues. (The lighter lines of flowers are more blue in person.)
I was also pleased to note that some of the flowers are calla lilies since white lilies are a symbol of Mary. No, I don't go to a Catholic church and I don't venerate Mary, but you can hardly celebrate Christmas (you know, Christmas that still has Christ in it) without realizing that she played a pretty big role in the whole saga.
Anyway, I think the fabric is pretty ideal for the table covering. Plus the batik is so pretty and complex, I didn't need to do anything more than hem the ends and throw it over the table.
But since I can't seem to keep things simple, I decided to make several strips to hang down the front:
There was only one up today because it's only the first Sunday of advent. I'll add one more each week until it will be completed on Christmas. I'm working on a "surprise" to be revealed on Christmas day, but it's not ready yet so I'm not going to tell you about it. (Plus, advent being a time of waiting, it seems appropriate to make you wait to see the whole picture. Sorry if that drives you nuts. ;)
What I can give you today is a little tutorial on the blind hem I used. It's very simple, but it can be tricky to get your head around how it works. But it's well worth the "mind bending" even if it's a little painful because the result is so professional and effective.
First, you fold over the hem to the wrong side at the final depth that you want and press:
Then you fold under the raw edge, trying to make the exposed part of the hem even:
and press it down again: (I love to iron.)
Now you need to do a little flip to get it ready for sewing. It would be hard to describe so I made this short video:
See how simple that is? You don't turn the fabric over (the wrong side still faces you), but just give the hem a little flip, making sure to keep a little bit exposed as shown.
Pin as you go:
Now you'll need to head to the sewing machine. Most machines will have a blind hem option. It's a straight stitch on one side with an occasional zig zag. It looks like this on my machine:
You can see that my machine has the option to do a blind hem to the right or the left. Your machine may only have one option.
You may also have a special foot for your machine, but you don't need to have it. If you do, it will have an uneven bottom--one side will be higher than the other. You put the fabric under the foot so that the ridge of the foot lines up with the fold, as seen here:
As you sew, the seam will be straight along the right side (the upper fold of the hem) and then take an occasional "bite" of the left fold, which is the body of the garment (or tablecloth). You can see in this picture that the machine has just finished taking a bite.
Once it's sewn, you can unfold them hem (and press again). Watching this may help you know what to expect:
Here's the seam as it comes off the machine:
And after unfolding and turning to the right side:
From a little further away, you hardly notice the stitches on the right side.
This is one of the flattest, well hanging hems I know. Try it out!
July 2026 monthly recap.........................
-
Two favorites were finished in July. The "Other 16 Patch" was made with
Marcia Derse fabrics, front, back, and binding. On this one I staggered
the b...
Randomly on a Saturday
-
1. This morning I’m drinking coffee and getting ready to go ride 100km with
Jen’s daughter Fenner. Fenner (I’m sure you know) is part of Team Knit for
the ...
Oh Scrap! : Bright and Scrappy
-
I really can't believe how fast last week flew by. I felt somewhat in
control on Monday and then before I knew it - It was Friday!
And I feel like I ...
Finished!!
-
Yesterday I sewed the binding onto the front of Rhapsody in Blue, Elaine
will add a label then finish the binding with hand sewing.
Here is the quilt dis...
Dance in Paris
-
Dance in Paris, designed by Brigitte Heitland of Zen Chic, with fabric also
designed by her, is one of those quilts you just enjoy from beginning to
end. T...
#3 : My Most Embarrassing Moment Would Be …
-
This is the 3rd installment in a series of 51 posts inspired by a list
of writing prompts from the website Journal Buddies. If you’d like to know
mor...
Gilipeysa Cardigan
-
Recently I have enjoyed indulging in a sweet little colorwork sweater as a
gift for my cousin’s brand new baby boy!
I have been seeing so many amazing co...
The Christmas Morning Socks Knit-Along!
-
Yesterday on Instagram I posted the idea of casting-on for a sock
knit-along with the goal to finish them in time to wear them Christmas
morning. I thou...